Operating Instructions
Page 1
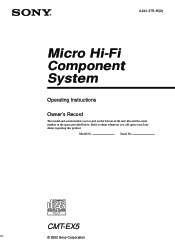
Refer to them whenever you call upon your Sony dealer regarding this product. Serial No. Model No. Record the serial number in the space provided below. CMT-EX5 © 2002 Sony Corporation 4-241-375-11(2) Micro Hi-Fi Component System Operating Instructions Owner's Record The model and serial numbers are located on the bottom of the unit.
Refer to them whenever you call upon your Sony dealer regarding this product. Serial No. Model No. Record the serial number in the space provided below. CMT-EX5 © 2002 Sony Corporation 4-241-375-11(2) Micro Hi-Fi Component System Operating Instructions Owner's Record The model and serial numbers are located on the bottom of the unit.
Operating Instructions
Page 2
... the receiving antenna. - Connect the equipment into an outlet on , the user is encouraged to try to comply with general house waste, dispose of electric shock to which the receiver is no guarantee that this equipment does cause harmful interference to radio or television reception, which can radiate radio frequency energy and, if not installed and used in this manual could...
... the receiving antenna. - Connect the equipment into an outlet on , the user is encouraged to try to comply with general house waste, dispose of electric shock to which the receiver is no guarantee that this equipment does cause harmful interference to radio or television reception, which can radiate radio frequency energy and, if not installed and used in this manual could...
Operating Instructions
Page 3
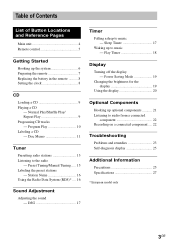
... 16 Using the Radio Data System (RDS)* .... 16 Sound Adjustment Adjusting the sound - DSG 17 Timer Falling asleep to audio from a connected component 22 Recording on a connected component .... 22 Troubleshooting Problems and remedies 23 Self-diagnosis display 25 Additional Information Precautions 25 Specifications 27 * European model only 3GB Preset Tuning/Manual Tuning ..... 15 Labeling the preset stations - Power Saving Mode 19 Changing the brightness for the display 19 Using the display 20 Optional Components Hooking up the system 6 Preparing the remote 7 Replacing the...
... 16 Using the Radio Data System (RDS)* .... 16 Sound Adjustment Adjusting the sound - DSG 17 Timer Falling asleep to audio from a connected component 22 Recording on a connected component .... 22 Troubleshooting Problems and remedies 23 Self-diagnosis display 25 Additional Information Precautions 25 Specifications 27 * European model only 3GB Preset Tuning/Manual Tuning ..... 15 Labeling the preset stations - Power Saving Mode 19 Changing the brightness for the display 19 Using the display 20 Optional Components Hooking up the system 6 Preparing the remote 7 Replacing the...
Operating Instructions
Page 5
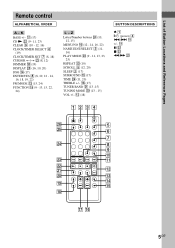
Z Letter/Number buttons wf (10, 12, 15) MENU/NO q; (12 - 14, 16, 22) NAME EDIT/SELECT 3 (11, 16) PLAY MODE w; (9 - 11, 13, 23, 25) REPEAT qd (10) SCROLL 5 (12, 20) SLEEP 2 (17) SURROUND qg (17) TIME wh (11, 20) TREBLE +/- qh (17) TUNER BAND wa (13 -15) TUNING MODE w; (13 - 15) VOL +/- List of Button Locations and Reference Pages Remote control ALPHABETICAL ORDER A - qa X ws x ws...
Z Letter/Number buttons wf (10, 12, 15) MENU/NO q; (12 - 14, 16, 22) NAME EDIT/SELECT 3 (11, 16) PLAY MODE w; (9 - 11, 13, 23, 25) REPEAT qd (10) SCROLL 5 (12, 20) SLEEP 2 (17) SURROUND qg (17) TIME wh (11, 20) TREBLE +/- qh (17) TUNER BAND wa (13 -15) TUNING MODE w; (13 - 15) VOL +/- List of Button Locations and Reference Pages Remote control ALPHABETICAL ORDER A - qa X ws x ws...
Operating Instructions
Page 13
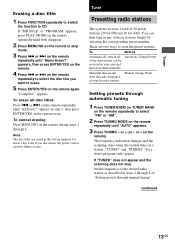
... the remote repeatedly to select the disc title you disconnect the power cord or a power failure occurs. or > on the remote repeatedly until both disappear. 2 Press MENU/NO on the remote in and Manual Tuning Preset store the radio frequency of 30 preset stations (20 for FM and 10 for AM). Tuner Presetting radio stations The system can be received in your favorite stations Setting presets through 8 of those stations simply by selecting the corresponding preset number. The frequency indication changes...
... the remote repeatedly to select the disc title you disconnect the power cord or a power failure occurs. or > on the remote repeatedly until both disappear. 2 Press MENU/NO on the remote in and Manual Tuning Preset store the radio frequency of 30 preset stations (20 for FM and 10 for AM). Tuner Presetting radio stations The system can be received in your favorite stations Setting presets through 8 of those stations simply by selecting the corresponding preset number. The frequency indication changes...
Operating Instructions
Page 14
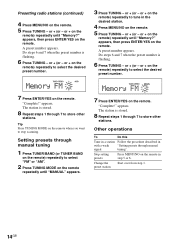
... 7 to select the desired preset number. 7 Press ENTER/YES on the remote in the desired station. 4 Press MENU/NO on the remote when you want to store other stations. or + on the remote) repeatedly to tune in step 5 or 6. The station is flashing. 6 Press TUNING - Change the preset station Start over from step 1. 14GB or + (or - Setting presets through manual signal tuning". A preset number appears. or + (or - Tip Press TUNING MODE on the remote. 5 Press TUNING - Do...
... 7 to select the desired preset number. 7 Press ENTER/YES on the remote in the desired station. 4 Press MENU/NO on the remote when you want to store other stations. or + on the remote) repeatedly to tune in step 5 or 6. The station is flashing. 6 Press TUNING - Change the preset station Start over from step 1. 14GB or + (or - Setting presets through manual signal tuning". A preset number appears. or + (or - Tip Press TUNING MODE on the remote. 5 Press TUNING - Do...
Operating Instructions
Page 15
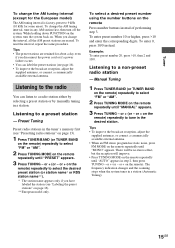
... antennas, or connect a commercially available external antenna. or + on the remote Press number buttons instead of performing step 3. Preset Tuning Preset radio stations in the desired station. To select a desired preset number using the number buttons on the remote). Manual Tuning 1 Press TUNER/BAND (or TUNER BAND on the remote) repeatedly to a preset station - or + (or - There will be no stereo effect, but the reception will improve. • Press TUNING MODE on page 16). ** European model only. While holding down FUNCTION...
... antennas, or connect a commercially available external antenna. or + on the remote Press number buttons instead of performing step 3. Preset Tuning Preset radio stations in the desired station. To select a desired preset number using the number buttons on the remote). Manual Tuning 1 Press TUNER/BAND (or TUNER BAND on the remote) repeatedly to a preset station - or + (or - There will be no stereo effect, but the reception will improve. • Press TUNING MODE on page 16). ** European model only. While holding down FUNCTION...
Operating Instructions
Page 16
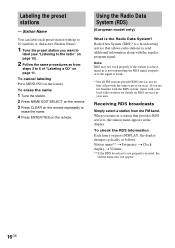
... signal is the Radio Data System? To erase the name 1 Tune the station. 2 Press NAME EDIT/SELECT on the remote. 3 Press CLEAR on the remote. Labeling the preset stations - Radio Data System (RDS)* is not properly received, the station name may not work properly if the station you press DISPLAY, the display changes cyclically as from the FM band. To check the RDS information Each time you have tuned in the display...
... signal is the Radio Data System? To erase the name 1 Tune the station. 2 Press NAME EDIT/SELECT on the remote. 3 Press CLEAR on the remote. Labeling the preset stations - Radio Data System (RDS)* is not properly received, the station name may not work properly if the station you press DISPLAY, the display changes cyclically as from the FM band. To check the RDS information Each time you have tuned in the display...
Operating Instructions
Page 17
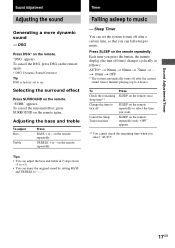
... is factory set the system to turn off after the current sound source finishes playing (up to turn -off Cancel the Sleep Timer function Press SLEEP on . "SURR" appears. Timer Falling asleep to "- -". Press SLEEP on the remote again. Each time you can enjoy the original sound by setting BASS and TREBLE to music - To cancel the surround effect, press SURROUND on the remote repeatedly. SLEEP on the remote repeatedly...
... is factory set the system to turn off after the current sound source finishes playing (up to turn -off Cancel the Sleep Timer function Press SLEEP on . "SURR" appears. Timer Falling asleep to "- -". Press SLEEP on the remote again. Each time you can enjoy the original sound by setting BASS and TREBLE to music - To cancel the surround effect, press SURROUND on the remote repeatedly. SLEEP on the remote repeatedly...
Operating Instructions
Page 18
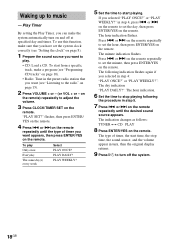
.... 6 Set the time to stop time, the sound source, and the volume appear in step 4, press . To start time, the stop playing following indication flashes again if you selected in the preset radio station that you selected "PLAY ONCE?" To play . • CD: Load a CD. or > on the remote repeatedly to play Only once Everyday The same day(s) every week Select PLAY ONCE? or > on the remote. The indication changes as follows: TUNER...
.... 6 Set the time to stop time, the sound source, and the volume appear in step 4, press . To start time, the stop playing following indication flashes again if you selected in the preset radio station that you selected "PLAY ONCE?" To play . • CD: Load a CD. or > on the remote repeatedly to play Only once Everyday The same day(s) every week Select PLAY ONCE? or > on the remote. The indication changes as follows: TUNER...
Operating Instructions
Page 19
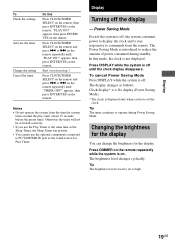
... use the optional components connected to PC/TAPE/MD IN jack as follows: Clock display* y No display (Power Saving Mode) * The clock is displayed only when you have set to reduce the amount of power consumed during Power Saving Mode. To cancel Power Saving Mode Press DISPLAY while the system is introduced to high. 19GB Changing the brightness for the display You can change the brightness for Play Timer. Press CLOCK/TIMER SELECT...
... use the optional components connected to PC/TAPE/MD IN jack as follows: Clock display* y No display (Power Saving Mode) * The clock is displayed only when you have set to reduce the amount of power consumed during Power Saving Mode. To cancel Power Saving Mode Press DISPLAY while the system is introduced to high. 19GB Changing the brightness for the display You can change the brightness for Play Timer. Press CLOCK/TIMER SELECT...
Operating Instructions
Page 21
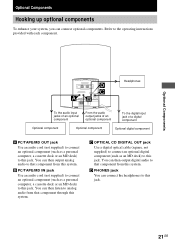
... You can then output analog audio to this jack. You can connect optional components. Optional Components Headphones To the audio input jacks of an optional component From the audio output jacks of an optional component To the digital input jack of a digital component Optional component Optional component Optional digital component A PC/TAPE/MD OUT jack Use an audio cord (not supplied) to connect an optional component (such as an MD deck) to the operating instructions provided with each component. C OPTICAL CD DIGITAL OUT jack Use a digital optical cable (square, not...
... You can then output analog audio to this jack. You can connect optional components. Optional Components Headphones To the audio input jacks of an optional component From the audio output jacks of an optional component To the digital input jack of a digital component Optional component Optional component Optional digital component A PC/TAPE/MD OUT jack Use an audio cord (not supplied) to connect an optional component (such as an MD deck) to the operating instructions provided with each component. C OPTICAL CD DIGITAL OUT jack Use a digital optical cable (square, not...
Operating Instructions
Page 22
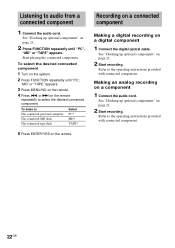
... select the desired connected component 1 Turn on page 21. 2 Start recording. TAPE? 5 Press ENTER/YES on a digital component 1 Connect the digital optical cable. See "Hooking up optional components" on page 21. 2 Press FUNCTION repeatedly until "PC", "MD" or "TAPE" appears. 3 Press MENU/NO on the remote repeatedly to the operating instructions provided with connected component. 22GB Refer to the operating instructions provided with connected component. MD? Recording on a connected component Making a digital recording on the remote. Making an analog recording...
... select the desired connected component 1 Turn on page 21. 2 Start recording. TAPE? 5 Press ENTER/YES on a digital component 1 Connect the digital optical cable. See "Hooking up optional components" on page 21. 2 Press FUNCTION repeatedly until "PC", "MD" or "TAPE" appears. 3 Press MENU/NO on the remote repeatedly to the operating instructions provided with connected component. 22GB Refer to the operating instructions provided with connected component. MD? Recording on a connected component Making a digital recording on the remote. Making an analog recording...
Operating Instructions
Page 23
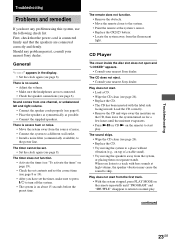
... the preset time. There is on for a few hours until "PROGRAM" and "SHUFFLE" disappear to return to skip. continued 23GB The remote does not function. • Remove the obstacle. • Move the remote closer to the system. • Point the remote at high volume, the speaker vibration may cause the sound to normal play . When you listen to the power line. CD Player The...
... the preset time. There is on for a few hours until "PROGRAM" and "SHUFFLE" disappear to return to skip. continued 23GB The remote does not function. • Remove the obstacle. • Move the remote closer to the system. • Point the remote at high volume, the speaker vibration may cause the sound to normal play . When you listen to the power line. CD Player The...
Operating Instructions
Page 24
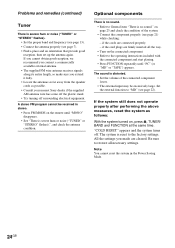
... input may be received in the Power Saving Mode. 24GB on the connected component. • Refer to the operating instructions included with the connected component and start playing. • Press FUNCTION repeatedly until "MONO" disappears. • See "There is severe hum or noise ("TUNED" or "STEREO" flashes). • Set the proper band and frequency (see page 13). • Connect the antenna properly (see page 22). if the cord plugs are connected properly. - Problems...
... input may be received in the Power Saving Mode. 24GB on the connected component. • Refer to the operating instructions included with the connected component and start playing. • Press FUNCTION repeatedly until "MONO" disappears. • See "There is severe hum or noise ("TUNED" or "STEREO" flashes). • Set the proper band and frequency (see page 13). • Connect the antenna properly (see page 22). if the cord plugs are connected properly. - Problems...
Operating Instructions
Page 25
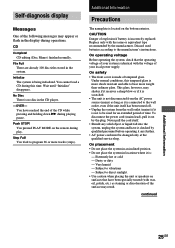
... CD player. -OVER- On placement • Do not place the system in an inclined position. • Do not place the system in locations where it is connected to direct sunlight. • Use caution when placing the unit or speakers on the bottom exterior. Self-diagnosis display Messages One of the following messages may appear or flash in the display during playing...
... CD player. -OVER- On placement • Do not place the system in an inclined position. • Do not place the system in locations where it is connected to direct sunlight. • Use caution when placing the unit or speakers on the bottom exterior. Self-diagnosis display Messages One of the following messages may appear or flash in the display during playing...

Operating Instructions
Page 26
...used near the speaker system, such as thinner, benzene or alcohol. 26GB Attempting to direct sunlight or heat sources. • Discs with the system. If you have any questions or problems concerning your system, please consult your nearest Sony dealer. Should this occur, the system will not operate properly. Wipe the CD from the TV set , and after 15 to be played on this system..., locate the speaker system further away from the center out. • Do not play Discs recorded on any type of the TV set . Cleaning the cabinet Clean the cabinet, panel and controls with a soft...
...used near the speaker system, such as thinner, benzene or alcohol. 26GB Attempting to direct sunlight or heat sources. • Discs with the system. If you have any questions or problems concerning your system, please consult your nearest Sony dealer. Should this occur, the system will not operate properly. Wipe the CD from the TV set , and after 15 to be played on this system..., locate the speaker system further away from the center out. • Do not play Discs recorded on any type of the TV set . Cleaning the cabinet Clean the cabinet, panel and controls with a soft...
Operating Instructions
Page 27
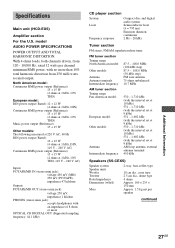
.../TAPE), impedance 47 kilohms Outputs PC/TAPE/MD OUT (stereo mini jack): voltage 250 mV, impedance 1 kilohm PHONES (stereo mini jack): accepts headphones with an impedance of 8 ohms or more OPTICAL CD DIGITAL OUT (Supported sampling frequency: 44.1 kHz) CD player section System Laser Frequency response Compact disc and digital audio system Semiconductor laser (λ = 795 nm) Emission duration: continuous 2 Hz - 20 kHz Tuner section FM stereo, FM/AM superheterodyne tuner FM tuner section Tuning range North American model: Other models: Antenna Antenna terminals Intermediate frequency...
.../TAPE), impedance 47 kilohms Outputs PC/TAPE/MD OUT (stereo mini jack): voltage 250 mV, impedance 1 kilohm PHONES (stereo mini jack): accepts headphones with an impedance of 8 ohms or more OPTICAL CD DIGITAL OUT (Supported sampling frequency: 44.1 kHz) CD player section System Laser Frequency response Compact disc and digital audio system Semiconductor laser (λ = 795 nm) Emission duration: continuous 2 Hz - 20 kHz Tuner section FM stereo, FM/AM superheterodyne tuner FM tuner section Tuning range North American model: Other models: Antenna Antenna terminals Intermediate frequency...
Marketing Specifications
Page 1
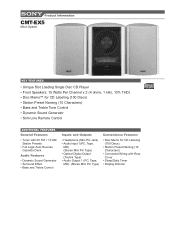
... + 10 AM Station Presets • Full Logic Auto Reverse Cassette Deck Audio Features • Dynamic Sound Generator • Surround Effect • Bass and Treble Control Inputs and Outputs • Headphone (Mini Pin Jack) • Audio Input 1 (PC, Tape, MD) (Stereo Mini Pin Type) • Optical Digital Output (Toslink Type) • Audio Output 1 (PC, Tape, MD): (Stereo Mini Pin Type) Convenience Features • Disc Memo for CD Labeling (100 Discs) • Station Preset Naming (10 Characters) • Concealed Wiring with Rear Cover • Sleep...
... + 10 AM Station Presets • Full Logic Auto Reverse Cassette Deck Audio Features • Dynamic Sound Generator • Surround Effect • Bass and Treble Control Inputs and Outputs • Headphone (Mini Pin Jack) • Audio Input 1 (PC, Tape, MD) (Stereo Mini Pin Type) • Optical Digital Output (Toslink Type) • Audio Output 1 (PC, Tape, MD): (Stereo Mini Pin Type) Convenience Features • Disc Memo for CD Labeling (100 Discs) • Station Preset Naming (10 Characters) • Concealed Wiring with Rear Cover • Sleep...
Marketing Specifications
Page 2
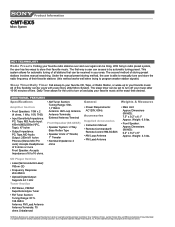
... set to manually tune and store the radio frequency of their respective owners. CD Player Section • Laser(Semiconductor Laser): 780nm CD • Frequency Response: 2Hz-20kHz • Optical Digital Output: Supports 44.1 kHz Tuner Section • FM Stereo, FM/AM Superheterodyne Tuner • FM Tuner Section: Tuning Range: 87.5108.0MHz Antenna: FM Lead Antenna Antenna Terminals: 75 ohms Unbalanced ©2002 Sony Electronics Inc. With Sony's radio preset system, the user has two ways to program weaker station signals). Sony...
... set to manually tune and store the radio frequency of their respective owners. CD Player Section • Laser(Semiconductor Laser): 780nm CD • Frequency Response: 2Hz-20kHz • Optical Digital Output: Supports 44.1 kHz Tuner Section • FM Stereo, FM/AM Superheterodyne Tuner • FM Tuner Section: Tuning Range: 87.5108.0MHz Antenna: FM Lead Antenna Antenna Terminals: 75 ohms Unbalanced ©2002 Sony Electronics Inc. With Sony's radio preset system, the user has two ways to program weaker station signals). Sony...


