Operating Instructions (CMTEP707)
Page 1
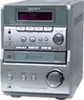
Model No Serial No CMT-EP707 © 2002 Sony Corporation 4-239-805-12 (2) Micro Hi-Fi Component System Operating Instructions Owner's Record The model and serial numbers are located on the bottom of the unit. Refer to them whenever you call upon your Sony dealer regarding this product. Record the serial number in the space provided below.
Model No Serial No CMT-EP707 © 2002 Sony Corporation 4-239-805-12 (2) Micro Hi-Fi Component System Operating Instructions Owner's Record The model and serial numbers are located on the bottom of the unit. Refer to them whenever you call upon your Sony dealer regarding this product. Record the serial number in the space provided below.
Operating Instructions (CMTEP707)
Page 2
... the user to the presence of uninsulated "dangerous voltage" within the product's enclosure that to which can radiate radio frequency energy and, if not installed and used in particular, specifies that provides guidelines for proper grounding and, in accordance with liquids, such as chemical waste. This label is classified as practical. Reorient or relocate the receiving antenna. - Connect...
... the user to the presence of uninsulated "dangerous voltage" within the product's enclosure that to which can radiate radio frequency energy and, if not installed and used in particular, specifies that provides guidelines for proper grounding and, in accordance with liquids, such as chemical waste. This label is classified as practical. Reorient or relocate the receiving antenna. - Connect...
Operating Instructions (CMTEP707)
Page 3
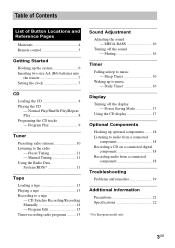
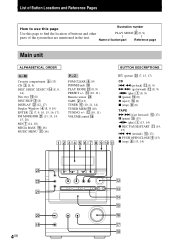
... Contents List of Button Locations and Reference Pages Main unit 4 Remote control 5 Getting Started Hooking up to music - Program Play 9 Tuner Presetting radio stations 10 Listening to music - CD Synchro Recording/Recording Manually 14 - Muting 16 Timer Falling asleep to the radio - Manual Tuning 11 Using the Radio Data System (RDS 11 Tape Loading a tape 13 Playing a tape 13 Recording to audio from a connected component 18 Recording a CD on a connected digital component 18 Recording audio from a connected component 18 Troubleshooting Problems and remedies 19...
... Contents List of Button Locations and Reference Pages Main unit 4 Remote control 5 Getting Started Hooking up to music - Program Play 9 Tuner Presetting radio stations 10 Listening to music - CD Synchro Recording/Recording Manually 14 - Muting 16 Timer Falling asleep to the radio - Manual Tuning 11 Using the Radio Data System (RDS 11 Tape Loading a tape 13 Playing a tape 13 Recording to audio from a connected component 18 Recording a CD on a connected digital component 18 Recording audio from a connected component 18 Troubleshooting Problems and remedies 19...
Operating Instructions (CMTEP707)
Page 4
..., 11) VOLUME control qh BUTTON DESCRIPTIONS @/1 (power) w; (7, 15, 17) CD . qd (10, 11) Remote sensor wd TAPE 2 (13) TUNER 6 (10, 11, 14) TUNER MEM q; (10) TUNING +/- m (rewind) qs (13) Z PUSH OPEN/CLOSE 9 (13) x (stop ) 8 (8) TAPE M > (fast forward) qs (13) X (pause) 0 (13) nN (play ) 1 (8, 9) X (pause) q; (8) Z (eject) qf (8) x (stop ) 8 (13, 14) 4GB List of Button Locations and Reference Pages How to use this page Use this...
..., 11) VOLUME control qh BUTTON DESCRIPTIONS @/1 (power) w; (7, 15, 17) CD . qd (10, 11) Remote sensor wd TAPE 2 (13) TUNER 6 (10, 11, 14) TUNER MEM q; (10) TUNING +/- m (rewind) qs (13) Z PUSH OPEN/CLOSE 9 (13) x (stop ) 8 (8) TAPE M > (fast forward) qs (13) X (pause) 0 (13) nN (play ) 1 (8, 9) X (pause) q; (8) Z (eject) qf (8) x (stop ) 8 (13, 14) 4GB List of Button Locations and Reference Pages How to use this page Use this...
Operating Instructions (CMTEP707)
Page 5
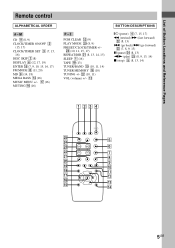
...) SLEEP 1 (16) TAPE ql (13) TUNER/BAND q; (10, 11, 14) TUNER MEMORY qk (10) TUNING +/- qd BUTTON DESCRIPTIONS @/1 (power) 4 (7, 15, 17) m (rewind) M (fast forward) ws (8, 13) . (go back) > (go forward) wd (7, 8, 9, 13) X (pause) wf (8, 13) nN (play) wg (8, 9, 13, 14) x (stop) 5 (8, 13, 14) 5GB Z PGM CLEAR qs (9) PLAY MODE w; (8, 9) PRESET/CLOCK/TIMER +/- List of Button Locations and Reference Pages Remote control ALPHABETICAL ORDER...
...) SLEEP 1 (16) TAPE ql (13) TUNER/BAND q; (10, 11, 14) TUNER MEMORY qk (10) TUNING +/- qd BUTTON DESCRIPTIONS @/1 (power) 4 (7, 15, 17) m (rewind) M (fast forward) ws (8, 13) . (go back) > (go forward) wd (7, 8, 9, 13) X (pause) wf (8, 13) nN (play) wg (8, 9, 13, 14) x (stop) 5 (8, 13, 14) 5GB Z PGM CLEAR qs (9) PLAY MODE w; (8, 9) PRESET/CLOCK/TIMER +/- List of Button Locations and Reference Pages Remote control ALPHABETICAL ORDER...
Operating Instructions (CMTEP707)
Page 7
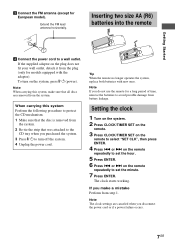
... SET on the remote repeatedly to select "SET CLK", then press ENTER. 4 Press . or > on the remote to set the hour. 5 Press ENTER. 6 Press . The clock starts working. Note The clock settings are canceled when you do not use the remote for a long period of time, remove the batteries to protect the CD mechanism. 1 Make sure that the disc is removed from the system...
... SET on the remote repeatedly to select "SET CLK", then press ENTER. 4 Press . or > on the remote to set the hour. 5 Press ENTER. 6 Press . The clock starts working. Note The clock settings are canceled when you do not use the remote for a long period of time, remove the batteries to protect the CD mechanism. 1 Make sure that the disc is removed from the system...
Operating Instructions (CMTEP707)
Page 9
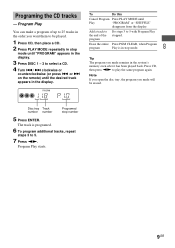
... PLAY MODE repeatedly in the system's memory even after it has been played back. or > on the remote) until the desired track appears in the display. 3 Press DISC 1 - 3 to select a CD. 4 Turn ./ > clockwise or counterclockwise (or press . Disc tray Track number number Programed step number 5 Press ENTER. To Do this Cancel Program Press PLAY MODE until "PROGRAM" appears in the display. Tip The program you made remains in stop mode. Program Play You...
... PLAY MODE repeatedly in the system's memory even after it has been played back. or > on the remote) until the desired track appears in the display. 3 Press DISC 1 - 3 to select a CD. 4 Turn ./ > clockwise or counterclockwise (or press . Disc tray Track number number Programed step number 5 Press ENTER. To Do this Cancel Program Press PLAY MODE until "PROGRAM" appears in the display. Tip The program you made remains in stop mode. Program Play You...
Operating Instructions (CMTEP707)
Page 10
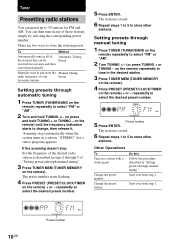
... the remote) + or - "STEREO" (for FM and AM. The preset number starts flashing. 4 Press PRESET (PRESET/CLOCK/TIMER on the remote) repeatedly to select "FM" or "AM". 2 Turn and hold TUNING +/- (or press and hold TUNING + or TUNING - on the remote) repeatedly to tune in "Setting presets through manual tuning". 3 Press TUNER MEM (TUNER MEMORY on the remote) until the frequency indication starts to store other stations. Other Operations To Tune in a station with a weak signal Change the preset number Do...
... the remote) + or - "STEREO" (for FM and AM. The preset number starts flashing. 4 Press PRESET (PRESET/CLOCK/TIMER on the remote) repeatedly to select "FM" or "AM". 2 Turn and hold TUNING +/- (or press and hold TUNING + or TUNING - on the remote) repeatedly to tune in "Setting presets through manual tuning". 3 Press TUNER MEM (TUNER MEMORY on the remote) until the frequency indication starts to store other stations. Other Operations To Tune in a station with a weak signal Change the preset number Do...
Operating Instructions (CMTEP707)
Page 11
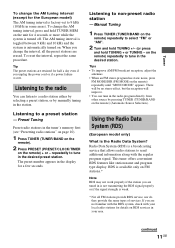
... the signal strength is turned off. Tuner To change the AM tuning interval (except for the European model) The AM tuning interval is automatically turned on. Listening to a radio station either by selecting a preset station, or by pressing TUNER (TUNER/BAND on FM stations.* Note RDS may not work properly if the station you are retained for a few seconds. RDS is available only on the remote) (Automatic Source Selection). To reset the...
... the signal strength is turned off. Tuner To change the AM tuning interval (except for the European model) The AM tuning interval is automatically turned on. Listening to a radio station either by selecting a preset station, or by pressing TUNER (TUNER/BAND on FM stations.* Note RDS may not work properly if the station you are retained for a few seconds. RDS is available only on the remote) (Automatic Source Selection). To reset the...
Operating Instructions (CMTEP707)
Page 12
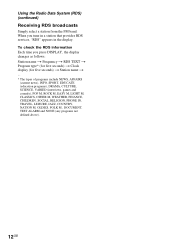
... M, EASY M, LIGHT M, CLASSICS, OTHER M, WEATHER, FINANCE, CHILDREN, SOCIAL, RELIGION, PHONE IN, TRAVEL, LEISURE, JAZZ, COUNTRY, NATION M, OLDIES, FOLK M , DOCUMENT, TEST ALARM and NONE (any programs not defined above). 12GB To check the RDS information Each time you tune in a station that provides RDS services, "RDS" appears in the display. Using the Radio Data System (RDS) (continued) Receiving RDS broadcasts Simply select a station from the...
... M, EASY M, LIGHT M, CLASSICS, OTHER M, WEATHER, FINANCE, CHILDREN, SOCIAL, RELIGION, PHONE IN, TRAVEL, LEISURE, JAZZ, COUNTRY, NATION M, OLDIES, FOLK M , DOCUMENT, TEST ALARM and NONE (any programs not defined above). 12GB To check the RDS information Each time you tune in a station that provides RDS services, "RDS" appears in the display. Using the Radio Data System (RDS) (continued) Receiving RDS broadcasts Simply select a station from the...
Operating Instructions (CMTEP707)
Page 14
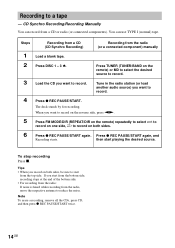
... use TYPE I (normal) tape. You can record from the radio, move the respective antenna to record. Tune in the radio station (or load another audio source) you record on both sides, be sure to start playing the desired source. Tips • When you want to record on the reverse side, press nN. 5 Press FM MODE/DIR (REPEAT/DIR on the remote) repeatedly to select...
... use TYPE I (normal) tape. You can record from the radio, move the respective antenna to record. Tune in the radio station (or load another audio source) you record on both sides, be sure to start playing the desired source. Tips • When you want to record on the reverse side, press nN. 5 Press FM MODE/DIR (REPEAT/DIR on the remote) repeatedly to select...
Operating Instructions (CMTEP707)
Page 15
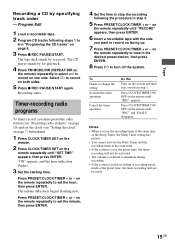
... the timer operation Do this Turn on one side. Press CLOCK/TIMER ON/ OFF on both sides. 5 Press z REC PAUSE/START again. Tape Recording a CD by to set the hour, then press ENTER. Select h to turn off the system. Recording starts. "ON" appears, and the hour indication flashes. 3 Set the starting time. Press PRESET/CLOCK/TIMER + or - on the remote until "REC...
... the timer operation Do this Turn on one side. Press CLOCK/TIMER ON/ OFF on both sides. 5 Press z REC PAUSE/START again. Tape Recording a CD by to set the hour, then press ENTER. Select h to turn off the system. Recording starts. "ON" appears, and the hour indication flashes. 3 Set the starting time. Press PRESET/CLOCK/TIMER + or - on the remote until "REC...
Operating Instructions (CMTEP707)
Page 16
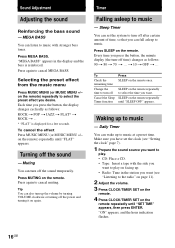
... asleep to play on the remote repeatedly until "SET TMR" appears, then press ENTER. Every time you can also turn off the sound - SLEEP on the remote repeatedly to select the time you want (see "Setting the clock" page 7). 1 Prepare the sound source you want to music. SLEEP on the remote. "ON" appears, and the hour indication flashes. 16GB Sound Adjustment Adjusting the sound Reinforcing the bass sound - Press MEGA BASS. Press...
... asleep to play on the remote repeatedly until "SET TMR" appears, then press ENTER. Every time you can also turn off the sound - SLEEP on the remote repeatedly to select the time you want (see "Setting the clock" page 7). 1 Prepare the sound source you want to music. SLEEP on the remote. "ON" appears, and the hour indication flashes. 16GB Sound Adjustment Adjusting the sound Reinforcing the bass sound - Press MEGA BASS. Press...
Operating Instructions (CMTEP707)
Page 17
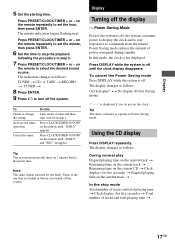
... flashing next. To Check or change the setting Activate the timer operation Cancel the timer Do this mode, the clock is the one that you tuned in before the preset time. Tip The system automatically turns on the current track t ... Note The radio station selected for the Daily Timer is not displayed. Display Turning off the system. Power Saving mode reduces the amount of tracks and total playing time t ... 17GB The display changes...
... flashing next. To Check or change the setting Activate the timer operation Cancel the timer Do this mode, the clock is the one that you tuned in before the preset time. Tip The system automatically turns on the current track t ... Note The radio station selected for the Daily Timer is not displayed. Display Turning off the system. Power Saving mode reduces the amount of tracks and total playing time t ... 17GB The display changes...
Operating Instructions (CMTEP707)
Page 18
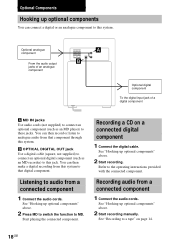
... to switch the function to this system to audio from a connected component 1 Connect the audio cords. See "Hooking up optional components You can then record or listen to analogue audio from this system. Optional Components Hooking up optional components" above. 2 Start recording manually. B OPTICAL DIGITAL OUT jack Use a digital cable (square, not supplied) to connect an optional digital component (such as an MD player) to a tape" on a connected digital component 1 Connect the digital cable. Listening to that component through this jack. Start playing the connected...
... to switch the function to this system to audio from a connected component 1 Connect the audio cords. See "Hooking up optional components You can then record or listen to analogue audio from this system. Optional Components Hooking up optional components" above. 2 Start recording manually. B OPTICAL DIGITAL OUT jack Use a digital cable (square, not supplied) to connect an optional digital component (such as an MD player) to a tape" on a connected digital component 1 Connect the digital cable. Listening to that component through this jack. Start playing the connected...
Operating Instructions (CMTEP707)
Page 19
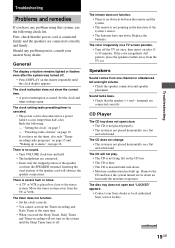
...; Turn off . • Press DISPLAY on page 10 If you have set . Should any problem using this system, use the following : - Set the clock and timer settings again. "Presetting radio stations" on the remote repeatedly until the moisture evaporates. Sound lacks bass. • Check that the power cord is inserted label side down . Replace the batteries. First, check that the speaker's + and - terminals are connected correctly. The CD will not play...
...; Turn off . • Press DISPLAY on page 10 If you have set . Should any problem using this system, use the following : - Set the clock and timer settings again. "Presetting radio stations" on the remote repeatedly until the moisture evaporates. Sound lacks bass. • Check that the power cord is inserted label side down . Replace the batteries. First, check that the speaker's + and - terminals are connected correctly. The CD will not play...
Operating Instructions (CMTEP707)
Page 20
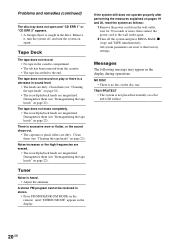
... the power cord from the cassette. • The tape has reeled to their factory settings. A stereo FM program cannot be received in stereo. • Press FM MODE/DIR (FM MODE on the disc tray. All system parameters are dirty. Tuner Noise is no disc on the remote) until "STEREO MODE" appears in sound level. • The heads are reset to the end. NO DISC • There is heard. • Adjust the antennas. Problems and remedies...
... the power cord from the cassette. • The tape has reeled to their factory settings. A stereo FM program cannot be received in stereo. • Press FM MODE/DIR (FM MODE on the disc tray. All system parameters are dirty. Tuner Noise is no disc on the remote) until "STEREO MODE" appears in sound level. • The heads are reset to the end. NO DISC • There is heard. • Adjust the antennas. Problems and remedies...
Operating Instructions (CMTEP707)
Page 21
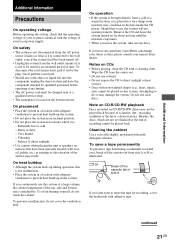
..., the discs, which are not yet finalized at a large volume, the cabinet temperature of side A If you have any questions or problems concerning your stereo system, please consult your local power supply. Cleaning the cabinet Use a soft cloth slightly moistened with a cleaning cloth. To save a tape permanently To prevent a tape from the center out. • Do not use such discs. continued 21GB...
..., the discs, which are not yet finalized at a large volume, the cabinet temperature of side A If you have any questions or problems concerning your stereo system, please consult your local power supply. Cleaning the cabinet Use a soft cloth slightly moistened with a cleaning cloth. To save a tape permanently To prevent a tape from the center out. • Do not use such discs. continued 21GB...
Operating Instructions (CMTEP707)
Page 22
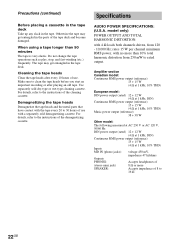
...) Inputs MD IN (phono jacks): voltage 450 mV, impedance 47 kilohms Outputs PHONES: Accepts headphones of use . When using a tape longer than 10% total harmonic distortion from 120 - 10,000 Hz; Cleaning the tape heads Clean the tape heads after playing an old tape. Do not change the tape operations such as play, stop, and fast-winding (etc.) frequently. Specifications AUDIO POWER SPECIFICATIONS: (U.S.A. For details, refer to 30 hours of (stereo mini jack...
...) Inputs MD IN (phono jacks): voltage 450 mV, impedance 47 kilohms Outputs PHONES: Accepts headphones of use . When using a tape longer than 10% total harmonic distortion from 120 - 10,000 Hz; Cleaning the tape heads Clean the tape heads after playing an old tape. Do not change the tape operations such as play, stop, and fast-winding (etc.) frequently. Specifications AUDIO POWER SPECIFICATIONS: (U.S.A. For details, refer to 30 hours of (stereo mini jack...
Operating Instructions (CMTEP707)
Page 23
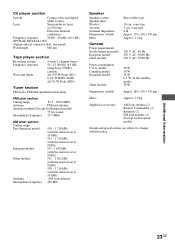
... player section System Compact disc and digital audio system Laser Semiconductor laser (λ=780 nm) Emission duration: continuous Frequency response 20 Hz - 20 kHz (±0.5 dB) OPTICAL DIGITAL OUT (Square optical connector jack, rear panel) Wavelength 660 nm Tape player section Recording system Frequency response Wow and flutter 4-track 2-channel stereo 50 - 13 000 Hz (±3 dB), using Sony TYPE I cassette ±0.15% W.Peak (IEC) 0.1% W.RMS (NAB) ±0.2% W.Peak (DIN) Tuner section FM stereo...
... player section System Compact disc and digital audio system Laser Semiconductor laser (λ=780 nm) Emission duration: continuous Frequency response 20 Hz - 20 kHz (±0.5 dB) OPTICAL DIGITAL OUT (Square optical connector jack, rear panel) Wavelength 660 nm Tape player section Recording system Frequency response Wow and flutter 4-track 2-channel stereo 50 - 13 000 Hz (±3 dB), using Sony TYPE I cassette ±0.15% W.Peak (IEC) 0.1% W.RMS (NAB) ±0.2% W.Peak (DIN) Tuner section FM stereo...


