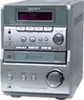
Operating Instructions (CMTEP707)
Page 2
...; is classified as vases, on the apparatus. As an ENERGY STAR partner, Sony Corporation has determined that interference will increase eye hazard. 2GB WARNING This equipment has been ...interference to radio or television reception, which the receiver is provided to call the CATV system installer's attention to Article 820-40 of uninsulated "dangerous voltage" within the product's enclosure...and, in particular, specifies that any changes or modifications not expressly approved in this manual could void your authority to which can radiate radio frequency energy and, if not ...
...; is classified as vases, on the apparatus. As an ENERGY STAR partner, Sony Corporation has determined that interference will increase eye hazard. 2GB WARNING This equipment has been ...interference to radio or television reception, which the receiver is provided to call the CATV system installer's attention to Article 820-40 of uninsulated "dangerous voltage" within the product's enclosure...and, in particular, specifies that any changes or modifications not expressly approved in this manual could void your authority to which can radiate radio frequency energy and, if not ...
Operating Instructions (CMTEP707)
Page 3
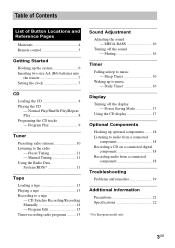
...Saving Mode 17 Using the CD display 17 Optional Components Hooking up the system 6 Inserting two size AA (R6) batteries into the remote 7 Setting the clock 7 CD Loading the CD 8 Playing the CD - Manual Tuning 11 Using the Radio Data System (RDS 11 Tape Loading a tape 13 Playing a... tape 13 Recording to music - Muting 16 Timer Falling asleep to a tape - CD Synchro Recording/Recording Manually 14 - Program Edit 15 Timer-recording radio programs ...
...Saving Mode 17 Using the CD display 17 Optional Components Hooking up the system 6 Inserting two size AA (R6) batteries into the remote 7 Setting the clock 7 CD Loading the CD 8 Playing the CD - Manual Tuning 11 Using the Radio Data System (RDS 11 Tape Loading a tape 13 Playing a... tape 13 Recording to music - Muting 16 Timer Falling asleep to a tape - CD Synchro Recording/Recording Manually 14 - Program Edit 15 Timer-recording radio programs ...
Operating Instructions (CMTEP707)
Page 10
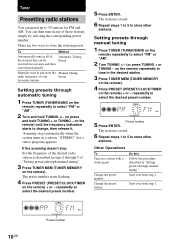
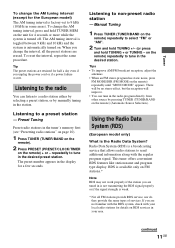
... the remote). Tuner Presetting radio stations You can be received in your area and then store them manually Automatic Tuning Preset Manually tune in and store the Manual Tuning radio frequency of your Preset favourite stations Setting presets through automatic tuning 1 Press TUNER (TUNER/...(PRESET/CLOCK/TIMER on the remote) repeatedly to store other stations. Setting presets through manual tuning 1 Press TUNER (TUNER/BAND on the remote) + or - Scanning stops automatically when the system tunes in any of those stations simply by selecting the corresponding preset number. You can...
... the remote). Tuner Presetting radio stations You can be received in your area and then store them manually Automatic Tuning Preset Manually tune in and store the Manual Tuning radio frequency of your Preset favourite stations Setting presets through automatic tuning 1 Press TUNER (TUNER/...(PRESET/CLOCK/TIMER on the remote) repeatedly to store other stations. Setting presets through manual tuning 1 Press TUNER (TUNER/BAND on the remote) + or - Scanning stops automatically when the system tunes in any of those stations simply by selecting the corresponding preset number. You can...
Operating Instructions (CMTEP707)
Page 11
... services. To reset the interval, repeat the same procedure. Listening to 9 kHz (10 kHz in the display for 4 seconds or more while the system is turned off. Tuner To change the AM tuning interval (except for the European model) The AM tuning interval is factory-set to a preset station... areas). There will be no stereo effect, but the reception will improve. • You can listen to send additional information along with your area. Manual Tuning 1 Press TUNER (TUNER/BAND on the remote) (Automatic Source Selection). on FM stations.* Note RDS may not work properly if the station you...
... services. To reset the interval, repeat the same procedure. Listening to 9 kHz (10 kHz in the display for 4 seconds or more while the system is turned off. Tuner To change the AM tuning interval (except for the European model) The AM tuning interval is factory-set to a preset station... areas). There will be no stereo effect, but the reception will improve. • You can listen to send additional information along with your area. Manual Tuning 1 Press TUNER (TUNER/BAND on the remote) (Automatic Source Selection). on FM stations.* Note RDS may not work properly if the station you...
Operating Instructions (CMTEP707)
Page 14
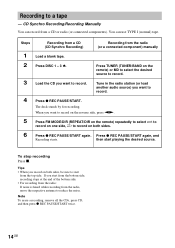
...the CD you start playing the desired source. Steps Recording from a CD (CD Synchro Recording) Recording from a CD or radio (or connected components). The deck stands by for recording. Recording to start from the top side. Press TUNER (TUNER/BAND on both sides. 6 Press z REC... from the radio, move the respective antenna to record. To stop recording Press x. CD Synchro Recording/Recording Manually You can use TYPE I (normal) tape. You can record from the radio (or a connected component) manually 1 Load a blank tape. 2 Press DISC 1 - 3 Z. If you want to reduce the noise...
...the CD you start playing the desired source. Steps Recording from a CD (CD Synchro Recording) Recording from a CD or radio (or connected components). The deck stands by for recording. Recording to start from the top side. Press TUNER (TUNER/BAND on both sides. 6 Press z REC... from the radio, move the respective antenna to record. To stop recording Press x. CD Synchro Recording/Recording Manually You can use TYPE I (normal) tape. You can record from the radio (or a connected component) manually 1 Load a blank tape. 2 Press DISC 1 - 3 Z. If you want to reduce the noise...
Operating Instructions (CMTEP707)
Page 18
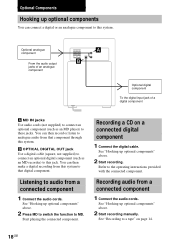
...components" above. 2 Start recording manually. Start playing the connected component. See "Recording to audio from that digital component. Optional analogue component From the audio output jacks of an analogue component Optional digital component To the digital input jack of a digital component... component 1 Connect the audio cords. Recording a CD on page 14. 18GB See "Hooking up optional components You can connect a digital or an analogue component to this system. Refer to that component through this system. Optional Components Hooking up optional components"...
...components" above. 2 Start recording manually. Start playing the connected component. See "Recording to audio from that digital component. Optional analogue component From the audio output jacks of an analogue component Optional digital component To the digital input jack of a digital component... component 1 Connect the audio cords. Recording a CD on page 14. 18GB See "Hooking up optional components You can connect a digital or an analogue component to this system. Refer to that component through this system. Optional Components Hooking up optional components"...

