
Operating Instructions
Page 3
...Subpart B of Part 15 of the following two conditions: (1) This device may be of sufficient magnitude to use. Your Digital camcorder is intended to alert the user to the presence of electric shock to comply with superior picture and sound quality. You will not...: Do not handle damaged or leaking LithiumIon batteries. Congratulations on , the user is intended to alert the user to the following measures: - Operation is subject to the presence of Conformity Trade Name: SONY Model No.: DSR-PD170 Responsible Party: Sony Electronics Inc. If this procuct may cause ...
...Subpart B of Part 15 of the following two conditions: (1) This device may be of sufficient magnitude to use. Your Digital camcorder is intended to alert the user to the presence of electric shock to comply with superior picture and sound quality. You will not...: Do not handle damaged or leaking LithiumIon batteries. Congratulations on , the user is intended to alert the user to the following measures: - Operation is subject to the presence of Conformity Trade Name: SONY Model No.: DSR-PD170 Responsible Party: Sony Electronics Inc. If this procuct may cause ...
Operating Instructions
Page 5
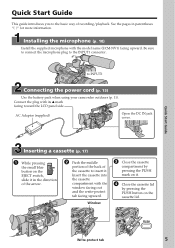
... the model name (ECM-NV1) facing upward. Be sure to connect the microphone plug to INPUT1 Connecting the power cord (p. 15) Use the battery pack when using your camcorder outdoors (p. 11). AC Adaptor (supplied) Open the DC IN jack cover. Quick Start Guide This guide introduces you to insert it . 4 Close the...
... the model name (ECM-NV1) facing upward. Be sure to connect the microphone plug to INPUT1 Connecting the power cord (p. 15) Use the battery pack when using your camcorder outdoors (p. 11). AC Adaptor (supplied) Open the DC IN jack cover. Quick Start Guide This guide introduces you to insert it . 4 Close the...
Operating Instructions
Page 6
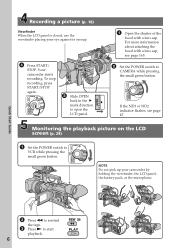
... small green button. To stop recording, press START/STOP again. Recording a picture (p. 18) Viewfinder When the LCD panel is closed, use the viewfinder placing your camcorder by holding the viewfinder, the LCD panel, the battery pack, or the microphone. Your...
... small green button. To stop recording, press START/STOP again. Recording a picture (p. 18) Viewfinder When the LCD panel is closed, use the viewfinder placing your camcorder by holding the viewfinder, the LCD panel, the battery pack, or the microphone. Your...
Operating Instructions
Page 9
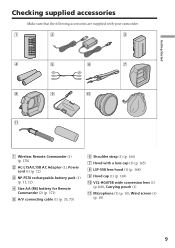
Getting Started Checking supplied accessories Make sure that the following accessories are supplied with your camcorder. 1 2 3 4 5 6 7 8 9 0 qa 1 Wireless Remote Commander (1) (p. 170) 2 AC-L15A/L15B AC Adaptor (1), Power cord (1) (p. 12) 3 NP-F570 rechargeable battery pack (1) (p. 11, 12) 4 Size AA (R6) battery for Remote Commander (2) (p. 171) 5 A/V connecting cable (1) (p. 33, 73) 6 Shoulder strap (1) (p. 166) 7 Hood with a lens...
Getting Started Checking supplied accessories Make sure that the following accessories are supplied with your camcorder. 1 2 3 4 5 6 7 8 9 0 qa 1 Wireless Remote Commander (1) (p. 170) 2 AC-L15A/L15B AC Adaptor (1), Power cord (1) (p. 12) 3 NP-F570 rechargeable battery pack (1) (p. 11, 12) 4 Size AA (R6) battery for Remote Commander (2) (p. 171) 5 A/V connecting cable (1) (p. 33, 73) 6 Shoulder strap (1) (p. 166) 7 Hood with a lens...
Operating Instructions
Page 11
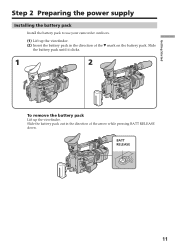
Getting Started Step 2 Preparing the power supply Installing the battery pack Install the battery pack to use your camcorder outdoors. (1) Lift up the viewfinder. Slide the battery pack out in the direction of the arrow while pressing BATT RELEASE down. BATT RELEASE 11 Slide the battery pack until it clicks. 1 2 To remove the battery pack Lift up the viewfinder. (2) Insert the battery pack in the direction of the V mark on the battery pack.
Getting Started Step 2 Preparing the power supply Installing the battery pack Install the battery pack to use your camcorder outdoors. (1) Lift up the viewfinder. Slide the battery pack out in the direction of the arrow while pressing BATT RELEASE down. BATT RELEASE 11 Slide the battery pack until it clicks. 1 2 To remove the battery pack Lift up the viewfinder. (2) Insert the battery pack in the direction of the V mark on the battery pack.

Operating Instructions
Page 12
...the LCD panel and open it again, it . Note on the remaining battery time indicator The remaining battery time indicator on the display window. When you are recording. When the remaining battery indicator changes to u, normal charge is completed until FULL appears on the ...using the viewfinder. To fully charge the battery (full charge), leave the battery pack attached for the correct remaining battery time to be correct, depending on your camcorder to the DC IN jack with your camcorder. Your camcorder operates only with the "InfoLITHIUM" battery pack (L series). (1) Open the ...
...the LCD panel and open it again, it . Note on the remaining battery time indicator The remaining battery time indicator on the display window. When you are recording. When the remaining battery indicator changes to u, normal charge is completed until FULL appears on the ...using the viewfinder. To fully charge the battery (full charge), leave the battery pack attached for the correct remaining battery time to be correct, depending on your camcorder to the DC IN jack with your camcorder. Your camcorder operates only with the "InfoLITHIUM" battery pack (L series). (1) Open the ...

Operating Instructions
Page 13
...power supply Getting Started Notes •Prevent metallic objects from the wall outlet. The battery pack is disconnected. - Until your camcorder. * Approximate minutes when recording while you use the NP-500/510/710 battery pack on /off. If a malfunction occurs, disconnect the plug from coming into ...the DC plug of recording time when you repeat recording start/stop, zooming and turning the power on your camcorder calculates the actual remaining battery time "- - - - Charging time Battery pack NP-F550 NP-F570 (supplied) NP-F730/F750 NP-F770 NP-F960 NP-F970 Full charge (...
...power supply Getting Started Notes •Prevent metallic objects from the wall outlet. The battery pack is disconnected. - Until your camcorder. * Approximate minutes when recording while you use the NP-500/510/710 battery pack on /off. If a malfunction occurs, disconnect the plug from coming into ...the DC plug of recording time when you repeat recording start/stop, zooming and turning the power on your camcorder calculates the actual remaining battery time "- - - - Charging time Battery pack NP-F550 NP-F570 (supplied) NP-F730/F750 NP-F770 NP-F960 NP-F970 Full charge (...

Operating Instructions
Page 14
... compatible with the "InfoLITHIUM" battery pack (L series). Notes •The supplied battery pack is charged a little. •Some types of battery packs may not be shorter if you use your camcorder in your camcorder. The "InfoLITHIUM" is a trademark of Sony Corporation. "InfoLITHIUM" is a lithium ion battery pack which can exchange data such as battery consumption with compatible video...
... compatible with the "InfoLITHIUM" battery pack (L series). Notes •The supplied battery pack is charged a little. •Some types of battery packs may not be shorter if you use your camcorder in your camcorder. The "InfoLITHIUM" is a trademark of Sony Corporation. "InfoLITHIUM" is a lithium ion battery pack which can exchange data such as battery consumption with compatible video...

Operating Instructions
Page 15
...•AC Adaptor can supply power even if the battery pack is attached to the DC IN jack, even when the power cord is not plugged into a wall outlet. Using a car battery Use the Sony DC Adaptor/Charger (optional). 15 This means that you use your camcorder for a long time, we recommend that the... battery pack cannot supply any power if the power cord is connected to your...
...•AC Adaptor can supply power even if the battery pack is attached to the DC IN jack, even when the power cord is not plugged into a wall outlet. Using a car battery Use the Sony DC Adaptor/Charger (optional). 15 This means that you use your camcorder for a long time, we recommend that the... battery pack cannot supply any power if the power cord is connected to your...
Operating Instructions
Page 16
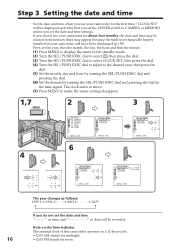
... indicator The internal clock of this camcorder operates on a 12-hour cycle. •12:00 AM stands for midnight. 16 •12:00 PM stands for about four months, the date and time may be cleared from memory (bars may appear) because the built-in rechargeable battery installed in the standby mode... time that you set the year, then the month, the day, the hour and then the minute. (1) Press MENU to display the menu in your camcorder will have been discharged (p.158). First, set the POWER switch to make the menu settings disappear. 1,7 2 3 MENU 4 2005 JAN 1 12 00 AM TC/UB SET...
... indicator The internal clock of this camcorder operates on a 12-hour cycle. •12:00 AM stands for midnight. 16 •12:00 PM stands for about four months, the date and time may be cleared from memory (bars may appear) because the built-in rechargeable battery installed in the standby mode... time that you set the year, then the month, the day, the hour and then the minute. (1) Press MENU to display the menu in your camcorder will have been discharged (p.158). First, set the POWER switch to make the menu settings disappear. 1,7 2 3 MENU 4 2005 JAN 1 12 00 AM TC/UB SET...

Operating Instructions
Page 19
... set REC MODE to DV SP The recordable time is smooth as long as you do not eject the cassette even if you change the battery pack, set the POWER switch to the left when you can record on one tape. You can make longer recording, use a mini DV cassette without... button. When you use mini DVCAM cassettes and set PROG. The LOCK switch is not a malfunction. Basics Recording a picture Note on the recording format Your camcorder records and plays back both on mini DVCAM cassettes and on the cassette. We recommend that you set to prevent the tape wear and save...
... set REC MODE to DV SP The recordable time is smooth as long as you do not eject the cassette even if you change the battery pack, set the POWER switch to the left when you can record on one tape. You can make longer recording, use a mini DV cassette without... button. When you use mini DVCAM cassettes and set PROG. The LOCK switch is not a malfunction. Basics Recording a picture Note on the recording format Your camcorder records and plays back both on mini DVCAM cassettes and on the cassette. We recommend that you set to prevent the tape wear and save...
Operating Instructions
Page 20
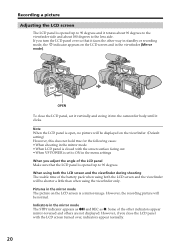
Some of the battery pack when using the viewfinder only. However, the recording picture will be shorter a little than when using both the LCD screen and the viewfinder during ... However, if you close the LCD panel, set to 90 degrees. Note When the LCD panel is set it vertically and swing it into the camcorder body until it clicks. When using both the LCD screen and the viewfinder will be displayed on the viewfinder. (Default setting) However, this does not...
Some of the battery pack when using the viewfinder only. However, the recording picture will be shorter a little than when using both the LCD screen and the viewfinder during ... However, if you close the LCD panel, set to 90 degrees. Note When the LCD panel is set it vertically and swing it into the camcorder body until it clicks. When using both the LCD screen and the viewfinder will be displayed on the viewfinder. (Default setting) However, this does not...
Operating Instructions
Page 21
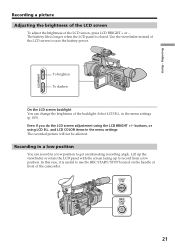
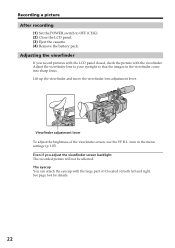
...B.L. Lift up the viewfinder or rotate the LCD panel with the screen facing up to save the battery power. To brighten To darken On the LCD screen backlight You can record in the menu settings (p.... 105). buttons, or using the LCD BRIGHT +/- The battery life is longer when the LCD panel is useful to get an interesting recording angle. Recording in a... low position You can change the brightness of the camcorder. START/ STOP REC REC START/ STOP 21 in a low position to use the REC START/...
...B.L. Lift up the viewfinder or rotate the LCD panel with the screen facing up to save the battery power. To brighten To darken On the LCD screen backlight You can record in the menu settings (p.... 105). buttons, or using the LCD BRIGHT +/- The battery life is longer when the LCD panel is useful to get an interesting recording angle. Recording in a... low position You can change the brightness of the camcorder. START/ STOP REC REC START/ STOP 21 in a low position to use the REC START/...
Operating Instructions
Page 22
... viewfinder. item in the viewfinder come into sharp focus. Adjust the viewfinder lens to OFF (CHG). (2) Close the LCD panel. (3) Eject the cassette. (4) Remove the battery pack.
... viewfinder. item in the viewfinder come into sharp focus. Adjust the viewfinder lens to OFF (CHG). (2) Close the LCD panel. (3) Eject the cassette. (4) Remove the battery pack.
Operating Instructions
Page 24
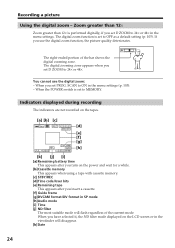
... recording The indicators are not recorded on the tapes. [a] [b] [c] 40min REC 00:00:00:01 45min [d] [e] [f] [g] DVCAM ND1 32K JUL 4 2003 12:05:56PM [h] [k] [j] [i] [a] Remaining battery time This appears after you set PROG. If you set D ZOOM to ON in SP mode [h]Audio mode [i] Time [j] ND filter The most suitable mode...
... recording The indicators are not recorded on the tapes. [a] [b] [c] 40min REC 00:00:00:01 45min [d] [e] [f] [g] DVCAM ND1 32K JUL 4 2003 12:05:56PM [h] [k] [j] [i] [a] Remaining battery time This appears after you set PROG. If you set D ZOOM to ON in SP mode [h]Audio mode [i] Time [j] ND filter The most suitable mode...
Operating Instructions
Page 52
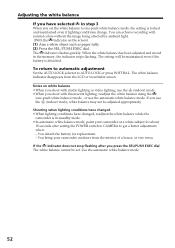
..., or vice versa. Shooting when lighting conditions have changed •When lighting conditions have selected in step 3 When you set . You detach the battery for about 10 seconds after you press the SEL/PUSH EXEC dial The white balance cannot be set the white balance to one -push white... POWER switch to CAMERA to AUTO LOCK or press WHT BAL. Use the automatic white balance mode. 52 The indicator flashes quickly. You bring your camcorder at a white subject for replacement. - To return to automatic adjustment Set the AUTO LOCK selector to get a better adjustment when: - Adjusting the ...
..., or vice versa. Shooting when lighting conditions have changed •When lighting conditions have selected in step 3 When you set . You detach the battery for about 10 seconds after you press the SEL/PUSH EXEC dial The white balance cannot be set the white balance to one -push white... POWER switch to CAMERA to AUTO LOCK or press WHT BAL. Use the automatic white balance mode. 52 The indicator flashes quickly. You bring your camcorder at a white subject for replacement. - To return to automatic adjustment Set the AUTO LOCK selector to get a better adjustment when: - Adjusting the ...
Operating Instructions
Page 108
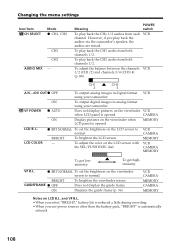
... z OFF ON VF POWER z AUTO ON To output analog images in analog format using your camcorder. Does not display pictures on LCD B.L. BRIGHT To brighten the LCD screen. - However, if you use power sources other than the battery pack, "BRIGHT" is opened MEMORY LCD B. To adjust the color on the viewfinder screen...
... z OFF ON VF POWER z AUTO ON To output analog images in analog format using your camcorder. Does not display pictures on LCD B.L. BRIGHT To brighten the LCD screen. - However, if you use power sources other than the battery pack, "BRIGHT" is opened MEMORY LCD B. To adjust the color on the viewfinder screen...
Operating Instructions
Page 113
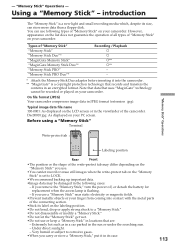
... cases: - You can store more data than a floppy disk. If you remove the "Memory Stick," turn the power off, or detach the battery for replacement when the access lamp is set to corrosive gases. •When you use or keep a "Memory Stick" in the viewfinder of "Memory... the sun or under the scorching sun. - Extremely hot such as in a car parked in JPEG format (extension .jpg). Dsc00001.jpg: As displayed on your camcorder. "Memory Stick" Operations - Using a "Memory Stick" - - Note that data that uses "MagicGate" technology cannot be damaged in the following types of the...
... cases: - You can store more data than a floppy disk. If you remove the "Memory Stick," turn the power off, or detach the battery for replacement when the access lamp is set to corrosive gases. •When you use or keep a "Memory Stick" in the viewfinder of "Memory... the sun or under the scorching sun. - Extremely hot such as in a car parked in JPEG format (extension .jpg). Dsc00001.jpg: As displayed on your camcorder. "Memory Stick" Operations - Using a "Memory Stick" - - Note that data that uses "MagicGate" technology cannot be damaged in the following types of the...

Operating Instructions
Page 115
...Stick", check it . Do not turn the power off , eject a "Memory Stick" or remove the battery pack. Access lamp To eject a "Memory Stick" Push the "Memory Stick" inward, then release your camcorder. Note The "Memory Stick" may occur. When the access lamp is not proper, or the "Memory ...are using is not compatible with the Sony logo pointing toward the LCD panel and the b mark pointing inward. If the " MEMORY STICK ERROR" indicator appears The "Memory Stick" is broken, the file format is lit or flashing Never shake or strike your camcorder. introduction Inserting a "Memory Stick"...
...Stick", check it . Do not turn the power off , eject a "Memory Stick" or remove the battery pack. Access lamp To eject a "Memory Stick" Push the "Memory Stick" inward, then release your camcorder. Note The "Memory Stick" may occur. When the access lamp is not proper, or the "Memory ...are using is not compatible with the Sony logo pointing toward the LCD panel and the b mark pointing inward. If the " MEMORY STICK ERROR" indicator appears The "Memory Stick" is broken, the file format is lit or flashing Never shake or strike your camcorder. introduction Inserting a "Memory Stick"...

Operating Instructions
Page 124
... POWER MEMORY OFF CAMERA (CHG) 3 PHOTO CAPTURE 4 PHOTO 124 When the access lamp is lit or is activated You cannot use this function. Your camcorder can read moving picture data through the input connector and record it as a still image on a "Memory Stick." Recording does not start yet. (4)... PHOTO lightly in the viewfinder. Also, do not turn the power off , eject a "Memory Stick" or remove the battery pack. Recording an image from a tape as a still image Your camcorder can also take in moving picture data recorded on a tape and record it as a still image on a "Memory Stick...
... POWER MEMORY OFF CAMERA (CHG) 3 PHOTO CAPTURE 4 PHOTO 124 When the access lamp is lit or is activated You cannot use this function. Your camcorder can read moving picture data through the input connector and record it as a still image on a "Memory Stick." Recording does not start yet. (4)... PHOTO lightly in the viewfinder. Also, do not turn the power off , eject a "Memory Stick" or remove the battery pack. Recording an image from a tape as a still image Your camcorder can also take in moving picture data recorded on a tape and record it as a still image on a "Memory Stick...


