

Operating Instructions
Page 3
...microphone 56 Using an external audio system or microphone... picture Troubleshooting 162 - SLIDE SHOW 148 Preventing accidental erasure - Digital effect 69 Usable cassettes 158 Superimposing a still image in a ... Rec Review 29 Playback - Digital program editing 88 Using with digital effects ......... 84 Step 1 Installing the microphone 7 Step 2 Preparing the ...time values 105 Superimposing a title 110 Making your camcorder abroad 171 Advanced Playback Operations Searching for picture quality... 118 Customizing Your Camcorder Advanced Recording Operations Changing the menu settings 120 ...
...microphone 56 Using an external audio system or microphone... picture Troubleshooting 162 - SLIDE SHOW 148 Preventing accidental erasure - Digital effect 69 Usable cassettes 158 Superimposing a still image in a ... Rec Review 29 Playback - Digital program editing 88 Using with digital effects ......... 84 Step 1 Installing the microphone 7 Step 2 Preparing the ...time values 105 Superimposing a title 110 Making your camcorder abroad 171 Advanced Playback Operations Searching for picture quality... 118 Customizing Your Camcorder Advanced Recording Operations Changing the menu settings 120 ...
Operating Instructions
Page 6
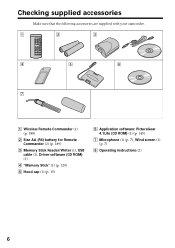
Checking supplied accessories Make sure that the following accessories are supplied with your camcorder. 1 2 3 4 5 6 7 1 Wireless Remote Commander (1) (p. 188) 2 Size AA (R6) battery for Remote Commander (2) (p. 189) 3 Memory Stick Reader/Writer (1), USB cable (1), Driver software (CD ROM) (1) 4 "Memory Stick" (1) (p. 129) 5 Hood cap (1) (p. 15) 6 Application software: PictureGear 4.1Lite (CD ROM) (1) (p. 145) 7 Microphone (1) (p. 7), Wind screen (1) (p. 7) 8 Operating instructions (2) 6
Checking supplied accessories Make sure that the following accessories are supplied with your camcorder. 1 2 3 4 5 6 7 1 Wireless Remote Commander (1) (p. 188) 2 Size AA (R6) battery for Remote Commander (2) (p. 189) 3 Memory Stick Reader/Writer (1), USB cable (1), Driver software (CD ROM) (1) 4 "Memory Stick" (1) (p. 129) 5 Hood cap (1) (p. 15) 6 Application software: PictureGear 4.1Lite (CD ROM) (1) (p. 145) 7 Microphone (1) (p. 7), Wind screen (1) (p. 7) 8 Operating instructions (2) 6

Operating Instructions
Page 7
Set the MIC LOW CUT switch to AUTO, for the front microphone. Be sure to connect the microphone plug to the MIC IN +48V connector. (1) Attach the wind screen to the microphone. (2) Loosen the microphone holder screw and open the cover. (3) Place the microphone into the holder with the model name (ECM-NV1) facing upward, ...close the cover, and tighten the screw. (4) Connect the plug of the microphone to the MIC IN +48V connector. (5) Set the AUDIO INPUT switches to FRONT, and the AUDIO SELECT switches to ON. When you can reduce the ...
Set the MIC LOW CUT switch to AUTO, for the front microphone. Be sure to connect the microphone plug to the MIC IN +48V connector. (1) Attach the wind screen to the microphone. (2) Loosen the microphone holder screw and open the cover. (3) Place the microphone into the holder with the model name (ECM-NV1) facing upward, ...close the cover, and tighten the screw. (4) Connect the plug of the microphone to the MIC IN +48V connector. (5) Set the AUDIO INPUT switches to FRONT, and the AUDIO SELECT switches to ON. When you can reduce the ...
Operating Instructions
Page 15
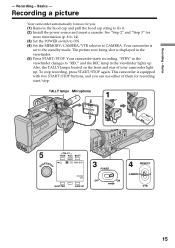
...for you can use either of your camcorder light up . "STBY" in the viewfinder changes to fix it. (2) Install the power source and insert a cassette. TALLY lamps Microphone 1 S 5 TART/STO TALLY TAKE REC BATT Li REC 00:00:00:01 SHUTTER DVCAM 32K GAIN UP 3 POWER OFF ON... 4 MEMORY CAMERA VTR 15 Recording - Recording a picture Your camcorder automatically focuses for more information (p. 8 to 14). (3)...
...for you can use either of your camcorder light up . "STBY" in the viewfinder changes to fix it. (2) Install the power source and insert a cassette. TALLY lamps Microphone 1 S 5 TART/STO TALLY TAKE REC BATT Li REC 00:00:00:01 SHUTTER DVCAM 32K GAIN UP 3 POWER OFF ON... 4 MEMORY CAMERA VTR 15 Recording - Recording a picture Your camcorder automatically focuses for more information (p. 8 to 14). (3)...

Operating Instructions
Page 56
... removed from the camcorder Fitting an optional microphone Use the following procedure to the MIC IN +48 V connector. 1 2 Microphone adaptor MIC IN +48 V connector Mark 56 Connect the microphone cable to attach an optional ECM-670 Microphone. (1) Loosen the screw of the CAC-12 Microphone Holder, then open the holder and replace the microphone adaptor with the...
... removed from the camcorder Fitting an optional microphone Use the following procedure to the MIC IN +48 V connector. 1 2 Microphone adaptor MIC IN +48 V connector Mark 56 Connect the microphone cable to attach an optional ECM-670 Microphone. (1) Loosen the screw of the CAC-12 Microphone Holder, then open the holder and replace the microphone adaptor with the...

Operating Instructions
Page 57
...not appear on the screen, using a microphone which is not powered through its cable Connect the microphone to the AUDIO IN CH1/CH2 connector and set the LINE/MIC selector to the microphone adaptor. When you use the microphone adaptor supplied with respect to MIC. 57... ECM-672: no microphone adaptor required. Advanced Recording Operations Connecting an optional external microphone To fit optional microphones (operable with a 48 V supply) other ...
...not appear on the screen, using a microphone which is not powered through its cable Connect the microphone to the AUDIO IN CH1/CH2 connector and set the LINE/MIC selector to the microphone adaptor. When you use the microphone adaptor supplied with respect to MIC. 57... ECM-672: no microphone adaptor required. Advanced Recording Operations Connecting an optional external microphone To fit optional microphones (operable with a 48 V supply) other ...

Operating Instructions
Page 58
... When connecting audio equipment: Set the LINE/MIC selector that corresponds to the channel that the cable is connected to LINE. When connecting a microphone: Set the LINE/MIC selector that corresponds to the channel that the cable is connected to MIC. AUDIO INPUT FRONT REAR FRONT REAR LINE ... OUT 12V connector. 58 Using an external audio system or microphone Connect an audio mixer or other external audio system component to the AUDIO IN CH1/CH2 connectors. (1) Connect an audio mixer or other than the 48-V microphone with 12-V power The camcorder can supply 12-V power to +48V ON.
... When connecting audio equipment: Set the LINE/MIC selector that corresponds to the channel that the cable is connected to LINE. When connecting a microphone: Set the LINE/MIC selector that corresponds to the channel that the cable is connected to MIC. AUDIO INPUT FRONT REAR FRONT REAR LINE ... OUT 12V connector. 58 Using an external audio system or microphone Connect an audio mixer or other external audio system component to the AUDIO IN CH1/CH2 connectors. (1) Connect an audio mixer or other than the 48-V microphone with 12-V power The camcorder can supply 12-V power to +48V ON.

Operating Instructions
Page 100
... points. AUDIO IN CH2 REAR/FRONT - - Audio dubbing You can record an audio sound to add to your recorded tape by connecting audio equipment or a microphone. AUDIO IN CH2 FRONT/FRONT - - FRONT/REAR - AUDIO IN CH1 - You can also use the Remote Commander for this operation. REAR/REAR AUDIO IN CH1...
... points. AUDIO IN CH2 REAR/FRONT - - Audio dubbing You can record an audio sound to add to your recorded tape by connecting audio equipment or a microphone. AUDIO IN CH2 FRONT/FRONT - - FRONT/REAR - AUDIO IN CH1 - You can also use the Remote Commander for this operation. REAR/REAR AUDIO IN CH1...

Operating Instructions
Page 102
... connect the video (yellow) plug. 102 Dubbing with the MIC IN +48V connector Check that a 48-V microphone is connected to the VIDEO IN/ OUT jack or VIDEO OUT connector. AUDIO IN CH1/CH2 : Signal flow Microphone (not supplied) You can monitor the additional sound by connecting the monitor to the MIC IN... with the AUDIO IN CH1/CH2 connectors For details on setup of the AUDIO IN CH1/CH2 connectors, see "Using an external audio system or microphone" on a monitor by the speaker or headphones.
... connect the video (yellow) plug. 102 Dubbing with the MIC IN +48V connector Check that a 48-V microphone is connected to the VIDEO IN/ OUT jack or VIDEO OUT connector. AUDIO IN CH1/CH2 : Signal flow Microphone (not supplied) You can monitor the additional sound by connecting the monitor to the MIC IN... with the AUDIO IN CH1/CH2 connectors For details on setup of the AUDIO IN CH1/CH2 connectors, see "Using an external audio system or microphone" on a monitor by the speaker or headphones.

Operating Instructions
Page 103
... appears on the LCD screen or in the viewfinder. (5) Press X and start point by using a headphones. •When dubbing with the supplied or an external microphone, you can check the recorded sound by pressing N. AUDIO DUB MEMORY/CAMERA/VTR Notes •When dubbing with the VIDEO IN/OUT jack or VIDEO... OUT connector, and you want to record at the point where you want to start recording to set your camcorder. (3) Locate the recording start playing back the audio you can check the recorded picture on the LCD screen, in the viewfinder, or on the screen...
... appears on the LCD screen or in the viewfinder. (5) Press X and start point by using a headphones. •When dubbing with the supplied or an external microphone, you can check the recorded sound by pressing N. AUDIO DUB MEMORY/CAMERA/VTR Notes •When dubbing with the VIDEO IN/OUT jack or VIDEO... OUT connector, and you want to record at the point where you want to start recording to set your camcorder. (3) Locate the recording start playing back the audio you can check the recorded picture on the LCD screen, in the viewfinder, or on the screen...
Operating Instructions
Page 176
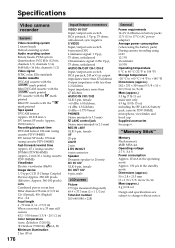
... 1/2) Video signal NTSC color, EIA standards Usable cassette DVCAM cassette with the mark printed Mini DVCAM cassette with the mark printed DV cassette with the mark... 340 000 pixels) Lens Combined power zoom lens Filter diameter 58 mm (2 3/8 in) 12× (Optical), 48× (Digital) F1.6 - 2.4 Focal length 6 - 72 mm (1/4 - 2 7/8 in) When converted to a 35 mm still camera 43...main unit only 4.9 kg (10 lb 13 oz) including the BP-L40 (A) battery pack, cassette PDV-184ME, microphone, viewfinder, and hood cap Supplied accessories See page 6. "Memory Stick" Memory Flash memory 4MB: MSA-4A Operating...
... 1/2) Video signal NTSC color, EIA standards Usable cassette DVCAM cassette with the mark printed Mini DVCAM cassette with the mark printed DV cassette with the mark... 340 000 pixels) Lens Combined power zoom lens Filter diameter 58 mm (2 3/8 in) 12× (Optical), 48× (Digital) F1.6 - 2.4 Focal length 6 - 72 mm (1/4 - 2 7/8 in) When converted to a 35 mm still camera 43...main unit only 4.9 kg (10 lb 13 oz) including the BP-L40 (A) battery pack, cassette PDV-184ME, microphone, viewfinder, and hood cap Supplied accessories See page 6. "Memory Stick" Memory Flash memory 4MB: MSA-4A Operating...

Operating Instructions
Page 184
...You can attach a wide teleconversion lens (not supplied) by removing the lens hood. When using additional filters We recommend that you use the Sony made filters having the genuine accessory mark. Identifying the parts and controls uf i; Fastening the grip strap Fasten the grip strap firmly. 184 Viewfinder... screw, and unscrew the lens hood counterclockwise. ih Lens ij Lens hood fixing screw Removing the lens hood To remove the lens hood for optional microphone holder (p. 56) ug MIC LOW CUT switch (p. 7) uh Power zoom lever (p. 24) uj PHOTO button (p. 62, 134) uk IRIS switch (p. 37...
...You can attach a wide teleconversion lens (not supplied) by removing the lens hood. When using additional filters We recommend that you use the Sony made filters having the genuine accessory mark. Identifying the parts and controls uf i; Fastening the grip strap Fasten the grip strap firmly. 184 Viewfinder... screw, and unscrew the lens hood counterclockwise. ih Lens ij Lens hood fixing screw Removing the lens hood To remove the lens hood for optional microphone holder (p. 56) ug MIC LOW CUT switch (p. 7) uh Power zoom lever (p. 24) uj PHOTO button (p. 62, 134) uk IRIS switch (p. 37...

Operating Instructions
Page 186
... qh qj qk ql w; 1 TAKE/TALLY lamp This lamp is not used with the camcorder. 2 REC/TALLY lamps (p. 15) The below REC lamp is not used with the camcorder. 3 Eyepiece focusing knob (p. 20) 4 Stopper (p. 187) 5 Microphone holding screw 6 Microphone holder 7 Microphone 8 LIGHT switch and light 9 BATT lamp (p. 10) 186 0 GAIN UP lamp (p. 38) qa SHUTTER...
... qh qj qk ql w; 1 TAKE/TALLY lamp This lamp is not used with the camcorder. 2 REC/TALLY lamps (p. 15) The below REC lamp is not used with the camcorder. 3 Eyepiece focusing knob (p. 20) 4 Stopper (p. 187) 5 Microphone holding screw 6 Microphone holder 7 Microphone 8 LIGHT switch and light 9 BATT lamp (p. 10) 186 0 GAIN UP lamp (p. 38) qa SHUTTER...

Operating Instructions
Page 187
VF connector Viewfinder left -to -right positioning ring Stopper To fit the viewfinder Reverse the removal procedure. (You need not hold the viewfinder stopper up the stopper, slide the viewfinder out. Identifying the parts and controls Removing the viewfinder Remove any microphone from the viewfinder before beginning. (1) Pull the viewfinder connector out of the VF connector on the front. (2) Loosen the viewfinder left -to -right positioning ring, then pulling up .) Quick Reference 187
VF connector Viewfinder left -to -right positioning ring Stopper To fit the viewfinder Reverse the removal procedure. (You need not hold the viewfinder stopper up the stopper, slide the viewfinder out. Identifying the parts and controls Removing the viewfinder Remove any microphone from the viewfinder before beginning. (1) Pull the viewfinder connector out of the VF connector on the front. (2) Loosen the viewfinder left -to -right positioning ring, then pulling up .) Quick Reference 187
Operating Instructions
Page 192
...monitor) 35 Continuous 135 Custom preset 50 Cut recording 76 Data code 32 Date search 80 Date/time indicator 32 DIGITAL EFFECT 69 Digital program editing ....... 88 Digital zoom 25 DISPLAY 31 DOT 67 Dubbing a tape 85 DV connecting cable 86 FRAME REC 76 GAIN 38 Grip ... 7 Mirror mode 22 Moisture condensation ...... 172 MONOTONE 67 ND filter 17 NTSC system 171 O, P E EDITSEARCH 29 END SEARCH 29, 33 External microphone (not supplied 56 F, G, H OLD MOVIE 69 Operation indicators .......... 190 OVERLAP 67 PHONES jack 181 Photo scan 83 Photo search 82 Picture search 33...
...monitor) 35 Continuous 135 Custom preset 50 Cut recording 76 Data code 32 Date search 80 Date/time indicator 32 DIGITAL EFFECT 69 Digital program editing ....... 88 Digital zoom 25 DISPLAY 31 DOT 67 Dubbing a tape 85 DV connecting cable 86 FRAME REC 76 GAIN 38 Grip ... 7 Mirror mode 22 Moisture condensation ...... 172 MONOTONE 67 ND filter 17 NTSC system 171 O, P E EDITSEARCH 29 END SEARCH 29, 33 External microphone (not supplied 56 F, G, H OLD MOVIE 69 Operation indicators .......... 190 OVERLAP 67 PHONES jack 181 Photo scan 83 Photo search 82 Picture search 33...


