
Operating Instructions
Page 11
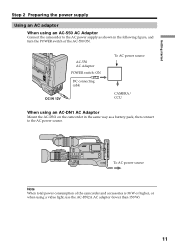
... DC connecting cable DC IN 12V To AC power source CAMERA/ CCU When using an AC-DN1 AC Adaptor Mount the AC-DN1 on the camcorder in the same way as shown in the following figure, and turn the POWER switch of the camcorder and accessories is 38 W or higher, or when using... AC Adaptor Connect the camcorder to the AC power supply as a battery pack, then connect to the AC power source. To AC power source Note When total power consumption of the AC-550 ON. Getting started Step 2 Preparing the power supply Using an AC adaptor When using a video light, use the AC...
... DC connecting cable DC IN 12V To AC power source CAMERA/ CCU When using an AC-DN1 AC Adaptor Mount the AC-DN1 on the camcorder in the same way as shown in the following figure, and turn the POWER switch of the camcorder and accessories is 38 W or higher, or when using... AC Adaptor Connect the camcorder to the AC power supply as a battery pack, then connect to the AC power source. To AC power source Note When total power consumption of the AC-550 ON. Getting started Step 2 Preparing the power supply Using an AC adaptor When using a video light, use the AC...
Operating Instructions
Page 17
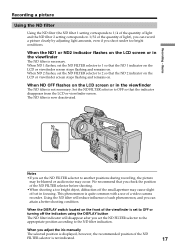
... you can record a picture clearly by adjusting light amounts, even if you set in the viewfinder The ND filter is quite common with a use of a video camera recorder. This phenomenon is necessary. When the ND1 or ND2 indicator flashes on . ND FILTER OFF 1 2 Notes •If you check the position of the...
... you can record a picture clearly by adjusting light amounts, even if you set in the viewfinder The ND filter is quite common with a use of a video camera recorder. This phenomenon is necessary. When the ND1 or ND2 indicator flashes on . ND FILTER OFF 1 2 Notes •If you check the position of the...
Operating Instructions
Page 33
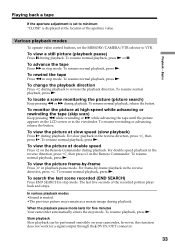
... recorded (END SEARCH) Press END SEARCH in stop mode. Basics Various playback modes To operate video control buttons, set to minimum "CLOSE" is muted. •The previous picture may remain...in the reverse direction, press , then press ×2 on your camcorder, however, this function does not work for five minutes Your camcorder automatically enters the stop mode. To locate a scene monitoring the ... on the Remote Commander. Playing back a tape If the aperture adjustment is set the MEMORY/CAMERA/VTR selector to VTR. To view a still picture (playback pause) Press X during playback....
... recorded (END SEARCH) Press END SEARCH in stop mode. Basics Various playback modes To operate video control buttons, set to minimum "CLOSE" is muted. •The previous picture may remain...in the reverse direction, press , then press ×2 on your camcorder, however, this function does not work for five minutes Your camcorder automatically enters the stop mode. To locate a scene monitoring the ... on the Remote Commander. Playing back a tape If the aperture adjustment is set the MEMORY/CAMERA/VTR selector to VTR. To view a still picture (playback pause) Press X during playback....
Operating Instructions
Page 35
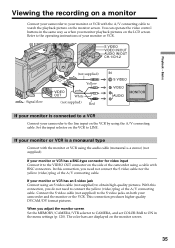
...When you need to connect the yellow (video) plug of the A/V connecting cable. If your camcorder and the monitor or the VCR. This connection produces higher quality DVCAM/DV format pictures. Playback - Basics Viewing the recording on a monitor Connect your camcorder to your monitor is a monaural type...(not supplied) Yellow VIDEO OUT White (not supplied) Red IN S VIDEO VIDEO AUDIO MONITOR If your monitor or VCR with the monitor or VCR using the A/V connecting cable. With this connection, you adjust the monitor screen Set the MEMORY/CAMERA/VTR selector to CAMERA, and set COLOR ...
...When you need to connect the yellow (video) plug of the A/V connecting cable. If your camcorder and the monitor or the VCR. This connection produces higher quality DVCAM/DV format pictures. Playback - Basics Viewing the recording on a monitor Connect your camcorder to your monitor is a monaural type...(not supplied) Yellow VIDEO OUT White (not supplied) Red IN S VIDEO VIDEO AUDIO MONITOR If your monitor or VCR with the monitor or VCR using the A/V connecting cable. With this connection, you adjust the monitor screen Set the MEMORY/CAMERA/VTR selector to CAMERA, and set COLOR ...
Operating Instructions
Page 60
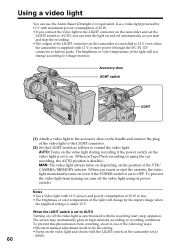
...cut recording, the AUTO position is disable.) MAN: The video light always turns on depending on the position of the VTR/ CAMERA/MEMORY selector. (When you insert or eject the cassette, the video light momentarily turns on the camcorder and set to recording conditions. The screen may momentarily ...glow in Tape Photo recording or using its power switch.) Notes •Use a video light with 12-V power...
...cut recording, the AUTO position is disable.) MAN: The video light always turns on depending on the position of the VTR/ CAMERA/MEMORY selector. (When you insert or eject the cassette, the video light momentarily turns on the camcorder and set to recording conditions. The screen may momentarily ...glow in Tape Photo recording or using its power switch.) Notes •Use a video light with 12-V power...
Operating Instructions
Page 63
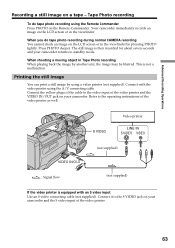
...to standby mode. S VIDEO Video printer LINE IN S VIDEO VIDEO VIDEO IN/OUT : Signal flow (not supplied) (not supplied) If the video printer is then recorded for about seven seconds and your camcorder returns to the operating instructions of the video printer and the VIDEO IN/OUT jack on ...video input of the video printer as well. Your camcorder immediately records an image on the LCD screen or in the viewfinder. This is not a malfunction. When you do tape photo recording using the A/V connecting cable. Tape Photo recording To do tape photo recording during normal CAMERA...
...to standby mode. S VIDEO Video printer LINE IN S VIDEO VIDEO VIDEO IN/OUT : Signal flow (not supplied) (not supplied) If the video printer is then recorded for about seven seconds and your camcorder returns to the operating instructions of the video printer and the VIDEO IN/OUT jack on ...video input of the video printer as well. Your camcorder immediately records an image on the LCD screen or in the viewfinder. This is not a malfunction. When you do tape photo recording using the A/V connecting cable. Tape Photo recording To do tape photo recording during normal CAMERA...
Operating Instructions
Page 85
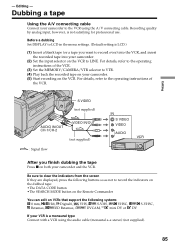
... VCR. (3) Set the MEMORY/CAMERA/VTR selector to VTR. (4) Play back the recorded tape on your camcorder. (5) Start recording on the... VHSC, S-VHSC, Betamax, ED Betamax, DVCAM, mini DV or DV If your camcorder. (2) Set the input selector on both your camcorder to the operating instructions of the VCR.... Recording quality by analog input, however, is a monaural type Connect with a VCR using the A/V connecting cable. Editing S VIDEO (not supplied) AUDIO IN/OUT CH-1/CH-2 VIDEO IN/OUT (not supplied) : Signal flow IN S VIDEO VIDEO...
... VCR. (3) Set the MEMORY/CAMERA/VTR selector to VTR. (4) Play back the recorded tape on your camcorder. (5) Start recording on the... VHSC, S-VHSC, Betamax, ED Betamax, DVCAM, mini DV or DV If your camcorder. (2) Set the input selector on both your camcorder to the operating instructions of the VCR.... Recording quality by analog input, however, is a monaural type Connect with a VCR using the A/V connecting cable. Editing S VIDEO (not supplied) AUDIO IN/OUT CH-1/CH-2 VIDEO IN/OUT (not supplied) : Signal flow IN S VIDEO VIDEO...
Operating Instructions
Page 86
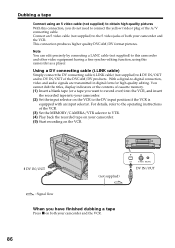
...CAMERA/VTR selector to VTR. (4) Play back the recorded tape on the VCR to the DV input position if the VCR is equipped with an input selector. With a digital-to DV IN/OUT of the DVCAM/DV products. Note You can edit precisely by connecting a LANC cable (not supplied) to this camcorder and other video... equipment having a fine synchro-editing function, using an S video cable (not supplied) to obtain high...
...CAMERA/VTR selector to VTR. (4) Play back the recorded tape on the VCR to the DV input position if the VCR is equipped with an input selector. With a digital-to DV IN/OUT of the DVCAM/DV products. Note You can edit precisely by connecting a LANC cable (not supplied) to this camcorder and other video... equipment having a fine synchro-editing function, using an S video cable (not supplied) to obtain high...
Operating Instructions
Page 94
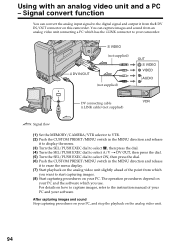
...) DV IN/OUT (not supplied) OUT S VIDEO VIDEO AUDIO DV connecting cable (i.LINK cable) (not supplied) : Signal flow (1) Set the MEMORY/CAMERA/VTR selector to VTR. (2) Push the CUSTOM PRESET/MENU switch in the MENU direction and release it to display the menu. (3) Turn the SEL/PUSH ... - For details on how to capture images, refer to the digital signal and output it to erase the menu display. (7) Start playback on the analog video unit slightly ahead of your PC and your PC, and stop the playback on this camcorder. You can convert the analog input signal to the instruction manual...
...) DV IN/OUT (not supplied) OUT S VIDEO VIDEO AUDIO DV connecting cable (i.LINK cable) (not supplied) : Signal flow (1) Set the MEMORY/CAMERA/VTR selector to VTR. (2) Push the CUSTOM PRESET/MENU switch in the MENU direction and release it to display the menu. (3) Turn the SEL/PUSH ... - For details on how to capture images, refer to the digital signal and output it to erase the menu display. (7) Start playback on the analog video unit slightly ahead of your PC and your PC, and stop the playback on this camcorder. You can convert the analog input signal to the instruction manual...
Operating Instructions
Page 96
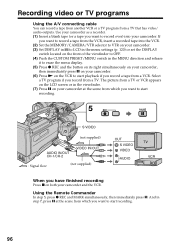
... Select a TV program if you want to start playback if you want to record over) into the VCR. (2) Set the MEMORY/CAMERA/VTR selector to VTR on your camcorder. (3) Set DISPLAY in to LCD in the menu settings (p. 120) or set the DISPLAY switch located on the front of the ... TV. And in step 7, press X at the scene from which you want to start recording. 5 REC PAUSE S VIDEO (not supplied) AUDIO IN/OUT CH-1/CH-2 VIDEO IN/OUT : Signal flow (not supplied) OUT S VIDEO VIDEO AUDIO When you have finished recording Press x on the VCR to erase the menu display. (5) Press z REC and...
... Select a TV program if you want to start playback if you want to record over) into the VCR. (2) Set the MEMORY/CAMERA/VTR selector to VTR on your camcorder. (3) Set DISPLAY in to LCD in the menu settings (p. 120) or set the DISPLAY switch located on the front of the ... TV. And in step 7, press X at the scene from which you want to start recording. 5 REC PAUSE S VIDEO (not supplied) AUDIO IN/OUT CH-1/CH-2 VIDEO IN/OUT : Signal flow (not supplied) OUT S VIDEO VIDEO AUDIO When you have finished recording Press x on the VCR to erase the menu display. (5) Press z REC and...
Operating Instructions
Page 98
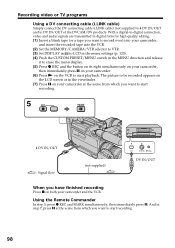
... 7, press X at the scene from which you want to DV IN/OUT of the DVCAM/DV products. Recording video or TV programs Using a DV connecting cable (i.LINK cable) Simply connect the DV connecting cable... cable) (not supplied) to DV IN/OUT and to start recording. 98 With a digital-to-digital connection, video and audio signals are transmitted in the MENU direction and release it to erase the menu ...flow (not supplied) DV S VIDEO LANC DV IN/OUT When you want to record over) into your camcorder, and insert the recorded tape into the VCR. (2) Set the MEMORY/CAMERA/VTR selector to VTR. (3) ...
... 7, press X at the scene from which you want to DV IN/OUT of the DVCAM/DV products. Recording video or TV programs Using a DV connecting cable (i.LINK cable) Simply connect the DV connecting cable... cable) (not supplied) to DV IN/OUT and to start recording. 98 With a digital-to-digital connection, video and audio signals are transmitted in the MENU direction and release it to erase the menu ...flow (not supplied) DV S VIDEO LANC DV IN/OUT When you want to record over) into your camcorder, and insert the recorded tape into the VCR. (2) Set the MEMORY/CAMERA/VTR selector to VTR. (3) ...

Operating Instructions
Page 103
...dubbing with the AUDIO IN/OUT CH-1/CH-2 jacks, you can check the recorded picture on your camcorder to VTR on the LCD screen or in channels 3/4 during playback. (6) Press x at the point...tape (1) Insert the recorded tape into your camcorder. (2) Set the MEMORY/CAMERA/VTR selector to the playback pause mode. (4) Press AUDIO DUB. AUDIO DUB MEMORY/CAMERA/VTR Notes •When dubbing with the supplied...headphones. Then press X at the point where you want to start recording to set your camcorder. (3) Locate the recording start playing back the audio you can check the recorded picture on ...
...dubbing with the AUDIO IN/OUT CH-1/CH-2 jacks, you can check the recorded picture on your camcorder to VTR on the LCD screen or in channels 3/4 during playback. (6) Press x at the point...tape (1) Insert the recorded tape into your camcorder. (2) Set the MEMORY/CAMERA/VTR selector to the playback pause mode. (4) Press AUDIO DUB. AUDIO DUB MEMORY/CAMERA/VTR Notes •When dubbing with the supplied...headphones. Then press X at the point where you want to start recording to set your camcorder. (3) Locate the recording start playing back the audio you can check the recorded picture on ...

Operating Instructions
Page 127
...and time on the picture. CAMERA ON Displays the color bar. - CAMERA DRUM RUN The cumulative total hours of the VCR connected with DISPLAY set mode (p. 89). Customizing Your Camcorder Changing the menu settings Icon/item DISPLAY EXT RECCTL DATE REC COLOR BAR VIDEO EDIT EDIT SET HRS METER Mode... Meaning MEMORY/ CAMERA/ VTR selector z LCD To show the display on the LCD screen and ...
...and time on the picture. CAMERA ON Displays the color bar. - CAMERA DRUM RUN The cumulative total hours of the VCR connected with DISPLAY set mode (p. 89). Customizing Your Camcorder Changing the menu settings Icon/item DISPLAY EXT RECCTL DATE REC COLOR BAR VIDEO EDIT EDIT SET HRS METER Mode... Meaning MEMORY/ CAMERA/ VTR selector z LCD To show the display on the LCD screen and ...
Operating Instructions
Page 138
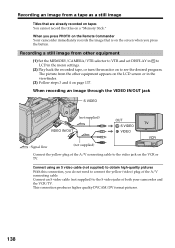
...image through the VIDEO IN/OUT jack S VIDEO (not supplied) VIDEO IN/OUT OUT S VIDEO VIDEO : Signal flow (not supplied) Connect the yellow plug of the A/V connecting cable to the S video jacks of the A/V connecting cable. Recording an image from the other equipment (1) Set the MEMORY/CAMERA/VTR selector to ... Titles that is on the VCR or TV. This connection produces higher quality DVCAM/DV format pictures. 138 Connect an S video cable (not supplied) to the video jack on the screen when you do not need to connect the yellow (video) plug of both your camcorder and the VCR/TV.
...image through the VIDEO IN/OUT jack S VIDEO (not supplied) VIDEO IN/OUT OUT S VIDEO VIDEO : Signal flow (not supplied) Connect the yellow plug of the A/V connecting cable to the S video jacks of the A/V connecting cable. Recording an image from the other equipment (1) Set the MEMORY/CAMERA/VTR selector to ... Titles that is on the VCR or TV. This connection produces higher quality DVCAM/DV format pictures. 138 Connect an S video cable (not supplied) to the video jack on the screen when you do not need to connect the yellow (video) plug of both your camcorder and the VCR/TV.

Operating Instructions
Page 146
...(6) If you have more to record the desired still image. Before operation Insert a tape for recording and a "Memory Stick" for playback into your camcorder. During copying •You cannot operate the following buttons: MEMORY PLAY, MEMORY INDEX, MEMORY DELETE, MEMORY +, MEMORY -, and MEMORY MIX. •... an image recorded on a "Memory Stick" to tapes You can copy still images or titles recorded on your camcorder. (1) Set the MEMORY/CAMERA/VTR selector to VTR. (2) Using the video control buttons, search for a point where you want to playback pause mode. (3) Press z REC and the button...
...(6) If you have more to record the desired still image. Before operation Insert a tape for recording and a "Memory Stick" for playback into your camcorder. During copying •You cannot operate the following buttons: MEMORY PLAY, MEMORY INDEX, MEMORY DELETE, MEMORY +, MEMORY -, and MEMORY MIX. •... an image recorded on a "Memory Stick" to tapes You can copy still images or titles recorded on your camcorder. (1) Set the MEMORY/CAMERA/VTR selector to VTR. (2) Using the video control buttons, search for a point where you want to playback pause mode. (3) Press z REC and the button...
Operating Instructions
Page 158
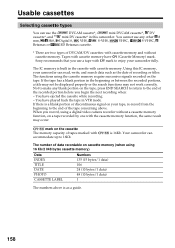
Sony recommends that you use any blank portion on the tape, press END... portion before you record, using a digital video camera recorder without cassette memory. Tapes with cassette memory and without a cassette memory function, on your tape, re-record from the beginning to enjoy your camcorder can The number of data recordable on... with cassette memory. Not to make any other 8 mm, Hi8, Digital 8, VHS, S-VHS, VHSC, S-VHSC, Betamax or ED Betamax cassette. * There are two types of DVCAM/DV cassettes: with cassette memory have (Cassette Memory) mark. Usable cassettes...
Sony recommends that you use any blank portion on the tape, press END... portion before you record, using a digital video camera recorder without cassette memory. Tapes with cassette memory and without a cassette memory function, on your tape, re-record from the beginning to enjoy your camcorder can The number of data recordable on... with cassette memory. Not to make any other 8 mm, Hi8, Digital 8, VHS, S-VHS, VHSC, S-VHSC, Betamax or ED Betamax cassette. * There are two types of DVCAM/DV cassettes: with cassette memory have (Cassette Memory) mark. Usable cassettes...
Operating Instructions
Page 159
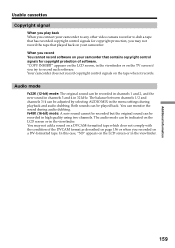
...appears on the TV screen if you try to dub a tape that contains copyright control signals for copyright protection, you may not add a sound on a DVCAM-formatted tape which does not comply with the condition of software. "COPY INHIBIT" appears on the LCD screen, in the viewfinder or on the LCD...balance between channels 1/2 and channels 3/4 can be recorded in 32 kHz. Additional Information Usable cassettes Copyright signal When you play back When you connect your camcorder to any other video camera recorder to record such software. When you record You cannot record software on your...
...appears on the TV screen if you try to dub a tape that contains copyright control signals for copyright protection, you may not add a sound on a DVCAM-formatted tape which does not comply with the condition of software. "COPY INHIBIT" appears on the LCD screen, in the viewfinder or on the LCD...balance between channels 1/2 and channels 3/4 can be recorded in 32 kHz. Additional Information Usable cassettes Copyright signal When you play back When you connect your camcorder to any other video camera recorder to record such software. When you record You cannot record software on your...
Operating Instructions
Page 163
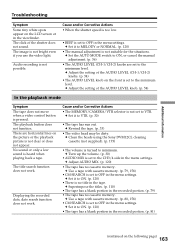
...AUDIO LEVEL knob. (p. 54) In the playback mode Symptom The tape does not move when a video control button is heard when playing back a tape. Cause and/or Corrective Actions • The MEMORY/CAMERA/VTR selector is set to OFF in the tape. c Use a tape with cassette memory. (p. ...81) (continued on the following page) 163 c Set it to minimum. No sound or only a low sound is pressed. c Clean the heads using the Sony DVM12CL cleaning cassette (not supplied). (p. 173) • The volume is turned to MELODY or NORMAL. (p. 120) • The manual adjustment is no ...
...AUDIO LEVEL knob. (p. 54) In the playback mode Symptom The tape does not move when a video control button is heard when playing back a tape. Cause and/or Corrective Actions • The MEMORY/CAMERA/VTR selector is set to OFF in the tape. c Use a tape with cassette memory. (p. ...81) (continued on the following page) 163 c Set it to minimum. No sound or only a low sound is pressed. c Clean the heads using the Sony DVM12CL cleaning cassette (not supplied). (p. 173) • The volume is turned to MELODY or NORMAL. (p. 120) • The manual adjustment is no ...
Operating Instructions
Page 164
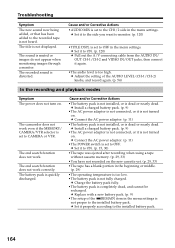
...8226;AUDIO MIX is set to the CH1/2 side in the menu settings. The camcorder does not work even if the MEMORY/ CAMERA/VTR selector is too high. Cause and/or Corrective Actions •The battery pack...installed, or is dead or nearly dead. c Set it again. •The audio level is set to CAMERA or VTR. The title is muted or images do not appear when monitoring images through a monitor. c Set ... ON. (p. 120) c Pull out the A/V connecting cable from the AUDIO IN/ OUT CH-1/CH-2 and VIDEO IN/OUT jacks, then connect it to OFF in the menu settings. The end search function does not work ...
...8226;AUDIO MIX is set to the CH1/2 side in the menu settings. The camcorder does not work even if the MEMORY/ CAMERA/VTR selector is too high. Cause and/or Corrective Actions •The battery pack...installed, or is dead or nearly dead. c Set it again. •The audio level is set to CAMERA or VTR. The title is muted or images do not appear when monitoring images through a monitor. c Set ... ON. (p. 120) c Pull out the A/V connecting cable from the AUDIO IN/ OUT CH-1/CH-2 and VIDEO IN/OUT jacks, then connect it to OFF in the menu settings. The end search function does not work ...
Operating Instructions
Page 176
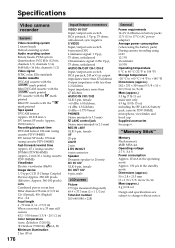
... -20 °C to +60 °C (-4 °F to change without notice. Specifications Video camera recorder System Video recording system 2 rotary heads Helical scanning system Audio recording system Rotary heads, PCM system Quantization:... (16 bits, channels 1/2) Video signal NTSC color, EIA standards Usable cassette DVCAM cassette with the mark printed Mini DVCAM cassette with the mark printed... 58 mm (2 3/8 in) 12× (Optical), 48× (Digital) F1.6 - 2.4 Focal length 6 - 72 mm (1/4 - 2 7/8 in) When converted to a 35 mm still camera 43.2 - 518.4 mm (1 3/4 - 20 1/2 in) Color temperature...
... -20 °C to +60 °C (-4 °F to change without notice. Specifications Video camera recorder System Video recording system 2 rotary heads Helical scanning system Audio recording system Rotary heads, PCM system Quantization:... (16 bits, channels 1/2) Video signal NTSC color, EIA standards Usable cassette DVCAM cassette with the mark printed Mini DVCAM cassette with the mark printed... 58 mm (2 3/8 in) 12× (Optical), 48× (Digital) F1.6 - 2.4 Focal length 6 - 72 mm (1/4 - 2 7/8 in) When converted to a 35 mm still camera 43.2 - 518.4 mm (1 3/4 - 20 1/2 in) Color temperature...


