

Operating Instructions
Page 3
...on a "Memory Stick" - Print mark 154 Additional Information Using the wide mode 66 Compatibility of DVCAM and Using the fader function 67 DV formats 156 Using special effects - Index search 77 Maintenance information and precautions ... 172 Specifications 176 ...... 76 Using your own titles 114 Labeling a cassette 116 Erasing the cassette memory data 118 Customizing Your Camcorder Advanced Recording Operations Changing the menu settings 120 Shooting with digital effects ......... 84 Step 1 Installing the microphone 7 Step 2 Preparing the power supply 8 Step 3 Inserting...
...on a "Memory Stick" - Print mark 154 Additional Information Using the wide mode 66 Compatibility of DVCAM and Using the fader function 67 DV formats 156 Using special effects - Index search 77 Maintenance information and precautions ... 172 Specifications 176 ...... 76 Using your own titles 114 Labeling a cassette 116 Erasing the cassette memory data 118 Customizing Your Camcorder Advanced Recording Operations Changing the menu settings 120 Shooting with digital effects ......... 84 Step 1 Installing the microphone 7 Step 2 Preparing the power supply 8 Step 3 Inserting...
Operating Instructions
Page 4
... the POWER switch to indicate that you can hear a beep or a melody sound to ON. The functions which require different operations depending on the DVCAM/DV format. date search (p. 80) •Searching for a photo - You see page 158. end search (p. 29, 33) •Searching a ...recording by date - title search (p. 79) •Superimposing a title (p. 110) •Making your camcorder are : •Searching the boundaries of the features that are marked with cassette memory. - Using this mark in capital letters. The functions you use...
... the POWER switch to indicate that you can hear a beep or a melody sound to ON. The functions which require different operations depending on the DVCAM/DV format. date search (p. 80) •Searching for a photo - You see page 158. end search (p. 29, 33) •Searching a ...recording by date - title search (p. 79) •Superimposing a title (p. 110) •Making your camcorder are : •Searching the boundaries of the features that are marked with cassette memory. - Using this mark in capital letters. The functions you use...
Operating Instructions
Page 13
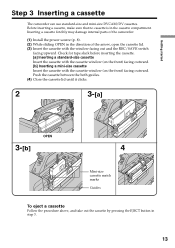
Before inserting a cassette, make sure that no cassette is in the direction of the camcorder. (1) Install the power source (p. 8). (2) While sliding OPEN in the cassette compartment. Check for tape slack before inserting the cassette. [a] Inserting a standard-size cassette Insert the ... eject a cassette Follow the procedure above, and take out the cassette by pressing the EJECT button in step 3. 13 Getting started Step 3 Inserting a cassette The camcorder can use standard-size and mini-size DVCAM/DV cassettes.
Before inserting a cassette, make sure that no cassette is in the direction of the camcorder. (1) Install the power source (p. 8). (2) While sliding OPEN in the cassette compartment. Check for tape slack before inserting the cassette. [a] Inserting a standard-size cassette Insert the ... eject a cassette Follow the procedure above, and take out the cassette by pressing the EJECT button in step 3. 13 Getting started Step 3 Inserting a cassette The camcorder can use standard-size and mini-size DVCAM/DV cassettes.

Operating Instructions
Page 16
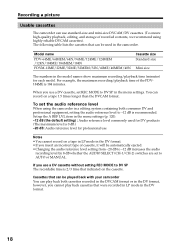
... the images back as you do not eject the cassette even if you turn off your camcorder in standby mode for five minutes The head drum of the camcorder automatically stops rotating. If you leave your camcorder. To re-start recording. This is played back. SCAN to start recording, press the ...this mode, but if you shoot a moving subject, the image shakes when it is to OFF. •Do not mix recordings in the DVCAM format and the DV format on one tape. When you use a tape with cassette memory, however, you can be written properly between the last scene you recorded and...
... the images back as you do not eject the cassette even if you turn off your camcorder in standby mode for five minutes The head drum of the camcorder automatically stops rotating. If you leave your camcorder. To re-start recording. This is played back. SCAN to start recording, press the ...this mode, but if you shoot a moving subject, the image shakes when it is to OFF. •Do not mix recordings in the DVCAM format and the DV format on one tape. When you use a tape with cassette memory, however, you can be written properly between the last scene you recorded and...
Operating Instructions
Page 18
...model names show maximum recording/playback time (minutes) for professional use a DV cassette, set the audio reference level When using highly reliable DVCAM cassettes). Cassettes that can be played back with your camcorder You can play back cassettes that can be automatically ejected. •...(To ensure high-quality playback, editing, and storage of recorded contents, we recommend using the camcorder in a editing system containing both cassettes recorded in the DVCAM format or in the DV format, however, you insert an incorrect type of the PDV184ME is 184 minutes. You can...
...model names show maximum recording/playback time (minutes) for professional use a DV cassette, set the audio reference level When using highly reliable DVCAM cassettes). Cassettes that can be played back with your camcorder You can play back cassettes that can be automatically ejected. •...(To ensure high-quality playback, editing, and storage of recorded contents, we recommend using the camcorder in a editing system containing both cassettes recorded in the DVCAM format or in the DV format, however, you insert an incorrect type of the PDV184ME is 184 minutes. You can...
Operating Instructions
Page 33
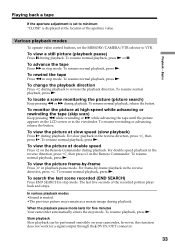
...last scene recorded (END SEARCH) Press END SEARCH in stop mode. When the playback pause mode lasts for a signal output through the DV IN/OUT connector. 33 To change the playback direction Press during playback. To resume rewinding or advancing, release the button. For double ... resume normal playback, press N. , then To view the picture at double speed Press ×2 on your camcorder, however, this function does not work for five minutes Your camcorder automatically enters the stop mode. Playing back a tape If the aperture adjustment is set the MEMORY/CAMERA/VTR selector...
...last scene recorded (END SEARCH) Press END SEARCH in stop mode. When the playback pause mode lasts for a signal output through the DV IN/OUT connector. 33 To change the playback direction Press during playback. To resume rewinding or advancing, release the button. For double ... resume normal playback, press N. , then To view the picture at double speed Press ×2 on your camcorder, however, this function does not work for five minutes Your camcorder automatically enters the stop mode. Playing back a tape If the aperture adjustment is set the MEMORY/CAMERA/VTR selector...
Operating Instructions
Page 34
... you insert the cassette recorded in a PAL system The camcorder automatically identify the system, and playback starts. "DV SP" appears on the LCD screen of the screen. If you play back a tape in SP mode. You can play back DV-formatted tapes recorded in the viewfinder during playback. You cannot... play back DV-formatted tapes on DV-formatted tapes You can only view the picture only on the LCD screen or in LP mode. Note on this camcorder if the tape is not a malfunction. This is recorded in reverse ...
... you insert the cassette recorded in a PAL system The camcorder automatically identify the system, and playback starts. "DV SP" appears on the LCD screen of the screen. If you play back a tape in SP mode. You can play back DV-formatted tapes recorded in the viewfinder during playback. You cannot... play back DV-formatted tapes on DV-formatted tapes You can only view the picture only on the LCD screen or in LP mode. Note on this camcorder if the tape is not a malfunction. This is recorded in reverse ...
Operating Instructions
Page 35
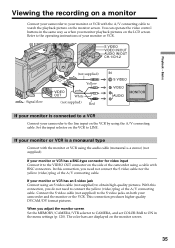
...LINE. Basics Viewing the recording on a monitor Connect your camcorder to connect the yellow (video) plug of your camcorder to the line input on both your monitor or VCR with BNC connectors. This connection produces higher quality DVCAM/DV format pictures. Set the input selector on the VCR to... the S video jacks on the VCR by using a cable with the A/V connecting cable to the operating instructions of the A/V connecting cable. In this connection, you need to your camcorder and the monitor...
...LINE. Basics Viewing the recording on a monitor Connect your camcorder to connect the yellow (video) plug of your camcorder to the line input on both your monitor or VCR with BNC connectors. This connection produces higher quality DVCAM/DV format pictures. Set the input selector on the VCR to... the S video jacks on the VCR by using a cable with the A/V connecting cable to the operating instructions of the A/V connecting cable. In this connection, you need to your camcorder and the monitor...

Operating Instructions
Page 59
When you use one of the following functions, you turn the external VCR to your camcorder. (1) Push the CUSTOM PRESET/MENU switch in the MENU direction and release it to a VCR •Tape Photo recording •Interval recording •Cut recording ...59 Setting EXT RECCTL in the menu settings to ON synchronizes the recording start/pause operation of the external VCR with the DV connecting cable (i.LINK cable). Note on your camcorder with the START/STOP button on the external VCR We recommend that you cannot make backup copies of recordings to the...
When you use one of the following functions, you turn the external VCR to your camcorder. (1) Push the CUSTOM PRESET/MENU switch in the MENU direction and release it to a VCR •Tape Photo recording •Interval recording •Cut recording ...59 Setting EXT RECCTL in the menu settings to ON synchronizes the recording start/pause operation of the external VCR with the DV connecting cable (i.LINK cable). Note on your camcorder with the START/STOP button on the external VCR We recommend that you cannot make backup copies of recordings to the...
Operating Instructions
Page 62
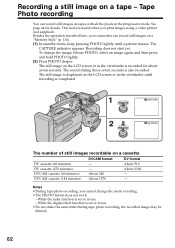
... press and hold PHOTO lightly. (2) Press PHOTO deeper. Besides the operation described here, your camcorder can record still images on the LCD screen or in use . - Recording does not start...supplied). About 340 About 1570 DV format About 510 About 2300 - - Recording a still image on a cassette DV cassette (60 minutes) DV cassette (270 minutes) DVCAM cassette (40 minutes) DVCAM cassette (184 minutes) DVCAM format - - To change...until a picture freezes. While the digital effect function is completed. 1 PHOTO CAPTURE 2 PHOTO The number of still images recordable on a...
... press and hold PHOTO lightly. (2) Press PHOTO deeper. Besides the operation described here, your camcorder can record still images on the LCD screen or in use . - Recording does not start...supplied). About 340 About 1570 DV format About 510 About 2300 - - Recording a still image on a cassette DV cassette (60 minutes) DV cassette (270 minutes) DVCAM cassette (40 minutes) DVCAM cassette (184 minutes) DVCAM format - - To change...until a picture freezes. While the digital effect function is completed. 1 PHOTO CAPTURE 2 PHOTO The number of still images recordable on a...

Operating Instructions
Page 84
... function that is stored in memory as a player. Pictures processed by the digital effect function Pictures processed by the digital effect function are not output through the DV IN/ OUT connector. In STILL or LUMI. The digital effect indicator lights up and the bars appear. and TRAIL. (1) In playback or...switch to adjust the effect. or TRAIL) flashes. (2) Press the SEL/PUSH EXEC dial. Playing back a tape with digital effects During playback, you can process a scene using your camcorder as a still picture at the time you press the SEL/PUSH EXEC dial. (3) Turn the SEL/PUSH EXEC dial...
... function that is stored in memory as a player. Pictures processed by the digital effect function Pictures processed by the digital effect function are not output through the DV IN/ OUT connector. In STILL or LUMI. The digital effect indicator lights up and the bars appear. and TRAIL. (1) In playback or...switch to adjust the effect. or TRAIL) flashes. (2) Press the SEL/PUSH EXEC dial. Playing back a tape with digital effects During playback, you can process a scene using your camcorder as a still picture at the time you press the SEL/PUSH EXEC dial. (3) Turn the SEL/PUSH EXEC dial...
Operating Instructions
Page 85
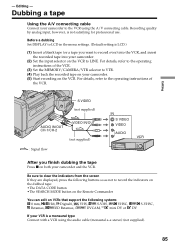
For details, refer to VTR. (4) Play back the recorded tape on your camcorder. (5) Start recording on both your camcorder and the VCR. For details, refer to the operating instructions of the VCR. (3) Set the MEMORY/CAMERA/VTR selector to the operating instructions of the .../OUT (not supplied) : Signal flow IN S VIDEO VIDEO AUDIO After you want to record over) into the VCR, and insert the recorded tape into your camcorder. (2) Set the input selector on VCRs that support the following systems 8 mm, Hi8, Digital8, VHS, S-VHS, VHSC, S-VHSC, Betamax, ED Betamax...
For details, refer to VTR. (4) Play back the recorded tape on your camcorder. (5) Start recording on both your camcorder and the VCR. For details, refer to the operating instructions of the VCR. (3) Set the MEMORY/CAMERA/VTR selector to the operating instructions of the .../OUT (not supplied) : Signal flow IN S VIDEO VIDEO AUDIO After you want to record over) into the VCR, and insert the recorded tape into your camcorder. (2) Set the input selector on VCRs that support the following systems 8 mm, Hi8, Digital8, VHS, S-VHS, VHSC, S-VHSC, Betamax, ED Betamax...
Operating Instructions
Page 86
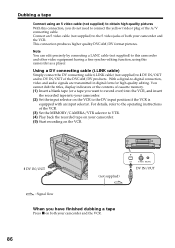
...quality pictures With this camcorder as a player. With a digital-to VTR. (4) Play back the recorded tape on your camcorder. (2) Set the input selector on the VCR to the DV input position if the VCR is equipped with an input selector. DV IN/OUT (not supplied) DV S VIDEO LANC DV IN/OUT : ...a tape Press x on the VCR. Using a DV connecting cable (i.LINK cable) Simply connect the DV connecting cable (i.LINK cable) (not supplied) to DV IN/OUT and to the S video jacks of the DVCAM/DV products. Connect an S video cable (not supplied) to DV IN/OUT of both your camcorder and the VCR.
...quality pictures With this camcorder as a player. With a digital-to VTR. (4) Play back the recorded tape on your camcorder. (2) Set the input selector on the VCR to the DV input position if the VCR is equipped with an input selector. DV IN/OUT (not supplied) DV S VIDEO LANC DV IN/OUT : ...a tape Press x on the VCR. Using a DV connecting cable (i.LINK cable) Simply connect the DV connecting cable (i.LINK cable) (not supplied) to DV IN/OUT and to the S video jacks of the DVCAM/DV products. Connect an S video cable (not supplied) to DV IN/OUT of both your camcorder and the VCR.
Operating Instructions
Page 87
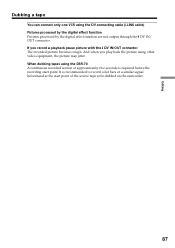
... recording start point of approximately five seconds is recommended to be dubbed on the camcorder. 87 Editing Dubbing a tape You can connect only one VCR using the DSR-70 A continuous recorded section of the source tape to record color bars or ...a similar signal beforehand at the start point. And when you record a playback pause picture with the DV IN/OUT connector The recorded picture becomes rough. When dubbing tapes using the DV connecting cable (i.LINK cable) Pictures processed by the digital...
... recording start point of approximately five seconds is recommended to be dubbed on the camcorder. 87 Editing Dubbing a tape You can connect only one VCR using the DSR-70 A continuous recorded section of the source tape to record color bars or ...a similar signal beforehand at the start point. And when you record a playback pause picture with the DV IN/OUT connector The recorded picture becomes rough. When dubbing tapes using the DV connecting cable (i.LINK cable) Pictures processed by the digital...

Operating Instructions
Page 88
...on page 86. 88 Preparation 1: Connecting the VCR Connect your camcorder and the VCR as player. To use this function, a DV connecting cable (i.LINK cable) (not supplied) will be selected by frame. This camcorder is equipped with the DV IN connector. When you dub using the same VCR again,... you start recording from the very beginning of the tape, the first few seconds of the tape may not record properly. Before operating the digital program editing Preparation 1 ...
...on page 86. 88 Preparation 1: Connecting the VCR Connect your camcorder and the VCR as player. To use this function, a DV connecting cable (i.LINK cable) (not supplied) will be selected by frame. This camcorder is equipped with the DV IN connector. When you dub using the same VCR again,... you start recording from the very beginning of the tape, the first few seconds of the tape may not record properly. Before operating the digital program editing Preparation 1 ...
Operating Instructions
Page 90
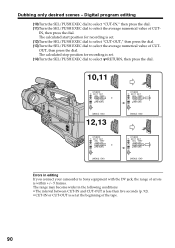
...recording is set at the beginning of the tape. 90 The range may become wider in editing If you connect your camcorder to select RETURN, then press the dial. 10,11 OTHERS ED I T SET ADJ TEST "CUT-I N" 0 ... is less than five seconds (p. 92). •CUT-IN or CUT-OUT is within +/- 5 frames. Digital program editing (10)Turn the SEL/PUSH EXEC dial to select "CUT-IN," then press the dial. ...- The calculated start position for recording is set. (14)Turn the SEL/PUSH EXEC dial to Sony equipment with the DV jack, the range of errors is set . (12)Turn the SEL/PUSH EXEC dial to select...
...recording is set at the beginning of the tape. 90 The range may become wider in editing If you connect your camcorder to select RETURN, then press the dial. 10,11 OTHERS ED I T SET ADJ TEST "CUT-I N" 0 ... is less than five seconds (p. 92). •CUT-IN or CUT-OUT is within +/- 5 frames. Digital program editing (10)Turn the SEL/PUSH EXEC dial to select "CUT-IN," then press the dial. ...- The calculated start position for recording is set. (14)Turn the SEL/PUSH EXEC dial to Sony equipment with the DV jack, the range of errors is set . (12)Turn the SEL/PUSH EXEC dial to select...

Operating Instructions
Page 93
...; The cassette is not inserted. • The tape has run out. • The write-protect tab is complete. To end the digital program editing function Your camcorder stops when the dubbing is set Push the CUSTOM PRESET/MENU switch in the viewfinder. You cannot record on the LCD screen or... in the MENU direction and release it to operate the digital program editing has not been made. • A DV connecting cable (i.LINK cable) ...
...; The cassette is not inserted. • The tape has run out. • The write-protect tab is complete. To end the digital program editing function Your camcorder stops when the dubbing is set Push the CUSTOM PRESET/MENU switch in the viewfinder. You cannot record on the LCD screen or... in the MENU direction and release it to operate the digital program editing has not been made. • A DV connecting cable (i.LINK cable) ...
Operating Instructions
Page 94
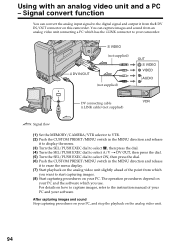
... capture images, refer to your camcorder. Using with an analog video unit and a PC - The operation procedures depend on your PC. After capturing images and sound Stop capturing procedures on your software. S VIDEO (not supplied) DV IN/OUT (not supplied) OUT S VIDEO VIDEO AUDIO DV connecting cable (i.LINK cable) (...from which has the i.LINK connector to the instruction manual of your PC and your PC and the software which you want to the digital signal and output it from an analog video unit connecting a PC which you use. Signal convert function You can capture images and ...
... capture images, refer to your camcorder. Using with an analog video unit and a PC - The operation procedures depend on your PC. After capturing images and sound Stop capturing procedures on your software. S VIDEO (not supplied) DV IN/OUT (not supplied) OUT S VIDEO VIDEO AUDIO DV connecting cable (i.LINK cable) (...from which has the i.LINK connector to the instruction manual of your PC and your PC and the software which you want to the digital signal and output it from an analog video unit connecting a PC which you use. Signal convert function You can capture images and ...
Operating Instructions
Page 97
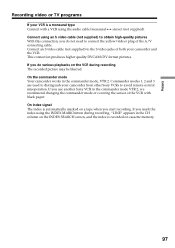
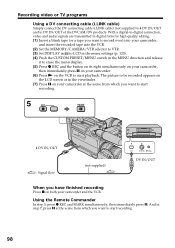
Connect an S video cable (not supplied) to the S video jacks of both your camcorder from other Sony VCRs to distinguish your camcorder and the VCR. This connection produces higher quality DVCAM/DV format pictures. On the commander mode Your camcorder works in the CH column on the INDEX SEARCH screen, and the index is recorded on cassette...
Connect an S video cable (not supplied) to the S video jacks of both your camcorder from other Sony VCRs to distinguish your camcorder and the VCR. This connection produces higher quality DVCAM/DV format pictures. On the commander mode Your camcorder works in the CH column on the INDEX SEARCH screen, and the index is recorded on cassette...
Operating Instructions
Page 98
... on its right simultaneously on your camcorder, then immediately press X on your camcorder at the scene from which you want to start recording. 5 REC PAUSE DV IN/OUT : Signal flow (not supplied) DV S VIDEO LANC DV IN/OUT When you want to DV IN/OUT of the DVCAM/DV products. With a digital-to-digital connection, video and audio signals are...
... on its right simultaneously on your camcorder, then immediately press X on your camcorder at the scene from which you want to start recording. 5 REC PAUSE DV IN/OUT : Signal flow (not supplied) DV S VIDEO LANC DV IN/OUT When you want to DV IN/OUT of the DVCAM/DV products. With a digital-to-digital connection, video and audio signals are...


