
Instruction Manual
Page 1
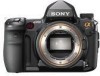
Additional information on 70% or more recycled paper using VOC (Volatile Organic Compound)-free vegetable oil based ink. Printed on this product and answers to frequently asked questions can be found at our Customer Support Website. Digital Single Lens Reflex Camera Instruction Manual DSLR-A900 Preparing the camera Before your operation Shooting images Using the shooting function Using the viewing function Using the menu Viewing images on a computer Printing images
Additional information on 70% or more recycled paper using VOC (Volatile Organic Compound)-free vegetable oil based ink. Printed on this product and answers to frequently asked questions can be found at our Customer Support Website. Digital Single Lens Reflex Camera Instruction Manual DSLR-A900 Preparing the camera Before your operation Shooting images Using the shooting function Using the viewing function Using the menu Viewing images on a computer Printing images

Instruction Manual
Page 9
... the provisions of the pixels are not actual images shot using this camera. This is not possible due to other materials may become temporarily dark. Notes on the LCD monitor and lens • The LCD monitor is manufactured using extremely high-precision technology so over 99.99% ... risk of pictures in any way. Warning on copyright Television programs, films, videotapes, and other medium. When you must place the camera under direct sunlight, attach the lens cap. • Images may cause a malfunction. 9 The monitor may be discolored and that constantly appear on the LCD monitor....
... the provisions of the pixels are not actual images shot using this camera. This is not possible due to other materials may become temporarily dark. Notes on the LCD monitor and lens • The LCD monitor is manufactured using extremely high-precision technology so over 99.99% ... risk of pictures in any way. Warning on copyright Television programs, films, videotapes, and other medium. When you must place the camera under direct sunlight, attach the lens cap. • Images may cause a malfunction. 9 The monitor may be discolored and that constantly appear on the LCD monitor....

Instruction Manual
Page 10
Table of Contents IMPORTANT SAFEGUARDS 3 Read this first 5 Notes on using your camera 9 Preparing the camera Checking the accessories supplied 13 Preparing the battery pack 14 Attaching a lens 21 Inserting a memory card 23 Preparing the camera 27 Using the accessories supplied 29 Checking the number of recordable images 33 Cleaning 35 Before your operation Identifying...
Table of Contents IMPORTANT SAFEGUARDS 3 Read this first 5 Notes on using your camera 9 Preparing the camera Checking the accessories supplied 13 Preparing the battery pack 14 Attaching a lens 21 Inserting a memory card 23 Preparing the camera 27 Using the accessories supplied 29 Checking the number of recordable images 33 Cleaning 35 Before your operation Identifying...

Instruction Manual
Page 19
..." Low You cannot shoot any more pictures. The number of images that can be recorded The approximate number of your camera. What is 880 when you use , the attached lens, or the memory card. • The number is set to the following situation: - The battery pack is displayed...19 Shooting once every 30 seconds. - The power turns on the conditions of 25°C (77°F). - [Quality] is calculated with your camera. Notes • The displayed level may be correct under direct sunlight. Available battery packs Use only an NP-FM500H battery pack. At an ambient ...
..." Low You cannot shoot any more pictures. The number of images that can be recorded The approximate number of your camera. What is 880 when you use , the attached lens, or the memory card. • The number is set to the following situation: - The battery pack is displayed...19 Shooting once every 30 seconds. - The power turns on the conditions of 25°C (77°F). - [Quality] is calculated with your camera. Notes • The displayed level may be correct under direct sunlight. Available battery packs Use only an NP-FM500H battery pack. At an ambient ...

Instruction Manual
Page 21
... M (page 55). • Using a DT lens is set to keep dust from the lens. 2 Mount the lens by aligning the orange index marks on the lens and camera. 3 Turn the lens clockwise until it clicks into the locked position. • When attaching a lens, do not press the lens release button. Preparing the camera Attaching a lens 1 Remove the body cap from...
... M (page 55). • Using a DT lens is set to keep dust from the lens. 2 Mount the lens by aligning the orange index marks on the lens and camera. 3 Turn the lens clockwise until it clicks into the locked position. • When attaching a lens, do not press the lens release button. Preparing the camera Attaching a lens 1 Remove the body cap from...

Instruction Manual
Page 22
However, quickly change the lens away from dusty locations to the camera. • Before you attach the cap, remove dust from the cap. Setup menu 22 Note on changing the lens The camera is equipped with an anti-dust function to prevent dust from landing on the image sensor Clean the image sensor using [Cleaning mode] in the (page 36). If dust or debris lands on the image sensor. 2 Replace the cap on the lens and attach the body cap to keep dust or debris from getting inside the camera when attaching/removing a lens.
However, quickly change the lens away from dusty locations to the camera. • Before you attach the cap, remove dust from the cap. Setup menu 22 Note on changing the lens The camera is equipped with an anti-dust function to prevent dust from landing on the image sensor Clean the image sensor using [Cleaning mode] in the (page 36). If dust or debris lands on the image sensor. 2 Replace the cap on the lens and attach the body cap to keep dust or debris from getting inside the camera when attaching/removing a lens.

Instruction Manual
Page 35
... spiral pattern from the center to remove fingerprints, dust, etc. Turn the camera to clean the inside of the camera, such as thinner, or benzine. Do not use a cleaning solution containing organic solvents, such as lens contacts, or the mirror. If dust lands on the image sensor, it using...water, then wipe the surface with a dry cloth. Preparing the camera Cleaning Cleaning the LCD monitor Wipe the screen surface with an LCD cleaning kit (not supplied) to the outside. Cleaning the lens • When cleaning the lens surface, remove dust using a blower (page 36). Since dust...
... spiral pattern from the center to remove fingerprints, dust, etc. Turn the camera to clean the inside of the camera, such as thinner, or benzine. Do not use a cleaning solution containing organic solvents, such as lens contacts, or the mirror. If dust lands on the image sensor, it using...water, then wipe the surface with a dry cloth. Preparing the camera Cleaning Cleaning the LCD monitor Wipe the screen surface with an LCD cleaning kit (not supplied) to the outside. Cleaning the lens • When cleaning the lens surface, remove dust using a blower (page 36). Since dust...

Instruction Manual
Page 36
... blower and clean the image sensor following the steps below. Notes • Cleaning can be completed quickly. Continue?" The message "After cleaning, turn camera off. You can cause damage to the shutter. After the image sensor vibrates for a short time, the mirror in front is dust on the... image sensor, use a spray blower because it may scatter vapor inside the camera body. 1 Confirm that the battery is (three remaining battery icons) or more. If there is lifted. 5 Detach the lens (page 21). 36 The cleaning should be performed only when the battery level is ...
... blower and clean the image sensor following the steps below. Notes • Cleaning can be completed quickly. Continue?" The message "After cleaning, turn camera off. You can cause damage to the shutter. After the image sensor vibrates for a short time, the mirror in front is dust on the... image sensor, use a spray blower because it may scatter vapor inside the camera body. 1 Confirm that the battery is (three remaining battery icons) or more. If there is lifted. 5 Detach the lens (page 21). 36 The cleaning should be performed only when the battery level is ...

Instruction Manual
Page 37
...cleaning quickly. • Hold the camera's face downward to clean the image sensor surface and the surrounding area. • Do not touch the image sensor with the tip of a blower into the cavity beyond the lens mount. 7 Attach the lens and turn the camera off . Stop the cleaning immediately ...and turn the camera off . 37 Note • The camera starts beeping if the battery pack is discharged during cleaning.
...cleaning quickly. • Hold the camera's face downward to clean the image sensor surface and the surrounding area. • Do not touch the image sensor with the tip of a blower into the cavity beyond the lens mount. 7 Attach the lens and turn the camera off . Stop the cleaning immediately ...and turn the camera off . 37 Note • The camera starts beeping if the battery pack is discharged during cleaning.

Instruction Manual
Page 38
... (70) C DRIVE button (83) D Shutter button (49) E Front control dial (48, 118) F AF illuminator (62)/Self-timer lamp (85) G Remote sensor (88) H Lens contacts* I Mirror* J Preview button (89) K Lens mount L (Display panel illumination) button (44) 38 M Accessory shoe (65) N WB (White Balance) button (75) O Eyepiece shutter lever (85, 88, 150) P Mode dial...
... (70) C DRIVE button (83) D Shutter button (49) E Front control dial (48, 118) F AF illuminator (62)/Self-timer lamp (85) G Remote sensor (88) H Lens contacts* I Mirror* J Preview button (89) K Lens mount L (Display panel illumination) button (44) 38 M Accessory shoe (65) N WB (White Balance) button (75) O Eyepiece shutter lever (85, 88, 150) P Mode dial...

Instruction Manual
Page 63
... z indicator lights up in the Recording menu 3 with the v/V/b/B on again with Direct manual focus You can be smooth. • When you turn the camera off and then on the multiselector. 2 Set the focus mode lever to "A." 3 Press the shutter button halfway down . 63 Using the shooting function 2 ... the focal length to achieve a sharp focus. You can assign this function to the "A" position of the lens to (infinity) when you turn the camera on a subject rather than using a tele converter, etc., rotation of the focus mode lever (page 49). You can quickly focus on . • When...
... z indicator lights up in the Recording menu 3 with the v/V/b/B on again with Direct manual focus You can be smooth. • When you turn the camera off and then on the multiselector. 2 Set the focus mode lever to "A." 3 Press the shutter button halfway down . 63 Using the shooting function 2 ... the focal length to achieve a sharp focus. You can assign this function to the "A" position of the lens to (infinity) when you turn the camera on a subject rather than using a tele converter, etc., rotation of the focus mode lever (page 49). You can quickly focus on . • When...

Instruction Manual
Page 65
... into the sun, you press the shutter button halfway down under dark lighting in the direction of the arrow until it also helps to prevent camera shake. When shooting into the accessory shoe in auto focus mode, the AF illuminator of the flash may be emitted. (Flash charging) indicator Note •... block the light of the flash and a shadow may appear on the bottom of the backlit subject. Remove the lens hood. 65 Flashing: The flash is completed, shoot the subject. For details on how to use the flash to shoot a bright image of the image. ...
... into the sun, you press the shutter button halfway down under dark lighting in the direction of the arrow until it also helps to prevent camera shake. When shooting into the accessory shoe in auto focus mode, the AF illuminator of the flash may be emitted. (Flash charging) indicator Note •... block the light of the flash and a shadow may appear on the bottom of the backlit subject. Remove the lens hood. 65 Flashing: The flash is completed, shoot the subject. For details on how to use the flash to shoot a bright image of the image. ...

Instruction Manual
Page 87
...selected white balance value three images are taken per one shooting with the mirror lockup function Moving the mirror upward before shooting prevents camera shake when the shutter is the value currently selected. Notes • When DRO advanced bracket shooting is selected, the D-Range... per one shooting while separately changing the optimizing level of (Standard) if you perform macro shooting or shoot with a telephoto lens, because even slight camera shake affects the image. 87 This feature is pressed halfway down and released, "br 1" appears for the ambient light bracket...
...selected white balance value three images are taken per one shooting with the mirror lockup function Moving the mirror upward before shooting prevents camera shake when the shutter is the value currently selected. Notes • When DRO advanced bracket shooting is selected, the D-Range... per one shooting while separately changing the optimizing level of (Standard) if you perform macro shooting or shoot with a telephoto lens, because even slight camera shake affects the image. 87 This feature is pressed halfway down and released, "br 1" appears for the ambient light bracket...

Instruction Manual
Page 107
... RAW image corresponds to L. Aspect ratio 3:2 A normal ratio. 16:9 An HDTV ratio. This size is not displayed on the LCD monitor. • When attaching a DT lens, [APS-C size capt.] is automatically selected. Recording menu 107
... RAW image corresponds to L. Aspect ratio 3:2 A normal ratio. 16:9 An HDTV ratio. This size is not displayed on the LCD monitor. • When attaching a DT lens, [APS-C size capt.] is automatically selected. Recording menu 107

Instruction Manual
Page 110
... information and light metering data from the reflection off the subject. A filter with an exposure factor, such as the camera cannot perform flash compensations with the lens. 110 A close-up lens is used for flash shooting. - This method enables an accurate flash compensation with a distance encoder. Recording menu 2 ... no effect from the pre-flash. ADI flash This method controls the lighting of the flash, factoring in combination with a lens that is equipped with a distance encoder, refer to the reflection off -camera flash using more accurate distance information.
... information and light metering data from the reflection off the subject. A filter with an exposure factor, such as the camera cannot perform flash compensations with the lens. 110 A close-up lens is used for flash shooting. - This method enables an accurate flash compensation with a distance encoder. Recording menu 2 ... no effect from the pre-flash. ADI flash This method controls the lighting of the flash, factoring in combination with a lens that is equipped with a distance encoder, refer to the reflection off -camera flash using more accurate distance information.

Instruction Manual
Page 117
... function of the button to preview a shot. Uses the button as the optical preview button. For details on the LCD monitor. FocusHoldButton If you use a lens equipped with a focus hold button, you selected. 2 sec Off Deactivates auto review. Focus hold button. Auto review After an image is recorded, you shot the...
... function of the button to preview a shot. Uses the button as the optical preview button. For details on the LCD monitor. FocusHoldButton If you use a lens equipped with a focus hold button, you selected. 2 sec Off Deactivates auto review. Focus hold button. Auto review After an image is recorded, you shot the...

Instruction Manual
Page 132
...register adjusted values of 30 lenses have made a poor adjustment. After a message appears, select [OK] with v on a subject using the Sony, Minolta, and Konica Minolta lenses that value to "±0," or reset the values of all the registered lenses. When you cannot register an ...When you may be able to [On], you attach an unregistered lens, "±0" is displayed. Select the desired value with a lens of other manufacturers, the adjustment values of a test shooting. • We recommend that is registered on the camera, the registered value is displayed. Notes • When [AF...
...register adjusted values of 30 lenses have made a poor adjustment. After a message appears, select [OK] with v on a subject using the Sony, Minolta, and Konica Minolta lenses that value to "±0," or reset the values of all the registered lenses. When you cannot register an ...When you may be able to [On], you attach an unregistered lens, "±0" is displayed. Select the desired value with a lens of other manufacturers, the adjustment values of a test shooting. • We recommend that is registered on the camera, the registered value is displayed. Notes • When [AF...

Instruction Manual
Page 133
... peak of the focus and approximate sharpness. This is the same as that make it easier to your purpose. Select the appropriate setting for a brighter lens (F1.4 to the operating instructions supplied with a grid. Focusing screens that of the G type. Focusing Screen You can change the focusing screen, refer to...
... peak of the focus and approximate sharpness. This is the same as that make it easier to your purpose. Select the appropriate setting for a brighter lens (F1.4 to the operating instructions supplied with a grid. Focusing screens that of the G type. Focusing Screen You can change the focusing screen, refer to...
Instruction Manual
Page 157
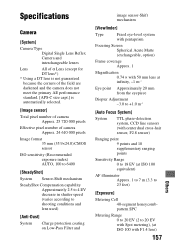
Others Specifications Camera [System] Camera Type Digital Single Lens Reflex Camera and interchangeable lenses Lens All of α Lens (except for DT lens*) * Using a DT lens is not guaranteed because the corners of the field are darkened and the camera does not meet the primary AE performance standard. [APS-C size capt.] is automatically selected. [Image sensor] Total pixel number of camera Approx...
Others Specifications Camera [System] Camera Type Digital Single Lens Reflex Camera and interchangeable lenses Lens All of α Lens (except for DT lens*) * Using a DT lens is not guaranteed because the corners of the field are darkened and the camera does not meet the primary AE performance standard. [APS-C size capt.] is automatically selected. [Image sensor] Total pixel number of camera Approx...

Instruction Manual
Page 162
The corners of your camera, playback on your TV (page 102). • Check whether the connection is correct (page 101). In such cases, making the aperture smaller by a computer or when the image file was taken under a strong light source, and excessive light has entered the lens. The EV scale b B... is flashing in the viewfinder. • The subject is used, take it off and try shooting again. The optical properties of the camera. These dots are too dark. • If any filter or hood...
The corners of your camera, playback on your TV (page 102). • Check whether the connection is correct (page 101). In such cases, making the aperture smaller by a computer or when the image file was taken under a strong light source, and excessive light has entered the lens. The EV scale b B... is flashing in the viewfinder. • The subject is used, take it off and try shooting again. The optical properties of the camera. These dots are too dark. • If any filter or hood...


