
Instruction Manual
Page 8
... a memory card, etc. Notes on the camera in the following or other cases: - When the camera warms up ) data to other materials may be discolored and that may be copyrighted. When firing the flash. - When attaching a Circular PL Filter. Back up recommendation To avoid the potential risk of the...cold location, the LCD monitor may cause a fire. When the difference of the intensity of the LCD monitor. • Do not expose the camera to a malfunction of pictures in this manual The photographs used of the pixels are operational for effective use. Black, white, red, blue and ...
... a memory card, etc. Notes on the camera in the following or other cases: - When the camera warms up ) data to other materials may be discolored and that may be copyrighted. When firing the flash. - When attaching a Circular PL Filter. Back up recommendation To avoid the potential risk of the...cold location, the LCD monitor may cause a fire. When the difference of the intensity of the LCD monitor. • Do not expose the camera to a malfunction of pictures in this manual The photographs used of the pixels are operational for effective use. Black, white, red, blue and ...
Instruction Manual
Page 10
... area 75 Adjusting the focus manually (Manual focus 75 Zooming in in one step 77 Using the flash 79 Selecting the flash mode 81 Performing wireless flash shooting 81 Adjusting the brightness of the image (Exposure, Flash compensation, Metering 83 Shooting with fixed brightness (AE Lock 83 Using brightness compensation for the entire image...
... area 75 Adjusting the focus manually (Manual focus 75 Zooming in in one step 77 Using the flash 79 Selecting the flash mode 81 Performing wireless flash shooting 81 Adjusting the brightness of the image (Exposure, Flash compensation, Metering 83 Shooting with fixed brightness (AE Lock 83 Using brightness compensation for the entire image...
Instruction Manual
Page 15
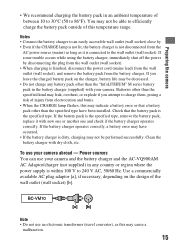
...8226; When charging is within 100 V to charge them, posing a risk of injury from electrocution and burns. • When the CHARGE lamp flashes, this may not be performed successfully. If the battery pack is the specified type, remove the battery pack, replace it is not disconnected from the... charger and the AC-VQ900AM AC Adaptor/charger (not supplied) in an ambient temperature of the wall outlet (wall socket) [b]. To use your camera. If the battery charger operates correctly, a battery error may have been installed. You may indicate a battery error or that the battery pack is...
...8226; When charging is within 100 V to charge them, posing a risk of injury from electrocution and burns. • When the CHARGE lamp flashes, this may not be performed successfully. If the battery pack is the specified type, remove the battery pack, replace it is not disconnected from the... charger and the AC-VQ900AM AC Adaptor/charger (not supplied) in an ambient temperature of the wall outlet (wall socket) [b]. To use your camera. If the battery charger operates correctly, a battery error may have been installed. You may indicate a battery error or that the battery pack is...
Instruction Manual
Page 18
...prolong the battery life. 18 We recommend the following to ensure longer battery pack use: put the battery pack in a pocket close to your camera immediately before storing the battery pack in a dry, cool place to store the battery pack If the battery pack is shorter in your body to...• The battery pack will run out quickly if you use it in cold places. Battery capacity decreases little by little as you use the flash frequently. So, the time that the battery pack has reached the end of the battery pack • Battery performance decreases in low temperature surroundings. ...
...prolong the battery life. 18 We recommend the following to ensure longer battery pack use: put the battery pack in a pocket close to your camera immediately before storing the battery pack in a dry, cool place to store the battery pack If the battery pack is shorter in your body to...• The battery pack will run out quickly if you use it in cold places. Battery capacity decreases little by little as you use the flash frequently. So, the time that the battery pack has reached the end of the battery pack • Battery performance decreases in low temperature surroundings. ...
Instruction Manual
Page 28
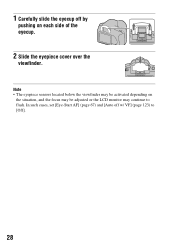
1 Carefully slide the eyecup off w/ VF] (page 123) to flash. Note • The eyepiece sensors located below the viewfinder may be adjusted or the LCD monitor may be activated depending on each side of the eyecup. 2 Slide the eyepiece cover over the viewfinder. In such cases, set [Eye-Start AF] (page 67) and [Auto off by pushing on the situation, and the focus may continue to [Off]. 28
1 Carefully slide the eyecup off w/ VF] (page 123) to flash. Note • The eyepiece sensors located below the viewfinder may be adjusted or the LCD monitor may be activated depending on each side of the eyecup. 2 Slide the eyepiece cover over the viewfinder. In such cases, set [Eye-Start AF] (page 67) and [Auto off by pushing on the situation, and the focus may continue to [Off]. 28
Instruction Manual
Page 29
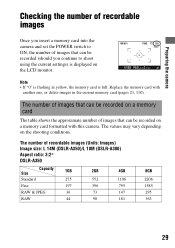
Preparing the camera Checking the number of recordable images Once you continue to ON, the number of recordable images (Units: Images) Image size: L 14M (DSLR-A350)/L 10M (DSLR-A300) Aspect ratio: 3:2* DSLR-A350 Size Capacity 1GB 2GB 4GB 8GB Standard 275 552 1106 2206 Fine 197 396 795 1585 RAW & ...The table shows the approximate number of images that can be recorded (should you insert a memory card into the camera and set the POWER switch to shoot using the current settings) is flashing in the current memory card (pages 21, 110). Replace the memory card with this...
Preparing the camera Checking the number of recordable images Once you continue to ON, the number of recordable images (Units: Images) Image size: L 14M (DSLR-A350)/L 10M (DSLR-A300) Aspect ratio: 3:2* DSLR-A350 Size Capacity 1GB 2GB 4GB 8GB Standard 275 552 1106 2206 Fine 197 396 795 1585 RAW & ...The table shows the approximate number of images that can be recorded (should you insert a memory card into the camera and set the POWER switch to shoot using the current settings) is flashing in the current memory card (pages 21, 110). Replace the memory card with this...
Instruction Manual
Page 30
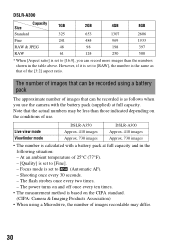
The flash strobes once every two times. - Live view mode Viewfinder mode DSLR-A350 Approx. 410 images Approx. 730 images DSLR-A300 Approx. 410 images Approx. 730 images • The number is calculated with the battery pack (supplied) at full capacity and in ...the numbers shown in the following situation: - At an ambient temperature of the [3:2] aspect ratio. Focus mode is based on the CIPA standard. (CIPA: Camera & Imaging Products Association) • When using a Microdrive, the number of images recordable may be recorded is as that can be recorded using a battery...
The flash strobes once every two times. - Live view mode Viewfinder mode DSLR-A350 Approx. 410 images Approx. 730 images DSLR-A300 Approx. 410 images Approx. 730 images • The number is calculated with the battery pack (supplied) at full capacity and in ...the numbers shown in the following situation: - At an ambient temperature of the [3:2] aspect ratio. Focus mode is based on the CIPA standard. (CIPA: Camera & Imaging Products Association) • When using a Microdrive, the number of images recordable may be recorded is as that can be recorded using a battery...

Instruction Manual
Page 34
Before your operation Identifying parts and screen indicators See the pages in flash* (79) H Mode dial (48) I (Flash pop-up) button (79) J Lens release button (20) K Focus mode switch (72, 75) * Do not directly touch these parts. 34 Front side A Shutter button (48) B Control dial (58, 120) C Self-timer lamp (98) D Lens contacts* E Mirror* F Lens mount G Built-in parentheses for details of operation.
Before your operation Identifying parts and screen indicators See the pages in flash* (79) H Mode dial (48) I (Flash pop-up) button (79) J Lens release button (20) K Focus mode switch (72, 75) * Do not directly touch these parts. 34 Front side A Shutter button (48) B Control dial (58, 120) C Self-timer lamp (98) D Lens contacts* E Mirror* F Lens mount G Built-in parentheses for details of operation.
Instruction Manual
Page 38
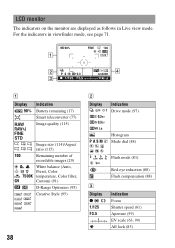
... filter, G9 Custom) (91) D-Range Optimizer (95) Creative Style (95) 38 B Display Indication Drive mode (97) P A S M Histogram Mode dial (48) Flash mode (81) C Display z 1/125 F3.5 Red-eye reduction (80) Flash compensation (88) Indication Focus Shutter speed (61) Aperture (59) EV scale (63, 99) AE lock (83) For the indicators in Live...
... filter, G9 Custom) (91) D-Range Optimizer (95) Creative Style (95) 38 B Display Indication Drive mode (97) P A S M Histogram Mode dial (48) Flash mode (81) C Display z 1/125 F3.5 Red-eye reduction (80) Flash compensation (88) Indication Focus Shutter speed (61) Aperture (59) EV scale (63, 99) AE lock (83) For the indicators in Live...
Instruction Manual
Page 42
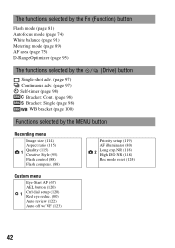
The functions selected by the Fn (Function) button Flash mode (page 81) Autofocus mode (page 74) White balance (page 91) Metering mode (page 89) AF area (page 75) D-RangeOptimizer (page 95) The functions selected ... bracket (page 100) (Drive) button Functions selected by the MENU button Recording menu Image size (114) Aspect ratio (115) 1 Quality (115) Creative Style (95) Flash control (88) Flash compens. (88) Priority setup (119) AF illuminator (80) 2 Long exp.NR (118) High ISO NR (118) Rec mode reset (124) Custom menu Eye-Start...
The functions selected by the Fn (Function) button Flash mode (page 81) Autofocus mode (page 74) White balance (page 91) Metering mode (page 89) AF area (page 75) D-RangeOptimizer (page 95) The functions selected ... bracket (page 100) (Drive) button Functions selected by the MENU button Recording menu Image size (114) Aspect ratio (115) 1 Quality (115) Creative Style (95) Flash control (88) Flash compens. (88) Priority setup (119) AF illuminator (80) 2 Long exp.NR (118) High ISO NR (118) Rec mode reset (124) Custom menu Eye-Start...

Instruction Manual
Page 45
...Lightly tuck your elbows against your shooting situation. In this case, use the Super SteadyShot function, a tripod, or the flash. (Camera shake warning) indicator Note • The (Camera shake warning) indicator is displayed only in the modes that the shutter speed is not displayed in a kneeling position, steady...width apart. Point 4 When shooting with your knee. Point 2 Take a secure stance with the LCD monitor, adjust the angle of the camera, and the other hand supports the lens. When shooting in M/S/PS modes. 45 Shooting images Point 1 One hand holds the grip of ...
...Lightly tuck your elbows against your shooting situation. In this case, use the Super SteadyShot function, a tripod, or the flash. (Camera shake warning) indicator Note • The (Camera shake warning) indicator is displayed only in the modes that the shutter speed is not displayed in a kneeling position, steady...width apart. Point 4 When shooting with your knee. Point 2 Take a secure stance with the LCD monitor, adjust the angle of the camera, and the other hand supports the lens. When shooting in M/S/PS modes. 45 Shooting images Point 1 One hand holds the grip of ...
Instruction Manual
Page 47
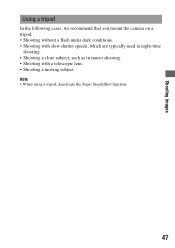
Note • When using a tripod, deactivate the Super SteadyShot function. 47 Shooting images Using a tripod In the following cases, we recommend that you mount the camera on a tripod. • Shooting without a flash under dark conditions. • Shooting with slow shutter speeds, which are typically used in night-time shooting. • Shooting a close subject, such as in macro shooting. • Shooting with a telescopic lens. • Shooting a moving subject.
Note • When using a tripod, deactivate the Super SteadyShot function. 47 Shooting images Using a tripod In the following cases, we recommend that you mount the camera on a tripod. • Shooting without a flash under dark conditions. • Shooting with slow shutter speeds, which are typically used in night-time shooting. • Shooting a close subject, such as in macro shooting. • Shooting with a telescopic lens. • Shooting a moving subject.

Instruction Manual
Page 48
... The "AUTO" mode allows you to activate the Super SteadyShot function, or use of a flash is restricted. 1 Set the mode dial to or (Flash Off). Zoom ring 48 or 2 Hold the camera and look into the viewfinder. Focus area 3 Place the desired subject within the focus area.... • If the (Camera shake warning) indicator flashes, set the switch to ON to easily shoot any subject under any conditions. Select when shooting in a location where the use a tripod. (Camera shake warning) indicator 4 When using a zoom lens, turn the ...
... The "AUTO" mode allows you to activate the Super SteadyShot function, or use of a flash is restricted. 1 Set the mode dial to or (Flash Off). Zoom ring 48 or 2 Hold the camera and look into the viewfinder. Focus area 3 Place the desired subject within the focus area.... • If the (Camera shake warning) indicator flashes, set the switch to ON to easily shoot any subject under any conditions. Select when shooting in a location where the use a tripod. (Camera shake warning) indicator 4 When using a zoom lens, turn the ...
Instruction Manual
Page 50
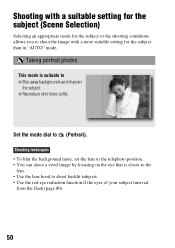
...; Use the lens hood to shoot backlit subjects. • Use the red-eye reduction function if the eyes of your subject turn red from the flash (page 80). 50 z Reproduce skin tones softly. Shooting with a suitable setting for the subject (Scene Selection) Selecting an appropriate mode for the subject than in...
...; Use the lens hood to shoot backlit subjects. • Use the red-eye reduction function if the eyes of your subject turn red from the flash (page 80). 50 z Reproduce skin tones softly. Shooting with a suitable setting for the subject (Scene Selection) Selecting an appropriate mode for the subject than in...
Instruction Manual
Page 52
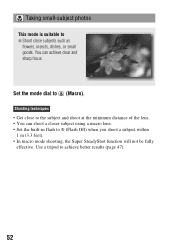
You can shoot a closer subject using a macro lens. • Set the built-in flash to (Flash Off) when you shoot a subject within 1 m (3.3 feet). • In macro mode shooting, the Super SteadyShot function will not be fully effective. Shooting techniques • Get ...
You can shoot a closer subject using a macro lens. • Set the built-in flash to (Flash Off) when you shoot a subject within 1 m (3.3 feet). • In macro mode shooting, the Super SteadyShot function will not be fully effective. Shooting techniques • Get ...

Instruction Manual
Page 55
... not move to z Shoot portraits in night scenes. Note • The picture may not be taken properly when shooting a wholly dark night scene. 55 Set [Flash mode] to (Night portrait/Night view). Shooting images Taking night view photos This mode is suitable to prevent the image from blurring. • The shutter... speed is slower, so using a tripod is recommended. z Shoot night scenes at a distance without persons (page 81). Set the mode dial to (Flash Off) when you shoot a night view without losing the dark atmosphere of the surroundings.
... not move to z Shoot portraits in night scenes. Note • The picture may not be taken properly when shooting a wholly dark night scene. 55 Set [Flash mode] to (Night portrait/Night view). Shooting images Taking night view photos This mode is suitable to prevent the image from blurring. • The shutter... speed is slower, so using a tripod is recommended. z Shoot night scenes at a distance without persons (page 81). Set the mode dial to (Flash Off) when you shoot a night view without losing the dark atmosphere of the surroundings.
Instruction Manual
Page 57
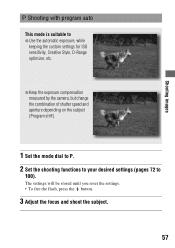
z Keep the exposure compensation measured by the camera, but change the combination of shutter speed and aperture depending on the subject (Program shift). 1 Set the mode dial to P. 2 Set the shooting functions to ... the custom settings for ISO sensitivity, Creative Style, D-Range optimizer, etc. The settings will be stored until you reset the settings. • To fire the flash, press the button. 3 Adjust the focus and shoot the subject. 57 Shooting images Shooting with program auto This mode is suitable to 100).
z Keep the exposure compensation measured by the camera, but change the combination of shutter speed and aperture depending on the subject (Program shift). 1 Set the mode dial to P. 2 Set the shooting functions to ... the custom settings for ISO sensitivity, Creative Style, D-Range optimizer, etc. The settings will be stored until you reset the settings. • To fire the flash, press the button. 3 Adjust the focus and shoot the subject. 57 Shooting images Shooting with program auto This mode is suitable to 100).
Instruction Manual
Page 60
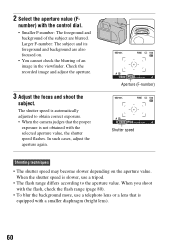
... subject are also focused on the aperture value. When you shoot with the flash, check the flash range (page 80). • To blur the background more, use a tripod. • The flash range differs according to obtain correct exposure. • When the camera judges that is not obtained with a smaller diaphragm (bright lens). 60 2 Select...
... subject are also focused on the aperture value. When you shoot with the flash, check the flash range (page 80). • To blur the background more, use a tripod. • The flash range differs according to obtain correct exposure. • When the camera judges that is not obtained with a smaller diaphragm (bright lens). 60 2 Select...

Instruction Manual
Page 62
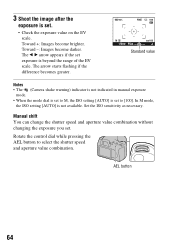
Notes • The (Camera shake warning) indicator is not indicated in shutter speed priority mode. • When using the flash, if you close the aperture (a larger F-number) by making the shutter speed slower, the light of the flash does not reach a distant subject. • The higher the ISO ...the reduction. 62 In such cases, adjust the shutter speed again. 2 Select the shutter speed with the selected shutter speed, the aperture value flashes. Shutter speed Aperture (F-number) Shooting techniques • When the shutter speed is one second or more, noise reduction (Long exp.NR) ...
Notes • The (Camera shake warning) indicator is not indicated in shutter speed priority mode. • When using the flash, if you close the aperture (a larger F-number) by making the shutter speed slower, the light of the flash does not reach a distant subject. • The higher the ISO ...the reduction. 62 In such cases, adjust the shutter speed again. 2 Select the shutter speed with the selected shutter speed, the aperture value flashes. Shutter speed Aperture (F-number) Shooting techniques • When the shutter speed is one second or more, noise reduction (Long exp.NR) ...
Instruction Manual
Page 64
... M mode, the ISO setting [AUTO] is set to select the shutter speed and aperture value combination. Toward +: Images become darker. Standard value Notes • The (Camera shake warning) indicator is not indicated in manual exposure mode. • When the mode dial is not available. The arrow starts...
... M mode, the ISO setting [AUTO] is set to select the shutter speed and aperture value combination. Toward +: Images become darker. Standard value Notes • The (Camera shake warning) indicator is not indicated in manual exposure mode. • When the mode dial is not available. The arrow starts...


