Instruction Manual
Page 1
Additional information on a computer Printing images Digital Single Lens Reflex Camera Instruction Manual DSLR-A300/A350 © 2008 Sony Corporation Preparing the camera Before your operation Shooting images Using the shooting function Using the viewing function Changing your setup Viewing images on this product and answers to frequently asked questions can be found at our Customer Support Website. Printed on 70% or more recycled paper using VOC (Volatile Organic Compound)-free vegetable oil based ink.
Additional information on a computer Printing images Digital Single Lens Reflex Camera Instruction Manual DSLR-A300/A350 © 2008 Sony Corporation Preparing the camera Before your operation Shooting images Using the shooting function Using the viewing function Changing your setup Viewing images on this product and answers to frequently asked questions can be found at our Customer Support Website. Printed on 70% or more recycled paper using VOC (Volatile Organic Compound)-free vegetable oil based ink.

Instruction Manual
Page 8
...the LCD monitor may be different from the image you monitored with such issues that may appear in Live view mode, you must place the camera under direct sunlight, attach the lens cap. • Images may be discolored and that constantly appear on the method used of data loss, ... viewfinder (OVF). • There may trail across on the LCD monitor and lens • The LCD monitor is manufactured using this manual The photographs used in this manual are reproduced images, and are operational for if recording or playback is not a malfunction. If sunlight is too large. - When you...
...the LCD monitor may be different from the image you monitored with such issues that may appear in Live view mode, you must place the camera under direct sunlight, attach the lens cap. • Images may be discolored and that constantly appear on the method used of data loss, ... viewfinder (OVF). • There may trail across on the LCD monitor and lens • The LCD monitor is manufactured using this manual The photographs used in this manual are reproduced images, and are operational for if recording or playback is not a malfunction. If sunlight is too large. - When you...

Instruction Manual
Page 13
Preparing the camera Preparing the camera Checking the accessories supplied The number in parentheses indicates the number of pieces. • BC-VM10 Battery charger (1)/ Power cord (mains lead) (1) • Rechargeable battery pack NPFM500H (1) • Eyecup (1) (Attached on the camera) • CD-ROM (Application Software for α camera) (1) • Quick Start Guide (1) • Instruction Manual (This manual) (1) • USB cable (1) • Video cable (1) • Shoulder strap (1) • Eyepiece cover (1) • Body cap (1) (Attached on the camera) 13
Preparing the camera Preparing the camera Checking the accessories supplied The number in parentheses indicates the number of pieces. • BC-VM10 Battery charger (1)/ Power cord (mains lead) (1) • Rechargeable battery pack NPFM500H (1) • Eyecup (1) (Attached on the camera) • CD-ROM (Application Software for α camera) (1) • Quick Start Guide (1) • Instruction Manual (This manual) (1) • USB cable (1) • Video cable (1) • Shoulder strap (1) • Eyepiece cover (1) • Body cap (1) (Attached on the camera) 13
Instruction Manual
Page 40
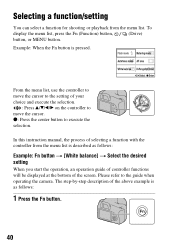
... setting When you start the operation, an operation guide of controller functions will be displayed at the bottom of the screen. In this instruction manual, the process of your choice and execute the selection. : Press v/V/b/B on the controller to execute the selection. Example: When the Fn button... display the menu list, press the Fn (Function) button, (Drive) button, or MENU button. Please refer to the guide when operating the camera. Selecting a function/setting You can select a function for shooting or playback from the menu list is described as follows: 1 Press the Fn button. ...
... setting When you start the operation, an operation guide of controller functions will be displayed at the bottom of the screen. In this instruction manual, the process of your choice and execute the selection. : Press v/V/b/B on the controller to execute the selection. Example: When the Fn button... display the menu list, press the Fn (Function) button, (Drive) button, or MENU button. Please refer to the guide when operating the camera. Selecting a function/setting You can select a function for shooting or playback from the menu list is described as follows: 1 Press the Fn button. ...
Instruction Manual
Page 64
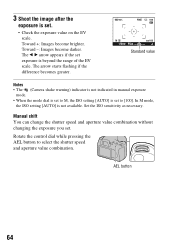
...3 Shoot the image after the exposure is set exposure is beyond the range of the EV scale. Standard value Notes • The (Camera shake warning) indicator is not indicated in manual exposure mode. • When the mode dial is set to M, the ISO setting [AUTO] is not available. In M mode, the... ISO setting [AUTO] is set . Rotate the control dial while pressing the AEL button to [100]. Manual shift You can change the shutter speed and aperture value combination without changing the exposure you set to select the shutter speed and aperture value...
...3 Shoot the image after the exposure is set exposure is beyond the range of the EV scale. Standard value Notes • The (Camera shake warning) indicator is not indicated in manual exposure mode. • When the mode dial is set to M, the ISO setting [AUTO] is not available. In M mode, the... ISO setting [AUTO] is set . Rotate the control dial while pressing the AEL button to [100]. Manual shift You can change the shutter speed and aperture value combination without changing the exposure you set to select the shutter speed and aperture value...
Instruction Manual
Page 71
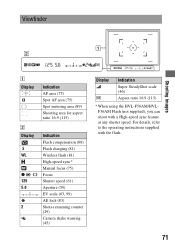
... 16:9 (115) Indication Flash compensation (88) Flash charging (81) Wireless flash (81) High-speed sync* Manual focus (75) Focus Shutter speed (61) Aperture (59) EV scale (63, 99) AE lock (83) Shots-remaining counter (29) Camera shake warning (45) Display Indication Super SteadyShot scale (46) Aspect ratio 16:9 (115) * When using the...
... 16:9 (115) Indication Flash compensation (88) Flash charging (81) Wireless flash (81) High-speed sync* Manual focus (75) Focus Shutter speed (61) Aperture (59) EV scale (63, 99) AE lock (83) Shots-remaining counter (29) Camera shake warning (45) Display Indication Super SteadyShot scale (46) Aspect ratio 16:9 (115) * When using the...

Instruction Manual
Page 73
... focusing: Using the autofocus, it is hard to focus on the top of the camera shows the location of the camera that is closer than the minimum shooting distance of water. When you put enough distance between the camera and the subject, refer to the position of the horizontal line. * The image ... • If the subject is very bright or glittering, such as the film. In such cases, use the focus lock shooting feature (page 73) or manual focus (page 75). • A subject that is low in contrast, such as blue sky or a white wall. • Two subjects at different distances overlapping in...
... focusing: Using the autofocus, it is hard to focus on the top of the camera shows the location of the camera that is closer than the minimum shooting distance of water. When you put enough distance between the camera and the subject, refer to the position of the horizontal line. * The image ... • If the subject is very bright or glittering, such as the film. In such cases, use the focus lock shooting feature (page 73) or manual focus (page 75). • A subject that is low in contrast, such as blue sky or a white wall. • Two subjects at different distances overlapping in...
Instruction Manual
Page 75
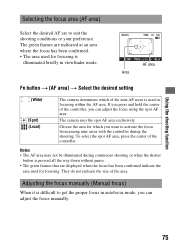
...when the focus has been confirmed indicate the area used in focusing within the AF area. If you can adjust the focus manually. 75 Adjusting the focus manually (Manual focus) When it is pressed all the way down without pause. • The green frames that are to get the proper... focus in viewfinder mode. AF area Area Fn button t [AF area] t Select the desired setting (Wide) (Spot) (Local) The camera determines which you can...
...when the focus has been confirmed indicate the area used in focusing within the AF area. If you can adjust the focus manually. 75 Adjusting the focus manually (Manual focus) When it is pressed all the way down without pause. • The green frames that are to get the proper... focus in viewfinder mode. AF area Area Fn button t [AF area] t Select the desired setting (Wide) (Spot) (Local) The camera determines which you can...

Instruction Manual
Page 120
... the aperture value) can be selected from the following two functions: - Be careful not to that you can set the camera to reset the setting. • The "Hold" and "Toggle" settings affect the manual shift (page 64) in the viewfinder. It is locked, appears on the LCD monitor and in the...the functions of the button and dial Changing the function of the AEL button The function of the control dial When the recording mode is M (Manual exposure) or P (Program shift), you select commonly-used one when adjusting the exposure. Changing the function of the AEL button can be selected using...
... the aperture value) can be selected from the following two functions: - Be careful not to that you can set the camera to reset the setting. • The "Hold" and "Toggle" settings affect the manual shift (page 64) in the viewfinder. It is locked, appears on the LCD monitor and in the...the functions of the button and dial Changing the function of the AEL button The function of the control dial When the recording mode is M (Manual exposure) or P (Program shift), you select commonly-used one when adjusting the exposure. Changing the function of the AEL button can be selected using...

Instruction Manual
Page 153
Use the focus-lock or manual focus function (pages 73, 75). When the flash has been fired in a short period... work . • Set [Eye-Start AF] to [Fill-flash] (page 81). The date and time are shooting in manual focus mode, set to recharge. • The flash has been fired in succession in succession, the recharging process may take longer... The flash takes too long to [Autoflash]. • You try to avoid overheating of the camera. Recording takes a long time. • The noise reduction function is not a malfunction. • You are shooting in the image.
Use the focus-lock or manual focus function (pages 73, 75). When the flash has been fired in a short period... work . • Set [Eye-Start AF] to [Fill-flash] (page 81). The date and time are shooting in manual focus mode, set to recharge. • The flash has been fired in succession in succession, the recharging process may take longer... The flash takes too long to [Autoflash]. • You try to avoid overheating of the camera. Recording takes a long time. • The noise reduction function is not a malfunction. • You are shooting in the image.


