
Instruction Manual
Page 7
...images in a cold location, the LCD monitor may be copyrighted. Black, white, red, blue and green points • Do not expose the camera to other materials may cause a fire. If sunlight is focused on a nearby object, it may be contrary to a malfunction of such materials ...bright points (white, red, blue or green in color) that constantly appear on the LCD monitor. Warning on the camera in any way. Unauthorized recording of your camera or a memory card, etc. When turning on copyright Television programs, films, videotapes, and other medium. The monitor may be discolored...
...images in a cold location, the LCD monitor may be copyrighted. Black, white, red, blue and green points • Do not expose the camera to other materials may cause a fire. If sunlight is focused on a nearby object, it may be contrary to a malfunction of such materials ...bright points (white, red, blue or green in color) that constantly appear on the LCD monitor. Warning on the camera in any way. Unauthorized recording of your camera or a memory card, etc. When turning on copyright Television programs, films, videotapes, and other medium. The monitor may be discolored...
Instruction Manual
Page 8
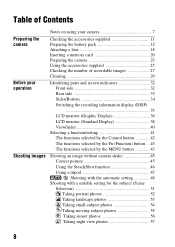
... the accessories supplied 11 Preparing the battery pack 12 Attaching a lens 18 Inserting a memory card 20 Preparing the camera 23 Using the accessories supplied 25 Checking the number of recordable images 27 Cleaning 29 Identifying parts and screen indicators 32 Front side ... Control button 42 The functions selected by the Fn (Function) button ... 43 The functions selected by the MENU button 43 Shooting an image without camera shake 45 Correct posture 45 Using the SteadyShot function 46 Using a tripod 47 / Shooting with the automatic setting 48 Shooting with a suitable setting ...
... the accessories supplied 11 Preparing the battery pack 12 Attaching a lens 18 Inserting a memory card 20 Preparing the camera 23 Using the accessories supplied 25 Checking the number of recordable images 27 Cleaning 29 Identifying parts and screen indicators 32 Front side ... Control button 42 The functions selected by the Fn (Function) button ... 43 The functions selected by the MENU button 43 Shooting an image without camera shake 45 Correct posture 45 Using the SteadyShot function 46 Using a tripod 47 / Shooting with the automatic setting 48 Shooting with a suitable setting ...
Instruction Manual
Page 10
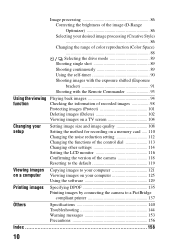
...102 Viewing images on a TV screen 104 Changing your setup Setting image size and image quality 108 Setting the method for recording on a memory card ..... 110 Changing the noise reduction setting 112 Changing the functions of the control dial 113 Changing other settings 114 Setting the LCD monitor... 116 Confirming the version of the camera 118 Resetting to the default 119 Viewing images Copying images to your computer 121 on a computer Viewing images on your computer 125 ...
...102 Viewing images on a TV screen 104 Changing your setup Setting image size and image quality 108 Setting the method for recording on a memory card ..... 110 Changing the noise reduction setting 112 Changing the functions of the control dial 113 Changing other settings 114 Setting the LCD monitor... 116 Confirming the version of the camera 118 Resetting to the default 119 Viewing images Copying images to your computer 121 on a computer Viewing images on your computer 125 ...

Instruction Manual
Page 20
..." media and the SD memory card and SDHC memory card are referred to use using the memory card switch. 20 Inserting a memory card Only "Memory Stick PRO Duo" media, "Memory Stick PRO-HG Duo" media, SD memory cards and SDHC memory cards can be used with this camera. Face side (SD memory card) Terminal part Face side ("Memory Stick PRO Duo...
..." media and the SD memory card and SDHC memory card are referred to use using the memory card switch. 20 Inserting a memory card Only "Memory Stick PRO Duo" media, "Memory Stick PRO-HG Duo" media, SD memory cards and SDHC memory cards can be used with this camera. Face side (SD memory card) Terminal part Face side ("Memory Stick PRO Duo...

Instruction Manual
Page 21
...it. • Do not expose the memory card to water. • Do not touch the terminal section of a car parked in a static-prone or electrically noisy environment. • We recommend backing up important data, such as to direct sunlight. - Preparing the camera 4 Close the memory card cover. Access lamp Notes on ...using memory cards • Do not strike, bend or drop the...
...it. • Do not expose the memory card to water. • Do not touch the terminal section of a car parked in a static-prone or electrically noisy environment. • We recommend backing up important data, such as to direct sunlight. - Preparing the camera 4 Close the memory card cover. Access lamp Notes on ...using memory cards • Do not strike, bend or drop the...

Instruction Manual
Page 22
.... MagicGate is equipped with MagicGate function. However, proper operation cannot be performed with the camera The types of "Memory Stick" media that requires MagicGate functions cannot be guaranteed for all "Memory Stick PRO Duo" media functions. Notes on the "Memory Stick" media used . • Do not press down hard when you write down on...
.... MagicGate is equipped with MagicGate function. However, proper operation cannot be performed with the camera The types of "Memory Stick" media that requires MagicGate functions cannot be guaranteed for all "Memory Stick PRO Duo" media functions. Notes on the "Memory Stick" media used . • Do not press down hard when you write down on...

Instruction Manual
Page 27
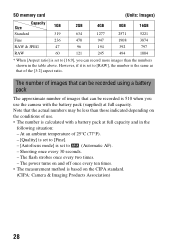
The number of images that can be recorded on a memory card The table shows the approximate number of images that can be recorded (should you insert a memory card into the camera and set the power switch to shoot using Sony standard memory cards for testing. Notes • When "0" (the number... of recordable images) flashes in yellow, it means no memory card has been inserted. The values may vary...
The number of images that can be recorded on a memory card The table shows the approximate number of images that can be recorded (should you insert a memory card into the camera and set the power switch to shoot using Sony standard memory cards for testing. Notes • When "0" (the number... of recordable images) flashes in yellow, it means no memory card has been inserted. The values may vary...
Instruction Manual
Page 28
...(Automatic AF). - At an ambient temperature of images that can record more images than those indicated depending on the CIPA standard. (CIPA: Camera & Imaging Products Association) 28 The power turns on and off once every ten times. • The measurement method is based on the ...conditions of the [3:2] aspect ratio. Note that of use the camera with a battery pack at full capacity. The flash strobes once every two times. - SD memory card (Units: Images) Size Capacity 1GB 2GB 4GB 8GB 16GB Standard 319 634 1277 2571 5221 ...
...(Automatic AF). - At an ambient temperature of images that can record more images than those indicated depending on the CIPA standard. (CIPA: Camera & Imaging Products Association) 28 The power turns on and off once every ten times. • The measurement method is based on the ...conditions of the [3:2] aspect ratio. Note that of use the camera with a battery pack at full capacity. The flash strobes once every two times. - SD memory card (Units: Images) Size Capacity 1GB 2GB 4GB 8GB 16GB Standard 319 634 1277 2571 5221 ...
Instruction Manual
Page 34
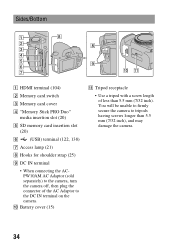
You will be unable to firmly secure the camera to the DC IN terminal on the camera. Sides/Bottom A HDMI terminal (104) B Memory card switch C Memory card cover D "Memory Stick PRO Duo" media insertion slot (20) E SD memory card insertion slot (20) F (USB) terminal (122, 138) G Access lamp (21) H Hooks for shoulder strap (25) I DC IN terminal...
You will be unable to firmly secure the camera to the DC IN terminal on the camera. Sides/Bottom A HDMI terminal (104) B Memory card switch C Memory card cover D "Memory Stick PRO Duo" media insertion slot (20) E SD memory card insertion slot (20) F (USB) terminal (122, 138) G Access lamp (21) H Hooks for shoulder strap (25) I DC IN terminal...

Instruction Manual
Page 37
D Display Indication Remaining battery (16) Image quality (109) Image size (108)/Aspect ratio (108) Memory card (20) 100 Remaining number of recordable images (27) Before your operation 37
D Display Indication Remaining battery (16) Image quality (109) Image size (108)/Aspect ratio (108) Memory card (20) 100 Remaining number of recordable images (27) Before your operation 37
Instruction Manual
Page 39
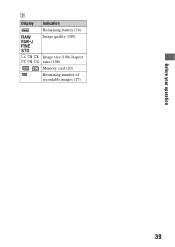
C Display Indication Remaining battery (16) Image quality (109) Image size (108)/Aspect ratio (108) Memory card (20) 100 Remaining number of recordable images (27) Before your operation 39
C Display Indication Remaining battery (16) Image quality (109) Image size (108)/Aspect ratio (108) Memory card (20) 100 Remaining number of recordable images (27) Before your operation 39

Instruction Manual
Page 90
... • The number after a 10 second pause. 1 on the control button. 90 Fine/Standard RAW & JPEG RAW No limit (Until the memory card is activated, audio signals and the self-timer lamp indicate the condition. The self-timer lamp flashes quickly and the audio signal sounds quickly... images continuously when "0" flashes in a photo and the 2-second self-timer is convenient to reduce the camera shake. [Self-timer(Cont.)] is convenient to prevent failure because the camera continuously shoots either three or five images after is the number of seconds that is currently selected. •...
... • The number after a 10 second pause. 1 on the control button. 90 Fine/Standard RAW & JPEG RAW No limit (Until the memory card is activated, audio signals and the self-timer lamp indicate the condition. The self-timer lamp flashes quickly and the audio signal sounds quickly... images continuously when "0" flashes in a photo and the 2-second self-timer is convenient to reduce the camera shake. [Self-timer(Cont.)] is convenient to prevent failure because the camera continuously shoots either three or five images after is the number of seconds that is currently selected. •...

Instruction Manual
Page 98
Checking the information of images 98 Basic information display Display 100-0003 DPOF3 Indication Memory card (20) Folder - file number (127) Protect (101) DPOF set (135) Image quality (109) 1/125 F3.5 ISO100 2009 1 1 10:37AM 3/7 Image size (108)/Aspect ratio (108) Remaining battery warning (16) Shutter speed (63) Aperture (61) ISO sensitivity (82) Date of recording File number/total number of recorded images Each time you press DISP on the control button, the information display changes (page 94).
Checking the information of images 98 Basic information display Display 100-0003 DPOF3 Indication Memory card (20) Folder - file number (127) Protect (101) DPOF set (135) Image quality (109) 1/125 F3.5 ISO100 2009 1 1 10:37AM 3/7 Image size (108)/Aspect ratio (108) Remaining battery warning (16) Shutter speed (63) Aperture (61) ISO sensitivity (82) Date of recording File number/total number of recorded images Each time you press DISP on the control button, the information display changes (page 94).

Instruction Manual
Page 99
... F3.5 ISO100 -0.3 Shutter speed (63) Aperture (61) ISO sensitivity (82) Exposure compensation (79) 99 Histogram display Using the viewing function A Display 100-0003 DPOF3 Indication Memory card (20) Folder -
... F3.5 ISO100 -0.3 Shutter speed (63) Aperture (61) ISO sensitivity (82) Exposure compensation (79) 99 Histogram display Using the viewing function A Display 100-0003 DPOF3 Indication Memory card (20) Folder -

Instruction Manual
Page 103
... 1 Fn button t [Image Index] t Select the desired number of the control button, then select the folder you delete images on a computer or format the memory card using the camera. 103 Using the viewing function 4 Press the Fn button. 5 Select [Delete] with v on the control button, then press the center of images by...
... 1 Fn button t [Image Index] t Select the desired number of the control button, then select the folder you delete images on a computer or format the memory card using the camera. 103 Using the viewing function 4 Press the Fn button. 5 Select [Delete] with v on the control button, then press the center of images by...
Instruction Manual
Page 109
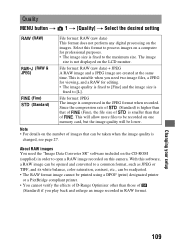
... • The RAW format image cannot be taken when the image quality is fixed to the maximum size. Note • For details on one memory card, but the image quality will allow more files to a common format, such as JPEG or TIFF, and its white balance, color saturation, ...MENU button t 1 t [Quality] t Select the desired setting (RAW) (RAW & JPEG) (Fine) (Standard) File format: RAW (raw data) This format does not perform any digital processing on a computer for editing. • The image quality is fixed to [Fine] and the image size is compressed in RAW format. Changing your setup...
... • The RAW format image cannot be taken when the image quality is fixed to the maximum size. Note • For details on one memory card, but the image quality will allow more files to a common format, such as JPEG or TIFF, and its white balance, color saturation, ...MENU button t 1 t [Quality] t Select the desired setting (RAW) (RAW & JPEG) (Fine) (Standard) File format: RAW (raw data) This format does not perform any digital processing on a computer for editing. • The image quality is fixed to [Fine] and the image size is compressed in RAW format. Changing your setup...
Instruction Manual
Page 110
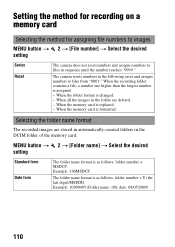
...numbers to images MENU button t 2 t [File number] t Select the desired setting Series Reset The camera does not reset numbers and assigns numbers to files from "0001." When the memory card is changed. - When the folder format is formatted. Example: 100MSDCF The folder name format is... as follows: folder number + Y (the last digit)/MM/DD. Selecting the folder name format The recorded images are deleted. ...
...numbers to images MENU button t 2 t [File number] t Select the desired setting Series Reset The camera does not reset numbers and assigns numbers to files from "0001." When the memory card is changed. - When the folder format is formatted. Example: 100MSDCF The folder name format is... as follows: folder number + Y (the last digit)/MM/DD. Selecting the folder name format The recorded images are deleted. ...

Instruction Manual
Page 111
... currently used, and the folder becomes the current recording folder. If you select the setting [Date form]. A new folder is lit. • Format the memory card using the camera. MENU button t 1 t [Format]t [OK] Notes • During the format, the access lamp lights up. Creating a new folder You can select the recording folder...
... currently used, and the folder becomes the current recording folder. If you select the setting [Date form]. A new folder is lit. • Format the memory card using the camera. MENU button t 1 t [Format]t [OK] Notes • During the format, the access lamp lights up. Creating a new folder You can select the recording folder...
Instruction Manual
Page 121
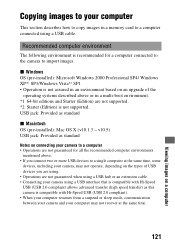
... a computer • Operations are not guaranteed for a computer connected to the camera to import images. Viewing images on a computer Copying images to your computer This section describes how to copy images in a memory card to a computer connected using . • Operations are not supported. *2 Starter.... *1 64-bit editions and Starter (Edition) are not guaranteed when using a USB hub or an extension cable. • Connecting your camera using a USB interface that is compatible with Hi-Speed USB (USB 2.0 compliant) allows advanced transfer (high speed transfer) as standard x ...
... a computer • Operations are not guaranteed for a computer connected to the camera to import images. Viewing images on a computer Copying images to your computer This section describes how to copy images in a memory card to a computer connected using . • Operations are not supported. *2 Starter.... *1 64-bit editions and Starter (Edition) are not guaranteed when using a USB hub or an extension cable. • Connecting your camera using a USB interface that is compatible with Hi-Speed USB (USB 2.0 compliant) allows advanced transfer (high speed transfer) as standard x ...

Instruction Manual
Page 122
... that [USB connection] in 3 is set to [Mass Storage]. 6 Connect the camera and your computer. Stage 1: Connecting the camera and your computer 1 Insert a memory card with recorded images into the camera. 2 Select the type of memory card you want to copy images from using the memory card switch. 3 Insert the sufficiently charged battery pack in the...
... that [USB connection] in 3 is set to [Mass Storage]. 6 Connect the camera and your computer. Stage 1: Connecting the camera and your computer 1 Insert a memory card with recorded images into the camera. 2 Select the type of memory card you want to copy images from using the memory card switch. 3 Insert the sufficiently charged battery pack in the...

