Instruction Manual
Page 8
...compensation for contents of the recording The contents of the copyright laws. When the camera warms up ) data to the provisions of the recording cannot be compensated for effective use. Notes on using your camera or a memory card, etc. However, there may trail across on a nearby object, it may... become temporarily dark. If sunlight is focused on the LCD monitor in any way. When you must place the camera under direct sunlight, attach the lens cap....
...compensation for contents of the recording The contents of the copyright laws. When the camera warms up ) data to the provisions of the recording cannot be compensated for effective use. Notes on using your camera or a memory card, etc. However, there may trail across on a nearby object, it may... become temporarily dark. If sunlight is focused on the LCD monitor in any way. When you must place the camera under direct sunlight, attach the lens cap....

Instruction Manual
Page 9
... Shooting images IMPORTANT SAFEGUARDS 3 Read this first 5 Notes on using your camera 8 Checking the accessories supplied 13 Preparing the battery pack 14 Attaching a lens 19 Inserting a memory card 21 Preparing the camera 25 Using the accessories supplied 27 Checking the number of recordable images 29... button ... 43 The functions selected by the (Drive) button 43 Functions selected by the MENU button 43 Shooting an image without camera shake 45 Correct posture 45 Using the Super SteadyShot function 46 Using a tripod 47 / Shooting with the automatic setting 48 Shooting ...
... Shooting images IMPORTANT SAFEGUARDS 3 Read this first 5 Notes on using your camera 8 Checking the accessories supplied 13 Preparing the battery pack 14 Attaching a lens 19 Inserting a memory card 21 Preparing the camera 25 Using the accessories supplied 27 Checking the number of recordable images 29... button ... 43 The functions selected by the (Drive) button 43 Functions selected by the MENU button 43 Shooting an image without camera shake 45 Correct posture 45 Using the Super SteadyShot function 46 Using a tripod 47 / Shooting with the automatic setting 48 Shooting ...
Instruction Manual
Page 11
... images (Delete 102 Viewing images on a TV screen 104 Changing your setup Setting image size and image quality 106 Setting the method for recording on a memory card ..... 108 Changing the noise reduction setting 110 Changing the conditions under which the shutter can close 111 Changing the functions of the button and dial... your computer 119 on a computer Viewing images on your computer 123 Using the software 127 Printing images Specifying DPOF 133 Printing images by connecting the camera to a PictBridge compliant printer 135 11
... images (Delete 102 Viewing images on a TV screen 104 Changing your setup Setting image size and image quality 106 Setting the method for recording on a memory card ..... 108 Changing the noise reduction setting 110 Changing the conditions under which the shutter can close 111 Changing the functions of the button and dial... your computer 119 on a computer Viewing images on your computer 123 Using the software 127 Printing images Specifying DPOF 133 Printing images by connecting the camera to a PictBridge compliant printer 135 11
Instruction Manual
Page 21
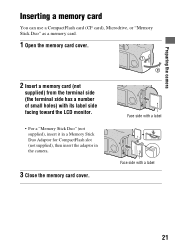
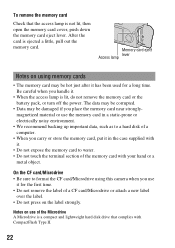
Preparing the camera Inserting a memory card You can use a CompactFlash card (CF card), Microdrive, or "Memory Stick Duo" as a memory card. 1 Open the memory card cover. 2 Insert a memory card (not supplied) from the terminal side (the terminal side has a number of small holes) with a label 21 Face side with a label Face side with its label side facing toward the LCD monitor. • For a "Memory Stick Duo" (not supplied), insert it in a Memory Stick Duo Adaptor for CompactFlash slot (not supplied), then insert the adaptor in the camera. 3 Close the memory card cover.
Preparing the camera Inserting a memory card You can use a CompactFlash card (CF card), Microdrive, or "Memory Stick Duo" as a memory card. 1 Open the memory card cover. 2 Insert a memory card (not supplied) from the terminal side (the terminal side has a number of small holes) with a label 21 Face side with a label Face side with its label side facing toward the LCD monitor. • For a "Memory Stick Duo" (not supplied), insert it in a Memory Stick Duo Adaptor for CompactFlash slot (not supplied), then insert the adaptor in the camera. 3 Close the memory card cover.
Instruction Manual
Page 22
...not expose the memory card to format the CF card/Microdrive using memory cards • The memory card may be hot just after it has been used for the first time. • Do not remove the label of a CF card/Microdrive or attach a new label over the label. • Do not press on using this camera when you ...handle it for a long time. Notes on use it . • When the access lamp is lit, do not remove the memory card or the battery pack, or turn off the power. Be careful when you use...
...not expose the memory card to format the CF card/Microdrive using memory cards • The memory card may be hot just after it has been used for the first time. • Do not remove the label of a CF card/Microdrive or attach a new label over the label. • Do not press on using this camera when you ...handle it for a long time. Notes on use it . • When the access lamp is lit, do not remove the memory card or the battery pack, or turn off the power. Be careful when you use...
Instruction Manual
Page 23
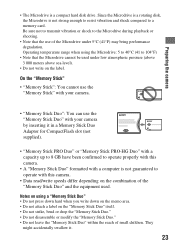
...-HG Duo" with a capacity up to 8 GB have been confirmed to operate properly with this camera. • A "Memory Stick Duo" formatted with a computer is not guaranteed to a memory card. Notes on the combination of small children. Preparing the camera • The Microdrive is not strong enough to resist vibration and shock compared to operate with...
...-HG Duo" with a capacity up to 8 GB have been confirmed to operate properly with this camera. • A "Memory Stick Duo" formatted with a computer is not guaranteed to a memory card. Notes on the combination of small children. Preparing the camera • The Microdrive is not strong enough to resist vibration and shock compared to operate with...

Instruction Manual
Page 29
Replace the memory card with this camera. Preparing the camera Checking the number of recordable images Once you insert a memory card into the camera and set the POWER switch to ON, the number of images that can record more images than the numbers shown in the table above. Note &#...8226; If "0" is full. The number of images that can be recorded on a memory card The table shows the approximate...
Replace the memory card with this camera. Preparing the camera Checking the number of recordable images Once you insert a memory card into the camera and set the POWER switch to ON, the number of images that can record more images than the numbers shown in the table above. Note &#...8226; If "0" is full. The number of images that can be recorded on a memory card The table shows the approximate...
Instruction Manual
Page 36
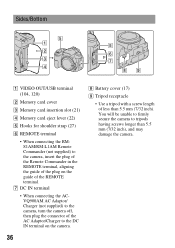
Sides/Bottom A VIDEO OUT/USB terminal (104, 120) B Memory card cover C Memory card insertion slot (21) D Memory card eject lever (22) E Hooks for shoulder strap (27) F REMOTE terminal • When connecting the RMS1AM/RM-L1AM Remote Commander (not supplied) to the camera, insert the plug of the Remote Commander in the REMOTE terminal, aligning the guide of the...
Sides/Bottom A VIDEO OUT/USB terminal (104, 120) B Memory card cover C Memory card insertion slot (21) D Memory card eject lever (22) E Hooks for shoulder strap (27) F REMOTE terminal • When connecting the RMS1AM/RM-L1AM Remote Commander (not supplied) to the camera, insert the plug of the Remote Commander in the REMOTE terminal, aligning the guide of the...
Instruction Manual
Page 89
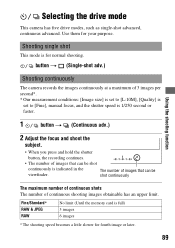
... RAW No limit (Until the memory card is full) 3 images 6 images * The shooting speed becomes a little slower for normal shooting. Using the shooting function Shooting single shot This mode is indicated in the viewfinder. Use them for your purpose. button t (Single-shot adv.) Shooting continuously The camera records the images continuously at a maximum... number of continuous shots The number of images that can be shot continuously is for fourth image or later. 89 Selecting the drive mode This camera has five drive modes, such as single-shot advanced, continuous advanced.
... RAW No limit (Until the memory card is full) 3 images 6 images * The shooting speed becomes a little slower for normal shooting. Using the shooting function Shooting single shot This mode is indicated in the viewfinder. Use them for your purpose. button t (Single-shot adv.) Shooting continuously The camera records the images continuously at a maximum... number of continuous shots The number of images that can be shot continuously is for fourth image or later. 89 Selecting the drive mode This camera has five drive modes, such as single-shot advanced, continuous advanced.
Instruction Manual
Page 103
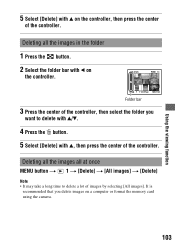
... the controller. Deleting all the images all the images in the folder 1 Press the button. 2 Select the folder bar with v on a computer or format the memory card using the camera. 103
... the controller. Deleting all the images all the images in the folder 1 Press the button. 2 Select the folder bar with v on a computer or format the memory card using the camera. 103
Instruction Manual
Page 107
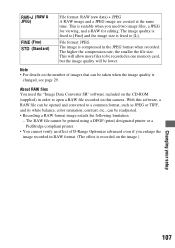
.... About RAW files You need two image files, a JPEG for viewing, and a RAW for editing. The image quality is fixed to be recorded in one memory card, but the image quality will be printed using a DPOF (print) designated printer or a PictBridge compliant printer. • You cannot verify an effect of images ...that can be taken when the image quality is recorded on this camera. (RAW & JPEG) (Fine) (Standard) File format: RAW (raw data) + JPEG A RAW image and a JPEG image are created at the same time...
.... About RAW files You need two image files, a JPEG for viewing, and a RAW for editing. The image quality is fixed to be recorded in one memory card, but the image quality will be printed using a DPOF (print) designated printer or a PictBridge compliant printer. • You cannot verify an effect of images ...that can be taken when the image quality is recorded on this camera. (RAW & JPEG) (Fine) (Standard) File format: RAW (raw data) + JPEG A RAW image and a JPEG image are created at the same time...

Instruction Manual
Page 108
... folder name format is as follows: folder number + MSDCF. When the memory card is as follows: folder number + Y (the last digit)/MM/DD. MENU button t 2 t [Folder name] t Select the desired setting Standard form Date form The folder name format is replaced. - The camera resets numbers in the following cases and assigns numbers to files...
... folder name format is as follows: folder number + MSDCF. When the memory card is as follows: folder number + Y (the last digit)/MM/DD. MENU button t 2 t [Folder name] t Select the desired setting Standard form Date form The folder name format is replaced. - The camera resets numbers in the following cases and assigns numbers to files...

Instruction Manual
Page 109
... irrevocably erases all data on the memory card. 109 Changing your setup Do not eject the memory card while the lamp is created with the camera, depending on a computer, the memory card may not be used to record images. If you can create a folder in a memory card for recording images. MENU button t...more folders, you format it on the format type used , and the folder becomes the current recording folder. Notes • Format the memory card using the camera. MENU button t 1 t [Format]t [OK] • During the format, the access lamp lights up. Creating a new folder You...
... irrevocably erases all data on the memory card. 109 Changing your setup Do not eject the memory card while the lamp is created with the camera, depending on a computer, the memory card may not be used to record images. If you can create a folder in a memory card for recording images. MENU button t...more folders, you format it on the format type used , and the folder becomes the current recording folder. Notes • Format the memory card using the camera. MENU button t 1 t [Format]t [OK] • During the format, the access lamp lights up. Creating a new folder You...
Instruction Manual
Page 119
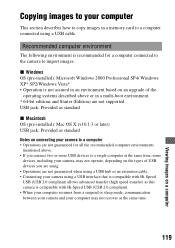
Recommended computer environment The following environment is recommended for all the recommended computer environments mentioned above or in a memory card to a computer connected using . • Operations are not supported. x Windows OS (pre-installed): Microsoft Windows 2000 Professional SP4/ ... compatible with Hi-Speed USB (USB 2.0 compliant). • When your computer resumes from a suspend or sleep mode, communication between your camera and your camera, may not operate, depending on the types of the operating systems described above . • If you are using a USB cable. ...
Recommended computer environment The following environment is recommended for all the recommended computer environments mentioned above or in a memory card to a computer connected using . • Operations are not supported. x Windows OS (pre-installed): Microsoft Windows 2000 Professional SP4/ ... compatible with Hi-Speed USB (USB 2.0 compliant). • When your computer resumes from a suspend or sleep mode, communication between your camera and your camera, may not operate, depending on the types of the operating systems described above . • If you are using a USB cable. ...
Instruction Manual
Page 120
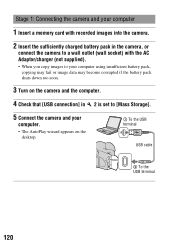
Stage 1: Connecting the camera and your computer 1 Insert a memory card with recorded images into the camera. 2 Insert the sufficiently charged battery pack in the camera, or connect the camera to a wall outlet (wall socket) with the AC Adaptor/charger (not supplied). • When you copy images to your computer ...image data may become corrupted if the battery pack shuts down too soon. 3 Turn on the camera and the computer. 4 Check that [USB connection] in 2 is set to [Mass Storage]. 5 Connect the camera and your computer. • The AutoPlay wizard appears on the desktop. 1 To the USB...
Stage 1: Connecting the camera and your computer 1 Insert a memory card with recorded images into the camera. 2 Insert the sufficiently charged battery pack in the camera, or connect the camera to a wall outlet (wall socket) with the AC Adaptor/charger (not supplied). • When you copy images to your computer ...image data may become corrupted if the battery pack shuts down too soon. 3 Turn on the camera and the computer. 4 Check that [USB connection] in 2 is set to [Mass Storage]. 5 Connect the camera and your computer. • The AutoPlay wizard appears on the desktop. 1 To the USB...

Instruction Manual
Page 124
... USB connection Perform the procedures listed below beforehand when: • Disconnecting the USB cable. • Removing the memory card. • Turning off the camera. x For Macintosh Drag and drop the drive icon or the icon of the memory card to the "Trash" icon. Confirm the device on the tasktray, then click (USB Mass Storage Device...
... USB connection Perform the procedures listed below beforehand when: • Disconnecting the USB cable. • Removing the memory card. • Turning off the camera. x For Macintosh Drag and drop the drive icon or the icon of the memory card to the "Trash" icon. Confirm the device on the tasktray, then click (USB Mass Storage Device...
Instruction Manual
Page 125
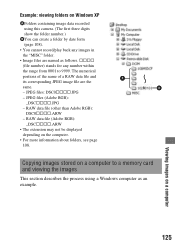
... on Windows XP AFolders containing image data recorded using this camera. (The first three digits show the folder number.) BYou can create a folder by date form (page 108). • You cannot record/play back any number within the range from 0001 to a memory card and viewing the images This section describes the process using...
... on Windows XP AFolders containing image data recorded using this camera. (The first three digits show the folder number.) BYou can create a folder by date form (page 108). • You cannot record/play back any number within the range from 0001 to a memory card and viewing the images This section describes the process using...
Instruction Manual
Page 126
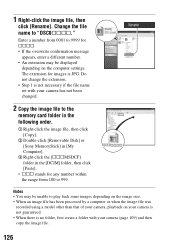
... create a folder with your camera has not been changed. 2 Copy the image file to 999. 1 Right-click the image file, then click [Rename]. Enter a number from 100 to the memory card folder in the following order. 1 Right-click the image file, then click [Copy]. 2 Double-click [Removable Disk] or [Sony MemoryStick] in [My Computer...
... create a folder with your camera has not been changed. 2 Copy the image file to 999. 1 Right-click the image file, then click [Rename]. Enter a number from 100 to the memory card folder in the following order. 1 Right-click the image file, then click [Copy]. 2 Double-click [Removable Disk] or [Sony MemoryStick] in [My Computer...
Instruction Manual
Page 134
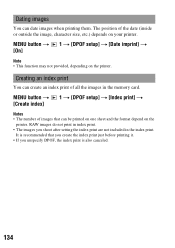
... images that you create the index print just before printing it. • If you shoot after setting the index print are not included in the memory card. RAW images do not print in index print. • The images you unspecify DPOF, the index print is recommended that can date images when printing...
... images that you create the index print just before printing it. • If you shoot after setting the index print are not included in the memory card. RAW images do not print in index print. • The images you unspecify DPOF, the index print is recommended that can date images when printing...
Instruction Manual
Page 135
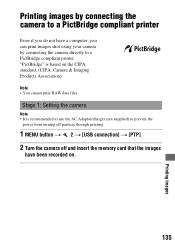
... Even if you do not have a computer, you can print images shot using your camera by connecting the camera directly to prevent the power from turning off partway through printing. 1 MENU button t 2 t [USB connection] t [PTP] 2 Turn the camera off and insert the memory card that the images have been recorded on the CIPA standard. (CIPA...
... Even if you do not have a computer, you can print images shot using your camera by connecting the camera directly to prevent the power from turning off partway through printing. 1 MENU button t 2 t [USB connection] t [PTP] 2 Turn the camera off and insert the memory card that the images have been recorded on the CIPA standard. (CIPA...


