Instruction Manual
Page 13
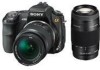
Preparing the camera Preparing the camera Checking the accessories supplied The number in parentheses indicates the number of pieces. • BC-VM10 Battery charger (1)/ Power cord (mains lead) (1) • Rechargeable battery pack NPFM500H (1) • Eyecup (1) (Attached on the camera) • CD-ROM (Application Software for α camera) (1) • Quick Start Guide (1) • Instruction Manual (This manual) (1) • USB cable (1) • Video cable (1) • Shoulder strap (1) • Eyepiece cover (1) • Body cap (1) (Attached on the camera) 13
Preparing the camera Preparing the camera Checking the accessories supplied The number in parentheses indicates the number of pieces. • BC-VM10 Battery charger (1)/ Power cord (mains lead) (1) • Rechargeable battery pack NPFM500H (1) • Eyecup (1) (Attached on the camera) • CD-ROM (Application Software for α camera) (1) • Quick Start Guide (1) • Instruction Manual (This manual) (1) • USB cable (1) • Video cable (1) • Shoulder strap (1) • Eyepiece cover (1) • Body cap (1) (Attached on the camera) 13
Instruction Manual
Page 14
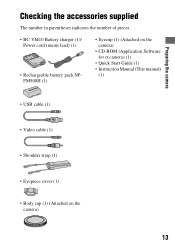
... charge Normal charge Approx. 235 min. It can be charged even when it has not been fully depleted. Preparing the battery pack When using the camera for the first time, be sure to charge a fully depleted battery pack (supplied) at a temperature of the battery back or charging conditions. 14 Approx... hour after the lamp is as follows. Push the battery pack until it has not been fully charged. 1 Insert the battery pack on the battery charger. Light on the remaining capacity of 25°C (77°F) is turned off: Full charge completed CHARGE lamp To a wall outlet (wall socket) ...
... charge Normal charge Approx. 235 min. It can be charged even when it has not been fully depleted. Preparing the battery pack When using the camera for the first time, be sure to charge a fully depleted battery pack (supplied) at a temperature of the battery back or charging conditions. 14 Approx... hour after the lamp is as follows. Push the battery pack until it has not been fully charged. 1 Insert the battery pack on the battery charger. Light on the remaining capacity of 25°C (77°F) is turned off: Full charge completed CHARGE lamp To a wall outlet (wall socket) ...
Instruction Manual
Page 15
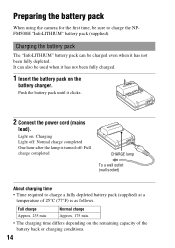
... as it with dry cloth, etc. Note • Do not use your camera abroad - Preparing the camera • We recommend charging the battery pack in the battery charger (supplied) with your camera. If the battery charger operates correctly, a battery error may be decreased. • Do not charge any...and burns. • When the CHARGE lamp flashes, this temperature range. Power sources You can use your camera and the battery charger and the AC-VQ900AM AC Adaptor/charger (not supplied) in any battery pack other than the "InfoLITHIUM" M series battery pack in an ambient ...
... as it with dry cloth, etc. Note • Do not use your camera abroad - Preparing the camera • We recommend charging the battery pack in the battery charger (supplied) with your camera. If the battery charger operates correctly, a battery error may be decreased. • Do not charge any...and burns. • When the CHARGE lamp flashes, this temperature range. Power sources You can use your camera and the battery charger and the AC-VQ900AM AC Adaptor/charger (not supplied) in any battery pack other than the "InfoLITHIUM" M series battery pack in an ambient ...

Instruction Manual
Page 27
...shooting with the self-timer, attach the eyepiece cover. 27 Preparing the camera Using the accessories supplied This section describes how to use of the viewfinder, as in the following pages. • Rechargeable battery pack (page 14) • Battery charger, Power cord (mains lead) (page 14) • Eyecup (page...ends of the strap on the strap. Eyepiece cover Using the eyepiece cover You can also attach the eyepiece cover (below) on the camera. • You can prevent light from entering through the viewfinder and affecting the exposure. When the shutter is released without the use...
...shooting with the self-timer, attach the eyepiece cover. 27 Preparing the camera Using the accessories supplied This section describes how to use of the viewfinder, as in the following pages. • Rechargeable battery pack (page 14) • Battery charger, Power cord (mains lead) (page 14) • Eyecup (page...ends of the strap on the strap. Eyepiece cover Using the eyepiece cover You can also attach the eyepiece cover (below) on the camera. • You can prevent light from entering through the viewfinder and affecting the exposure. When the shutter is released without the use...
Instruction Manual
Page 32
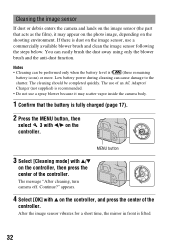
Notes • Cleaning can cause damage to the shutter. The use of an AC Adaptor/ Charger (not supplied) is recommended. • Do not use a commercially available blower brush and clean the image sensor following the steps below. Continue?" After... on the shooting environment. appears. 4 Select [OK] with v on the controller, then press the center of the controller. The message "After cleaning, turn camera off. Low battery power during cleaning can be completed quickly. MENU button 3 Select [Cleaning mode] with v/V on the controller, and press the center of the...
Notes • Cleaning can cause damage to the shutter. The use of an AC Adaptor/ Charger (not supplied) is recommended. • Do not use a commercially available blower brush and clean the image sensor following the steps below. Continue?" After... on the shooting environment. appears. 4 Select [OK] with v on the controller, then press the center of the controller. The message "After cleaning, turn camera off. Low battery power during cleaning can be completed quickly. MENU button 3 Select [Cleaning mode] with v/V on the controller, and press the center of the...
Instruction Manual
Page 36
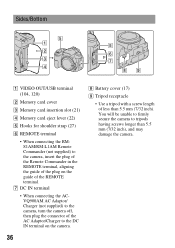
... Memory card eject lever (22) E Hooks for shoulder strap (27) F REMOTE terminal • When connecting the RMS1AM/RM-L1AM Remote Commander (not supplied) to the camera, insert the plug of the Remote Commander in the REMOTE terminal, aligning the guide of the plug on the... camera. 36 H Battery cover (17) I Tripod receptacle • Use a tripod with a screw length of the REMOTE terminal. G DC IN terminal • When connecting the ACVQ900AM AC Adaptor/ Charger (not supplied) to the camera, turn the camera off, then plug the connector of the AC ...
... Memory card eject lever (22) E Hooks for shoulder strap (27) F REMOTE terminal • When connecting the RMS1AM/RM-L1AM Remote Commander (not supplied) to the camera, insert the plug of the Remote Commander in the REMOTE terminal, aligning the guide of the plug on the... camera. 36 H Battery cover (17) I Tripod receptacle • Use a tripod with a screw length of the REMOTE terminal. G DC IN terminal • When connecting the ACVQ900AM AC Adaptor/ Charger (not supplied) to the camera, turn the camera off, then plug the connector of the AC ...
Instruction Manual
Page 120
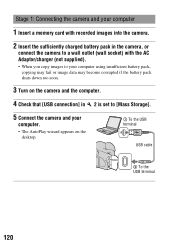
... your computer 1 Insert a memory card with recorded images into the camera. 2 Insert the sufficiently charged battery pack in the camera, or connect the camera to a wall outlet (wall socket) with the AC Adaptor/charger (not supplied). • When you copy images to your computer using insufficient battery pack,... copying may fail or image data may become corrupted if the battery pack shuts down too soon. 3 Turn on the camera and the computer. 4 Check that [...
... your computer 1 Insert a memory card with recorded images into the camera. 2 Insert the sufficiently charged battery pack in the camera, or connect the camera to a wall outlet (wall socket) with the AC Adaptor/charger (not supplied). • When you copy images to your computer using insufficient battery pack,... copying may fail or image data may become corrupted if the battery pack shuts down too soon. 3 Turn on the camera and the computer. 4 Check that [...
Instruction Manual
Page 135
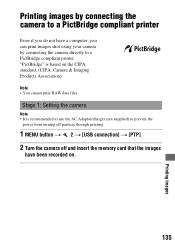
...Even if you can print images shot using your camera by connecting the camera to a PictBridge compliant printer. Stage 1: Setting the camera Note • It is based on . 135 Printing images "PictBridge" is recommended to use the AC Adaptor/charger (not supplied) to prevent the power from ...turning off partway through printing. 1 MENU button t 2 t [USB connection] t [PTP] 2 Turn the camera off and insert the memory card that the images have a computer, you...
...Even if you can print images shot using your camera by connecting the camera to a PictBridge compliant printer. Stage 1: Setting the camera Note • It is based on . 135 Printing images "PictBridge" is recommended to use the AC Adaptor/charger (not supplied) to prevent the power from ...turning off partway through printing. 1 MENU button t 2 t [USB connection] t [PTP] 2 Turn the camera off and insert the memory card that the images have a computer, you...

Instruction Manual
Page 140
...;F) (When using the Microdrive: 5 to 40°C (41 to 104°F)) Exif Exif Ver.2.21 USB communication Hi-Speed USB (USB 2.0 compliant) BC-VM10 Battery charger Input rating 100 V - 240 V AC, 50/60 Hz Output rating 8.4 V DC, 750 mA Operating temperature range 0 to 40°C (32 to 104°F) Storage temperature...
...;F) (When using the Microdrive: 5 to 40°C (41 to 104°F)) Exif Exif Ver.2.21 USB communication Hi-Speed USB (USB 2.0 compliant) BC-VM10 Battery charger Input rating 100 V - 240 V AC, 50/60 Hz Output rating 8.4 V DC, 750 mA Operating temperature range 0 to 40°C (32 to 104°F) Storage temperature...
Instruction Manual
Page 147
... not want to delete (page 101). We recommend that you protect images that the camera is turned on. • When the battery level is low, install the charged battery pack (page 16), or use the AC Adaptor/charger (not supplied). • Use the USB cable (supplied) (page 120). • Disconnect the USB... cable, and connect it . The image does not appear on the TV screen. • Check [Video output] to see if the video output signal of your camera is set to the color...
... not want to delete (page 101). We recommend that you protect images that the camera is turned on. • When the battery level is low, install the charged battery pack (page 16), or use the AC Adaptor/charger (not supplied). • Use the USB cable (supplied) (page 120). • Disconnect the USB... cable, and connect it . The image does not appear on the TV screen. • Check [Video output] to see if the video output signal of your camera is set to the color...
Instruction Manual
Page 151
... or local authorized Sony service facility. The number of recordable images does not decrease or decreases two at a time. • This is not illuminated (page 25). If an AC Adaptor/charger (not supplied) is indicated on the image when you turn off the camera. Others The lens gets fogged. • Moisture condensation has...
... or local authorized Sony service facility. The number of recordable images does not decrease or decreases two at a time. • This is not illuminated (page 25). If an AC Adaptor/charger (not supplied) is indicated on the image when you turn off the camera. Others The lens gets fogged. • Moisture condensation has...
Instruction Manual
Page 152
..."InfoLITHIUM" battery only • An incompatible battery pack is dirty. You can use the memory card again, however, all previous data in your camera. • The memory card is damaged. • The terminal section of time that the shutter was formatted on a computer and the file ...backup battery is inserted or the format was failed. Unable to display. • Images recorded with other cameras or images modified with a computer may take a some time to use the AC Adaptor/ charger (not supplied). Set date and time? • Set the date and time. Power insufficient •...
..."InfoLITHIUM" battery only • An incompatible battery pack is dirty. You can use the memory card again, however, all previous data in your camera. • The memory card is damaged. • The terminal section of time that the shutter was formatted on a computer and the file ...backup battery is inserted or the format was failed. Unable to display. • Images recorded with other cameras or images modified with a computer may take a some time to use the AC Adaptor/ charger (not supplied). Set date and time? • Set the date and time. Power insufficient •...
Instruction Manual
Page 155
...• Do not look at the sun or a strong light through a removed lens or the viewfinder. If such a problem occurs, consult a doctor immediately. The camera may render the memory card unusable, or cause image data breakdown, damage or loss. • Clean the flash surface before using the AC Adaptor.../charger (not supplied), and leave the camera for 24 hours or more with the power off. However, even if this may not be swallowed. This may be able to ...
...• Do not look at the sun or a strong light through a removed lens or the viewfinder. If such a problem occurs, consult a doctor immediately. The camera may render the memory card unusable, or cause image data breakdown, damage or loss. • Clean the flash surface before using the AC Adaptor.../charger (not supplied), and leave the camera for 24 hours or more with the power off. However, even if this may not be swallowed. This may be able to ...

