
Instruction Manual
Page 3
...out of the reach of small children. • Keep the battery pack dry. • Replace only with the same or equivalent type recommended by Sony. • Dispose of used battery packs promptly as described in the instructions. [ AC Adaptor Connect the AC Adaptor to the collection and recycling ...that can help preserve our environment by returning your used with Canadian ICES-003. For Customers in the U.S.A. Operation is for use with this camera only, and should not be used rechargeable batteries to the nearest wall outlet (wall socket). The UL Mark on the product means it has...
...out of the reach of small children. • Keep the battery pack dry. • Replace only with the same or equivalent type recommended by Sony. • Dispose of used battery packs promptly as described in the instructions. [ AC Adaptor Connect the AC Adaptor to the collection and recycling ...that can help preserve our environment by returning your used with Canadian ICES-003. For Customers in the U.S.A. Operation is for use with this camera only, and should not be used rechargeable batteries to the nearest wall outlet (wall socket). The UL Mark on the product means it has...
Instruction Manual
Page 8
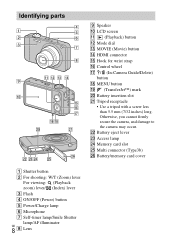
.../AF illuminator 8GB H Lens Identifying parts I Speaker J LCD screen K (Playback) button L Mode dial M MOVIE (Movie) button N HDMI connector O Hook for wrist strap P Control wheel Q / (In-Camera Guide/Delete) button R MENU button S (TransferJet™) mark T Battery insertion slot U Tripod receptacle • Use a tripod with a screw less than 5.5 mm (7/32 inches) long. Otherwise...
.../AF illuminator 8GB H Lens Identifying parts I Speaker J LCD screen K (Playback) button L Mode dial M MOVIE (Movie) button N HDMI connector O Hook for wrist strap P Control wheel Q / (In-Camera Guide/Delete) button R MENU button S (TransferJet™) mark T Battery insertion slot U Tripod receptacle • Use a tripod with a screw less than 5.5 mm (7/32 inches) long. Otherwise...
Instruction Manual
Page 10
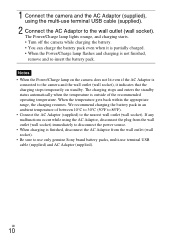
...AC Adaptor (supplied), using the AC Adaptor, disconnect the plug from the wall outlet (wall socket). • Be sure to use only genuine Sony brand battery packs, multi-use terminal USB cable (supplied). 2 Connect the AC Adaptor to the nearest wall outlet (wall socket). If any malfunctions ...-use terminal USB cable (supplied) and AC Adaptor (supplied). The Power/Charge lamp lights orange, and charging starts. • Turn off the camera while charging the battery. • You can charge the battery pack even when it indicates that the charging stops temporarily on standby. When the ...
...AC Adaptor (supplied), using the AC Adaptor, disconnect the plug from the wall outlet (wall socket). • Be sure to use only genuine Sony brand battery packs, multi-use terminal USB cable (supplied). 2 Connect the AC Adaptor to the nearest wall outlet (wall socket). If any malfunctions ...-use terminal USB cable (supplied) and AC Adaptor (supplied). The Power/Charge lamp lights orange, and charging starts. • Turn off the camera while charging the battery. • You can charge the battery pack even when it indicates that the charging stops temporarily on standby. When the ...
Instruction Manual
Page 11
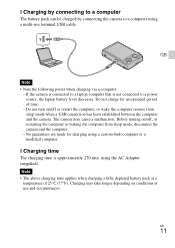
...using the AC Adaptor (supplied). GB 11 Before turning on/off or restart the computer, or wake the computer resume from sleep mode, disconnect the camera and the computer. - x Charging time The charging time is not connected to a computer using a multi-use and circumstances. Note • The...on /off , or restarting the computer or waking the computer from sleep mode when a USB connection has been established between the computer and the camera. Charging may cause a malfunction. Do not turn on conditions of 25°C (77°F). GB Note • Note the following points ...
...using the AC Adaptor (supplied). GB 11 Before turning on/off or restart the computer, or wake the computer resume from sleep mode, disconnect the camera and the computer. - x Charging time The charging time is not connected to a computer using a multi-use and circumstances. Note • The...on /off , or restarting the computer or waking the computer from sleep mode when a USB connection has been established between the computer and the camera. Charging may cause a malfunction. Do not turn on conditions of 25°C (77°F). GB Note • Note the following points ...
Instruction Manual
Page 12
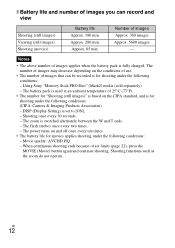
... to [ON]. - The number of images that can record and view Shooting (still images) Viewing (still images) Shooting (movies) Battery life Approx. 180 min. Using Sony "Memory Stick PRO Duo" (Mark2) media (sold separately) - The zoom is set limits (page 22), press the MOVIE (Movie) button again and continue shooting. The... images Approx. 5600 images - The power turns on and off once every ten times. • The battery life for shooting under the following conditions: (CIPA: Camera & Imaging Products Association) -
... to [ON]. - The number of images that can record and view Shooting (still images) Viewing (still images) Shooting (movies) Battery life Approx. 180 min. Using Sony "Memory Stick PRO Duo" (Mark2) media (sold separately) - The zoom is set limits (page 22), press the MOVIE (Movie) button again and continue shooting. The... images Approx. 5600 images - The power turns on and off once every ten times. • The battery life for shooting under the following conditions: (CIPA: Camera & Imaging Products Association) -
Instruction Manual
Page 13
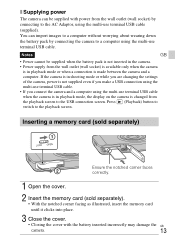
...until it clicks into place. 3 Close the cover. • Closing the cover with power from the wall outlet (wall socket) by connecting the camera to a computer using the multi-use terminal USB cable. You can be supplied when the battery pack is not inserted in playback mode or when... a connection is in the camera. • Power supply from the playback screen to the playback screen. x Supplying power The camera can import images to a computer without worrying about wearing down the battery pack by connecting to ...
...until it clicks into place. 3 Close the cover. • Closing the cover with power from the wall outlet (wall socket) by connecting the camera to a computer using the multi-use terminal USB cable. You can be supplied when the battery pack is not inserted in playback mode or when... a connection is in the camera. • Power supply from the playback screen to the playback screen. x Supplying power The camera can import images to a computer without worrying about wearing down the battery pack by connecting to ...
Instruction Manual
Page 15
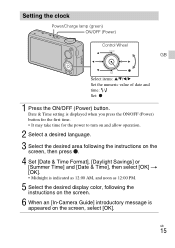
... indicated as 12:00 AM, and noon as 12:00 PM. 5 Select the desired display color, following the instructions on the screen. 6 When an [In-Camera Guide] introductory message is appeared on the screen, select [OK]. Setting the clock Power/Charge lamp (green) ON/OFF (Power) Control Wheel GB Select items...
... indicated as 12:00 AM, and noon as 12:00 PM. 5 Select the desired display color, following the instructions on the screen. 6 When an [In-Camera Guide] introductory message is appeared on the screen, select [OK]. Setting the clock Power/Charge lamp (green) ON/OFF (Power) Control Wheel GB Select items...
Instruction Manual
Page 16
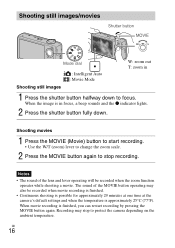
... and lever operating will be recorded when movie recording is finished. • Continuous shooting is possible for approximately 29 minutes at one time at the camera's default settings and when the temperature is approximately 25°C (77°F). When the image is finished, you can restart recording by pressing the MOVIE... dial : Intelligent Auto : Movie Mode W: zoom out T: zoom in focus, a beep sounds and the z indicator lights. 2 Press the shutter button fully down to protect the camera depending on the ambient temperature.
... and lever operating will be recorded when movie recording is finished. • Continuous shooting is possible for approximately 29 minutes at one time at the camera's default settings and when the temperature is approximately 25°C (77°F). When the image is finished, you can restart recording by pressing the MOVIE... dial : Intelligent Auto : Movie Mode W: zoom out T: zoom in focus, a beep sounds and the z indicator lights. 2 Press the shutter button fully down to protect the camera depending on the ambient temperature.
Instruction Manual
Page 17
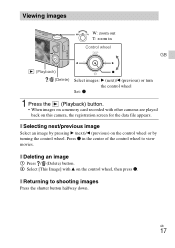
... or by pressing B (next)/b (previous) on the control wheel, then press z. x Deleting an image 1 Press / (Delete) button. 2 Select [This Image] with other cameras are played back on this camera, the registration screen for the data file appears. Viewing images W: zoom out T: zoom in the center of the control wheel to shooting images...
... or by pressing B (next)/b (previous) on the control wheel, then press z. x Deleting an image 1 Press / (Delete) button. 2 Select [This Image] with other cameras are played back on this camera, the registration screen for the data file appears. Viewing images W: zoom out T: zoom in the center of the control wheel to shooting images...
Instruction Manual
Page 18
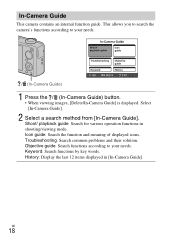
... 18 Icon guide: Search the function and meaning of displayed icons. In-Camera Guide This camera contains an internal function guide. Shoot/ playback guide: Search for various operation functions in [In-Camera Guide]. Objective guide: Search functions according to your needs. Keyword: Search... allows you to search the camera's functions according to your needs. / (In-Camera Guide) 1 Press the / (In-Camera Guide) button. • When viewing images, [Delete/In-Camera Guide] is displayed. Select [In-Camera Guide]. 2 Select a search method from [In-Camera Guide]. History: Display the ...
... 18 Icon guide: Search the function and meaning of displayed icons. In-Camera Guide This camera contains an internal function guide. Shoot/ playback guide: Search for various operation functions in [In-Camera Guide]. Objective guide: Search functions according to your needs. Keyword: Search... allows you to search the camera's functions according to your needs. / (In-Camera Guide) 1 Press the / (In-Camera Guide) button. • When viewing images, [Delete/In-Camera Guide] is displayed. Select [In-Camera Guide]. 2 Select a search method from [In-Camera Guide]. History: Display the ...
Instruction Manual
Page 19
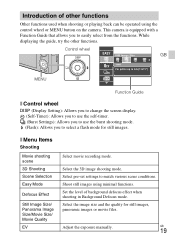
... you to easily select from the functions. Select the 3D image shooting mode. Shoot still images using the control wheel or MENU button on the camera. GB 19 Select pre-set settings to select a flash mode for still images, panoramic images or movie files. Select the image size and the quality... for still images. Adjust the exposure manually. Introduction of background defocus effect when shooting in Background Defocus mode. This camera is equipped with a Function Guide that allows you to match various scene conditions.
... you to easily select from the functions. Select the 3D image shooting mode. Shoot still images using the control wheel or MENU button on the camera. GB 19 Select pre-set settings to select a flash mode for still images, panoramic images or movie files. Select the image size and the quality... for still images. Adjust the exposure manually. Introduction of background defocus effect when shooting in Background Defocus mode. This camera is equipped with a Function Guide that allows you to match various scene conditions.
Instruction Manual
Page 20
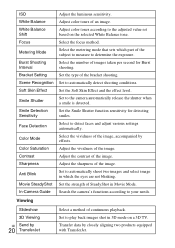
... function sensitivity for Burst shooting. Face Detection Select to automatically detect shooting conditions. Movie SteadyShot Set the strength of the image. In-Camera Guide Search the camera's functions according to the camera automatically release the shutter when a smile is detected. Bracket Setting Set the type of the image, accompanied by effects. Color Mode...
... function sensitivity for Burst shooting. Face Detection Select to automatically detect shooting conditions. Movie SteadyShot Set the strength of the image. In-Camera Guide Search the camera's functions according to the camera automatically release the shutter when a smile is detected. Bracket Setting Set the type of the image, accompanied by effects. Color Mode...
Instruction Manual
Page 21
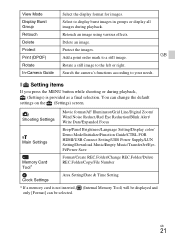
Search the camera's functions according to display burst images in groups or display all images during playback, (Settings) is not inserted, (Internal Memory Tool) will be selected. Shooting ... displayed and only [Format] can change the default settings on the (Settings) screen. View Mode Display Burst Group Retouch Delete Protect Print (DPOF) Rotate In-Camera Guide Select the display format for images. Delete an image.
Search the camera's functions according to display burst images in groups or display all images during playback, (Settings) is not inserted, (Internal Memory Tool) will be selected. Shooting ... displayed and only [Format] can change the default settings on the (Settings) screen. View Mode Display Burst Group Retouch Delete Protect Print (DPOF) Rotate In-Camera Guide Select the display format for images. Delete an image.
Instruction Manual
Page 22
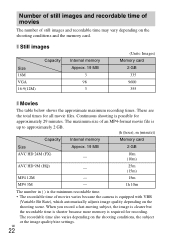
... because more memory is possible for all movie files. Number of still images and recordable time of movies The number of movies varies because the camera is equipped with VBR (Variable Bit Rate), which automatically adjusts image quality depending on the shooting conditions, the subject or the image quality/size settings...
... because more memory is possible for all movie files. Number of still images and recordable time of movies The number of movies varies because the camera is equipped with VBR (Variable Bit Rate), which automatically adjusts image quality depending on the shooting conditions, the subject or the image quality/size settings...
Instruction Manual
Page 23
...compatible device: (TransferJet) 1080 60i-compatible device: 60i 1080 50i-compatible device: 50i • Do not watch 3D images shot with this camera for yourself the length and frequency of 6). Also refer to the individual. GB 23 Note that a child's eyesight is a 1080 60i-...they vary according to the operating instructions supplied with the device or software you may be repaired. • Do not aim the camera at the development stage (particularly children below the age of breaks you may occur. Be particularly careful of discomfort, stop viewing the...
...compatible device: (TransferJet) 1080 60i-compatible device: 60i 1080 50i-compatible device: 50i • Do not watch 3D images shot with this camera for yourself the length and frequency of 6). Also refer to the individual. GB 23 Note that a child's eyesight is a 1080 60i-...they vary according to the operating instructions supplied with the device or software you may be repaired. • Do not aim the camera at the development stage (particularly children below the age of breaks you may occur. Be particularly careful of discomfort, stop viewing the...
Instruction Manual
Page 24
... appear on the LCD screen. If you turn off or you may be repaired. Otherwise, the camera may not properly record or play back images. • In sandy or dusty places Be careful ...not to let sand or dust get hot due to protect the camera. These dots are operational for effective use. In this case, leave the power off automatically to ... are a normal result of the manufacturing process, and do not affect the recording. On camera's temperature Your camera and battery may cause a malfunction. • In a location subject to record movies or the...
... appear on the LCD screen. If you turn off or you may be repaired. Otherwise, the camera may not properly record or play back images. • In sandy or dusty places Be careful ...not to let sand or dust get hot due to protect the camera. These dots are operational for effective use. In this case, leave the power off automatically to ... are a normal result of the manufacturing process, and do not affect the recording. On camera's temperature Your camera and battery may cause a malfunction. • In a location subject to record movies or the...
Instruction Manual
Page 25
GB No compensation for damaged content or recording failure Sony cannot compensate for a long time, you charge a battery that has not been used for failure to record or loss or damage of recorded content due to a malfunction of the camera or recording media, etc. To prevent damage to ... the finish or casing: - On charging the battery If you may be copyrighted. Charge the battery again. Cleaning the camera surface Clean the camera surface with a soft cloth slightly moistened with water, then wipe the surface with a dry cloth. Warning on copyright Television programs, films, ...
GB No compensation for damaged content or recording failure Sony cannot compensate for a long time, you charge a battery that has not been used for failure to record or loss or damage of recorded content due to a malfunction of the camera or recording media, etc. To prevent damage to ... the finish or casing: - On charging the battery If you may be copyrighted. Charge the battery again. Cleaning the camera surface Clean the camera surface with a soft cloth slightly moistened with water, then wipe the surface with a dry cloth. Warning on copyright Television programs, films, ...

Instruction Manual
Page 26
... with Dolby Digital Stereo Creator • Manufactured under license from Dolby Laboratories. Specifications Camera [System] Image device: 7.77 mm (1/2.3 type) Exmor R CMOS sensor Total pixel number of camera: Approx. 16.8 Megapixels Effective pixel number of camera: Approx. 16.2 Megapixels Lens: Sony G 7× zoom lens f = 4.28 mm - 30.0 mm (24 mm - 168 mm (35 mm...
... with Dolby Digital Stereo Creator • Manufactured under license from Dolby Laboratories. Specifications Camera [System] Image device: 7.77 mm (1/2.3 type) Exmor R CMOS sensor Total pixel number of camera: Approx. 16.8 Megapixels Effective pixel number of camera: Approx. 16.2 Megapixels Lens: Sony G 7× zoom lens f = 4.28 mm - 30.0 mm (24 mm - 168 mm (35 mm...


