Instruction Manual
Page 2
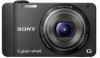
...INSTRUCTIONS If the shape of the plug does not fit the power outlet, use an attachment plug adaptor of in the space provided below. Record the serial number in fire. CAUTION [ Battery pack If the battery pack is mishandled, the battery pack can burst, cause a fire or even chemical burns. English Owner's Record The model and serial numbers...into contact with the battery terminals. • Do not expose to high temperature above 60°C (140°F) such as hammering, dropping or stepping on the bottom. Refer to rain or moisture. DSC-WX10 Serial No Model No. Model No. AC-UB10/...
...INSTRUCTIONS If the shape of the plug does not fit the power outlet, use an attachment plug adaptor of in the space provided below. Record the serial number in fire. CAUTION [ Battery pack If the battery pack is mishandled, the battery pack can burst, cause a fire or even chemical burns. English Owner's Record The model and serial numbers...into contact with the battery terminals. • Do not expose to high temperature above 60°C (140°F) such as hammering, dropping or stepping on the bottom. Refer to rain or moisture. DSC-WX10 Serial No Model No. Model No. AC-UB10/...

Instruction Manual
Page 3
... sure to charge the battery pack using the AC Adaptor, immediately shut off the power by GB disconnecting the plug from the wall outlet (wall socket). The power cord (mains lead), if supplied, is an internationally recognized safety organization. If some trouble occurs while using a genuine Sony battery charger or a device that can help preserve our environment by Sony. • Dispose of used rechargeable batteries to...
... sure to charge the battery pack using the AC Adaptor, immediately shut off the power by GB disconnecting the plug from the wall outlet (wall socket). The power cord (mains lead), if supplied, is an internationally recognized safety organization. If some trouble occurs while using a genuine Sony battery charger or a device that can help preserve our environment by Sony. • Dispose of used rechargeable batteries to...
Instruction Manual
Page 4
... of the following two conditions: (1) This device may cause undesired operation. [ CAUTION You are designed to Subpart B of Part 15 of Conformity Trade Name: SONY Model No.: DSC-WX10 Responsible Party: Sony Electronics Inc. [ Regulatory Information Declaration of FCC Rules. This equipment generates, uses, and can be used in a residential installation. Address: 16530 Via Esprillo, San Diego, CA 92127 U.S.A. If...
... of the following two conditions: (1) This device may cause undesired operation. [ CAUTION You are designed to Subpart B of Part 15 of Conformity Trade Name: SONY Model No.: DSC-WX10 Responsible Party: Sony Electronics Inc. [ Regulatory Information Declaration of FCC Rules. This equipment generates, uses, and can be used in a residential installation. Address: 16530 Via Esprillo, San Diego, CA 92127 U.S.A. If...
Instruction Manual
Page 5
...), restart the application or disconnect and connect the communication cable (USB, etc.) again. [ Disposal of this product, please contact your local Civic Office, your household waste disposal service or the shop where you will help prevent potential negative consequences for using connection cables shorter than 3 meters (9.8 feet). [ Attention The electromagnetic fields at the specific frequencies may influence the picture and sound of...
...), restart the application or disconnect and connect the communication cable (USB, etc.) again. [ Disposal of this product, please contact your local Civic Office, your household waste disposal service or the shop where you will help prevent potential negative consequences for using connection cables shorter than 3 meters (9.8 feet). [ Attention The electromagnetic fields at the specific frequencies may influence the picture and sound of...
Instruction Manual
Page 8
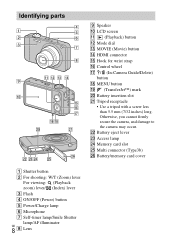
... X Memory card slot Y Multi connector (Type3b) Z Battery/memory card cover A Shutter button B For shooting: W/T (Zoom) lever For viewing: (Playback zoom) lever/ (Index) lever C Flash D ON/OFF (Power) button E Power/Charge lamp F Microphone G Self-timer lamp/Smile Shutter lamp/AF illuminator 8GB H Lens Identifying parts I Speaker J LCD screen K (Playback) button L Mode dial M MOVIE (Movie) button N HDMI connector O Hook for wrist strap P Control wheel Q / (In-Camera Guide/Delete) button R MENU button S (TransferJet™) mark T Battery insertion slot U Tripod receptacle • Use a tripod...
... X Memory card slot Y Multi connector (Type3b) Z Battery/memory card cover A Shutter button B For shooting: W/T (Zoom) lever For viewing: (Playback zoom) lever/ (Index) lever C Flash D ON/OFF (Power) button E Power/Charge lamp F Microphone G Self-timer lamp/Smile Shutter lamp/AF illuminator 8GB H Lens Identifying parts I Speaker J LCD screen K (Playback) button L Mode dial M MOVIE (Movie) button N HDMI connector O Hook for wrist strap P Control wheel Q / (In-Camera Guide/Delete) button R MENU button S (TransferJet™) mark T Battery insertion slot U Tripod receptacle • Use a tripod...
Instruction Manual
Page 10
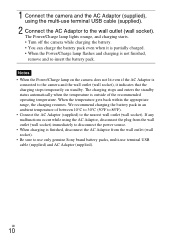
... the wall outlet (wall socket), it is partially charged. • When the Power/Charge lamp flashes and charging is not finished, remove and re-insert the battery pack. GB 10 If any malfunctions occur while using the multi-use terminal USB cable (supplied) and AC Adaptor (supplied). 1 Connect the camera and the AC Adaptor (supplied), using the AC Adaptor, disconnect the plug from the...
... the wall outlet (wall socket), it is partially charged. • When the Power/Charge lamp flashes and charging is not finished, remove and re-insert the battery pack. GB 10 If any malfunctions occur while using the multi-use terminal USB cable (supplied) and AC Adaptor (supplied). 1 Connect the camera and the AC Adaptor (supplied), using the AC Adaptor, disconnect the plug from the...
Instruction Manual
Page 11
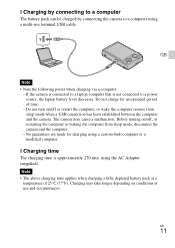
... charging time is not connected to a computer using a multi-use and circumstances. Charging may cause a malfunction. If the camera is connected to a laptop computer that is approximately 270 min. x Charging by connecting to a computer The battery pack can be charged by connecting the camera to a power source, the laptop battery level decreases. Do not turn on /off or restart the computer, or wake the computer resume from sleep mode...
... charging time is not connected to a computer using a multi-use and circumstances. Charging may cause a malfunction. If the camera is connected to a laptop computer that is approximately 270 min. x Charging by connecting to a computer The battery pack can be charged by connecting the camera to a power source, the laptop battery level decreases. Do not turn on /off or restart the computer, or wake the computer resume from sleep mode...
Instruction Manual
Page 12
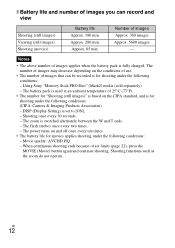
... 22), press the MOVIE (Movie) button again and continue shooting. DISP (Display Setting) is fully charged. The zoom is for shooting under the following conditions: - The flash strobes once every two times. - The power turns on the conditions of use. • The number of set to [ON]. - Shooting functions such as the zoom do not operate. Approx. 85 min. When continuous shooting ends because of images that can record and view Shooting (still images) Viewing (still images) Shooting (movies) Battery life Approx. 180...
... 22), press the MOVIE (Movie) button again and continue shooting. DISP (Display Setting) is fully charged. The zoom is for shooting under the following conditions: - The flash strobes once every two times. - The power turns on the conditions of use. • The number of set to [ON]. - Shooting functions such as the zoom do not operate. Approx. 85 min. When continuous shooting ends because of images that can record and view Shooting (still images) Viewing (still images) Shooting (movies) Battery life Approx. 180...
Instruction Manual
Page 13
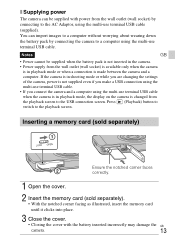
... the camera is in playback mode, the display on the camera is changed from the wall outlet (wall socket) is available only when the camera is made between the camera and a computer. Press (Playback) button to switch to the USB connection screen. x Supplying power The camera can import images to a computer without worrying about wearing down the battery pack by connecting to the AC Adaptor, using the multi-use terminal USB cable (supplied). Inserting a memory card...
... the camera is in playback mode, the display on the camera is changed from the wall outlet (wall socket) is available only when the camera is made between the camera and a computer. Press (Playback) button to switch to the USB connection screen. x Supplying power The camera can import images to a computer without worrying about wearing down the battery pack by connecting to the AC Adaptor, using the multi-use terminal USB cable (supplied). Inserting a memory card...
Instruction Manual
Page 15
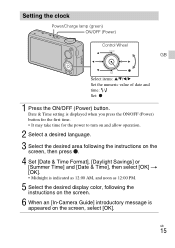
Setting the clock Power/Charge lamp (green) ON/OFF (Power) Control Wheel GB Select items: v/V/b/B Set the numeric value of date and time: / Set: z 1 Press the ON/OFF (Power) button. Date & Time setting is displayed when you press the ON/OFF (Power) button for the first time. • It may take time for the power to turn on and allow operation. 2 Select a desired language. 3 Select the desired area following the instructions on the screen, then press z. 4 Set [Date & Time Format], [Daylight Savings] or...
Setting the clock Power/Charge lamp (green) ON/OFF (Power) Control Wheel GB Select items: v/V/b/B Set the numeric value of date and time: / Set: z 1 Press the ON/OFF (Power) button. Date & Time setting is displayed when you press the ON/OFF (Power) button for the first time. • It may take time for the power to turn on and allow operation. 2 Select a desired language. 3 Select the desired area following the instructions on the screen, then press z. 4 Set [Date & Time Format], [Daylight Savings] or...
Instruction Manual
Page 16
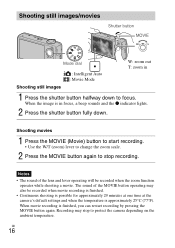
... camera's default settings and when the temperature is finished, you can restart recording by pressing the MOVIE button again. Notes • The sound of the MOVIE button operating may stop recording. When movie recording is approximately 25°C (77°F). GB 16 When the image is in Shooting still images 1 Press the shutter button halfway down . Shooting still images/movies Shutter button MOVIE Mode dial : Intelligent Auto : Movie Mode W: zoom out T: zoom in focus, a beep sounds and the z indicator lights. 2 Press the shutter button fully down to protect...
... camera's default settings and when the temperature is finished, you can restart recording by pressing the MOVIE button again. Notes • The sound of the MOVIE button operating may stop recording. When movie recording is approximately 25°C (77°F). GB 16 When the image is in Shooting still images 1 Press the shutter button halfway down . Shooting still images/movies Shutter button MOVIE Mode dial : Intelligent Auto : Movie Mode W: zoom out T: zoom in focus, a beep sounds and the z indicator lights. 2 Press the shutter button fully down to protect...
Instruction Manual
Page 17
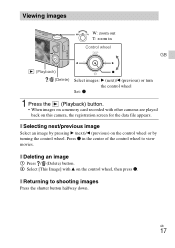
x Deleting an image 1 Press / (Delete) button. 2 Select [This Image] with other cameras are played back on this camera, the registration screen for the data file appears. GB 17 Press z in Control wheel GB (Playback) / (Delete) Select images: B (next)/b (previous) or turn the control wheel Set: z 1 Press the (Playback) button. • When images on a memory card recorded with v on the control wheel, then press z. Viewing images W: zoom out T: zoom in the center of the control wheel to shooting images Press the shutter button halfway down. x Returning...
x Deleting an image 1 Press / (Delete) button. 2 Select [This Image] with other cameras are played back on this camera, the registration screen for the data file appears. GB 17 Press z in Control wheel GB (Playback) / (Delete) Select images: B (next)/b (previous) or turn the control wheel Set: z 1 Press the (Playback) button. • When images on a memory card recorded with v on the control wheel, then press z. Viewing images W: zoom out T: zoom in the center of the control wheel to shooting images Press the shutter button halfway down. x Returning...
Instruction Manual
Page 18
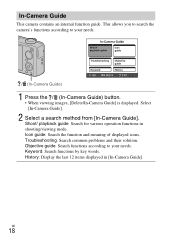
...In-Camera Guide]. Icon guide: Search the function and meaning of displayed icons. This allows you to search the camera's functions according to your needs. / (In-Camera Guide) 1 Press the / (In-Camera Guide) button. • When viewing images, [Delete/In-Camera Guide] is displayed. In-Camera Guide This camera contains an internal function guide. Keyword: Search functions by key words. Troubleshooting: Search common problems and their solution. History: Display the last 12 items displayed in shooting/viewing mode. GB 18 Shoot/ playback guide: Search for various operation functions...
...In-Camera Guide]. Icon guide: Search the function and meaning of displayed icons. This allows you to search the camera's functions according to your needs. / (In-Camera Guide) 1 Press the / (In-Camera Guide) button. • When viewing images, [Delete/In-Camera Guide] is displayed. In-Camera Guide This camera contains an internal function guide. Keyword: Search functions by key words. Troubleshooting: Search common problems and their solution. History: Display the last 12 items displayed in shooting/viewing mode. GB 18 Shoot/ playback guide: Search for various operation functions...
Instruction Manual
Page 19
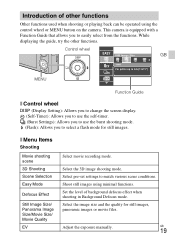
... Easy Mode Defocus Effect Still Image Size/ Panorama Image Size/Movie Size/ Movie Quality EV Select movie recording mode. While displaying the guide, try the other functions Other functions used when shooting or playing back can be operated using minimal functions. Select the image size and the quality for still images. Select the 3D image shooting mode. Set the level of other functions. GB 19 Introduction of background defocus effect when shooting in Background Defocus mode. Adjust the exposure manually. Shoot still images using the control wheel or MENU button...
... Easy Mode Defocus Effect Still Image Size/ Panorama Image Size/Movie Size/ Movie Quality EV Select movie recording mode. While displaying the guide, try the other functions Other functions used when shooting or playing back can be operated using minimal functions. Select the image size and the quality for still images. Select the 3D image shooting mode. Set the level of other functions. GB 19 Introduction of background defocus effect when shooting in Background Defocus mode. Adjust the exposure manually. Shoot still images using the control wheel or MENU button...
Instruction Manual
Page 20
... and adjust various settings automatically. Burst Shooting Interval Select the number of an image. Viewing Slideshow 3D Viewing GB Send by effects. White Balance Shift Adjust color tones according to determine the exposure. Transfer data by closely aligning two products equipped with TransferJet. Focus Select the focus method. Scene Recognition Set to your needs. White Balance Adjust color tones of images taken per second for detecting smiles. ISO Adjust the luminous sensitivity. In-Camera Guide Search the camera's functions...
... and adjust various settings automatically. Burst Shooting Interval Select the number of an image. Viewing Slideshow 3D Viewing GB Send by effects. White Balance Shift Adjust color tones according to determine the exposure. Transfer data by closely aligning two products equipped with TransferJet. Focus Select the focus method. Scene Recognition Set to your needs. White Balance Adjust color tones of images taken per second for detecting smiles. ISO Adjust the luminous sensitivity. In-Camera Guide Search the camera's functions...
Instruction Manual
Page 21
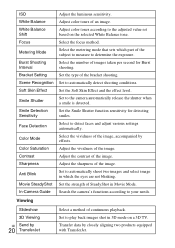
.../Language Setting/Display color/ Demo Mode/Initialize/Function Guide/CTRL FOR HDMI/USB Connect Setting/USB Power Supply/LUN Setting/Download Music/Empty Music/TransferJet/EyeFi/Power Save Memory Card Tool* Format/Create REC.Folder/Change REC.Folder/Delete REC.Folder/Copy/File Number Clock Settings Area Setting/Date & Time Setting * If a memory card is provided as a final selection. View Mode Display Burst Group Retouch Delete Protect Print (DPOF) Rotate In-Camera Guide Select the display format for images. x Setting items If you press the MENU button while shooting or during playback...
.../Language Setting/Display color/ Demo Mode/Initialize/Function Guide/CTRL FOR HDMI/USB Connect Setting/USB Power Supply/LUN Setting/Download Music/Empty Music/TransferJet/EyeFi/Power Save Memory Card Tool* Format/Create REC.Folder/Change REC.Folder/Delete REC.Folder/Copy/File Number Clock Settings Area Setting/Date & Time Setting * If a memory card is provided as a final selection. View Mode Display Burst Group Retouch Delete Protect Print (DPOF) Rotate In-Camera Guide Select the display format for images. x Setting items If you press the MENU button while shooting or during playback...
Instruction Manual
Page 22
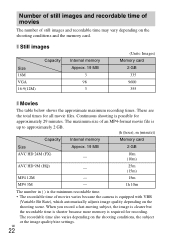
... or the image quality/size settings. Number of still images and recordable time of movies The number of movies varies because the camera is equipped with VBR (Variable Bit Rate), which automatically adjusts image quality depending on the shooting scene. When you record a fast-moving subject, the image is clearer but the recordable time is shorter because more memory is possible for recording. x Still images Size 16M VGA 16:9(12M) Capacity Internal memory Approx...
... or the image quality/size settings. Number of still images and recordable time of movies The number of movies varies because the camera is equipped with VBR (Variable Bit Rate), which automatically adjusts image quality depending on the shooting scene. When you record a fast-moving subject, the image is clearer but the recordable time is shorter because more memory is possible for recording. x Still images Size 16M VGA 16:9(12M) Capacity Internal memory Approx...
Instruction Manual
Page 23
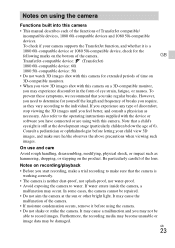
... you view 3D images shot with this camera on a 3D-compatible monitor, you have connected or are using with the device or software you may be able to the operating instructions supplied with this camera. Also refer to record images. GB 23 Notes on using the camera Functions built into this camera • This manual describes each of the functions of the lens. To check if your child view 3D images, and make...
... you view 3D images shot with this camera on a 3D-compatible monitor, you have connected or are using with the device or software you may be able to the operating instructions supplied with this camera. Also refer to record images. GB 23 Notes on using the camera Functions built into this camera • This manual describes each of the functions of the lens. To check if your child view 3D images, and make...
Instruction Manual
Page 24
... with the camera in some tiny black and/or bright dots (white, red, blue or green) may appear on the camera and battery temperature, you may cause malfunction or damage the camera. A message will be displayed on the LCD screen and lens The LCD screen is not a malfunction. This may cause the camera to record movies. In this may be repaired. GB 24 Notes on the LCD screen before the power turns off...
... with the camera in some tiny black and/or bright dots (white, red, blue or green) may appear on the camera and battery temperature, you may cause malfunction or damage the camera. A message will be displayed on the LCD screen and lens The LCD screen is not a malfunction. This may cause the camera to record movies. In this may be repaired. GB 24 Notes on the LCD screen before the power turns off...

Instruction Manual
Page 26
... pixel number of camera: Approx. 16.8 Megapixels Effective pixel number of camera: Approx. 16.2 Megapixels Lens: Sony G 7× zoom lens f = 4.28 mm - 30.0 mm (24 mm - 168 mm (35 mm film equivalent)) F2.4 (W) - F5.9 (T) While shooting movies (16:9): 26 mm - 182 mm While shooting movies (4:3): 32 mm - 224 mm SteadyShot: Optical Exposure control: Automatic exposure, Manual exposure, Scene Selection (15 modes) White balance: Automatic, Daylight, Cloudy, Fluorescent 1/2/3, Incandescent, Flash, One Push Signal format: For...
... pixel number of camera: Approx. 16.8 Megapixels Effective pixel number of camera: Approx. 16.2 Megapixels Lens: Sony G 7× zoom lens f = 4.28 mm - 30.0 mm (24 mm - 168 mm (35 mm film equivalent)) F2.4 (W) - F5.9 (T) While shooting movies (16:9): 26 mm - 182 mm While shooting movies (4:3): 32 mm - 224 mm SteadyShot: Optical Exposure control: Automatic exposure, Manual exposure, Scene Selection (15 modes) White balance: Automatic, Daylight, Cloudy, Fluorescent 1/2/3, Incandescent, Flash, One Push Signal format: For...


