Instruction Manual
Page 5
...local Civic Office, your household waste disposal service or the shop where you will help prevent potential negative consequences for using connection cables shorter than 3 meters (9.8 feet). [ Attention The electromagnetic fields at the specific frequencies may apply, See www.dtsc.ca.gov... this product. Instead it shall be handed over to discontinue midway (fail), restart the application or disconnect and connect the communication cable (USB, etc.) again. [ Disposal of electrical and electronic equipment. For Customers in Europe This product has been tested and found compliant...
...local Civic Office, your household waste disposal service or the shop where you will help prevent potential negative consequences for using connection cables shorter than 3 meters (9.8 feet). [ Attention The electromagnetic fields at the specific frequencies may apply, See www.dtsc.ca.gov... this product. Instead it shall be handed over to discontinue midway (fail), restart the application or disconnect and connect the communication cable (USB, etc.) again. [ Disposal of electrical and electronic equipment. For Customers in Europe This product has been tested and found compliant...
Instruction Manual
Page 9
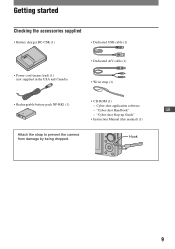
"Cyber-shot Step-up Guide" • Instruction Manual (this manual) (1) Attach the strap to prevent the camera from damage by being dropped. Hook 9 Cyber-shot application software - "Cyber-shot Handbook" GB - Getting started Checking the accessories supplied • Battery charger BC-CSK (1) • Dedicated USB cable (1) • Power cord (mains lead) (1) (not supplied in the USA and Canada) • Dedicated A/V cable (1) • Wrist strap (1) • CD-ROM (1) • Rechargeable battery pack NP-BK1 (1) -
"Cyber-shot Step-up Guide" • Instruction Manual (this manual) (1) Attach the strap to prevent the camera from damage by being dropped. Hook 9 Cyber-shot application software - "Cyber-shot Handbook" GB - Getting started Checking the accessories supplied • Battery charger BC-CSK (1) • Dedicated USB cable (1) • Power cord (mains lead) (1) (not supplied in the USA and Canada) • Dedicated A/V cable (1) • Wrist strap (1) • CD-ROM (1) • Rechargeable battery pack NP-BK1 (1) -
Instruction Manual
Page 23
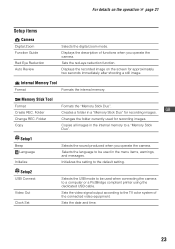
...or a PictBridge compliant printer using the dedicated USB cable. Sets the date and time. 23 Displays the recorded image on the operation 1 page 21 Setup items Camera Digital Zoom Function Guide Red Eye Reduction Auto Review Selects the digital zoom mode. Folder Formats the "Memory Stick ...REC. Initializes the setting to the TV color system of functions when you operate the camera. For details on the screen for approximately two seconds immediately after shooting a still image. Displays the description of the connected video equipment. Copy Copies all images in a...
...or a PictBridge compliant printer using the dedicated USB cable. Sets the date and time. 23 Displays the recorded image on the operation 1 page 21 Setup items Camera Digital Zoom Function Guide Red Eye Reduction Auto Review Selects the digital zoom mode. Folder Formats the "Memory Stick ...REC. Initializes the setting to the TV color system of functions when you operate the camera. For details on the screen for approximately two seconds immediately after shooting a still image. Displays the description of the connected video equipment. Copy Copies all images in a...
Cyber-shot® Handbook
Page 17
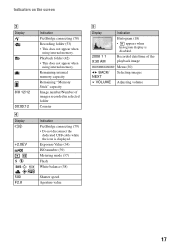
... appear when using internal memory. Recorded date/time of images recorded in selected folder Counter Indication PictBridge connecting (79) • Do not disconnect the dedicated USB cable while the icon is disabled. Remaining internal memory capacity Remaining "Memory Stick" capacity Image number/Number of the playback image Menu (30) Selecting images Adjusting...
... appear when using internal memory. Recorded date/time of images recorded in selected folder Counter Indication PictBridge connecting (79) • Do not disconnect the dedicated USB cable while the icon is disabled. Remaining internal memory capacity Remaining "Memory Stick" capacity Image number/Number of the playback image Menu (30) Selecting images Adjusting...
Cyber-shot® Handbook
Page 19
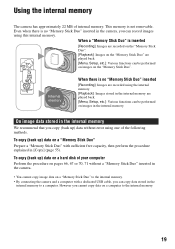
...; You cannot copy image data on a "Memory Stick Duo" to the internal memory. • By connecting the camera and a computer with sufficient free capacity, then perform the procedure explained in the internal memory. B Internal memory When there is inserted B [Recording]: Images .... To copy (back up ) data on a "Memory Stick Duo" Prepare a "Memory Stick Duo" with a dedicated USB cable, you cannot copy data on images in [Copy] (page 55). Using the internal memory The camera has approximately 22 MB of the following methods. Even when there is not removable. On image data stored...
...; You cannot copy image data on a "Memory Stick Duo" to the internal memory. • By connecting the camera and a computer with sufficient free capacity, then perform the procedure explained in the internal memory. B Internal memory When there is inserted B [Recording]: Images .... To copy (back up ) data on a "Memory Stick Duo" Prepare a "Memory Stick Duo" with a dedicated USB cable, you cannot copy data on images in [Copy] (page 55). Using the internal memory The camera has approximately 22 MB of the following methods. Even when there is not removable. On image data stored...
Cyber-shot® Handbook
Page 57
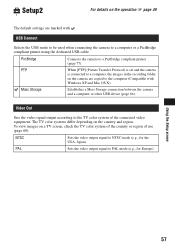
... according to a computer or a PictBridge compliant printer using the dedicated USB cable. PAL Sets the video output signal to the computer (Compatible with . USB Connect Selects the USB mode to be used when connecting the camera to the TV color system of use (page 60). Using the ...TV color system of the country or region of the connected video equipment. Mass Storage Establishes a Mass Storage connection between the camera and a computer or other USB device (page 66). Setup2 2 For details on the operation 1 page 49 The default settings are copied to PAL mode (e.g.,...
... according to a computer or a PictBridge compliant printer using the dedicated USB cable. PAL Sets the video output signal to the computer (Compatible with . USB Connect Selects the USB mode to be used when connecting the camera to the TV color system of use (page 60). Using the ...TV color system of the country or region of the connected video equipment. Mass Storage Establishes a Mass Storage connection between the camera and a computer or other USB device (page 66). Setup2 2 For details on the operation 1 page 49 The default settings are copied to PAL mode (e.g.,...
Cyber-shot® Handbook
Page 66
... recognize the camera. Connecting the camera to your computer 1 To the (USB) · A/V OUT terminal 2 Insert the sufficiently charged battery pack in the internal memory, this step is established for a while. * During communication, the access indicators turn on the screen of the camera. Access indicators* (Playback) button When a USB connection is unnecessary. Dedicated USB cable 2 To a USB jack...
... recognize the camera. Connecting the camera to your computer 1 To the (USB) · A/V OUT terminal 2 Insert the sufficiently charged battery pack in the internal memory, this step is established for a while. * During communication, the access indicators turn on the screen of the camera. Access indicators* (Playback) button When a USB connection is unnecessary. Dedicated USB cable 2 To a USB jack...
Cyber-shot® Handbook
Page 68
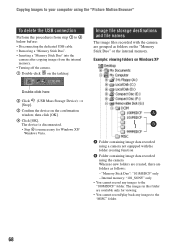
...the "Picture Motion Browser" To delete the USB connection Perform the procedures from step 1 to 4 below before: • Disconnecting the dedicated USB cable. • Removing a "Memory Stick Duo". • Inserting a "Memory Stick Duo" into the camera after copying images from the internal memory.... • Turning off the camera. 1 Double-click on the tasktray. Internal memory: "101_SONY...
...the "Picture Motion Browser" To delete the USB connection Perform the procedures from step 1 to 4 below before: • Disconnecting the dedicated USB cable. • Removing a "Memory Stick Duo". • Inserting a "Memory Stick Duo" into the camera after copying images from the internal memory.... • Turning off the camera. 1 Double-click on the tasktray. Internal memory: "101_SONY...
Cyber-shot® Handbook
Page 70
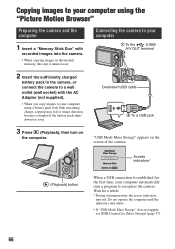
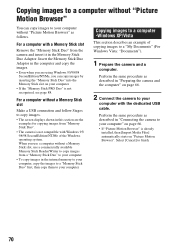
... you can copy images to your computer without "Picture Motion Browser" as described in "Preparing the camera and the computer" on page 66. 2 Connect the camera to your computer. For a computer without a Memory Stick slot Make a USB connection and follow Stages to copy images. • The screen displays shown in the internal memory... inserting the "Memory Stick Duo" into the Memory Stick slot on "Picture Motion Browser". Select [Cancel] to a "My Documents" (For Windows Vista: "Documents"). 1 Prepare the camera and a computer. For a computer with the dedicated USB cable.
... you can copy images to your computer without "Picture Motion Browser" as described in "Preparing the camera and the computer" on page 66. 2 Connect the camera to your computer. For a computer without a Memory Stick slot Make a USB connection and follow Stages to copy images. • The screen displays shown in the internal memory... inserting the "Memory Stick Duo" into the Memory Stick slot on "Picture Motion Browser". Select [Cancel] to a "My Documents" (For Windows Vista: "Documents"). 1 Prepare the camera and a computer. For a computer with the dedicated USB cable.
Cyber-shot® Handbook
Page 73
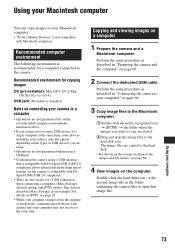
...PTP] modes. Copying and viewing images on page 66. 2 Connect the dedicated USB cable. Double-click the hard disk icon t the desired image file in "Connecting the camera to your computer" on connecting your camera to the camera. For details on [PTP], see page 57. • When your computer ... following environment is recommended for copying images OS (pre-installed): Mac OS 9.1/9.2/ Mac OS X(v10.1 to v10.4) USB jack: Provided as the camera is compatible with Hi-Speed USB (USB 2.0 compliant) allows advanced transfer (high speed transfer) as standard Notes on page 66. 3 Copy image files to...
...PTP] modes. Copying and viewing images on page 66. 2 Connect the dedicated USB cable. Double-click the hard disk icon t the desired image file in "Connecting the camera to your computer" on connecting your camera to the camera. For details on [PTP], see page 57. • When your computer ... following environment is recommended for copying images OS (pre-installed): Mac OS 9.1/9.2/ Mac OS X(v10.1 to v10.4) USB jack: Provided as the camera is compatible with Hi-Speed USB (USB 2.0 compliant) allows advanced transfer (high speed transfer) as standard Notes on page 66. 3 Copy image files to...
Cyber-shot® Handbook
Page 74
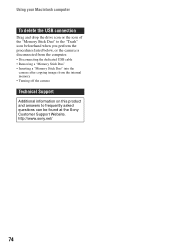
... the computer. • Disconnecting the dedicated USB cable • Removing a "Memory Stick Duo" • Inserting a "Memory Stick Duo" into the camera after copying images from the internal memory • Turning off the camera Technical Support Additional information on this product and answers to frequently asked questions can be found at the Sony Customer Support Website.
... the computer. • Disconnecting the dedicated USB cable • Removing a "Memory Stick Duo" • Inserting a "Memory Stick Duo" into the camera after copying images from the internal memory • Turning off the camera Technical Support Additional information on this product and answers to frequently asked questions can be found at the Sony Customer Support Website.

Cyber-shot® Handbook
Page 77
...movies. • If the indicator flashes on the screen of the camera for about five seconds (error notification), check the connected printer. The USB mode is based on the CIPA standard. (CIPA: Camera & Imaging Products Association) In single image mode You can print ... print images shot using your camera by connecting the camera directly to select (Setup). 3 Select (Setup2) with V, then 2 select [USB Connect] with v/V/B. 4 Select [PictBridge] with the dedicated USB cable. Stage 1: Preparing the camera Prepare the camera to connect it to display the menu. Printing still images 77 MENU...
...movies. • If the indicator flashes on the screen of the camera for about five seconds (error notification), check the connected printer. The USB mode is based on the CIPA standard. (CIPA: Camera & Imaging Products Association) In single image mode You can print ... print images shot using your camera by connecting the camera directly to select (Setup). 3 Select (Setup2) with V, then 2 select [USB Connect] with v/V/B. 4 Select [PictBridge] with the dedicated USB cable. Stage 1: Preparing the camera Prepare the camera to connect it to display the menu. Printing still images 77 MENU...
Cyber-shot® Handbook
Page 78
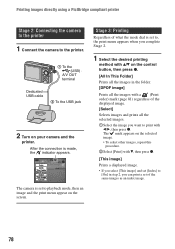
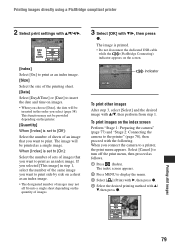
...menu appear on your camera and the printer. Stage 3: Printing Regardless of the displayed image. [Select] Selects images and prints all the images in step 2, you want to the printer. 1 To the (USB) · A/V OUT terminal Dedicated USB cable 2 To the USB jack 2 Turn on ...the screen. Printing images directly using a PictBridge compliant printer Stage 2: Connecting the camera to the printer 1 Connect the camera to print with b/B, then press z.
...menu appear on your camera and the printer. Stage 3: Printing Regardless of the displayed image. [Select] Selects images and prints all the images in step 2, you want to the printer. 1 To the (USB) · A/V OUT terminal Dedicated USB cable 2 To the USB jack 2 Turn on ...the screen. Printing images directly using a PictBridge compliant printer Stage 2: Connecting the camera to the printer 1 Connect the camera to print with b/B, then press z.
Cyber-shot® Handbook
Page 79
...select (page 58). Select [Cancel] to a printer, the print menu appears. Printing still images 79 indicator To print other images After step 3, select [Select] and the desired...onto a single sheet depending on the index screen Perform "Stage 1: Preparing the camera" (page 77) and "Stage 2: Connecting the camera to the printer" (page 78), then proceed with the following. The index ...time on the screen. When [Index] is printed. • Do not disconnect the dedicated USB cable while the (PictBridge Connecting) indicator appears on images. • When you choose [Date], the...
...select (page 58). Select [Cancel] to a printer, the print menu appears. Printing still images 79 indicator To print other images After step 3, select [Select] and the desired...onto a single sheet depending on the index screen Perform "Stage 1: Preparing the camera" (page 77) and "Stage 2: Connecting the camera to the printer" (page 78), then proceed with the following. The index ...time on the screen. When [Index] is printed. • Do not disconnect the dedicated USB cable while the (PictBridge Connecting) indicator appears on images. • When you choose [Date], the...
Cyber-shot® Handbook
Page 88
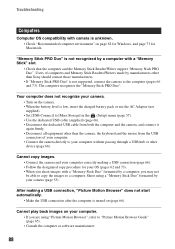
... to [Mass Storage] in the (Setup) menu (page 57). • Use the dedicated USB cable (supplied) (page 66). • Disconnect the dedicated USB cable from both the computer and the camera, and connect it again firmly. • Disconnect all equipment other than Sony should contact those manufacturers. • If "Memory Stick PRO Duo" is low, insert...
... to [Mass Storage] in the (Setup) menu (page 57). • Use the dedicated USB cable (supplied) (page 66). • Disconnect the dedicated USB cable from both the computer and the camera, and connect it again firmly. • Disconnect all equipment other than Sony should contact those manufacturers. • If "Memory Stick PRO Duo" is low, insert...
Cyber-shot® Handbook
Page 90
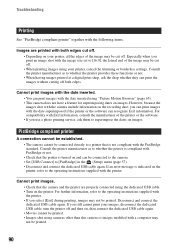
...• The camera cannot be connected directly to the operating instructions supplied with the printer. • If you still cannot print your images, disconnect the dedicated USB cable, turn the ... these functions or not. • When having images printed at a digital print shop, ask the shop whether they can print images with the...shot with the camera include information on the recording date, you use a photo printing service, ask them to superimpose the dates on the printer, refer to [PictBridge] in the (Setup) menu (page 57). • Disconnect and connect the dedicated USB cable...
...• The camera cannot be connected directly to the operating instructions supplied with the printer. • If you still cannot print your images, disconnect the dedicated USB cable, turn the ... these functions or not. • When having images printed at a digital print shop, ask the shop whether they can print images with the...shot with the camera include information on the recording date, you use a photo printing service, ask them to superimpose the dates on the printer, refer to [PictBridge] in the (Setup) menu (page 57). • Disconnect and connect the dedicated USB cable...

Cyber-shot® Handbook
Page 91
...-number. • If you replace a recording medium, you use paper of a different size after canceling printing. • Wait for a while as to the camera, disconnect and then reconnect the dedicated USB cable. • The print setting of the camera differs from that has stopped moving. • Insert a charged battery pack, then turn on the...
...-number. • If you replace a recording medium, you use paper of a different size after canceling printing. • Wait for a while as to the camera, disconnect and then reconnect the dedicated USB cable. • The print setting of the camera differs from that has stopped moving. • Insert a charged battery pack, then turn on the...
Cyber-shot® Handbook
Page 94
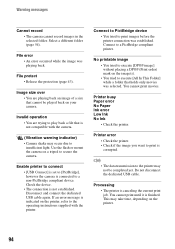
.... • Check if the image you want to secure the camera. This may not be played back on a tripod to print is not compatible with the printer. Do not disconnect the dedicated USB cable. File protect • Release the protection (page 43). Disconnect and... connect the dedicated USB cable again. Connect to PictBridge device • You tried to a PictBridge compliant printer. Warning messages Cannot record • The camera cannot record images in the...
.... • Check if the image you want to secure the camera. This may not be played back on a tripod to print is not compatible with the printer. Do not disconnect the dedicated USB cable. File protect • Release the protection (page 43). Disconnect and... connect the dedicated USB cable again. Connect to PictBridge device • You tried to a PictBridge compliant printer. Warning messages Cannot record • The camera cannot record images in the...
Cyber-shot® Handbook
Page 100
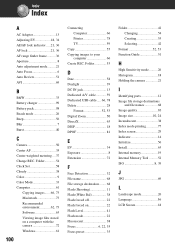
...Landscape mode 26 Language 56 LCD Screen 18 Folder 53 D Date 58 Daylight 39 DC IN jack 13 Dedicated A/V cable 59 Dedicated USB cable ..... 66, 78 Delete 28 Format 52, 53 Digital Zoom 50 DirectX 63 DISP 18 DPOF 81 E EV 34 Exposure 8 Extension 72 F Face Detection 32 File name... 68 File storage destination ........ 68 Flash (Shooting 11 Flash (White Bal 38 Flash forced off 22 Flash forced on a computer with the camera...
...Landscape mode 26 Language 56 LCD Screen 18 Folder 53 D Date 58 Daylight 39 DC IN jack 13 Dedicated A/V cable 59 Dedicated USB cable ..... 66, 78 Delete 28 Format 52, 53 Digital Zoom 50 DirectX 63 DISP 18 DPOF 81 E EV 34 Exposure 8 Extension 72 F Face Detection 32 File name... 68 File storage destination ........ 68 Flash (Shooting 11 Flash (White Bal 38 Flash forced off 22 Flash forced on a computer with the camera...
Marketing Specifications (DSC-S780)
Page 2
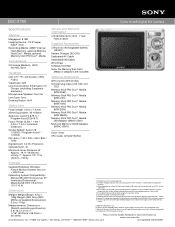
... Battery Charger (BC-CSK) Dedicated AV Cable Dedicated USB Cable Wrist Strap Software CD-ROM Note: No Memory Stick Duo™ Media or adaptors are available in Smile Shutter mode. 7.Shooting at www.sony.com/dn Sony Electronics Inc. •16530 Via Esprillo ... to the Cyber-shot®. 5.Smart Zoom® feature will be up to five minutes long. Convenience Still Image Mode(s): JPEG: Normal, Burst Hardware LCD: 2.5"1 TFT LCD Screen (153K Pixels) Viewfinder: N/A Lens Construction: 6 Elements in part without notice. DSC-S780 Cyber-shot® Digital Still Camera Specifications General ...
... Battery Charger (BC-CSK) Dedicated AV Cable Dedicated USB Cable Wrist Strap Software CD-ROM Note: No Memory Stick Duo™ Media or adaptors are available in Smile Shutter mode. 7.Shooting at www.sony.com/dn Sony Electronics Inc. •16530 Via Esprillo ... to the Cyber-shot®. 5.Smart Zoom® feature will be up to five minutes long. Convenience Still Image Mode(s): JPEG: Normal, Burst Hardware LCD: 2.5"1 TFT LCD Screen (153K Pixels) Viewfinder: N/A Lens Construction: 6 Elements in part without notice. DSC-S780 Cyber-shot® Digital Still Camera Specifications General ...


