Instruction Manual
Page 1
... product and answers to frequently asked questions can be found at our Customer Support Website. Preparation Digital Still Camera Instruction Manual DSC-S500 Before operating the unit, please read this manual and "Cyber-shot Handbook" (PDF) on the bottom. http://www.sony.net/ Shoot images easily (Auto adjustment mode) View/delete images Printing images Troubleshooting Others ©...
... product and answers to frequently asked questions can be found at our Customer Support Website. Preparation Digital Still Camera Instruction Manual DSC-S500 Before operating the unit, please read this manual and "Cyber-shot Handbook" (PDF) on the bottom. http://www.sony.net/ Shoot images easily (Auto adjustment mode) View/delete images Printing images Troubleshooting Others ©...
Instruction Manual
Page 5
... electricity or electromagnetism causes data transfer to provide reasonable protection against harmful interference in the EMC Directive for help. By ensuring this camera. This equipment generates, uses, and can be determined by turning the equipment off and on, the user is encouraged to try...influence the picture and sound of the FCC Rules. These limits are cautioned that interference will help prevent potential negative consequences for a digital device pursuant to Subpart B of Part 15 of the following two conditions: (1) This device may cause harmful interference to which ...
... electricity or electromagnetism causes data transfer to provide reasonable protection against harmful interference in the EMC Directive for help. By ensuring this camera. This equipment generates, uses, and can be determined by turning the equipment off and on, the user is encouraged to try...influence the picture and sound of the FCC Rules. These limits are cautioned that interference will help prevent potential negative consequences for a digital device pursuant to Subpart B of Part 15 of the following two conditions: (1) This device may cause harmful interference to which ...
Instruction Manual
Page 6
...Duo". Water entering the inside of "Memory Stick" that can be destroyed. Or it may cause the malfunction of your camera. • Do not use the camera near a location that the camera is lighted, as the internal memory data or "Memory Stick Duo" data may cause malfunctions. • If moisture ... Stick Duo" with "Memory Stick" compatible equipment You can use the "Memory Stick Duo" by making a back up • Do not turn off the camera or remove the batteries or "Memory Stick Duo" while the access lamp is working correctly. • Be careful not to record or play back properly...
...Duo". Water entering the inside of "Memory Stick" that can be destroyed. Or it may cause the malfunction of your camera. • Do not use the camera near a location that the camera is lighted, as the internal memory data or "Memory Stick Duo" data may cause malfunctions. • If moisture ... Stick Duo" with "Memory Stick" compatible equipment You can use the "Memory Stick Duo" by making a back up • Do not turn off the camera or remove the batteries or "Memory Stick Duo" while the access lamp is working correctly. • Be careful not to record or play back properly...
Instruction Manual
Page 7
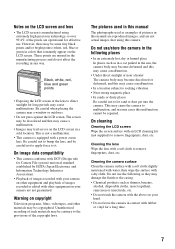
...of pictures in color) that may cause a malfunction. • Images may trail across on the LCD screen in the sun, the camera body may become discolored or deformed, and this may be copyrighted. The pictures used in this manual The photographs used as examples of ... on copyright Television programs, films, videotapes, and other equipment on your camera are not actual images shot using extremely high-precision technology so over 99.4% of the copyright laws. Cleaning the camera surface Clean the camera surface with a soft cloth slightly moistened with water, then wipe the surface...
...of pictures in color) that may cause a malfunction. • Images may trail across on the LCD screen in the sun, the camera body may become discolored or deformed, and this may be copyrighted. The pictures used in this manual The photographs used as examples of ... on copyright Television programs, films, videotapes, and other equipment on your camera are not actual images shot using extremely high-precision technology so over 99.4% of the copyright laws. Cleaning the camera surface Clean the camera surface with a soft cloth slightly moistened with water, then wipe the surface...
Instruction Manual
Page 8
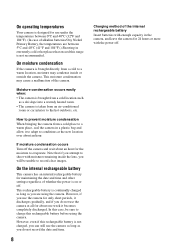
...Note that exceed this range is brought from a cold location such as you are using the camera. On moisture condensation If the camera is on or off . On the internal rechargeable battery This camera has an internal rechargeable battery for the moisture to a warm location, moisture may cause a ...hot places that if you attempt to shoot with moisture remaining inside or outside the camera. How to prevent moisture condensation When bringing the camera from a cold place to a warm place, seal the camera in a plastic bag and allow it discharges gradually, and if you do not record...
...Note that exceed this range is brought from a cold location such as you are using the camera. On moisture condensation If the camera is on or off . On the internal rechargeable battery This camera has an internal rechargeable battery for the moisture to a warm location, moisture may cause a ...hot places that if you attempt to shoot with moisture remaining inside or outside the camera. How to prevent moisture condensation When bringing the camera from a cold place to a warm place, seal the camera in a plastic bag and allow it discharges gradually, and if you do not record...
Instruction Manual
Page 9
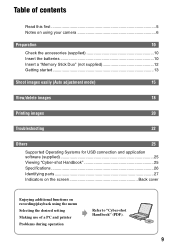
Table of contents Read this first 5 Notes on using your camera 6 Preparation 10 Check the accessories (supplied 10 Insert the batteries 10 Insert a "Memory Stick Duo" (not supplied 12 Getting started 13 Shoot images ...15 View/delete images 18 Printing images 20 Troubleshooting 22 Others 25 Supported Operating Systems for USB connection and application software (supplied 25 Viewing "Cyber-shot Handbook 25 Specifications 26 Identifying parts 27 Indicators on the screen Back cover Enjoying additional functions on recording/playback using the menu Selecting the desired...
Table of contents Read this first 5 Notes on using your camera 6 Preparation 10 Check the accessories (supplied 10 Insert the batteries 10 Insert a "Memory Stick Duo" (not supplied 12 Getting started 13 Shoot images ...15 View/delete images 18 Printing images 20 Troubleshooting 22 Others 25 Supported Operating Systems for USB connection and application software (supplied 25 Viewing "Cyber-shot Handbook 25 Specifications 26 Identifying parts 27 Indicators on the screen Back cover Enjoying additional functions on recording/playback using the menu Selecting the desired...
Instruction Manual
Page 10
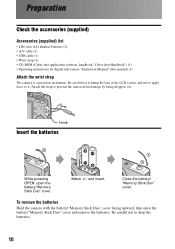
To remove the batteries Hold the camera with the battery/"Memory Stick Duo" cover facing upward, then open the battery/"Memory Stick Duo" cover. Attach the strap to drop the batteries. 10...; LR6 (size AA) alkaline batteries (2) • A/V cable (1) • USB cable (1) • Wrist strap (1) • CD-ROM (Cyber-shot application software, handbook "Cyber-shot Handbook") (1) • Operating instructions for digital still camera "Instruction Manual" (this manual) (1) Attach the wrist strap The camera is a precision instrument. Be careful not to bump the lens or the LCD screen, and not...
To remove the batteries Hold the camera with the battery/"Memory Stick Duo" cover facing upward, then open the battery/"Memory Stick Duo" cover. Attach the strap to drop the batteries. 10...; LR6 (size AA) alkaline batteries (2) • A/V cable (1) • USB cable (1) • Wrist strap (1) • CD-ROM (Cyber-shot application software, handbook "Cyber-shot Handbook") (1) • Operating instructions for digital still camera "Instruction Manual" (this manual) (1) Attach the wrist strap The camera is a precision instrument. Be careful not to bump the lens or the LCD screen, and not...
Instruction Manual
Page 11
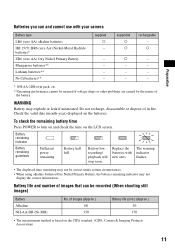
...8226; When using alkaline batteries/Oxy Nickel Primary Battery, the battery remaining indicator may not display the correct information. Replace the batteries with your camera Battery type LR6 (size AA) alkaline batteries HR 15/51:HR6 (size AA) Nickel-Metal Hydride batteries* ZR6 (size AA) Oxy ...batteries** Ni-Cd batteries** supplied a - - - - - of the battery. Check the valid date (month-year) displayed on the CIPA standard. (CIPA: Camera & Imaging Products Association) 11 To check the remaining battery time Press POWER to turn on and check the time on the LCD screen. The warning...
...8226; When using alkaline batteries/Oxy Nickel Primary Battery, the battery remaining indicator may not display the correct information. Replace the batteries with your camera Battery type LR6 (size AA) alkaline batteries HR 15/51:HR6 (size AA) Nickel-Metal Hydride batteries* ZR6 (size AA) Oxy ...batteries** Ni-Cd batteries** supplied a - - - - - of the battery. Check the valid date (month-year) displayed on the CIPA standard. (CIPA: Camera & Imaging Products Association) 11 To check the remaining battery time Press POWER to turn on and check the time on the LCD screen. The warning...
Instruction Manual
Page 12
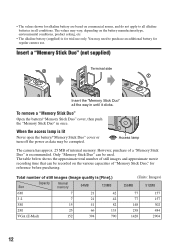
... open the battery/"Memory Stick Duo" cover or turn off the power as data may need to all alkaline batteries in once. Access lamp The camera has approx. 25 MB of still images (Image quality is recommended. To remove a "Memory Stick Duo" Open the battery/"Memory Stick Duo" cover, ...all conditions. • The values shown for alkaline battery are based on commercial norms, and do not apply to purchase an additional battery for regular camera use only. Only "Memory Stick Duo" can be recorded on the various capacities of "Memory Stick Duo," for trial use . The table below shows...
... open the battery/"Memory Stick Duo" cover or turn off the power as data may need to all alkaline batteries in once. Access lamp The camera has approx. 25 MB of still images (Image quality is recommended. To remove a "Memory Stick Duo" Open the battery/"Memory Stick Duo" cover, ...all conditions. • The values shown for alkaline battery are based on commercial norms, and do not apply to purchase an additional battery for regular camera use only. Only "Memory Stick Duo" can be recorded on the various capacities of "Memory Stick Duo," for trial use . The table below shows...
Instruction Manual
Page 13
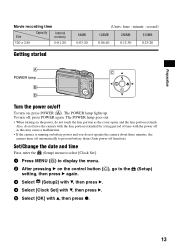
The POWER lamp lights up. Also, do not operate the camera about three minutes, the camera turns off automatically to the (Setup) setting, then press B again. 3 Select (Setup2) with V, then press B. 2 4 Select [Clock Set] with V, then press B. 5 Select [OK] with the ...; When turning on the power, do not touch the lens portion as this may cause a malfunction. • If the camera is running on battery power and you do not leave the camera with the lens portion extended for a long period of time with v, then press z. 13 Set/Change the date and time...
The POWER lamp lights up. Also, do not operate the camera about three minutes, the camera turns off automatically to the (Setup) setting, then press B again. 3 Select (Setup2) with V, then press B. 2 4 Select [Clock Set] with V, then press B. 5 Select [OK] with the ...; When turning on the power, do not touch the lens portion as this may cause a malfunction. • If the camera is running on battery power and you do not leave the camera with the lens portion extended for a long period of time with v, then press z. 13 Set/Change the date and time...

Instruction Manual
Page 15
AE/AF lock indicator Flashing t lit/beeps Press fully down . Movie: Press fully down . Also, you can stabilize the camera by leaning against a tree or a building beside you. Still image: Select . Using a tripod may be effective. Shoot an image 1 Select a mode (A). The ...Also, using the flash in the center of the focus frame Hints for preventing blur Hold the camera steadily, keeping your arms at your side. Shoot images easily (Auto adjustment mode) A B Hold the camera Shoot images easily (Auto adjustment mode) Position the subject in dark places is also recommended. AF...
AE/AF lock indicator Flashing t lit/beeps Press fully down . Movie: Press fully down . Also, you can stabilize the camera by leaning against a tree or a building beside you. Still image: Select . Using a tripod may be effective. Shoot an image 1 Select a mode (A). The ...Also, using the flash in the center of the focus frame Hints for preventing blur Hold the camera steadily, keeping your arms at your side. Shoot images easily (Auto adjustment mode) A B Hold the camera Shoot images easily (Auto adjustment mode) Position the subject in dark places is also recommended. AF...
Instruction Manual
Page 16
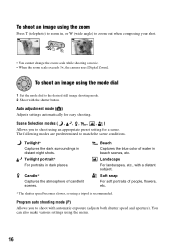
...to shoot with automatic exposure (adjusts both shutter speed and aperture). Beach Captures the blue color of water in distant night shots. Program auto shooting mode (P) Allows you to shoot using the menu. 16 Scene Selection modes Allows you to match the ...portraits in , or W (wide angle) to zoom out when composing your shot. VGA W T 30 1.1 VGA W T 30 5.0 • You cannot change the zoom scale while shooting a movie. • When the zoom scale exceeds 3×, the camera uses [Digital Zoom]. Auto adjustment mode ( ) Adjusts settings automatically for a scene.
...to shoot with automatic exposure (adjusts both shutter speed and aperture). Beach Captures the blue color of water in distant night shots. Program auto shooting mode (P) Allows you to shoot using the menu. 16 Scene Selection modes Allows you to match the ...portraits in , or W (wide angle) to zoom out when composing your shot. VGA W T 30 1.1 VGA W T 30 5.0 • You cannot change the zoom scale while shooting a movie. • When the zoom scale exceeds 3×, the camera uses [Digital Zoom]. Auto adjustment mode ( ) Adjusts settings automatically for a scene.

Instruction Manual
Page 18
.../Fast forward: b/B (Return to delete and press 2 Select [Delete] with v on a computer or TV. To delete images 1 Display the image you took. Press b ( ) on this camera. To cancel, press b again. • The image may appear rough right after playback starts. • To delete an image, press (Delete) and select [Delete] with...
.../Fast forward: b/B (Return to delete and press 2 Select [Delete] with v on a computer or TV. To delete images 1 Display the image you took. Press b ( ) on this camera. To cancel, press b again. • The image may appear rough right after playback starts. • To delete an image, press (Delete) and select [Delete] with...

Instruction Manual
Page 19
... [All In This Folder] with v/V/b/B. Adjust the portion: v/V/b/B Cancel playback zoom: z to delete the indicator from the image in on a TV screen by connecting the camera to the single-image screen, press z. Viewing an index screen While displaying a still image, press (Index), then select an image with v/V in step 1 instead of...
... [All In This Folder] with v/V/b/B. Adjust the portion: v/V/b/B Cancel playback zoom: z to delete the indicator from the image in on a TV screen by connecting the camera to the single-image screen, press z. Viewing an index screen While displaying a still image, press (Index), then select an image with v/V in step 1 instead of...
Instruction Manual
Page 20
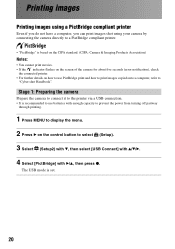
Stage 1: Preparing the camera Prepare the camera to connect it to the printer via a USB connection. • It is set. 20 The USB mode is recommended to use PictBridge print and how to print images copied onto a computer, refer to "Cyber-shot Handbook". Printing images Printing ...images using a PictBridge compliant printer Even if you do not have a computer, you can print images shot using your camera by connecting the camera directly to a PictBridge compliant printer. • "PictBridge" ...
Stage 1: Preparing the camera Prepare the camera to connect it to the printer via a USB connection. • It is set. 20 The USB mode is recommended to use PictBridge print and how to print images copied onto a computer, refer to "Cyber-shot Handbook". Printing images Printing ...images using a PictBridge compliant printer Even if you do not have a computer, you can print images shot using your camera by connecting the camera directly to a PictBridge compliant printer. • "PictBridge" ...
Instruction Manual
Page 21
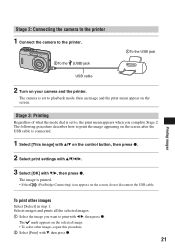
...image and the print menu appear on the control button, then press z. 2 Select print settings with v/V/b/B. 3 Select [OK] with b/B, then press z. The camera is connected. 1 Select [This image] with v/V on the screen. Printing images To print other images, repeat this procedure. 2 Select [Print] with V, then... press z. 21 Stage 2: Connecting the camera to the printer 1 Connect the camera to the printer. 2To the (USB) jack 1To the USB jack USB cable 2 Turn on the selected image. • To ...
...image and the print menu appear on the control button, then press z. 2 Select print settings with v/V/b/B. 3 Select [OK] with b/B, then press z. The camera is connected. 1 Select [This image] with v/V on the screen. Printing images To print other images, repeat this procedure. 2 Select [Print] with V, then... press z. 21 Stage 2: Connecting the camera to the printer 1 Connect the camera to the printer. 2To the (USB) jack 1To the USB jack USB cable 2 Turn on the selected image. • To ...
Instruction Manual
Page 22
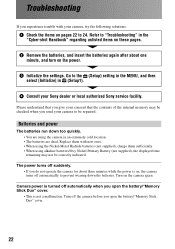
...pages 22 to prevent wearing down too quickly. • You are using the camera in the "Cyber-shot Handbook" regarding unlisted items on these pages. 2 Remove the batteries, and insert...If you open the battery/"Memory Stick Duo" cover. 22 Camera power is on the camera again. The power turns off the camera before you send your consent that the contents of the ...Refer to the (Setup) setting in the MENU, and then select [Initialize] in (Setup1). 1 4 Consult your camera, try the following solutions. 1 Check the items on the power. 3 Initialize the settings. Go to "Troubleshooting" ...
...pages 22 to prevent wearing down too quickly. • You are using the camera in the "Cyber-shot Handbook" regarding unlisted items on these pages. 2 Remove the batteries, and insert...If you open the battery/"Memory Stick Duo" cover. 22 Camera power is on the camera again. The power turns off the camera before you send your consent that the contents of the ...Refer to the (Setup) setting in the MENU, and then select [Initialize] in (Setup1). 1 4 Consult your camera, try the following solutions. 1 Check the items on the power. 3 Initialize the settings. Go to "Troubleshooting" ...

Instruction Manual
Page 23
...) to [Burst]. - (Twilight mode) or (Candle mode) is full, do one of the internal memory or "Memory Stick Duo" (page 12). Shooting still images Your camera cannot record images. • Check the free capacity of the following: - The date and time are not displayed. • While shooting, the date and time...
...) to [Burst]. - (Twilight mode) or (Candle mode) is full, do one of the internal memory or "Memory Stick Duo" (page 12). Shooting still images Your camera cannot record images. • Check the free capacity of the following: - The date and time are not displayed. • While shooting, the date and time...

Instruction Manual
Page 24
Viewing images Your camera cannot play back images. • Set the mode dial to the USB jack. 24 Delete the USB connection. The date and time are not displayed. • The (Screen status) button is in USB mode. The image does not appear on the TV screen. • Check [Video Out] to see if the video output signal of your camera is set to the color system of your TV. • Check whether the connection is correct. • The USB cable is connected to (page 18). • The camera is turned off.
Viewing images Your camera cannot play back images. • Set the mode dial to the USB jack. 24 Delete the USB connection. The date and time are not displayed. • The (Screen status) button is in USB mode. The image does not appear on the TV screen. • Check [Video Out] to see if the video output signal of your camera is set to the color system of your TV. • Check whether the connection is correct. • The USB cable is connected to (page 18). • The camera is turned off.
Instruction Manual
Page 26
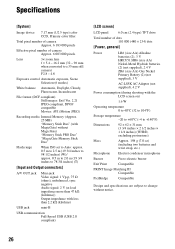
.... 6 003 000 pixels Lens 3× zoom lens f = 5.4 - 16.2 mm (32 - 96 mm when converted to a 35 mm still camera) F2.8 - 4.8 Exposure control Automatic exposure, Scene Selection (6 modes) White balance Automatic, Daylight, Cloudy, Fluorescent, Incandescent File format (DCF compliant) Still images: Exif Ver. 2.21 JPEG ...
.... 6 003 000 pixels Lens 3× zoom lens f = 5.4 - 16.2 mm (32 - 96 mm when converted to a 35 mm still camera) F2.8 - 4.8 Exposure control Automatic exposure, Scene Selection (6 modes) White balance Automatic, Daylight, Cloudy, Fluorescent, Incandescent File format (DCF compliant) Still images: Exif Ver. 2.21 JPEG ...


