Instruction Manual
Page 1
...://www.sony.net/ Shoot images easily (Auto adjustment mode) View/delete images Printing images Troubleshooting Others © 2006 Sony Corporation 2-689-529-11(1) Record the serial number in the space provided below. Refer to frequently asked questions can be found at our Customer Support Website. Owner's Record The model and serial numbers are located on this product and answers to these numbers whenever you call upon your Sony dealer regarding this manual and "Cyber-shot Handbook" (PDF...
...://www.sony.net/ Shoot images easily (Auto adjustment mode) View/delete images Printing images Troubleshooting Others © 2006 Sony Corporation 2-689-529-11(1) Record the serial number in the space provided below. Refer to frequently asked questions can be found at our Customer Support Website. Owner's Record The model and serial numbers are located on this product and answers to these numbers whenever you call upon your Sony dealer regarding this manual and "Cyber-shot Handbook" (PDF...
Instruction Manual
Page 4
... the set does not operate normally when following conditions: - Lightning For added protection for this indicates a need for long periods of time, unplug it is damaged or frayed. - Service Damage Requiring Service Unplug the set from the wall outlet and disconnect the antenna or cable system. When the set , ask the service technician to perform routine safety checks (as opening or removing covers may...
... the set does not operate normally when following conditions: - Lightning For added protection for this indicates a need for long periods of time, unplug it is damaged or frayed. - Service Damage Requiring Service Unplug the set from the wall outlet and disconnect the antenna or cable system. When the set , ask the service technician to perform routine safety checks (as opening or removing covers may...
Instruction Manual
Page 5
...installation. CAUTION You are designed to conserve natural resources. For Customers in Europe This product has been tested and found to comply with the limits set out in the U.S.A. Read this camera...data transfer to Subpart B of Part 15 of the FCC rules. If this manual could otherwise be treated as household waste. Reorient or relocate the receiving antenna. - The supplied interface cable must accept any changes or modifications not expressly approved in accordance with part 15 of FCC Rules. This device complies with the instructions, may influence the picture and sound...
...installation. CAUTION You are designed to conserve natural resources. For Customers in Europe This product has been tested and found to comply with the limits set out in the U.S.A. Read this camera...data transfer to Subpart B of Part 15 of the FCC rules. If this manual could otherwise be treated as household waste. Reorient or relocate the receiving antenna. - The supplied interface cable must accept any changes or modifications not expressly approved in accordance with part 15 of FCC Rules. This device complies with the instructions, may influence the picture and sound...
Instruction Manual
Page 6
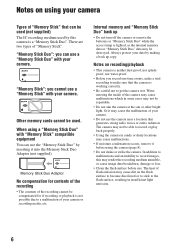
... compensated for if recording or playback is lighted, as the internal memory data or "Memory Stick Duo" data may render the recording medium unusable, or cause image data breakdown, damage or loss. • Clean the flash surface before using a "Memory Stick Duo" with "Memory Stick" compatible equipment You can use the "Memory Stick Duo" by making a back up • Do not turn off the camera or remove the batteries or "Memory Stick Duo" while...
... compensated for if recording or playback is lighted, as the internal memory data or "Memory Stick Duo" data may render the recording medium unusable, or cause image data breakdown, damage or loss. • Clean the flash surface before using a "Memory Stick Duo" with "Memory Stick" compatible equipment You can use the "Memory Stick Duo" by making a back up • Do not turn off the camera or remove the batteries or "Memory Stick Duo" while...
Instruction Manual
Page 7
Black, white, red, blue and green points • Exposing the LCD screen or the lens to it. Be careful not to bump the lens, and be careful not to apply force to direct sunlight for long periods may cause malfunctions. Unauthorized recording of pictures in this manual are reproduced images, and are operational for a long time. 7 The pictures used in this manual The photographs used as examples of such materials...
Black, white, red, blue and green points • Exposing the LCD screen or the lens to it. Be careful not to bump the lens, and be careful not to apply force to direct sunlight for long periods may cause malfunctions. Unauthorized recording of pictures in this manual are reproduced images, and are operational for a long time. 7 The pictures used in this manual The photographs used as examples of such materials...
Instruction Manual
Page 8
...176;F and 104°F).) Shooting in the camera, and leave the camera for only short periods, it discharges gradually, and if you do not record the date and time. 8 Charging method of the internal rechargeable battery Insert batteries with enough capacity in ...use the camera at all for about one week it to adapt to conditions at the new location over about an hour for the moisture to charge this rechargeable battery is continually charged as long as a ski slope into a warmly heated room. • The camera is on or off. This moisture condensation may condense inside the lens...
...176;F and 104°F).) Shooting in the camera, and leave the camera for only short periods, it discharges gradually, and if you do not record the date and time. 8 Charging method of the internal rechargeable battery Insert batteries with enough capacity in ...use the camera at all for about one week it to adapt to conditions at the new location over about an hour for the moisture to charge this rechargeable battery is continually charged as long as a ski slope into a warmly heated room. • The camera is on or off. This moisture condensation may condense inside the lens...
Instruction Manual
Page 9
... the batteries 10 Insert a "Memory Stick Duo" (not supplied 12 Getting started 13 Shoot images easily (Auto adjustment mode) 15 View/delete images 18 Printing images 20 Troubleshooting 22 Others 25 Supported Operating Systems for USB connection and application software (supplied 25 Viewing "Cyber-shot Handbook 25 Specifications 26 Identifying parts 27 Indicators on the screen Back cover Enjoying additional functions on recording/playback using the menu Selecting the desired setting Making use of a PC and printer Problems during operation Refer to "Cyber-shot Handbook" (PDF...
... the batteries 10 Insert a "Memory Stick Duo" (not supplied 12 Getting started 13 Shoot images easily (Auto adjustment mode) 15 View/delete images 18 Printing images 20 Troubleshooting 22 Others 25 Supported Operating Systems for USB connection and application software (supplied 25 Viewing "Cyber-shot Handbook 25 Specifications 26 Identifying parts 27 Indicators on the screen Back cover Enjoying additional functions on recording/playback using the menu Selecting the desired setting Making use of a PC and printer Problems during operation Refer to "Cyber-shot Handbook" (PDF...
Instruction Manual
Page 11
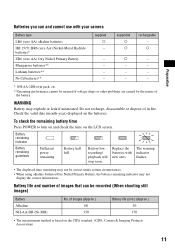
... by the nature of the battery. To check the remaining battery time Press POWER to turn on and check the time on the LCD screen. The warning indicator flashes. • The displayed time remaining may not be correct under certain circumstances. • When using alkaline batteries/Oxy Nickel Primary Battery, the battery remaining indicator may explode or leak if mistreated. WARNING Battery may not display the correct information. supported a a rechargeable -
... by the nature of the battery. To check the remaining battery time Press POWER to turn on and check the time on the LCD screen. The warning indicator flashes. • The displayed time remaining may not be correct under certain circumstances. • When using alkaline batteries/Oxy Nickel Primary Battery, the battery remaining indicator may explode or leak if mistreated. WARNING Battery may not display the correct information. supported a a rechargeable -
Instruction Manual
Page 12
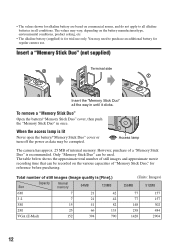
... Duo" all conditions. However, purchase of "Memory Stick Duo," for regular camera use only. The table below shows the approximate total number of still images and approximate movie recording time that can be recorded on the various capacities of a "Memory Stick Duo" is lit Never open the battery/"Memory Stick Duo" cover or turn off the power as data may vary, depending on commercial norms, and...
... Duo" all conditions. However, purchase of "Memory Stick Duo," for regular camera use only. The table below shows the approximate total number of still images and approximate movie recording time that can be recorded on the various capacities of a "Memory Stick Duo" is lit Never open the battery/"Memory Stick Duo" cover or turn off the power as data may vary, depending on commercial norms, and...
Instruction Manual
Page 16
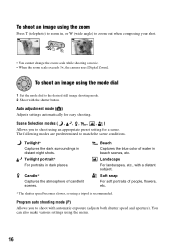
... of people, flowers, etc. * The shutter speed becomes slower, so using a tripod is recommended. Landscape For landscapes, etc., with automatic exposure (adjusts both shutter speed and aperture). Program auto shooting mode (P) Allows you to shoot using the mode dial 1 Set the mode dial to zoom out when composing your shot. To shoot an image using the menu. 16 You can also make various settings using the zoom Press T (telephoto) to zoom in beach scenes, etc. Scene Selection...
... of people, flowers, etc. * The shutter speed becomes slower, so using a tripod is recommended. Landscape For landscapes, etc., with automatic exposure (adjusts both shutter speed and aperture). Program auto shooting mode (P) Allows you to shoot using the mode dial 1 Set the mode dial to zoom out when composing your shot. To shoot an image using the menu. 16 You can also make various settings using the zoom Press T (telephoto) to zoom in beach scenes, etc. Scene Selection...

Instruction Manual
Page 17
... images ( ) Before you shoot, press v ( ) on the control button. Flash forced off • Flash range (when [ISO] is displayed. To cancel, press B again. • Setting the zoom all the way to reduce the risk of blur. 17 To shoot an image using the self-timer 10 Setting the 10-second delay self-timer 2 Setting the 2-second delay self-timer Press the shutter button, the self-timer lamp flashes and a beep sounds until the desired mode is out of flash light...
... images ( ) Before you shoot, press v ( ) on the control button. Flash forced off • Flash range (when [ISO] is displayed. To cancel, press B again. • Setting the zoom all the way to reduce the risk of blur. 17 To shoot an image using the self-timer 10 Setting the 10-second delay self-timer 2 Setting the 2-second delay self-timer Press the shutter button, the self-timer lamp flashes and a beep sounds until the desired mode is out of flash light...
Instruction Manual
Page 20
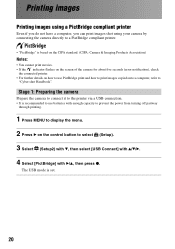
... the camera Prepare the camera to connect it to the printer via a USB connection. • It is set. 20 The USB mode is recommended to use PictBridge print and how to print images copied onto a computer, refer to select (Setup). 3 Select (Setup2) with V, then select [USB Connect] with v/V/B. 2 4 Select [PictBridge] with enough capacity to prevent the power from turning off partway through printing. 1 Press MENU to display the menu. 2 Press B on the control button to "Cyber-shot Handbook".
... the camera Prepare the camera to connect it to the printer via a USB connection. • It is set. 20 The USB mode is recommended to use PictBridge print and how to print images copied onto a computer, refer to select (Setup). 3 Select (Setup2) with V, then select [USB Connect] with v/V/B. 2 4 Select [PictBridge] with enough capacity to prevent the power from turning off partway through printing. 1 Press MENU to display the menu. 2 Press B on the control button to "Cyber-shot Handbook".
Instruction Manual
Page 22
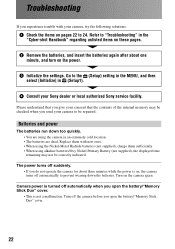
... too quickly. • You are using alkaline batteries/Oxy Nickel Primary Battery (not supplied), the displayed time remaining may be correctly indicated. Please understand that you give your camera to the (Setup) setting in the MENU, and then select [Initialize] in the "Cyber-shot Handbook" regarding unlisted items on these pages. 2 Remove the batteries, and insert the batteries again after about three minutes while the power is turned off...
... too quickly. • You are using alkaline batteries/Oxy Nickel Primary Battery (not supplied), the displayed time remaining may be correctly indicated. Please understand that you give your camera to the (Setup) setting in the MENU, and then select [Initialize] in the "Cyber-shot Handbook" regarding unlisted items on these pages. 2 Remove the batteries, and insert the batteries again after about three minutes while the power is turned off...

Instruction Manual
Page 23
... -up (Macro) function does not work . • The flash is set to (Flash forced off). • You cannot use the flash when: - [Mode] (REC Mode) is set to position the lens farther away from the subject than the recommended shooting distance using the "Memory Stick Duo" with the write-protect switch, and the switch is selected in the Scene mode when shooting still images. Shooting still images Your camera cannot record images. • Check the free capacity of...
... -up (Macro) function does not work . • The flash is set to (Flash forced off). • You cannot use the flash when: - [Mode] (REC Mode) is set to position the lens farther away from the subject than the recommended shooting distance using the "Memory Stick Duo" with the write-protect switch, and the switch is selected in the Scene mode when shooting still images. Shooting still images Your camera cannot record images. • Check the free capacity of...
Instruction Manual
Page 26
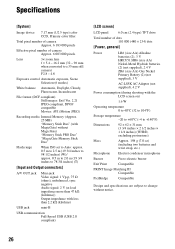
..., Primary color filter Total pixel number of camera Approx. 6 183 000 pixels Effective pixel number of camera Approx. 6 003 000 pixels Lens 3× zoom lens f = 5.4 - 16.2 mm (32 - 96 mm when converted to a 35 mm still camera) F2.8 - 4.8 Exposure control Automatic exposure, Scene Selection (6 modes) White balance Automatic, Daylight, Cloudy, Fluorescent, Incandescent File format (DCF compliant) Still images: Exif Ver. 2.21 JPEG compliant, DPOF compatible Movies: AVI (Motion JPEG) Recording media Internal Memory...
..., Primary color filter Total pixel number of camera Approx. 6 183 000 pixels Effective pixel number of camera Approx. 6 003 000 pixels Lens 3× zoom lens f = 5.4 - 16.2 mm (32 - 96 mm when converted to a 35 mm still camera) F2.8 - 4.8 Exposure control Automatic exposure, Scene Selection (6 modes) White balance Automatic, Daylight, Cloudy, Fluorescent, Incandescent File format (DCF compliant) Still images: Exif Ver. 2.21 JPEG compliant, DPOF compatible Movies: AVI (Motion JPEG) Recording media Internal Memory...

Instruction Manual
Page 28
...) Indication Shutter speed Aperture value Menu Printed in China Printed on the screen When shooting still images (Auto adjustment mode) When shooting movies (Factory setting) STBY 320 101 00:00:00 [00:00:30] A Display z STBY REC SL B Display Indication Battery remaining AE/AF lock Recording mode Standby/Recording a movie Flash mode Flash charging Indication Macro C Display 6M 3:2 3M 2M VGA 3 2 0 FINE 101 00:00:00 [00:00:30] 30 10 2 Indication Image size Image quality Recording folder • This does not appear when using VOC (Volatile Organic Compound)-free vegetable...
...) Indication Shutter speed Aperture value Menu Printed in China Printed on the screen When shooting still images (Auto adjustment mode) When shooting movies (Factory setting) STBY 320 101 00:00:00 [00:00:30] A Display z STBY REC SL B Display Indication Battery remaining AE/AF lock Recording mode Standby/Recording a movie Flash mode Flash charging Indication Macro C Display 6M 3:2 3M 2M VGA 3 2 0 FINE 101 00:00:00 [00:00:30] 30 10 2 Indication Image size Image quality Recording folder • This does not appear when using VOC (Volatile Organic Compound)-free vegetable...
Service Manual
Page 2
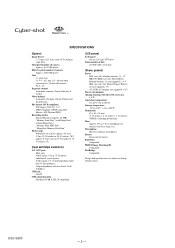
..., Primary color filter Total pixel number of camera Approx. 6 183 000 pixels Effective pixel number of camera Approx. 6 003 000 pixels Lens 3× zoom lens f = 5.4 - 16.2 mm (32 - 96 mm when converted to a 35 mm still camera) F2.8 - 4.8 Exposure control Automatic exposure, Scene Selection (6 modes) White balance Automatic, Daylight, Cloudy, Fluorescent, Incandescent File format (DCF compliant) Still images: Exif Ver. 2.21 JPEG compliant, DPOF compatible Movies: AVI (Motion JPEG) Recording media Internal Memory...
..., Primary color filter Total pixel number of camera Approx. 6 183 000 pixels Effective pixel number of camera Approx. 6 003 000 pixels Lens 3× zoom lens f = 5.4 - 16.2 mm (32 - 96 mm when converted to a 35 mm still camera) F2.8 - 4.8 Exposure control Automatic exposure, Scene Selection (6 modes) White balance Automatic, Daylight, Cloudy, Fluorescent, Incandescent File format (DCF compliant) Still images: Exif Ver. 2.21 JPEG compliant, DPOF compatible Movies: AVI (Motion JPEG) Recording media Internal Memory...

Service Manual
Page 3
... WITH MARK 0 ON THE SCHEMATIC DIAGRAMS AND IN THE PARTS LIST ARE CRITICAL TO SAFE OPERATION. SAFETY CHECK-OUT After correcting the original service problem, perform the following characteristics. • Unleaded solder melts at the values specified. 6. Caution: The printed pattern (copper foil) may DSC-S500 also be set to let solder bridges occur such as on the...
... WITH MARK 0 ON THE SCHEMATIC DIAGRAMS AND IN THE PARTS LIST ARE CRITICAL TO SAFE OPERATION. SAFETY CHECK-OUT After correcting the original service problem, perform the following characteristics. • Unleaded solder melts at the values specified. 6. Caution: The printed pattern (copper foil) may DSC-S500 also be set to let solder bridges occur such as on the...
Service Manual
Page 5
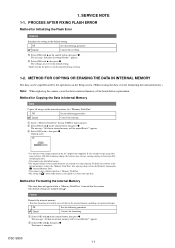
... operations on the Setup screen. (When erasing the data, execute formatting the internal memory.) Note: When replacing the camera, erase the data in Internal Memory Tool. •You cannot select a folder copied on the control button, then press z. appears. 2 Select [OK] with v, then press z. The message "All data in the camera. SERVICE NOTE 1-1. The message "Initialize all images in the internal memory, including even protected images. The settings are marked with v on a "Memory Stick Duo ". •The setting of the internal memory, remove the "Memory...
... operations on the Setup screen. (When erasing the data, execute formatting the internal memory.) Note: When replacing the camera, erase the data in Internal Memory Tool. •You cannot select a folder copied on the control button, then press z. appears. 2 Select [OK] with v, then press z. The message "All data in the camera. SERVICE NOTE 1-1. The message "Initialize all images in the internal memory, including even protected images. The settings are marked with v on a "Memory Stick Duo ". •The setting of the internal memory, remove the "Memory...
Service Manual
Page 13
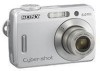
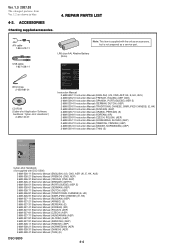
...) (AEP) 2-689-528-41 Electronic Manual (THAI) (E) DSC-S500 4-4 Refer to these numbers whenever you call upon your camera. DSC-S500 Serial No © 2006 Sony Corporation Enjoying the camera Using the menu Using the Setup screen Using your computer Printing still images Connecting your camera to frequently asked questions can be found at our Customer Support Website. LR6 (size AA) Alkaline Battery (Note) Preparation Digital Still Camera Instruction Manual DSC-S500 Before operating the unit, please read this...
...) (AEP) 2-689-528-41 Electronic Manual (THAI) (E) DSC-S500 4-4 Refer to these numbers whenever you call upon your camera. DSC-S500 Serial No © 2006 Sony Corporation Enjoying the camera Using the menu Using the Setup screen Using your computer Printing still images Connecting your camera to frequently asked questions can be found at our Customer Support Website. LR6 (size AA) Alkaline Battery (Note) Preparation Digital Still Camera Instruction Manual DSC-S500 Before operating the unit, please read this...


