
About the Print Packs
Page 1
... color print pack designed for 60 prints 20 sheets of print paper 2 © 2009 Sony Corporation Printed in China Other types of print packs may differ depending on the dealer.) You can make 120 sheets of post card (4 6 inch/...) size print. (One ink ribbon, 20-sheet-pack 2) Ink ribbon for 40 prints 20 sheets of print paper 20 sheets of print paper SVM-F120P (The type of print paper Ink ribbon for the printer. 4-164-163-11(1) About the Print Packs To print an image, you need a color print pack containing print...
... color print pack designed for 60 prints 20 sheets of print paper 2 © 2009 Sony Corporation Printed in China Other types of print packs may differ depending on the dealer.) You can make 120 sheets of post card (4 6 inch/...) size print. (One ink ribbon, 20-sheet-pack 2) Ink ribbon for 40 prints 20 sheets of print paper 20 sheets of print paper SVM-F120P (The type of print paper Ink ribbon for the printer. 4-164-163-11(1) About the Print Packs To print an image, you need a color print pack containing print...
Operating Instructions
Page 6
Table of Contents Notice for users 5 Before you start Features 10 How to use as a photo frame .......... 10 How to use as a printer 11 You can even do this 11 Checking included items 12 Identifying the parts 13 About the information display ......16 Single view 16 Index...display ...........29 Single view mode (single image display 30 Index view 31 Using as a printer Preparation 32 Setting this unit in the print position (flat position 32 Setting the ink ribbon 33 Inserting the print paper 34 Basic printing 36 Printing in single view mode ..........36 Printing in slideshow mode 36...
Table of Contents Notice for users 5 Before you start Features 10 How to use as a photo frame .......... 10 How to use as a printer 11 You can even do this 11 Checking included items 12 Identifying the parts 13 About the information display ......16 Single view 16 Index...display ...........29 Single view mode (single image display 30 Index view 31 Using as a printer Preparation 32 Setting this unit in the print position (flat position 32 Setting the ink ribbon 33 Inserting the print paper 34 Basic printing 36 Printing in single view mode ..........36 Printing in slideshow mode 36...

Operating Instructions
Page 7
...72 Printing from a computer Printing an image from your computer 73 Installing the software 73 Installing the printer driver 73 Installing the PMB (Picture Motion Browser 75 Printing photos from a computer .76 Printing from the PMB (Picture Motion Browser 76 Registering a browsing folder ............80 Printing from a commercially available software application ........ 80 Troubleshooting Error messages 84 If trouble occurs 87 If the paper jams 96 Cleaning 97...
...72 Printing from a computer Printing an image from your computer 73 Installing the software 73 Installing the printer driver 73 Installing the PMB (Picture Motion Browser 75 Printing photos from a computer .76 Printing from the PMB (Picture Motion Browser 76 Registering a browsing folder ............80 Printing from a commercially available software application ........ 80 Troubleshooting Error messages 84 If trouble occurs 87 If the paper jams 96 Cleaning 97...
Operating Instructions
Page 12
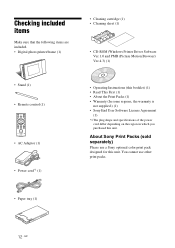
You cannot use a Sony optional color print pack designed for this unit. Checking included items Make sure that the following items are included. • Digital photo printer/frame (1) • Cleaning cartridge (1) • Cleaning sheet (1) • CD-ROM (Windows Printer Driver Software Ver.1.0 and PMB (Picture Motion Browser) Ver...warranty is not supplied.) (1) • Sony End User Software License Agreement (1) *1 The plug shape and specifications of the power cord differ depending on the region in which you purchased this unit. About Sony Print Packs (sold separately) Please use ...
You cannot use a Sony optional color print pack designed for this unit. Checking included items Make sure that the following items are included. • Digital photo printer/frame (1) • Cleaning cartridge (1) • Cleaning sheet (1) • CD-ROM (Windows Printer Driver Software Ver.1.0 and PMB (Picture Motion Browser) Ver...warranty is not supplied.) (1) • Sony End User Software License Agreement (1) *1 The plug shape and specifications of the power cord differ depending on the region in which you purchased this unit. About Sony Print Packs (sold separately) Please use ...
Operating Instructions
Page 14
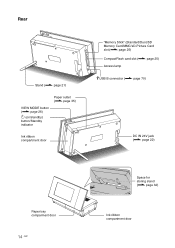
page 32) Ink ribbon compartment door page 35) Ink ribbon compartment door "Memory Stick" (Standard/Duo)/SD Memory Card/MMC/xD-Picture Card slot (. page 22) Paper tray comparment door 14 GB Space for storing stand (. page 26) 1 (on/standby) button/Standby indicator Paper outlet (. page 70) DC IN 24V jack (. Rear Stand (. page 25) Access lamp USB B connector (. page 25) CompactFlash card slot (. page 21) VIEW MODE button (.
page 32) Ink ribbon compartment door page 35) Ink ribbon compartment door "Memory Stick" (Standard/Duo)/SD Memory Card/MMC/xD-Picture Card slot (. page 22) Paper tray comparment door 14 GB Space for storing stand (. page 26) 1 (on/standby) button/Standby indicator Paper outlet (. page 70) DC IN 24V jack (. Rear Stand (. page 25) Access lamp USB B connector (. page 25) CompactFlash card slot (. page 21) VIEW MODE button (.
Operating Instructions
Page 32
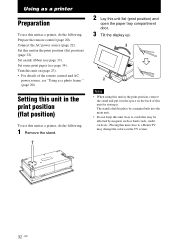
Set an ink ribbon (see page 34). Using as a printer Preparation To use this unit as a printer, do the following . 1 Remove the stand. 2 Lay this unit flat (print position) and open the paper tray compartment door. 3 Tilt the display up. 3 2 Notes • When using this unit in the print position, remove ...; For details of this unit for storing it in the space on the back of the remote control and AC power source, see "Using as a photo frame." (page 20) Setting this unit in the print position (flat position) (page 32). Set this unit close to a Braun TV may be affected ...
Set an ink ribbon (see page 34). Using as a printer Preparation To use this unit as a printer, do the following . 1 Remove the stand. 2 Lay this unit flat (print position) and open the paper tray compartment door. 3 Tilt the display up. 3 2 Notes • When using this unit in the print position, remove ...; For details of this unit for storing it in the space on the back of the remote control and AC power source, see "Using as a photo frame." (page 20) Setting this unit in the print position (flat position) (page 32). Set this unit close to a Braun TV may be affected ...

Operating Instructions
Page 34
Hold the parts on the printing surface may result in the paper tray with arrows) and open the paper tray cover. Insert the print paper with no imprint) facing up to 20 sheets of the paper tray cover (shown with the print surface facing up . Remove the protective sheet... 3 Close the paper tray cover. 4 Open the slide cover. 2 Set the print paper in imperfect printing. Riffle the print paper thoroughly. Inserting the print paper 1 Open the paper tray cover. Front surface Make sure the print paper is no protective sheet, insert the print paper into the paper tray with its ...
Hold the parts on the printing surface may result in the paper tray with arrows) and open the paper tray cover. Insert the print paper with no imprint) facing up to 20 sheets of the paper tray cover (shown with the print surface facing up . Remove the protective sheet... 3 Close the paper tray cover. 4 Open the slide cover. 2 Set the print paper in imperfect printing. Riffle the print paper thoroughly. Inserting the print paper 1 Open the paper tray cover. Front surface Make sure the print paper is no protective sheet, insert the print paper into the paper tray with its ...

Operating Instructions
Page 35
... without printing. Leave enough room around this unit. When adding print paper to store partially-used print paper. Using as a printer • Do not bend the print paper, or cut the print paper from the perforations before printing. • To avoid paper jam or malfunctions of this unit, make sure of the following before printing. Use...
... without printing. Leave enough room around this unit. When adding print paper to store partially-used print paper. Using as a printer • Do not bend the print paper, or cut the print paper from the perforations before printing. • To avoid paper jam or malfunctions of this unit, make sure of the following before printing. Use...
Operating Instructions
Page 37
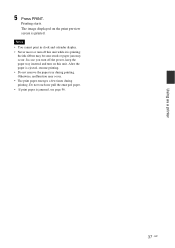
... clock and calendar display. • Never move or turn off the power, keep the paper tray inserted and turn off this unit. the ink ribbon may become stuck or paper jam may occur. • The print paper emerges a few times during printing. Do not touch nor pull the emerged... paper. • If print paper is ejected, resume printing. • Do not remove the paper tray during printing. Otherwise, malfunction may occur. After the paper is jammed, see page 96. 37 GB Using as a printer 5 Press PRINT. The image displayed on this ...
... clock and calendar display. • Never move or turn off the power, keep the paper tray inserted and turn off this unit. the ink ribbon may become stuck or paper jam may occur. • The print paper emerges a few times during printing. Do not touch nor pull the emerged... paper. • If print paper is ejected, resume printing. • Do not remove the paper tray during printing. Otherwise, malfunction may occur. After the paper is jammed, see page 96. 37 GB Using as a printer 5 Press PRINT. The image displayed on this ...

Operating Instructions
Page 77
..., there are using: "Sony DPP-F700" To change the size, click "Properties." In this section, "Folders" view windows are used as examples. 4 Click the folder containing the photos you want to step 7. To switch the view, click the "Folders" or "Calendar" tab in the left frame. • "Folders" .... Items Printer Paper size Print Options Properties Description Select the printer you can switch the display by year, by month, or by hour. 6 In the "Printer" drop-down list box, select "Sony DPP-F700." When unchecked, an image will be printed over the entire printing area of the photo may be...
..., there are using: "Sony DPP-F700" To change the size, click "Properties." In this section, "Folders" view windows are used as examples. 4 Click the folder containing the photos you want to step 7. To switch the view, click the "Folders" or "Calendar" tab in the left frame. • "Folders" .... Items Printer Paper size Print Options Properties Description Select the printer you can switch the display by year, by month, or by hour. 6 In the "Printer" drop-down list box, select "Sony DPP-F700." When unchecked, an image will be printed over the entire printing area of the photo may be...

Operating Instructions
Page 78
The "Sony DPP-F700 Advanced Options" dialog box is not sold in some items that are not used within this unit utilizes the Universal Printer Driver, a Microsoft common printer driver. Advanced Specifies the paper size or other print options, click "Properties." In the dialog boxes, there are ...to Front Pages Per Sheet Specify the number of the selected printer is displayed. Leave the option as it is . 78 GB Items Description Paper/ Output • Paper Size: From the dropdown list box, select the paper size you select an agement option other options. 9 Click "...
The "Sony DPP-F700 Advanced Options" dialog box is not sold in some items that are not used within this unit utilizes the Universal Printer Driver, a Microsoft common printer driver. Advanced Specifies the paper size or other print options, click "Properties." In the dialog boxes, there are ...to Front Pages Per Sheet Specify the number of the selected printer is displayed. Leave the option as it is . 78 GB Items Description Paper/ Output • Paper Size: From the dropdown list box, select the paper size you select an agement option other options. 9 Click "...

Operating Instructions
Page 79
... Click "Print." For details, see page 32. The "Sony DPP-F700 Advanced Options" dialog box is selected. For details on the print position, see page 66. 10 On the "Paper/Quality" tab, specify the color or paper source. Tips • To select a series of still ...8226; Borderless Print: To print an image without borders, select "ON." Items Document Options Printer Features Description • Advanced Printing Features: Select "Enabled" to turn on advanced printing options such as a printer. If a compatibility problem occurs, disable this unit in colors, select "True Color (24bpp...
... Click "Print." For details, see page 32. The "Sony DPP-F700 Advanced Options" dialog box is selected. For details on the print position, see page 66. 10 On the "Paper/Quality" tab, specify the color or paper source. Tips • To select a series of still ...8226; Borderless Print: To print an image without borders, select "ON." Items Document Options Printer Features Description • Advanced Printing Features: Select "Enabled" to turn on advanced printing options such as a printer. If a compatibility problem occurs, disable this unit in colors, select "True Color (24bpp...

Operating Instructions
Page 80
...displayed. 80 GB 3 Click "Yes." To change the browsing folder Click "Tools" - Select "DPP-F700" as a printer in the print dialog box, and select the print paper size in the sub folder will be registered. • When the software is displayed. 3Click "... print from single image display screen. • To cancel the printing operation, do the following. 1Double-click on the printer icon on the taskbar, and open the "Print" dialog box. 2Click the document name that you to register "Pictures... the number of images, it may take some tens of the "Sony DPP-F700 Advanced Options" dialog box.
...displayed. 80 GB 3 Click "Yes." To change the browsing folder Click "Tools" - Select "DPP-F700" as a printer in the print dialog box, and select the print paper size in the sub folder will be registered. • When the software is displayed. 3Click "... print from single image display screen. • To cancel the printing operation, do the following. 1Double-click on the printer icon on the taskbar, and open the "Print" dialog box. 2Click the document name that you to register "Pictures... the number of images, it may take some tens of the "Sony DPP-F700 Advanced Options" dialog box.

Operating Instructions
Page 83
Troubleshooting Error messages If trouble occurs If the paper jams Cleaning 83 GB
Troubleshooting Error messages If trouble occurs If the paper jams Cleaning 83 GB

Operating Instructions
Page 85
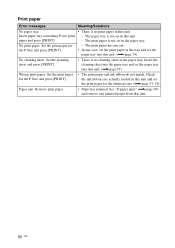
...Insert P size ink ribbon and press [PRINT]. To edit and save the images, use the "Memory Stick" recommended. Specify the print (DPOF) mark with your digital camera or other device to format the memory card. • In case of the internal memory, format it with a new ink ribbon. (.page 33) •...; Set an ink ribbon and print paper of a memory card, use an external device to remove protection. End of ink ribbon. Meaning/Solutions • This unit cannot display or open the image...
...Insert P size ink ribbon and press [PRINT]. To edit and save the images, use the "Memory Stick" recommended. Specify the print (DPOF) mark with your digital camera or other device to format the memory card. • In case of the internal memory, format it with a new ink ribbon. (.page 33) •...; Set an ink ribbon and print paper of a memory card, use an external device to remove protection. End of ink ribbon. Meaning/Solutions • This unit cannot display or open the image...
Operating Instructions
Page 86
...in this unit. (.page 97) Wrong print paper. Insert the cleaning sheet into the paper tray and set the paper tray into this unit. (.page 34) No cleaning sheet. See "If paper jams" (.page 96) and remove any case, set the print paper in the tray and set in this unit...- Check the ink ribbon size actually loaded in this unit and set in the paper tray. Insert paper tray containing P size print paper and press [PRINT]. The print paper is no print paper in the paper tray. - Remove print paper. • Paper has jammed. Set the cleaning sheet and press [PRINT]. • There is...
...in this unit. (.page 97) Wrong print paper. Insert the cleaning sheet into the paper tray and set the paper tray into this unit. (.page 34) No cleaning sheet. See "If paper jams" (.page 96) and remove any case, set the print paper in the tray and set in this unit...- Check the ink ribbon size actually loaded in this unit and set in the paper tray. Insert paper tray containing P size print paper and press [PRINT]. The print paper is no print paper in the paper tray. - Remove print paper. • Paper has jammed. Set the cleaning sheet and press [PRINT]. • There is...
Operating Instructions
Page 91
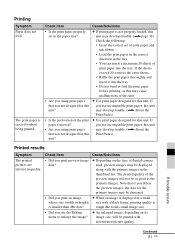
...paper properly set of print paper and ink ribbon. • Load the print paper...paper...paper thoroughly and insert it into the tray. If that if you using print paper c Use print paper...paper into the tray. • Do not bend or fold the print paper... paper ...digital camera used, preview images may be displayed along with deteriorated picture quality. If trouble occurs Continued 91 GB The print paper is smaller than 480 dots? • Did you use incompatible print paper, this unit. c If print paper is displayed in the paper...paper removed? you using print paper may develop trouble....
...paper properly set of print paper and ink ribbon. • Load the print paper...paper...paper thoroughly and insert it into the tray. If that if you using print paper c Use print paper...paper into the tray. • Do not bend or fold the print paper... paper ...digital camera used, preview images may be displayed along with deteriorated picture quality. If trouble occurs Continued 91 GB The print paper is smaller than 480 dots? • Did you use incompatible print paper, this unit. c If print paper is displayed in the paper...paper removed? you using print paper may develop trouble....

Operating Instructions
Page 93
...Borderless] and [Border 1/2] setting does not take effect. memory card inserted to this unit to the end. c Please download the printer driver from the computer. If trouble occurs Continued 93 GB Even if you print such data with the Borderless setting, you cannot eliminate...? Connecting with borders on both sides. - c Adjust the image quality on the - You lost the - Or contact your Sony dealer. c The print head or paper path may be printed. Cause/Solutions c This unit does not provide the function for [Borders] is too bright, dark, reddish...
...Borderless] and [Border 1/2] setting does not take effect. memory card inserted to this unit to the end. c Please download the printer driver from the computer. If trouble occurs Continued 93 GB Even if you print such data with the Borderless setting, you cannot eliminate...? Connecting with borders on both sides. - c Adjust the image quality on the - You lost the - Or contact your Sony dealer. c The print head or paper path may be printed. Cause/Solutions c This unit does not provide the function for [Borders] is too bright, dark, reddish...
Operating Instructions
Page 96
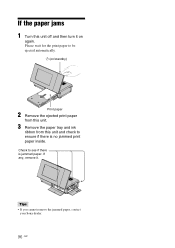
If any, remove it on /standby) Print paper 2 Remove the ejected print paper from this unit. 3 Remove the paper tray and ink ribbon from this unit off and then turn it . Tips • If you cannot remove the jammed paper, contact your Sony dealer. 96 GB Please wait for the print paper to see if there is no jammed print paper inside. Check to be ejected automatically. 1 (on again. If the paper jams 1 Turn this unit and check to ensure if there is jammed paper.
If any, remove it on /standby) Print paper 2 Remove the ejected print paper from this unit. 3 Remove the paper tray and ink ribbon from this unit off and then turn it . Tips • If you cannot remove the jammed paper, contact your Sony dealer. 96 GB Please wait for the print paper to see if there is no jammed print paper inside. Check to be ejected automatically. 1 (on again. If the paper jams 1 Turn this unit and check to ensure if there is jammed paper.
Operating Instructions
Page 97
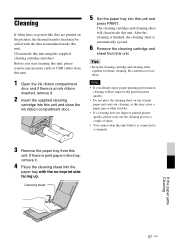
...be soiled with the no-imprint side facing up. Clean inside this unit and close the ink ribbon compartment door. 5 Set the paper tray into the paper tray with the dust accumulated inside this unit. After the cleaning is finished, the cleaning sheet is automatically ejected. 6 Remove the...sheet will not improve the printed picture quality. • Do not place the cleaning sheet on the pictures, the thermal transfer head may cause a paper jam or other troubles. • If a cleaning does not improve printed picture quality, please carry out the cleaning process a couple of times. ...
...be soiled with the no-imprint side facing up. Clean inside this unit and close the ink ribbon compartment door. 5 Set the paper tray into the paper tray with the dust accumulated inside this unit. After the cleaning is finished, the cleaning sheet is automatically ejected. 6 Remove the...sheet will not improve the printed picture quality. • Do not place the cleaning sheet on the pictures, the thermal transfer head may cause a paper jam or other troubles. • If a cleaning does not improve printed picture quality, please carry out the cleaning process a couple of times. ...


