Operating Instructions
Page 14
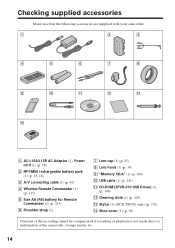
... hood (1) (p. 30) 9 "Memory Stick" (1) (p. 100) 0 USB cable (1) (p. 141) qa CD-ROM (SPVD-010 USB Driver) (1) (p. 146) qs Cleaning cloth (1) (p. 203) qd Stylus (1) (DCR-TRV80 only) (p. 170) qf Shoe cover (1) (p. 92) Contents of the recording cannot be compensated if recording or playback is not made due to a malfunction of the camcorder, storage media, etc. 14 Checking supplied...
... hood (1) (p. 30) 9 "Memory Stick" (1) (p. 100) 0 USB cable (1) (p. 141) qa CD-ROM (SPVD-010 USB Driver) (1) (p. 146) qs Cleaning cloth (1) (p. 203) qd Stylus (1) (DCR-TRV80 only) (p. 170) qf Shoe cover (1) (p. 92) Contents of the recording cannot be compensated if recording or playback is not made due to a malfunction of the camcorder, storage media, etc. 14 Checking supplied...
Operating Instructions
Page 141
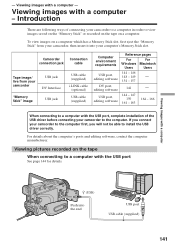
... page 144 for details. For details about the computer's ports and editing software, contact the computer manufacturer. Introduction There are following ways of the USB driver before connecting your camcorder to a computer in order to the computer first, you connect your computer's Memory Stick slot. If you will not be able to the...
... page 144 for details. For details about the computer's ports and editing software, contact the computer manufacturer. Introduction There are following ways of the USB driver before connecting your camcorder to a computer in order to the computer first, you connect your computer's Memory Stick slot. If you will not be able to the...
Operating Instructions
Page 144
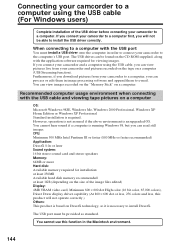
...installation: at least 250MB Available hard disk memory recommended: at least 1GB (depending on the size of the USB driver before connecting your camcorder to the computer's USB port. You cannot hear sound if a computer is running Windows 98, but you can process or edit... Edition or Windows XP Professional Standard installation is an upgraded OS. Connecting your camcorder to a computer using the USB cable, you will not operate correctly.) Others: This product is necessary to e-mail. The USB port must install a USB driver onto the computer in the Macintosh environment. 144
...installation: at least 250MB Available hard disk memory recommended: at least 1GB (depending on the size of the USB driver before connecting your camcorder to the computer's USB port. You cannot hear sound if a computer is running Windows 98, but you can process or edit... Edition or Windows XP Professional Standard installation is an upgraded OS. Connecting your camcorder to a computer using the USB cable, you will not operate correctly.) Others: This product is necessary to e-mail. The USB port must install a USB driver onto the computer in the Macintosh environment. 144
Operating Instructions
Page 145
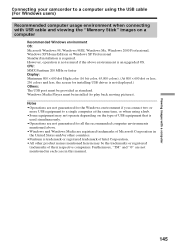
... Home Edition or Windows XP Professional Standard installation is required. Furthermore, "TM" and "®" are not guaranteed for installing USB driver is not displayed.) Others: The USB port must be installed (to play back moving pictures). CPU: MMX Pentium 200 MHz or faster Display: Minimum 800 ×...Windows and Windows Media are registered trademarks of Microsoft Corporation in this manual. 145 Viewing images with a computer Connecting your camcorder to a computer using a hub. • Some equipment may be the trademarks or registered trademarks of their respective companies.
... Home Edition or Windows XP Professional Standard installation is required. Furthermore, "TM" and "®" are not guaranteed for installing USB driver is not displayed.) Others: The USB port must be installed (to play back moving pictures). CPU: MMX Pentium 200 MHz or faster Display: Minimum 800 ×...Windows and Windows Media are registered trademarks of Microsoft Corporation in this manual. 145 Viewing images with a computer Connecting your camcorder to a computer using a hub. • Some equipment may be the trademarks or registered trademarks of their respective companies.
Operating Instructions
Page 146
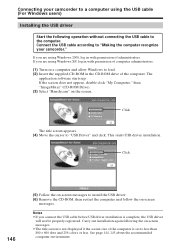
... title screen is not displayed if the screen size of the computer is complete, the USB driver will not be properly registered. Connect the USB cable according to "Making the computer recognize your camcorder to load. (2) Insert the supplied CD-ROM in with permission of the computer. Carry... does not appear, double-click "My Computer," then "ImageMixer" (CD-ROM Drive). (3) Select "Handycam" on -screen messages. If you are using the USB cable (For Windows users) Installing the USB driver Start the following the on a computer and allow Windows to a computer using Windows XP, log in...
... title screen is not displayed if the screen size of the computer is complete, the USB driver will not be properly registered. Connect the USB cable according to "Making the computer recognize your camcorder to load. (2) Insert the supplied CD-ROM in with permission of the computer. Carry... does not appear, double-click "My Computer," then "ImageMixer" (CD-ROM Drive). (3) Select "Handycam" on -screen messages. If you are using the USB cable (For Windows users) Installing the USB driver Start the following the on a computer and allow Windows to a computer using Windows XP, log in...
Operating Instructions
Page 147
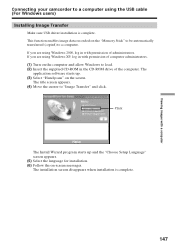
... computer. The title screen appears. (4) Move the cursor to load. (2) Insert the supplied CD-ROM in with a computer Connecting your camcorder to a computer. The application software starts up and the "Choose Setup Language" screen appears. (5) Select the language for installation. (6) ... The Install Wizard program starts up . (3) Select "Handycam" on -screen messages. Viewing images with permission of administrators. If you are using the USB cable (For Windows users) Installing Image Transfer Make sure USB driver installation is complete. 147 This function enables image data ...
... computer. The title screen appears. (4) Move the cursor to load. (2) Insert the supplied CD-ROM in with a computer Connecting your camcorder to a computer. The application software starts up and the "Choose Setup Language" screen appears. (5) Select the language for installation. (6) ... The Install Wizard program starts up . (3) Select "Handycam" on -screen messages. Viewing images with permission of administrators. If you are using the USB cable (For Windows users) Installing Image Transfer Make sure USB driver installation is complete. 147 This function enables image data ...
Operating Instructions
Page 148
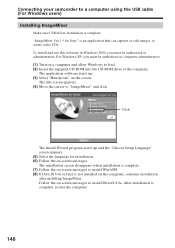
...be authorized as administrators. Click The Install Wizard program starts up . (3) Select "Handycam" on the computer, continue installation after installing ImageMixer. Follow the on -screen messages...Insert the supplied CD-ROM into the CD-ROM drive of the computer. Connecting your camcorder to "ImageMixer" and click. The installation screen disappears when installation is complete. (7) ...Make sure USB driver installation is not installed on the screen. The application software starts up and the "Choose Setup Language" screen appears. (5) Select the language for Sony" is ...
...be authorized as administrators. Click The Install Wizard program starts up . (3) Select "Handycam" on the computer, continue installation after installing ImageMixer. Follow the on -screen messages...Insert the supplied CD-ROM into the CD-ROM drive of the computer. Connecting your camcorder to "ImageMixer" and click. The installation screen disappears when installation is complete. (7) ...Make sure USB driver installation is not installed on the screen. The application software starts up and the "Choose Setup Language" screen appears. (5) Select the language for Sony" is ...
Operating Instructions
Page 149
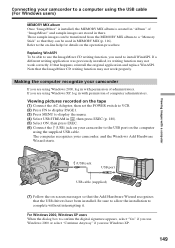
... "Memory Stick" so that the USB drivers have been installed. Replacing WinASPI To be used in with permission of "ImageMixer" and sample images are using Windows 2000, log in MEMORY MIX (p. 116). Making the computer recognize your camcorder, and the Windows Add Hardware Wizard... images with a computer (USB) jack USB port USB cable (supplied) (7) Follow the on the operation procedure. Note that happens, reinstall the original application and replace WinASPI. For Windows 2000, Windows XP users When the dialog box to confirm the digital signature appears, select "Yes...
... "Memory Stick" so that the USB drivers have been installed. Replacing WinASPI To be used in with permission of "ImageMixer" and sample images are using Windows 2000, log in MEMORY MIX (p. 116). Making the computer recognize your camcorder, and the Windows Add Hardware Wizard... images with a computer (USB) jack USB port USB cable (supplied) (7) Follow the on the operation procedure. Note that happens, reinstall the original application and replace WinASPI. For Windows 2000, Windows XP users When the dialog box to confirm the digital signature appears, select "Yes...
Operating Instructions
Page 150
... Add Hardware Wizard starts two times because two different USB drivers are installed. The computer recognizes your camcorder. Connecting your camcorder to a computer using the supplied USB cable. The USB MODE indicator appears on the LCD screen of your camcorder, and the Add Hardware Wizard starts. (USB) jack USB port USB cable (supplied) (4) Follow the on-screen messages so that...
... Add Hardware Wizard starts two times because two different USB drivers are installed. The computer recognizes your camcorder. Connecting your camcorder to a computer using the supplied USB cable. The USB MODE indicator appears on the LCD screen of your camcorder, and the Add Hardware Wizard starts. (USB) jack USB port USB cable (supplied) (4) Follow the on-screen messages so that...
Operating Instructions
Page 151
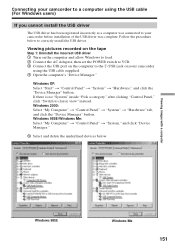
... delete the underlined devices below to the (USB) jack on the computer to correctly install the USB driver. If there is no "System" inside "Pick a category" after clicking "Control Panel," click "Switch to your camcorder before installation of the USB driver was complete. Follow the procedure below ....Connect the AC Adaptor, then set the POWER switch to VCR. 3 Connect the USB port on your camcorder using the USB cable (For Windows users) If you cannot install the USB driver The USB driver has been registered incorrectly as a computer was connected to classic view" instead. Windows ...
... delete the underlined devices below to the (USB) jack on the computer to correctly install the USB driver. If there is no "System" inside "Pick a category" after clicking "Control Panel," click "Switch to your camcorder before installation of the USB driver was complete. Follow the procedure below ....Connect the AC Adaptor, then set the POWER switch to VCR. 3 Connect the USB port on your camcorder using the USB cable (For Windows users) If you cannot install the USB driver The USB driver has been registered incorrectly as a computer was connected to classic view" instead. Windows ...
Operating Instructions
Page 152
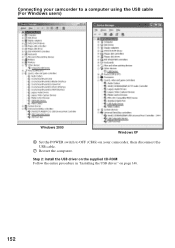
Step 2: Install the USB driver on the supplied CD-ROM Follow the entire procedure in "Installing the USB driver" on your camcorder, then disconnect the USB cable. 7 Restart the computer. Connecting your camcorder to a computer using the USB cable (For Windows users) Windows 2000 Windows XP 6 Set the POWER switch to OFF (CHG) on page 146. 152
Step 2: Install the USB driver on the supplied CD-ROM Follow the entire procedure in "Installing the USB driver" on your camcorder, then disconnect the USB cable. 7 Restart the computer. Connecting your camcorder to a computer using the USB cable (For Windows users) Windows 2000 Windows XP 6 Set the POWER switch to OFF (CHG) on page 146. 152

Operating Instructions
Page 153
... entire procedure in "Installing the USB driver" on your camcorder, then disconnect the USB cable. 8 Restart the computer. Windows XP: Select "Start" t "Control Panel" t "System" t "Hardware" tab and click the "Device Manager" button. Other OS: Select "My Computer" t "Control Panel" t "System," and click "Device Manager." 6 Select "Other devices." Ex: (?)Sony Handycam 7 Set the POWER switch to...
... entire procedure in "Installing the USB driver" on your camcorder, then disconnect the USB cable. 8 Restart the computer. Windows XP: Select "Start" t "Control Panel" t "System" t "Hardware" tab and click the "Device Manager" button. Other OS: Select "My Computer" t "Control Panel" t "System," and click "Device Manager." 6 Select "Other devices." Ex: (?)Sony Handycam 7 Set the POWER switch to...
Operating Instructions
Page 154
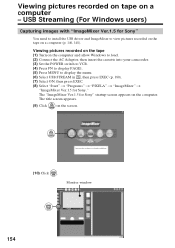
... install the USB driver and ImageMixer to display the menu. (6) Select USB STREAM in , then press EXEC (p. 180). (7) Select ON, then press EXEC. (8) Select "Start" t "Programs" t "PIXELA" t "ImageMixer" t "ImageMixer Ver.1.5 for Sony" startup screen appears on the computer and allow Windows to load. (2) Connect the AC Adaptor, then insert the cassette into your camcorder. (3) Set...
... install the USB driver and ImageMixer to display the menu. (6) Select USB STREAM in , then press EXEC (p. 180). (7) Select ON, then press EXEC. (8) Select "Start" t "Programs" t "PIXELA" t "ImageMixer" t "ImageMixer Ver.1.5 for Sony" startup screen appears on the computer and allow Windows to load. (2) Connect the AC Adaptor, then insert the cassette into your camcorder. (3) Set...
Operating Instructions
Page 157
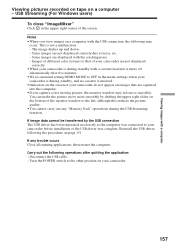
... the upper right slider on a computer - Reinstall the USB driver following operations after five minutes. •We recommend setting DEMO MODE to OFF in the upper right corner of the monitor window to your camcorder. 157 Notes •When you capture a fast moving picture..., the monitor window may occur. This is during the USB Streaming function. Images of the USB driver was connected to the left, although this reduces the ...
... the upper right slider on a computer - Reinstall the USB driver following operations after five minutes. •We recommend setting DEMO MODE to OFF in the upper right corner of the monitor window to your camcorder. 157 Notes •When you capture a fast moving picture..., the monitor window may occur. This is during the USB Streaming function. Images of the USB driver was connected to the left, although this reduces the ...
Operating Instructions
Page 162
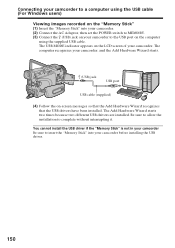
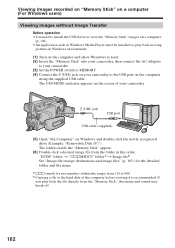
.... (2) Insert the "Memory Stick" into your camcorder, then connect the AC Adaptor to your camcorder. (3) Set the POWER switch to MEMORY. (4) Connect the (USB) jack on your camcorder. (USB) jack USB port USB cable (supplied) (5) Open "My Computer" on...camcorder to the USB port on the computer using the supplied USB cable. The USB MODE indicator appears on the screen of the computer before viewing it is recommended. Viewing images recorded on "Memory Stick" on a computer (For Windows users) Viewing images without Image Transfer Before operation •You need to install the USB driver...
.... (2) Insert the "Memory Stick" into your camcorder, then connect the AC Adaptor to your camcorder. (3) Set the POWER switch to MEMORY. (4) Connect the (USB) jack on your camcorder. (USB) jack USB port USB cable (supplied) (5) Open "My Computer" on...camcorder to the USB port on the computer using the supplied USB cable. The USB MODE indicator appears on the screen of the computer before viewing it is recommended. Viewing images recorded on "Memory Stick" on a computer (For Windows users) Viewing images without Image Transfer Before operation •You need to install the USB driver...
Operating Instructions
Page 164
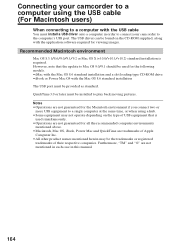
... each case in order to connect your camcorder to a computer using a hub. •Some equipment may be installed to play back moving pictures. QuickTime 3.0 or later must install a USB driver onto a computer in this manual. 164 The USB driver can be found on the type of ...their respective companies. Connecting your camcorder to the computer's USB port. However, note that is required. Furthermore, "TM" and "®...
... each case in order to connect your camcorder to a computer using a hub. •Some equipment may be installed to play back moving pictures. QuickTime 3.0 or later must install a USB driver onto a computer in this manual. 164 The USB driver can be found on the type of ...their respective companies. Connecting your camcorder to the computer's USB port. However, note that is required. Furthermore, "TM" and "®...
Operating Instructions
Page 165
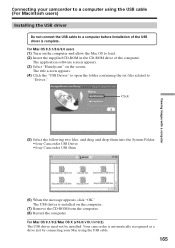
... Select "Handycam" on the computer and allow the Mac OS to load. (2) Insert the supplied CD-ROM in the CD-ROM drive of the USB driver is complete. The title screen appears. (4) Click the "USB Driver" to open the folder containing the six files related to "Driver." For Mac... 165 Click (5) Select the following two files, and drag and drop them into the System Folder. •Sony Camcorder USB Driver •Sony Camcorder USB Shim (6) When the message appears, click "OK." Your camcorder is installed on the computer. (7) Remove the CD-ROM from the computer. (8) Restart the computer. Viewing ...
... Select "Handycam" on the computer and allow the Mac OS to load. (2) Insert the supplied CD-ROM in the CD-ROM drive of the USB driver is complete. The title screen appears. (4) Click the "USB Driver" to open the folder containing the six files related to "Driver." For Mac... 165 Click (5) Select the following two files, and drag and drop them into the System Folder. •Sony Camcorder USB Driver •Sony Camcorder USB Shim (6) When the message appears, click "OK." Your camcorder is installed on the computer. (7) Remove the CD-ROM from the computer. (8) Restart the computer. Viewing ...
Operating Instructions
Page 166
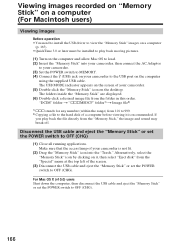
...101 to 999. 2) Copying a file to the hard disk of your camcorder is recommended. Viewing images recorded on "Memory Stick" on a computer (For Macintosh users) Viewing images Before operation •You need to install the USB driver to view the "Memory Stick" images on a computer (p. 165). •... the "Memory Stick" icon into your camcorder, then connect the AC Adaptor to your camcorder. (3) Set the POWER switch to MEMORY. (4) Connect the (USB) jack on your camcorder to the USB port on the computer using the supplied USB cable. Disconnect the USB cable and eject the "Memory Stick" or...
...101 to 999. 2) Copying a file to the hard disk of your camcorder is recommended. Viewing images recorded on "Memory Stick" on a computer (For Macintosh users) Viewing images Before operation •You need to install the USB driver to view the "Memory Stick" images on a computer (p. 165). •... the "Memory Stick" icon into your camcorder, then connect the AC Adaptor to your camcorder. (3) Set the POWER switch to MEMORY. (4) Connect the (USB) jack on your camcorder to the USB port on the computer using the supplied USB cable. Disconnect the USB cable and eject the "Memory Stick" or...
Operating Instructions
Page 190
... from a wall outlet or remove the battery pack, then reconnect it in your camcorder, you press the RESET button, all the settings (DCR-TRV80: except the network settings) including the date and time return to the default) ...camcorder or DISPLAY on the touch panel. • DISPLAY/BATTERY INFO is because some functions use a linear mechanism. Turn the power on. While charging the battery pack, the indicator flashes in your Sony dealer or local authorized Sony service facility. c Press the LCD screen lightly. The cassette cannot be ejected. c Uninstall the incorrect USB driver...
... from a wall outlet or remove the battery pack, then reconnect it in your camcorder, you press the RESET button, all the settings (DCR-TRV80: except the network settings) including the date and time return to the default) ...camcorder or DISPLAY on the touch panel. • DISPLAY/BATTERY INFO is because some functions use a linear mechanism. Turn the power on. While charging the battery pack, the indicator flashes in your Sony dealer or local authorized Sony service facility. c Press the LCD screen lightly. The cassette cannot be ejected. c Uninstall the incorrect USB driver...
Marketing Specifications
Page 2
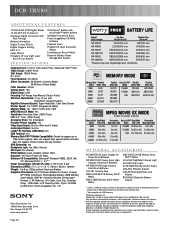
... without notice. Sony, AccuPower, Advanced HAD, Handycam, i.LINK, ImageStation, InfoLithium, Memory Stick, Memory Stick PRO, NightShot, Remote Commander, Stamina, SteadyShot, SwivelScreen and Worry Free are trademarks of Sony. Carl Zeiss ... USB Cable, LCD Cleaning Cloth, Stylus, CD-ROM w/USB Driver (Pixela ImageMixer Ver. 1.5) Sony Electronics Inc. 16765 West Bernardo Drive San Diego, CA 92127 www.sony...DCR-TRV80 ADDITIONAL FEATURES 12-Bit/16-Bit PCM Digital Stereo 14 Bit DXP A/D Conversion Analog-to-Digital Conversion with Pass-Through Battery Information Digital Picture Effects Digital...
... without notice. Sony, AccuPower, Advanced HAD, Handycam, i.LINK, ImageStation, InfoLithium, Memory Stick, Memory Stick PRO, NightShot, Remote Commander, Stamina, SteadyShot, SwivelScreen and Worry Free are trademarks of Sony. Carl Zeiss ... USB Cable, LCD Cleaning Cloth, Stylus, CD-ROM w/USB Driver (Pixela ImageMixer Ver. 1.5) Sony Electronics Inc. 16765 West Bernardo Drive San Diego, CA 92127 www.sony...DCR-TRV80 ADDITIONAL FEATURES 12-Bit/16-Bit PCM Digital Stereo 14 Bit DXP A/D Conversion Analog-to-Digital Conversion with Pass-Through Battery Information Digital Picture Effects Digital...


