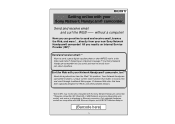
Insert: Getting Online with your Camera
Page 1
...? Only selected Handycam models are compatible with USB-Ethernet Adaptor and USB-PSTN Modem Adaptor. (Barcode here) -1- Send and receive email.** Want to send a great digital vacation photo or short MPEG movie to send and receive email, browse the Web, and more! ...directly from your Sony Network Handycam® camcorder. No problem. Your Sony Network Handycam camcorder lets you send...
...? Only selected Handycam models are compatible with USB-Ethernet Adaptor and USB-PSTN Modem Adaptor. (Barcode here) -1- Send and receive email.** Want to send a great digital vacation photo or short MPEG movie to send and receive email, browse the Web, and more! ...directly from your Sony Network Handycam® camcorder. No problem. Your Sony Network Handycam camcorder lets you send...
PIXELA ImageMixer 1.0 Manual
Page 6
... or more of VRAM, minimum of 800x600 at 16bit hi-color (65,000 colors); DirectX must be installed. for capturing a movie via USB or IEEE1394. In Windows ® 98, USB capturing is not supported) Chapter 4 Movie Editing Environment Chapter 5 Layout Environment Chapter 6 Image Editor CPU Software Sound Memory Hard Disk Graphics Intel...
... or more of VRAM, minimum of 800x600 at 16bit hi-color (65,000 colors); DirectX must be installed. for capturing a movie via USB or IEEE1394. In Windows ® 98, USB capturing is not supported) Chapter 4 Movie Editing Environment Chapter 5 Layout Environment Chapter 6 Image Editor CPU Software Sound Memory Hard Disk Graphics Intel...
PIXELA ImageMixer 1.0 Manual
Page 7
USB or IEEE1394 capturing is not compatible) 64MB or more Approx. 100MB for program, 1GB or more of less than 800 x 600, or in a screen area of free space recommended for work space. Minimum of 800x600 (32,000 colors) ImageMixer will not run correctly in less than 256 colors. All rights reserved. Copyright © 2001 PIXELA Corp. Pre-installed QuickTime 4 or later. OS Memory Hard Disk Graphics Other Mac OS 8.5.1 or later (Mac OS X is not available with Macintosh.
USB or IEEE1394 capturing is not compatible) 64MB or more Approx. 100MB for program, 1GB or more of less than 800 x 600, or in a screen area of free space recommended for work space. Minimum of 800x600 (32,000 colors) ImageMixer will not run correctly in less than 256 colors. All rights reserved. Copyright © 2001 PIXELA Corp. Pre-installed QuickTime 4 or later. OS Memory Hard Disk Graphics Other Mac OS 8.5.1 or later (Mac OS X is not available with Macintosh.
PIXELA ImageMixer 1.0 Manual
Page 9
Click the 'USB Driver' button when you want to be installed. If the Menu screen does not appear automatically, search for the [Setup Menu] icon by following the ...
Click the 'USB Driver' button when you want to be installed. If the Menu screen does not appear automatically, search for the [Setup Menu] icon by following the ...
PIXELA ImageMixer 1.0 Manual
Page 22
...in media. This section changes depending on the Main 3. Capturing still shots or entire scenes from a digital movie camera is displayed. Introduction Chapter 1 Before Use 2-1 Capture Environment Chapter 2 Capture Environment Capture ...digital camera Audio CD Recording Mode Control panel Caution Recording music files Troubleshooting Sound Recording Mode Control panel Recording sound files Recording sound files while previewing movie images Troubleshooting USB Device Capture Mode (Win) Control panel Connection status Capturing movie scenes Capturing still pictures DV Camcorder...
...in media. This section changes depending on the Main 3. Capturing still shots or entire scenes from a digital movie camera is displayed. Introduction Chapter 1 Before Use 2-1 Capture Environment Chapter 2 Capture Environment Capture ...digital camera Audio CD Recording Mode Control panel Caution Recording music files Troubleshooting Sound Recording Mode Control panel Recording sound files Recording sound files while previewing movie images Troubleshooting USB Device Capture Mode (Win) Control panel Connection status Capturing movie scenes Capturing still pictures DV Camcorder...
PIXELA ImageMixer 1.0 Manual
Page 23
... Depending on the capture mode selected, album file thumbnails are displayed in a list. Digital Camera Import Mode button Click to start CD recording mode. USB Device Capture Mode button Click to start USB device capture mode. (Windows only) DV Camcorder Click to start sound recording mode. CD Recording Mode button Click to start import...
... Depending on the capture mode selected, album file thumbnails are displayed in a list. Digital Camera Import Mode button Click to start CD recording mode. USB Device Capture Mode button Click to start USB device capture mode. (Windows only) DV Camcorder Click to start sound recording mode. CD Recording Mode button Click to start import...
PIXELA ImageMixer 1.0 Manual
Page 48
Click to enable the capturing of still pictures. Control panel Monitor window Volume control Still Picture Capture button Motion Picture Capture button Displays images from devices connected to your computer's USB port, such as a digital camera. Click to enable the capturing of movie scenes. 2-6-1 USB Device Capture Mode (Windows Only) ImageMixer enables you to capture still pictures or movie scenes directly from the USB-connected device. Adjust volume by dragging the slider.
Click to enable the capturing of still pictures. Control panel Monitor window Volume control Still Picture Capture button Motion Picture Capture button Displays images from devices connected to your computer's USB port, such as a digital camera. Click to enable the capturing of movie scenes. 2-6-1 USB Device Capture Mode (Windows Only) ImageMixer enables you to capture still pictures or movie scenes directly from the USB-connected device. Adjust volume by dragging the slider.
PIXELA ImageMixer 1.0 Manual
Page 49
...to capture still picture.' Set the device to capture either a still picture or a movie scene. of this button functions as a digital video camera) to the PC correctly, the message on the information display panel will displayed. Capture button Information display panel Click to ...display images through the USB connection. Consult the instruction manual that this button depends on the computer. Please confirm the connection between the PC and the ...
...to capture still picture.' Set the device to capture either a still picture or a movie scene. of this button functions as a digital video camera) to the PC correctly, the message on the information display panel will displayed. Capture button Information display panel Click to ...display images through the USB connection. Consult the instruction manual that this button depends on the computer. Please confirm the connection between the PC and the ...
PIXELA ImageMixer 1.0 Manual
Page 50
Designate an album from a USB-connected device. 1. This setting does not effect the original sound level of the captured movie scene. 4. This function cannot be used while capturing is checked ... designated in step 1. After the capture is now possible. To view the newly captured file, double-click its thumbnail to save the captured movie file. 2. 2-6-2 USB Device Capture Mode (Windows Only) Capturing movie scenes Follow these steps to begin 5. Click the [Stop] button at the desired point to capture (record) a movie...
Designate an album from a USB-connected device. 1. This setting does not effect the original sound level of the captured movie scene. 4. This function cannot be used while capturing is checked ... designated in step 1. After the capture is now possible. To view the newly captured file, double-click its thumbnail to save the captured movie file. 2. 2-6-2 USB Device Capture Mode (Windows Only) Capturing movie scenes Follow these steps to begin 5. Click the [Stop] button at the desired point to capture (record) a movie...
PIXELA ImageMixer 1.0 Manual
Page 51
.... button. 3. To view the captured file, double-click its thumbnail to the album designated in progress. Copyright © 2001 PIXELA Corp. Designate an album from a USB-connected device. 1. After the capture is now possible. All rights reserved. Capturing still pictures Follow these steps to capture a still picture from the album list...
.... button. 3. To view the captured file, double-click its thumbnail to the album designated in progress. Copyright © 2001 PIXELA Corp. Designate an album from a USB-connected device. 1. After the capture is now possible. All rights reserved. Capturing still pictures Follow these steps to capture a still picture from the album list...
PIXELA ImageMixer 1.0 Manual
Page 61
... created with PIXELA ImageMixer is only Windows except . This function is MPEG1. However, if you can effectively "set preferences related to the USB device capture mode or the DV camcorder capture mode, both of the files will allow movie files to save them on your computer. Movie capture settings Here you wish...
... created with PIXELA ImageMixer is only Windows except . This function is MPEG1. However, if you can effectively "set preferences related to the USB device capture mode or the DV camcorder capture mode, both of the files will allow movie files to save them on your computer. Movie capture settings Here you wish...
PIXELA ImageMixer 1.0 Manual
Page 63
...your computer. Copyright © 2001 PIXELA Corp. For example, if you enter the prefix 'ABC,' the names of audio CDs. USB Capture Device Setting This setting allows you experience a loss of where possible directories exist on , be saved. Prefix for properly transferring... the audio portion of movie media captured from that ImageMixer captures or records will, from devices connected to the USB port of audio CDs. q Digital recording Digital recording is enabled by checking this setting. Unchecking the box will be saved as 'ABC0001,' 'ABC0002,' 'ABC0003,' ...
...your computer. Copyright © 2001 PIXELA Corp. For example, if you enter the prefix 'ABC,' the names of audio CDs. USB Capture Device Setting This setting allows you experience a loss of where possible directories exist on , be saved. Prefix for properly transferring... the audio portion of movie media captured from that ImageMixer captures or records will, from devices connected to the USB port of audio CDs. q Digital recording Digital recording is enabled by checking this setting. Unchecking the box will be saved as 'ABC0001,' 'ABC0002,' 'ABC0003,' ...
Operating Instructions (primary manual)
Page 2
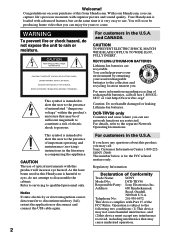
... only. For customers in the U.S.A. Operation is for years to discontinue midway (fail), restart the application or disconnect and connect the USB cable again. and CANADA CAUTION TO PREVENT ELECTRIC SHOCK, MATCH WIDE BLADE OF PLUG TO WIDE SLOT, FULLY INSERT. This symbol is... You can help preserve our environment by returning your purchase of this Handycam is harmful to eyes, do not expose the unit to the presence of Conformity Trade Name: SONY Model No.: DCR-TRV50 Responsible Party: Sony Electronics Inc. If you have any interference received, including interference that ...
... only. For customers in the U.S.A. Operation is for years to discontinue midway (fail), restart the application or disconnect and connect the USB cable again. and CANADA CAUTION TO PREVENT ELECTRIC SHOCK, MATCH WIDE BLADE OF PLUG TO WIDE SLOT, FULLY INSERT. This symbol is... You can help preserve our environment by returning your purchase of this Handycam is harmful to eyes, do not expose the unit to the presence of Conformity Trade Name: SONY Model No.: DCR-TRV50 Responsible Party: Sony Electronics Inc. If you have any interference received, including interference that ...

Operating Instructions (primary manual)
Page 4
... •Viewing images recorded on "Memory Stick"s using the USB cable (p. 190, 195) •Viewing moving pictures recorded on tapes using the USB cable (p. 185) •Capturing images on your computer from your camcorder using the USB cable (p. 187) •Converting an analog signal into digital to capture images onto your computer (p. 196) Capturing images...
... •Viewing images recorded on "Memory Stick"s using the USB cable (p. 190, 195) •Viewing moving pictures recorded on tapes using the USB cable (p. 185) •Capturing images on your computer from your camcorder using the USB cable (p. 187) •Converting an analog signal into digital to capture images onto your computer (p. 196) Capturing images...
Operating Instructions (primary manual)
Page 7
...on your computer using the USB cable - Digital program editing (on your computer using the USB cable - SLIDE SHOW 166 Preventing accidental erasure - Introduction 174 Connecting your camcorder to your computer - For...camcorder. MPEG movie playback 159 Copying images recorded on "Memory Stick"s to correct trouble 210 Self-diagnosis display 217 Warning indicators and messages .... 218 Additional Information Usable cassettes 220 About the "InfoLITHIUM" battery pack 223 About i.LINK 225 Using your computer - Signal convert function 196 Using the Network function (DCR-TRV50...
...on your computer using the USB cable - Digital program editing (on your computer using the USB cable - SLIDE SHOW 166 Preventing accidental erasure - Introduction 174 Connecting your camcorder to your computer - For...camcorder. MPEG movie playback 159 Copying images recorded on "Memory Stick"s to correct trouble 210 Self-diagnosis display 217 Warning indicators and messages .... 218 Additional Information Usable cassettes 220 About the "InfoLITHIUM" battery pack 223 About i.LINK 225 Using your computer - Signal convert function 196 Using the Network function (DCR-TRV50...

Operating Instructions (primary manual)
Page 14
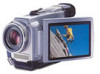
Checking supplied accessories Make sure that the following accessories are supplied with your camcorder. 1 2 3 4 5 6 7 8 9 q; qa qs qd 1 AC-L10A/L10B/L10C AC power adaptor (1), power cord (1) (p. 16) 2 NP-FM50 battery pack (1) (p. 15, 16) 3 A/V ...hood (1) (p. 30) 9 "Memory Stick" (1) (p. 117) 0 USB cable (1) (p. 180) qa CD-ROM (SPVD-008 USB Driver) (1) (p. 179) qs Cleaning cloth (1) (p. 229) qd Stylus (1) (DCR-TRV50 only) (p. 198) Contents of the recording cannot be compensated if recording or playback is not made due to a malfunction of the camcorder, storage media, etc. 14
Checking supplied accessories Make sure that the following accessories are supplied with your camcorder. 1 2 3 4 5 6 7 8 9 q; qa qs qd 1 AC-L10A/L10B/L10C AC power adaptor (1), power cord (1) (p. 16) 2 NP-FM50 battery pack (1) (p. 15, 16) 3 A/V ...hood (1) (p. 30) 9 "Memory Stick" (1) (p. 117) 0 USB cable (1) (p. 180) qa CD-ROM (SPVD-008 USB Driver) (1) (p. 179) qs Cleaning cloth (1) (p. 229) qd Stylus (1) (DCR-TRV50 only) (p. 198) Contents of the recording cannot be compensated if recording or playback is not made due to a malfunction of the camcorder, storage media, etc. 14
Operating Instructions (primary manual)
Page 21
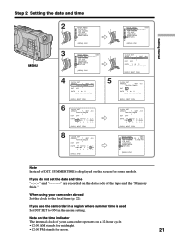
... MENU 2 SETUP MENU CLOCK SET USB STREAM LTR SIZE LANGUAGE DEMO MODE [MENU] : END 3 SETUP MENU STBY CLOCK SET - -:- -:- - If you use the camcorder in a region where summer time is displayed on the data code of your camcorder abroad Set the clock to ON ... R RR 5 : 30PM r rr [EXEC] : END 5 SETUP MENU STBY CLOCK SET - -:- -:- - When using your camcorder operates on the time indicator The internal clock of the tape and the "Memory Stick." USB STREAM LTR SIZE LANGUAGE DEMO MODE RETURN [MENU] : END CLOCK SET AREA 1 R GMT Lisbon, London r DST OFF +0.0 DATE...
... MENU 2 SETUP MENU CLOCK SET USB STREAM LTR SIZE LANGUAGE DEMO MODE [MENU] : END 3 SETUP MENU STBY CLOCK SET - -:- -:- - If you use the camcorder in a region where summer time is displayed on the data code of your camcorder abroad Set the clock to ON ... R RR 5 : 30PM r rr [EXEC] : END 5 SETUP MENU STBY CLOCK SET - -:- -:- - When using your camcorder operates on the time indicator The internal clock of the tape and the "Memory Stick." USB STREAM LTR SIZE LANGUAGE DEMO MODE RETURN [MENU] : END CLOCK SET AREA 1 R GMT Lisbon, London r DST OFF +0.0 DATE...
Operating Instructions (primary manual)
Page 78
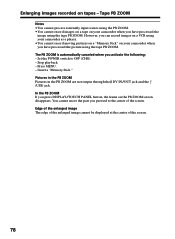
...PB ZOOM. Stop playback. - Pictures in the PB ZOOM Pictures in the PB ZOOM are not output through the DV IN/OUT jack and the (USB) jack. The PB ZOOM is automatically canceled when you pressed to OFF (CHG). - Edge of the enlarged image The edge of the enlarged image ...be displayed at the center of the screen. Insert a "Memory Stick." You cannot move the part you activate the following: - Enlarging images recorded on your camcorder when you have processed the picture using the tape PB ZOOM. Tape PB ZOOM Notes •You cannot process externally input scenes using the PB...
...PB ZOOM. Stop playback. - Pictures in the PB ZOOM Pictures in the PB ZOOM are not output through the DV IN/OUT jack and the (USB) jack. The PB ZOOM is automatically canceled when you pressed to OFF (CHG). - Edge of the enlarged image The edge of the enlarged image ...be displayed at the center of the screen. Insert a "Memory Stick." You cannot move the part you activate the following: - Enlarging images recorded on your camcorder when you have processed the picture using the tape PB ZOOM. Tape PB ZOOM Notes •You cannot process externally input scenes using the PB...
Operating Instructions (primary manual)
Page 117
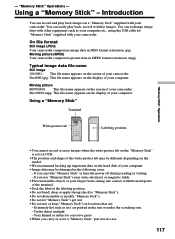
... or keep "Memory Stick"s in the following cases: - Under direct sunlight - Extremely hot such as your computer etc., using the USB cable for "Memory Stick" supplied with your camcorder. Using a "Memory Stick" - You can exchange image data with other equipment such as in a car parked in MPEG format (...tab Labeling position "Memory Stick" Operations •You cannot record or erase images when the write-protect tab on the hard disk of your camcorder. If you carry or store a "Memory Stick," put it in JPEG format (extension .jpg). Introduction You can record and play back,...
... or keep "Memory Stick"s in the following cases: - Under direct sunlight - Extremely hot such as your computer etc., using the USB cable for "Memory Stick" supplied with your camcorder. Using a "Memory Stick" - You can exchange image data with other equipment such as in a car parked in MPEG format (...tab Labeling position "Memory Stick" Operations •You cannot record or erase images when the write-protect tab on the hard disk of your camcorder. If you carry or store a "Memory Stick," put it in JPEG format (extension .jpg). Introduction You can record and play back,...

Operating Instructions (primary manual)
Page 174
Viewing images recorded on a computer which has a Memory Stick slot, first eject the "Memory Stick" from the camcorder and then insert it into the end USB connector USB cable (supplied) 174 To view images on a tape When connecting to view images saved on a "Memory Stick" or recorded on tape on your Computer - Viewing ...
Viewing images recorded on a computer which has a Memory Stick slot, first eject the "Memory Stick" from the camcorder and then insert it into the end USB connector USB cable (supplied) 174 To view images on a tape When connecting to view images saved on a "Memory Stick" or recorded on tape on your Computer - Viewing ...


