Computer Applications Guide
Page 2
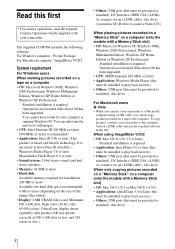
... 98. To copy pictures, connect your camcorder to play back movies.) • Others: USB port (this must be provided as standard), DV Interface (IEEE1394, i.LINK) (to connect via an i.LINK cable), disc drive When only copying pictures recorded on a "Memory Stick" on a computer (only the models with a Memory Stick slot) • OS: Mac OS 9.1/9.2 or...
... 98. To copy pictures, connect your camcorder to play back movies.) • Others: USB port (this must be provided as standard), DV Interface (IEEE1394, i.LINK) (to connect via an i.LINK cable), disc drive When only copying pictures recorded on a "Memory Stick" on a computer (only the models with a Memory Stick slot) • OS: Mac OS 9.1/9.2 or...
Computer Applications Guide
Page 3
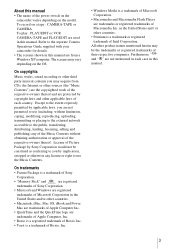
...authorization or approval of the respective owners thereof. On trademarks • Picture Package is a trademark of Sony Corporation. • "Memory Stick" and are registered trademarks of Sony Corporation. • Microsoft and Windows are registered trademarks of Microsoft Corporation in the United States and /...Macromedia Flash Player are not mentioned in each country. About this manual • The name of the power switch on the camcorder varies depending on the OS. Furthermore, "" and "" are trademarks or registered trademarks of Macromedia, Inc. On ...
...authorization or approval of the respective owners thereof. On trademarks • Picture Package is a trademark of Sony Corporation. • "Memory Stick" and are registered trademarks of Sony Corporation. • Microsoft and Windows are registered trademarks of Microsoft Corporation in the United States and /...Macromedia Flash Player are not mentioned in each country. About this manual • The name of the power switch on the camcorder varies depending on the OS. Furthermore, "" and "" are trademarks or registered trademarks of Macromedia, Inc. On ...
Computer Applications Guide
Page 4
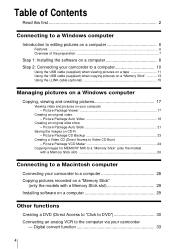
... images for MEMORY MIX to a "Memory Stick" (only the models with a Memory Stick slot 26 Connecting to a Macintosh computer Connecting your camcorder to a computer 28 Copying pictures recorded on a "Memory Stick" (only the models with a Memory Stick slot 29 Installing software on CD-R - Picture Package CD Backup 23 Creating a Video CD (Direct Access to the computer via your computer - Digital convert...
... images for MEMORY MIX to a "Memory Stick" (only the models with a Memory Stick slot 26 Connecting to a Macintosh computer Connecting your camcorder to a computer 28 Copying pictures recorded on a "Memory Stick" (only the models with a Memory Stick slot 29 Installing software on CD-R - Picture Package CD Backup 23 Creating a Video CD (Direct Access to the computer via your computer - Digital convert...
Computer Applications Guide
Page 6
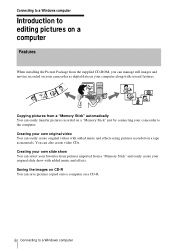
... the supplied CD-ROM, you can easily transfer pictures recorded on a "Memory Stick" just by connecting your computer along with several features. Creating your own slide show with added music and effects using pictures recorded on a tape as digital data on your camcorder as materials. Connecting to a Windows computer Introduction to a Windows computer You...
... the supplied CD-ROM, you can easily transfer pictures recorded on a "Memory Stick" just by connecting your computer along with several features. Creating your own slide show with added music and effects using pictures recorded on a tape as digital data on your camcorder as materials. Connecting to a Windows computer Introduction to a Windows computer You...
Computer Applications Guide
Page 10
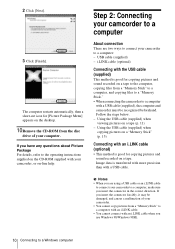
... for [Picture Package Menu] appears on a tape to the computer, copying files from a "Memory Stick" to a computer, and copying files to a "Memory Stick." • When connecting the camcorder to a computer with your camcorder. • You cannot copy pictures from the disc drive of your camcorder, or on a tape (p. 11) - i.LINK cable (optional) Connecting with a USB cable. Using...
... for [Picture Package Menu] appears on a tape to the computer, copying files from a "Memory Stick" to a computer, and copying files to a "Memory Stick." • When connecting the camcorder to a computer with your camcorder. • You cannot copy pictures from the disc drive of your camcorder, or on a tape (p. 11) - i.LINK cable (optional) Connecting with a USB cable. Using...
Computer Applications Guide
Page 13
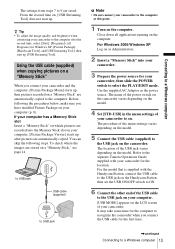
...] starts up [USB Streaming Tool]. Using the USB cable (supplied) when copying pictures on a "Memory Stick" When you connect your camcorder. To check where the images are recorded into your camcorder. 3 Prepare the power source for Windows XP, [Picture Package], [Handycam Tools], and [USB Streaming Tool], then start up after the second time, select [Start...
...] starts up [USB Streaming Tool]. Using the USB cable (supplied) when copying pictures on a "Memory Stick" When you connect your camcorder. To check where the images are recorded into your camcorder. 3 Prepare the power source for Windows XP, [Picture Package], [Handycam Tools], and [USB Streaming Tool], then start up after the second time, select [Start...
Computer Applications Guide
Page 14
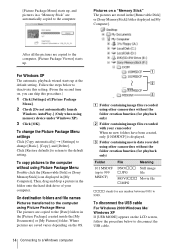
... follow the procedure below to the computer. . Where pictures are saved varies depending on a "Memory Stick" The pictures are copied to the computer using other camcorders without the folder creation function (for playback only) B Folder containing image files recorded with your ...C A Folder containing image files recorded using Picture Package Menu The pictures are stored in the [Removable Disk] or [Sony MemoryStick] folder displayed in a "Memory Stick" are copied to the computer, [Picture Package Viewer] starts up to 999 MSDCF) File Meaning DSC0sss Still image s.JPG...
... follow the procedure below to the computer. . Where pictures are saved varies depending on a "Memory Stick" The pictures are copied to the computer using other camcorders without the folder creation function (for playback only) B Folder containing image files recorded with your ...C A Folder containing image files recorded using Picture Package Menu The pictures are stored in the [Removable Disk] or [Sony MemoryStick] folder displayed in a "Memory Stick" are copied to the computer, [Picture Package Viewer] starts up to 999 MSDCF) File Meaning DSC0sss Still image s.JPG...
Computer Applications Guide
Page 17
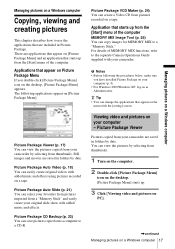
... on your computer - Picture Package Auto Slide (p. 21) You can select your favorites from pictures imported from a "Memory Stick" and easily create your camcorder are saved in Picture Package. Viewing video and pictures on a Windows computer b Notes • Before following applications appear.... Applications that appear on as Administrators. Picture Package VCD Maker (p. 24) You can copy images for MEMORY MIX to a "Memory Stick." For details of the computer MEMORY MIX Image Tool (p. 26) You can create a Video CD from pictures recorded on the desktop, [...
... on your computer - Picture Package Auto Slide (p. 21) You can select your favorites from pictures imported from a "Memory Stick" and easily create your camcorder are saved in Picture Package. Viewing video and pictures on a Windows computer b Notes • Before following applications appear.... Applications that appear on as Administrators. Picture Package VCD Maker (p. 24) You can copy images for MEMORY MIX to a "Memory Stick." For details of the computer MEMORY MIX Image Tool (p. 26) You can create a Video CD from pictures recorded on the desktop, [...
Computer Applications Guide
Page 26
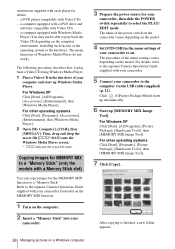
...Memory Stick" into your camcorder, then slide the POWER switch repeatedly to a "Memory Stick" (only the models with your camcorder. 5 Connect your computer and start up [MEMORY MIX Image Tool]. a computer equipped with your camcorder for your camcorder. 3 Prepare the power source for details on the MEMORY...], [Picture Package], [Handycam Tools], then [MEMORY MIX Image Tool]. For other operating systems Click [Start], [Programs], [Picture Package], [Handycam Tools], then [MEMORY MIX Image Tool]. 7 Click [Copy]. . The name of the power switch on the camcorder varies depending on the ...
...Memory Stick" into your camcorder, then slide the POWER switch repeatedly to a "Memory Stick" (only the models with your camcorder. 5 Connect your computer and start up [MEMORY MIX Image Tool]. a computer equipped with your camcorder for your camcorder. 3 Prepare the power source for details on the MEMORY...], [Picture Package], [Handycam Tools], then [MEMORY MIX Image Tool]. For other operating systems Click [Start], [Programs], [Picture Package], [Handycam Tools], then [MEMORY MIX Image Tool]. 7 Click [Copy]. . The name of the power switch on the camcorder varies depending on the ...

Computer Applications Guide
Page 28
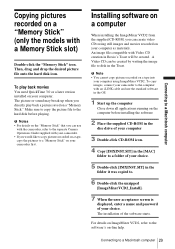
... the USB cable from the camcorder and computer. Connecting to a Macintosh computer Connecting your camcorder to a computer 1 Insert a "Memory Stick" into your camcorder. 2 Prepare the power source for the location. Use the supplied AC Adaptor as the power source. Refer to the separate Camera Operations Guide supplied with the Handycam Station, connect the USB cable to...
... the USB cable from the camcorder and computer. Connecting to a Macintosh computer Connecting your camcorder to a computer 1 Insert a "Memory Stick" into your camcorder. 2 Prepare the power source for the location. Use the supplied AC Adaptor as the power source. Refer to the separate Camera Operations Guide supplied with the Handycam Station, connect the USB cable to...
Computer Applications Guide
Page 29
... to copy pictures recorded on a tape, copy the pictures to a "Memory Stick" on a tape into your computer using still images and movies recorded on your computer. An image file compatible with your camcorder. • If you can use the standard software in the OS. ...8226; You cannot copy pictures recorded on your camcorder first. The installation of your choice. The picture or sound may break up the computer Close down all applications running on a "Memory Stick" (only the models with a Memory Stick slot) Double-click the "Memory Stick" icon. For details on ImageMixer VCD2, refer...
... to copy pictures recorded on a tape, copy the pictures to a "Memory Stick" on a tape into your computer using still images and movies recorded on your computer. An image file compatible with your camcorder. • If you can use the standard software in the OS. ...8226; You cannot copy pictures recorded on your camcorder first. The installation of your choice. The picture or sound may break up the computer Close down all applications running on a "Memory Stick" (only the models with a Memory Stick slot) Double-click the "Memory Stick" icon. For details on ImageMixer VCD2, refer...

Computer Applications Guide
Page 32
...the help files of 10 seconds or longer on . • You cannot operate your camcorder. When "Click to DVD" is created. While recording images onto a "Memory Stick" - When [A/V t DV OUT] in a format other than Digital 8 format. 32 Other functions A DVD containing the data up from an 8mm tape ...if it contains pictures recorded in the menu settings of your camcorder is set the POWER switch to another ...
...the help files of 10 seconds or longer on . • You cannot operate your camcorder. When "Click to DVD" is created. While recording images onto a "Memory Stick" - When [A/V t DV OUT] in a format other than Digital 8 format. 32 Other functions A DVD containing the data up from an 8mm tape ...if it contains pictures recorded in the menu settings of your camcorder is set the POWER switch to another ...
Computer Applications Guide
Page 35
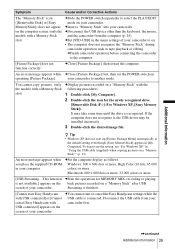
... mode, set [USB STREAM] in your computer. cFor the model that is supplied with the Handycam Station, set [USB STREAM] in the menu settings of your camcorder to your camcorder first, then copy the pictures recorded on the "Memory Stick" to on. cSlide the POWER switch repeatedly to select the PLAY/EDIT mode, set the...
... mode, set [USB STREAM] in your computer. cFor the model that is supplied with the Handycam Station, set [USB STREAM] in the menu settings of your camcorder to your camcorder first, then copy the pictures recorded on the "Memory Stick" to on. cSlide the POWER switch repeatedly to select the PLAY/EDIT mode, set the...
Computer Applications Guide
Page 36
...) • [? b Note • Deleting anything other than [USB Audio Device], [USB Device], [USB Composite Device], [? Sony DSC] may vary depending on a "Memory Stick" (only the models with a "?" For copying and viewing pictures recorded on a tape • [USB Audio Device] in the [Sound, ...incorrectly as (E:)) may cause malfunction of the USB driver was completed. Sony Handycam] or [? mark in the [Other devices] folder 5 When the [Confirm Device Removal] screen appears, click [OK]. 6 Turn off the power of your camcorder, disconnect the USB cable, then restart the computer. 7 Place ...
...) • [? b Note • Deleting anything other than [USB Audio Device], [USB Device], [USB Composite Device], [? Sony DSC] may vary depending on a "Memory Stick" (only the models with a "?" For copying and viewing pictures recorded on a tape • [USB Audio Device] in the [Sound, ...incorrectly as (E:)) may cause malfunction of the USB driver was completed. Sony Handycam] or [? mark in the [Other devices] folder 5 When the [Confirm Device Removal] screen appears, click [OK]. 6 Turn off the power of your camcorder, disconnect the USB cable, then restart the computer. 7 Place ...
Computer Applications Guide
Page 37
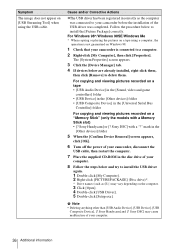
... drive)*. * Drive names (such as Administrators. 1 Check that your camcorder is connected to delete them , then click [Uninstall] to a computer. 2 Right-click [My Computer], then click [Properties]. Sony DSC] with a Memory Stick slot) • [? Sony DSC] may vary depending on the computer. 3 Click [Open]. 4...off the power of your camcorder, disconnect the USB cable, then restart the computer. 9 Place the supplied CD-ROM in the [Other devices] folder For copying and viewing pictures recorded on a "Memory Stick" (only the models with a "?" Sony Handycam] and [? Additional information ...
... drive)*. * Drive names (such as Administrators. 1 Check that your camcorder is connected to delete them , then click [Uninstall] to a computer. 2 Right-click [My Computer], then click [Properties]. Sony DSC] with a Memory Stick slot) • [? Sony DSC] may vary depending on the computer. 3 Click [Open]. 4...off the power of your camcorder, disconnect the USB cable, then restart the computer. 9 Place the supplied CD-ROM in the [Other devices] folder For copying and viewing pictures recorded on a "Memory Stick" (only the models with a "?" Sony Handycam] and [? Additional information ...
Computer Applications Guide
Page 38
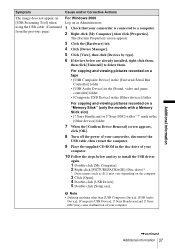
...click [OK]. 9 Turn off the power of your camcorder, disconnect the USB cable, then restart the computer. 10 Place the supplied CD-ROM in the [Other devices] folder For copying and viewing pictures recorded on a "Memory Stick" (only the models with a "?" The [System ...Properties] screen appears. 4 Click the [Hardware] tab. 5 Click [Device Manager]. 6 Click [View], then click [Devices by type]. 7 If devices below and try to a computer. 2 Click [Start]. 3 Right-click [My Computer], then click [Properties]. Sony Handycam] and...
...click [OK]. 9 Turn off the power of your camcorder, disconnect the USB cable, then restart the computer. 10 Place the supplied CD-ROM in the [Other devices] folder For copying and viewing pictures recorded on a "Memory Stick" (only the models with a "?" The [System ...Properties] screen appears. 4 Click the [Hardware] tab. 5 Click [Device Manager]. 6 Click [View], then click [Devices by type]. 7 If devices below and try to a computer. 2 Click [Start]. 3 Right-click [My Computer], then click [Properties]. Sony Handycam] and...
Computer Applications Guide
Page 39
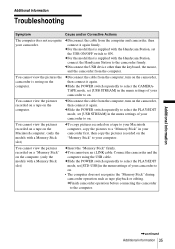
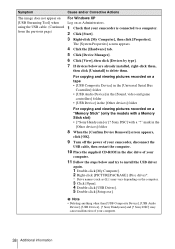
...the POWER switch on a "Memory Stick"" (p. 13). This function cStart the operations for the newly recognized drive [Removable Disk (F:)] (For Windows XP, [Sony Memory Stick]). You cannot copy pictures. (only the models with a Memory Stick slot) cDisplay pictures recorded on a "Memory Stick" with the following procedures.... the drive is finished. [Cannot start Easy Handycam with USB connected] or [Cannot cancel Easy Handycam with USB connected] appears on . • The computer does not recognize the "Memory Stick" during camcorder operation such as follows: Windows: 800 ×...
...the POWER switch on a "Memory Stick"" (p. 13). This function cStart the operations for the newly recognized drive [Removable Disk (F:)] (For Windows XP, [Sony Memory Stick]). You cannot copy pictures. (only the models with a Memory Stick slot) cDisplay pictures recorded on a "Memory Stick" with the following procedures.... the drive is finished. [Cannot start Easy Handycam with USB connected] or [Cannot cancel Easy Handycam with USB connected] appears on . • The computer does not recognize the "Memory Stick" during camcorder operation such as follows: Windows: 800 ×...
Computer Applications Guide
Page 41
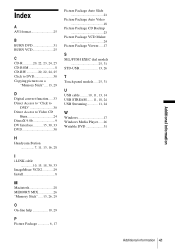
... 20, 22, 24, 25 Click to DVD 30 Copying pictures on a "Memory Stick" .... 13, 29 D Digital convert function......33 Direct Access to "Click to DVD 30 Direct Access to Video CD Burn 24 DirectX 9.0b 9 DV Interface 15, 30, 33 DVD 30 H Handycam Station 7, 11, 13, 16, 28 I i.LINK cable 10, 15, 18, 30...
... 20, 22, 24, 25 Click to DVD 30 Copying pictures on a "Memory Stick" .... 13, 29 D Digital convert function......33 Direct Access to "Click to DVD 30 Direct Access to Video CD Burn 24 DirectX 9.0b 9 DV Interface 15, 30, 33 DVD 30 H Handycam Station 7, 11, 13, 16, 28 I i.LINK cable 10, 15, 18, 30...
Camera Operations Guide
Page 5
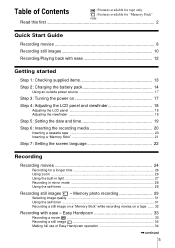
...Handycam operation 34 ,continued 5 Easy Handycam 33 Recording a movie 33 Recording a still image 34 Making full use of Contents : Features available for tape only. : Features available for a longer time 26 Using zoom ...26 Using the built-in light 27 Recording in mirror mode 28 Using the self-timer 28 Recording still images - Memory... the recording media 20 Inserting a cassette tape 20 Inserting a "Memory Stick 21 Step 7: Setting the screen language 22 Recording Recording movies 24 Recording for "Memory Stick" only. Read this first 2 Quick Start Guide Recording movies ...
...Handycam operation 34 ,continued 5 Easy Handycam 33 Recording a movie 33 Recording a still image 34 Making full use of Contents : Features available for tape only. : Features available for a longer time 26 Using zoom ...26 Using the built-in light 27 Recording in mirror mode 28 Using the self-timer 28 Recording still images - Memory... the recording media 20 Inserting a cassette tape 20 Inserting a "Memory Stick 21 Step 7: Setting the screen language 22 Recording Recording movies 24 Recording for "Memory Stick" only. Read this first 2 Quick Start Guide Recording movies ...
Camera Operations Guide
Page 6
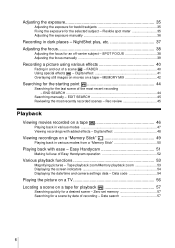
... Fading in various modes 47 Viewing recordings with ease - END SEARCH 44 Searching manually - Digital effect 48 Viewing recordings on a tape 46 Playing back in and out of Easy Handycam operation 52 Various playback functions 53 Magnifying pictures - Data code 54 Playing the picture on...35 Adjusting the exposure manually 36 Recording in various modes from a "Memory Stick 50 Playing back with added effects - NightShot plus, etc 37 Adjusting the focus 38 Adjusting the focus for the selected subject - Digital effect 41 Overlaying still images on movies on a tape for playback 57...
... Fading in various modes 47 Viewing recordings with ease - END SEARCH 44 Searching manually - Digital effect 48 Viewing recordings on a tape 46 Playing back in and out of Easy Handycam operation 52 Various playback functions 53 Magnifying pictures - Data code 54 Playing the picture on...35 Adjusting the exposure manually 36 Recording in various modes from a "Memory Stick 50 Playing back with added effects - NightShot plus, etc 37 Adjusting the focus 38 Adjusting the focus for the selected subject - Digital effect 41 Overlaying still images on movies on a tape for playback 57...


