Camera Operations Guide
Page 2
... of important operating and maintenance (servicing) instructions in the U.S.A. You can help preserve our environment by returning your used rechargeable batteries to persons. This symbol is intended to alert the user to rain or moisture. and CANADA CAUTION TO PREVENT ELECTRIC SHOCK,... MATCH WIDE BLADE OF PLUG TO WIDE SLOT, FULLY INSERT. RECYCLING LITHIUM-ION BATTERIES Lithium-Ion batteries are recyclable. b Notice • If static electricity or electromagnetic interference causes data transfer to discontinue midway (fail), restart the...
... of important operating and maintenance (servicing) instructions in the U.S.A. You can help preserve our environment by returning your used rechargeable batteries to persons. This symbol is intended to alert the user to rain or moisture. and CANADA CAUTION TO PREVENT ELECTRIC SHOCK,... MATCH WIDE BLADE OF PLUG TO WIDE SLOT, FULLY INSERT. RECYCLING LITHIUM-ION BATTERIES Lithium-Ion batteries are recyclable. b Notice • If static electricity or electromagnetic interference causes data transfer to discontinue midway (fail), restart the...
Camera Operations Guide
Page 4
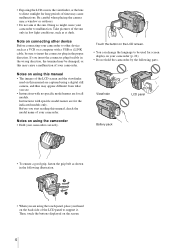
... of the LCD screen and the viewfinder used on this manual are captured using a digital still camera, and thus may be used for screen display on your camcorder (p. 22) • Do not hold the camcorder by the following illustration. • When you start reading this may cause malfunctions. ...sunlight for long periods of time may cause a malfunction of your camcorder. Viewfinder LCD panel Battery pack • To ensure a good grip, fasten the grip belt as at the sun. Notes on using the touch panel, place your camcorder to support it. Doing so might cause your hand on the ...
... of the LCD screen and the viewfinder used on this manual are captured using a digital still camera, and thus may be used for screen display on your camcorder (p. 22) • Do not hold the camcorder by the following illustration. • When you start reading this may cause malfunctions. ...sunlight for long periods of time may cause a malfunction of your camcorder. Viewfinder LCD panel Battery pack • To ensure a good grip, fasten the grip belt as at the sun. Notes on using the touch panel, place your camcorder to support it. Doing so might cause your hand on the ...
Camera Operations Guide
Page 5
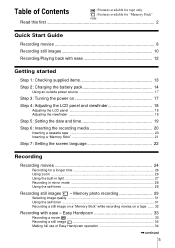
... Recording/Playing back with ease 12 Getting started Step 1: Checking supplied items 13 Step 2: Charging the battery pack 14 Using an outside power source 17 Step 3: Turning the power on a tape ....... 32 Recording with ease - Easy Handycam 33 Recording a movie 33 Recording a still image 34 Making full use of Contents : Features available... Using zoom ...26 Using the built-in light 27 Recording in mirror mode 28 Using the self-timer 28 Recording still images - Table of Easy Handycam operation 34 ,continued 5
... Recording/Playing back with ease 12 Getting started Step 1: Checking supplied items 13 Step 2: Charging the battery pack 14 Using an outside power source 17 Step 3: Turning the power on a tape ....... 32 Recording with ease - Easy Handycam 33 Recording a movie 33 Recording a still image 34 Making full use of Contents : Features available... Using zoom ...26 Using the built-in light 27 Recording in mirror mode 28 Using the self-timer 28 Recording still images - Table of Easy Handycam operation 34 ,continued 5
Camera Operations Guide
Page 7
... Troubleshooting 103 Warning indicators and messages ...110 Additional Information Using your camcorder abroad ..........114 Usable cassette tapes 115 About the "Memory Stick 116 About the "InfoLITHIUM" battery pack 118 About i.LINK 119 Maintenance and precautions ..........120 Specification 123...Dubbing pictures from a tape to a "Memory Stick 89 Dubbing still images from a tape - Digital program editing 91 Deleting recorded pictures 98 Marking recorded images with your camcorder: • Editing images with specific information - APPLI.) menu - PROGRAM AE/16:9 WIDE, etc...
... Troubleshooting 103 Warning indicators and messages ...110 Additional Information Using your camcorder abroad ..........114 Usable cassette tapes 115 About the "Memory Stick 116 About the "InfoLITHIUM" battery pack 118 About i.LINK 119 Maintenance and precautions ..........120 Specification 123...Dubbing pictures from a tape to a "Memory Stick 89 Dubbing still images from a tape - Digital program editing 91 Deleting recorded pictures 98 Marking recorded images with your camcorder: • Editing images with specific information - APPLI.) menu - PROGRAM AE/16:9 WIDE, etc...
Camera Operations Guide
Page 8
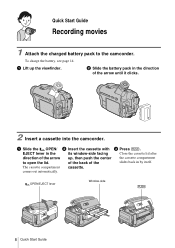
...side 8 Quick Start Guide The cassette compartment cassette. of the back of the arrow until it clicks. 2 Insert a cassette into the camcorder. b Slide the battery pack in the direction of the slides back in the its window-side facing Close the cassette lid after direction of the arrow up... the viewfinder. To charge the battery, see page 14. a Lift up , then push the center the cassette compartment to the camcorder. Quick Start Guide Recording movies 1 Attach the charged...
...side 8 Quick Start Guide The cassette compartment cassette. of the back of the arrow until it clicks. 2 Insert a cassette into the camcorder. b Slide the battery pack in the direction of the slides back in the its window-side facing Close the cassette lid after direction of the arrow up... the viewfinder. To charge the battery, see page 14. a Lift up , then push the center the cassette compartment to the camcorder. Quick Start Guide Recording movies 1 Attach the charged...
Camera Operations Guide
Page 10
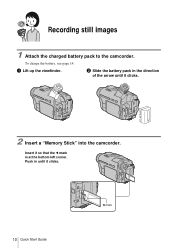
Insert it clicks. 2 Insert a "Memory Stick" into the camcorder. To charge the battery, see page 14. Push in the direction of the arrow until it clicks. 10 Quick Start Guide b mark b Slide the battery pack in until it so that the b mark is at the bottom left corner. Recording still images 1 Attach the charged battery pack to the camcorder. a Lift up the viewfinder.
Insert it clicks. 2 Insert a "Memory Stick" into the camcorder. To charge the battery, see page 14. Push in the direction of the arrow until it clicks. 10 Quick Start Guide b mark b Slide the battery pack in until it so that the b mark is at the bottom left corner. Recording still images 1 Attach the charged battery pack to the camcorder. a Lift up the viewfinder.

Camera Operations Guide
Page 13
Wireless Remote Commander (1) A button-type lithium battery is no "Memory Stick" media supplied with DCR-TRV361. A/V connecting cable (1) USB cable (1) AC Adaptor (1) Power cord (1) Rechargeable battery pack NP-FM30 (1) CD-ROM "SPVD-012 USB Driver" (1) Cleaning cloth (1) Camera Operations Guide (This... (DCR-TRV361) "Memory Stick" media is only supplied with DCR-TRV460. Shoulder strap (1) See page 127 on how to attach the shoulder strap. There is already installed. Getting started Step 1: Checking supplied items Make sure you have following items supplied with your camcorder....
Wireless Remote Commander (1) A button-type lithium battery is no "Memory Stick" media supplied with DCR-TRV361. A/V connecting cable (1) USB cable (1) AC Adaptor (1) Power cord (1) Rechargeable battery pack NP-FM30 (1) CD-ROM "SPVD-012 USB Driver" (1) Cleaning cloth (1) Camera Operations Guide (This... (DCR-TRV361) "Memory Stick" media is only supplied with DCR-TRV460. Shoulder strap (1) See page 127 on how to attach the shoulder strap. There is already installed. Getting started Step 1: Checking supplied items Make sure you have following items supplied with your camcorder....
Camera Operations Guide
Page 14
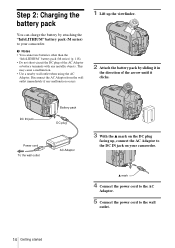
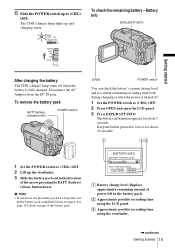
...plug facing up the viewfinder. 2 Attach the battery pack by attaching the "InfoLITHIUM" battery pack (M series) to your camcorder. DC IN jack Power cord To the wall outlet Battery pack DC plug AC Adaptor 3 With the v mark on your camcorder. Disconnect the AC Adaptor from the wall outlet... immediately if any metallic objects. Step 2: Charging the battery pack You can charge the battery by sliding it in the direction of the AC Adaptor or battery terminals with any malfunction occurs. 1 Lift...
...plug facing up the viewfinder. 2 Attach the battery pack by attaching the "InfoLITHIUM" battery pack (M series) to your camcorder. DC IN jack Power cord To the wall outlet Battery pack DC plug AC Adaptor 3 With the v mark on your camcorder. Disconnect the AC Adaptor from the wall outlet... immediately if any metallic objects. Step 2: Charging the battery pack You can charge the battery by sliding it in the direction of the AC Adaptor or battery terminals with any malfunction occurs. 1 Lift...
Camera Operations Guide
Page 15
...jack. b Note • If you do not use up and charging starts. To remove the battery pack BATT(battery) release button POWER switch OPEN POWER switch You can check the battery's current charge level and its current remaining recording time both during charging or when the power is... turned off when the battery is fully charged. C Approximate possible recording time using the LCD panel. Battery Info DSPL/BATT INFO Getting started 15 See page 119 about 7 seconds. Keep the button pressed ...
...jack. b Note • If you do not use up and charging starts. To remove the battery pack BATT(battery) release button POWER switch OPEN POWER switch You can check the battery's current charge level and its current remaining recording time both during charging or when the power is... turned off when the battery is fully charged. C Approximate possible recording time using the LCD panel. Battery Info DSPL/BATT INFO Getting started 15 See page 119 about 7 seconds. Keep the button pressed ...

Camera Operations Guide
Page 16
... record, start/stop, slide the POWER switch to the DC IN jack of your camcorder, even if its power cord is fully discharged. (For Battery information only.) 16 Getting started For DCR-TRV460: The playing time of tapes recorded on Approximate number of minutes available when you use... a fully charged battery pack at 25°C (77°F). Charging time Approximate number of minutes required...
... record, start/stop, slide the POWER switch to the DC IN jack of your camcorder, even if its power cord is fully discharged. (For Battery information only.) 16 Getting started For DCR-TRV460: The playing time of tapes recorded on Approximate number of minutes available when you use... a fully charged battery pack at 25°C (77°F). Charging time Approximate number of minutes required...
Camera Operations Guide
Page 17
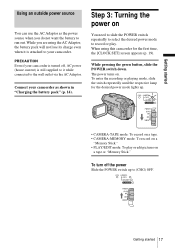
...] screen appears (p. 19). When using the AC Adaptor, the battery pack will not lose its charge even when it is still supplied to it while connected to (CHG) OFF. Getting started 17 Connect your camcorder. PRECAUTION Even if your camcorder is turned off the power Slide the POWER switch up . •... the power source when you are using this camcorder for the desired power mode lights up to the wall outlet via the AC Adaptor. While pressing the green button, slide the POWER switch down. While you do not want the battery to record or play or edit pictures on a tape...
...] screen appears (p. 19). When using the AC Adaptor, the battery pack will not lose its charge even when it is still supplied to it while connected to (CHG) OFF. Getting started 17 Connect your camcorder. PRECAUTION Even if your camcorder is turned off the power Slide the POWER switch up . •... the power source when you are using this camcorder for the desired power mode lights up to the wall outlet via the AC Adaptor. While pressing the green button, slide the POWER switch down. While you do not want the battery to record or play or edit pictures on a tape...
Camera Operations Guide
Page 18
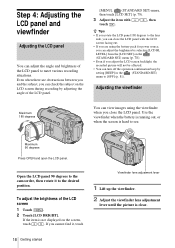
... battery is running out, or when the screen is hard to [OFF] (p. 81). z Tips • If you rotate the LCD panel 180 degrees to the lens side, you can close the LCD panel. Maximum 90 degrees Press OPEN and open the LCD panel. Open the LCD panel 90 degrees to the camcorder... panel. [MENU], (STANDARD SET) menu, then touch [LCD SET] (p. 78). 3 Adjust the item with the LCD screen facing out. • If you are using the battery pack for power source, you can adjust the brightness by adjusting the angle of the LCD screen 1 Touch . 2 Touch [LCD BRIGHT]. If you adjust the...
... battery is running out, or when the screen is hard to [OFF] (p. 81). z Tips • If you rotate the LCD panel 180 degrees to the lens side, you can close the LCD panel. Maximum 90 degrees Press OPEN and open the LCD panel. Open the LCD panel 90 degrees to the camcorder... panel. [MENU], (STANDARD SET) menu, then touch [LCD SET] (p. 78). 3 Adjust the item with the LCD screen facing out. • If you are using the battery pack for power source, you can adjust the brightness by adjusting the angle of the LCD screen 1 Touch . 2 Touch [LCD BRIGHT]. If you adjust the...
Camera Operations Guide
Page 19
... the display in the CAMERA- To hide the buttons on the screen. 4 Touch [YES]. Proceed to step 7 when you do not use your camcorder, extend the viewfinder and pull it repeatedly to select a desired effect (only in the viewfinder. [EXPOSURE], etc. EXPO- are recording on a tape... (p. 35) and fader (p. 40) while checking the image on your camcorder for the first time. 3 Touch . 60min MENU 1/3 FADER SPOT METER -:--:-- To use the large-capacity battery pack When you use the large-capacity battery pack (NP-QM71/QM71D/QM91/QM91D) on the viewfinder. In that case...
... the display in the CAMERA- To hide the buttons on the screen. 4 Touch [YES]. Proceed to step 7 when you do not use your camcorder, extend the viewfinder and pull it repeatedly to select a desired effect (only in the viewfinder. [EXPOSURE], etc. EXPO- are recording on a tape... (p. 35) and fader (p. 40) while checking the image on your camcorder for the first time. 3 Touch . 60min MENU 1/3 FADER SPOT METER -:--:-- To use the large-capacity battery pack When you use the large-capacity battery pack (NP-QM71/QM71D/QM91/QM91D) on the viewfinder. In that case...
Camera Operations Guide
Page 22
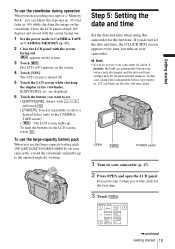
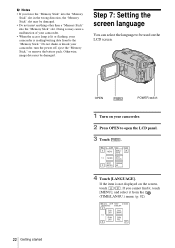
... PRGRAM METER AE 4 Touch [LANGUAGE]. Doing so may cause a malfunction of your camcorder. • When the access lamp is lit or flashing, your camcorder, turn the power off, eject the "Memory Stick," or remove the battery pack. If you force the "Memory Stick" into the "Memory Stick" slot. ...Do not shake or knock your camcorder is not displayed on your camcorder. 2 Press OPEN to open the LCD ...
... PRGRAM METER AE 4 Touch [LANGUAGE]. Doing so may cause a malfunction of your camcorder. • When the access lamp is lit or flashing, your camcorder, turn the power off, eject the "Memory Stick," or remove the battery pack. If you force the "Memory Stick" into the "Memory Stick" slot. ...Do not shake or knock your camcorder is not displayed on your camcorder. 2 Press OPEN to open the LCD ...
Camera Operations Guide
Page 25
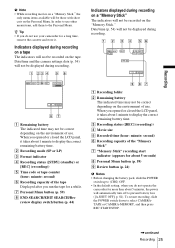
... not be recorded on the tape. Indicators displayed during recording. 60min REC 101 0:00:00 320 2min P-MENU 60min REC 0:00:00 P-MENU A Remaining battery The indicated time may not be recorded on the Personal Menu. Date/time (p. 54) will not be correct depending on the environment of use your... camcorder for about 1 minute to (CHG) OFF. • In the default setting, when you do not use . When you run the tape for more than about ...
... not be recorded on the tape. Indicators displayed during recording. 60min REC 101 0:00:00 320 2min P-MENU 60min REC 0:00:00 P-MENU A Remaining battery The indicated time may not be recorded on the Personal Menu. Date/time (p. 54) will not be correct depending on the environment of use your... camcorder for about 1 minute to (CHG) OFF. • In the default setting, when you do not use . When you run the tape for more than about ...
Camera Operations Guide
Page 27
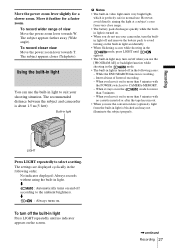
... the mode for more than 5 minutes with no indicator appears on in light to suit your camcorder, turn off according to CAMERA-MEMORY. - in light off and remove the battery pack to select a setting. To record closer view Move the power zoom lever towards W. The...lever slightly for a faster zoom. m : Automatically turns on . The subject appears farther away (Wide angle). The recommended distance between the subject and camcorder is working. - When you use your shooting situation. While the END SEARCH function is about 1.5 m (5 feet). To turn the built- When ...
... the mode for more than 5 minutes with no indicator appears on in light to suit your camcorder, turn off according to CAMERA-MEMORY. - in light off and remove the battery pack to select a setting. To record closer view Move the power zoom lever towards W. The...lever slightly for a faster zoom. m : Automatically turns on . The subject appears farther away (Wide angle). The recommended distance between the subject and camcorder is working. - When you use your shooting situation. While the END SEARCH function is about 1.5 m (5 feet). To turn the built- When ...
Camera Operations Guide
Page 47
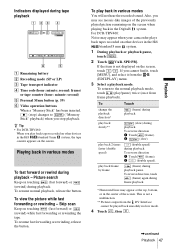
...top, bottom, or in the center of the previously played picture remaining on the screen, touch / . For DCR-TRV460: Noise may appear when your camcorder plays back tapes recorded on touching (fast forward) or (rewind) during playback. To Touch change the playback ... battery B Recording mode (SP or LP) C Tape transport indicator D Time code (hour: minute: second: frame) or tape counter (hour: minute: second) E Personal Menu button (p. 59) F Video operation buttons When a "Memory Stick" has been inserted, (stop playback. SPD PB]. z Tip • For DCR-TRV460:...
...top, bottom, or in the center of the previously played picture remaining on the screen, touch / . For DCR-TRV460: Noise may appear when your camcorder plays back tapes recorded on touching (fast forward) or (rewind) during playback. To Touch change the playback ... battery B Recording mode (SP or LP) C Tape transport indicator D Time code (hour: minute: second: frame) or tape counter (hour: minute: second) E Personal Menu button (p. 59) F Video operation buttons When a "Memory Stick" has been inserted, (stop playback. SPD PB]. z Tip • For DCR-TRV460:...
Camera Operations Guide
Page 50
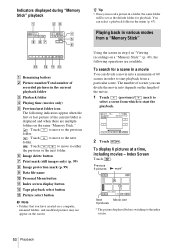
... 6 pictures N mark* END 101-0002 2 / 10 101 SET Next Movie icon 6 pictures * The picture displayed before switching to select a scene from a "Memory Stick" P-MENU A Remaining battery B Picture number/Total number of 60 scenes in the menu (p. 67). Playing back in various modes from which to start playback from a particular scene. To...
... 6 pictures N mark* END 101-0002 2 / 10 101 SET Next Movie icon 6 pictures * The picture displayed before switching to select a scene from a "Memory Stick" P-MENU A Remaining battery B Picture number/Total number of 60 scenes in the menu (p. 67). Playing back in various modes from which to start playback from a particular scene. To...
Camera Operations Guide
Page 72
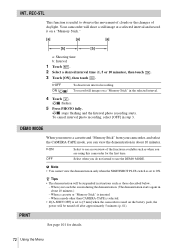
INT. Your camcorder will shoot a still image at a selected interval and record it on a "Memory Stick" in the selected interval. 4 Touch . When a mode other than CAMERA-TAPE is selected. • If [A.SHUT OFF] is used on the battery pack, the power will be turned off after approximately 5 ...screen during the demonstration. (The demonstration starts again in situations such as those described below. - Select when you are using this camcorder for details. 72 Using the Menu b Note • You cannot view the demonstration only when the NIGHTSHOT PLUS switch is set ...
INT. Your camcorder will shoot a still image at a selected interval and record it on a "Memory Stick" in the selected interval. 4 Touch . When a mode other than CAMERA-TAPE is selected. • If [A.SHUT OFF] is used on the battery pack, the power will be turned off after approximately 5 ...screen during the demonstration. (The demonstration starts again in situations such as those described below. - Select when you are using this camcorder for details. 72 Using the Menu b Note • You cannot view the demonstration only when the NIGHTSHOT PLUS switch is set ...

Camera Operations Guide
Page 75
The power will not be turned off , the characters you are using your camcorder on the battery pack and do not operate it for 5 minutes, the power automatically goes off as the default setting. Then, reselect the Using the Menu Using the ...
The power will not be turned off , the characters you are using your camcorder on the battery pack and do not operate it for 5 minutes, the power automatically goes off as the default setting. Then, reselect the Using the Menu Using the ...


