Operating Instructions
Page 9
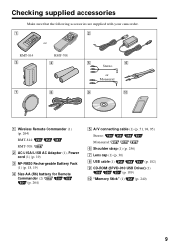
Checking supplied accessories Make sure that the following accessories are supplied with your camcorder. 1 2 or RMT-814 3 RMT-708 4 5 6 Stereo or Monaural 7 8 9 q; 1 Wireless Remote Commander (1) (p. 264) RMT-814: RMT-708: 2 AC-L15A/L15B AC Adaptor (1), Power cord (1) (p. 19) 3 ... Pack (1) (p. 18, 19) 4 Size AA (R6) battery for Remote Commander (2) (p. 264) 5 A/V connecting cable (1) (p. 51, 94, 95) Stereo: Monaural: 6 Shoulder strap (1) (p. 256) 7 Lens cap (1) (p. 30) 8 USB cable (1) (p. 182) 9 CD-ROM (SPVD-010 USB Driver) (1) (p. 189) 0 "Memory Stick" (1) (p. 240) 9
Checking supplied accessories Make sure that the following accessories are supplied with your camcorder. 1 2 or RMT-814 3 RMT-708 4 5 6 Stereo or Monaural 7 8 9 q; 1 Wireless Remote Commander (1) (p. 264) RMT-814: RMT-708: 2 AC-L15A/L15B AC Adaptor (1), Power cord (1) (p. 19) 3 ... Pack (1) (p. 18, 19) 4 Size AA (R6) battery for Remote Commander (2) (p. 264) 5 A/V connecting cable (1) (p. 51, 94, 95) Stereo: Monaural: 6 Shoulder strap (1) (p. 256) 7 Lens cap (1) (p. 30) 8 USB cable (1) (p. 182) 9 CD-ROM (SPVD-010 USB Driver) (1) (p. 189) 0 "Memory Stick" (1) (p. 240) 9
Operating Instructions
Page 182
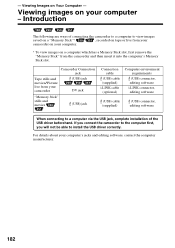
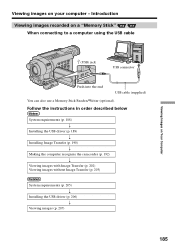
... a computer which has a Memory Stick slot, first remove the "Memory Stick" from your camcorder (USB) jack DV jack "Memory Stick" stills and movies (USB) jack Connection cable (USB) cable (supplied) i.LINK cable (optional) Computer environment requirements (USB) connector, editing software i.LINK connector, editing software (USB) cable (supplied) (USB) connector, editing software When connecting to install the USB driver correctly. -
... a computer which has a Memory Stick slot, first remove the "Memory Stick" from your camcorder (USB) jack DV jack "Memory Stick" stills and movies (USB) jack Connection cable (USB) cable (supplied) i.LINK cable (optional) Computer environment requirements (USB) connector, editing software i.LINK connector, editing software (USB) cable (supplied) (USB) connector, editing software When connecting to install the USB driver correctly. -
Operating Instructions
Page 183
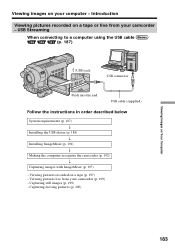
... on a tape or live from your camcorder - Capturing moving pictures (p. 200) Viewing Images on your camcorder (p. 199) - USB Streaming When connecting to a computer using the USB cable (p. 187) (USB) jack USB connector Push into the end USB cable (supplied) Follow the instructions in order described below System requirements (p. 187) r Installing the USB driver (p. 189) r Installing ImageMixer (p. 191) r Making the...
... on a tape or live from your camcorder - Capturing moving pictures (p. 200) Viewing Images on your camcorder (p. 199) - USB Streaming When connecting to a computer using the USB cable (p. 187) (USB) jack USB connector Push into the end USB cable (supplied) Follow the instructions in order described below System requirements (p. 187) r Installing the USB driver (p. 189) r Installing ImageMixer (p. 191) r Making the...
Operating Instructions
Page 185
... the instructions in order described below System requirements (p. 188) r Installing the USB driver (p. 189) r Installing Image Transfer (p. 190) r Making the computer recognize the camcorder (p. 192) r Viewing images with Image Transfer (p. 202) Viewing images without Image Transfer (p. 203) System requirements (p. 205) r Installing the USB driver (p. 206) r Viewing images (p. 207) 185 Viewing Images on Your Computer Viewing...
... the instructions in order described below System requirements (p. 188) r Installing the USB driver (p. 189) r Installing Image Transfer (p. 190) r Making the computer recognize the camcorder (p. 192) r Viewing images with Image Transfer (p. 202) Viewing images without Image Transfer (p. 203) System requirements (p. 205) r Installing the USB driver (p. 206) r Viewing images (p. 207) 185 Viewing Images on Your Computer Viewing...
Operating Instructions
Page 187
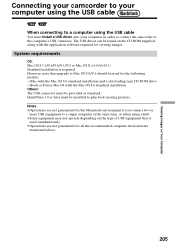
.... System requirements To view pictures recorded on the size of the USB driver before connecting the camcorder to the computer. You cannot hear sound if your computer to connect the camcorder to install the USB driver correctly. Standard installation is running Windows 98, but you will not... operate correctly) Others: The USB connector must install a USB driver onto your computer is required. CPU: Minimum 500 MHz ...
.... System requirements To view pictures recorded on the size of the USB driver before connecting the camcorder to the computer. You cannot hear sound if your computer to connect the camcorder to install the USB driver correctly. Standard installation is running Windows 98, but you will not... operate correctly) Others: The USB connector must install a USB driver onto your computer is required. CPU: Minimum 500 MHz ...

Operating Instructions
Page 188
... for installing USB driver is required. Notes •Operations are not guaranteed for all system requirements mentioned above. 188 Windows Media Player must be installed (to play back moving pictures). Standard installation is not displayed.) Others: The USB connector must be provided as standard. Connecting your camcorder to your ... × 600 dot or less, 256 colors and less, the screen for the Windows environment if you connect two or more USB equipment to a single computer at the same time, or when using the USB cable System requirements To view images recorded on the type of...
... for installing USB driver is required. Notes •Operations are not guaranteed for all system requirements mentioned above. 188 Windows Media Player must be installed (to play back moving pictures). Standard installation is not displayed.) Others: The USB connector must be provided as standard. Connecting your camcorder to your ... × 600 dot or less, 256 colors and less, the screen for the Windows environment if you connect two or more USB equipment to a single computer at the same time, or when using the USB cable System requirements To view images recorded on the type of...

Operating Instructions
Page 189
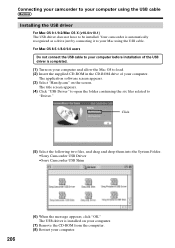
... instructions on page 194. 189 If you connect the USB cable before USB driver installation is complete, the USB driver will not be properly registered. If the screen does not appear, double-click "My Computer" and then "ImageMixer" (CD-ROM Drive). (3) Select "Handycam" on Your Computer Connecting your camcorder to your computer. Note If you are using...
... instructions on page 194. 189 If you connect the USB cable before USB driver installation is complete, the USB driver will not be properly registered. If the screen does not appear, double-click "My Computer" and then "ImageMixer" (CD-ROM Drive). (3) Select "Handycam" on Your Computer Connecting your camcorder to your computer. Note If you are using...
Operating Instructions
Page 192
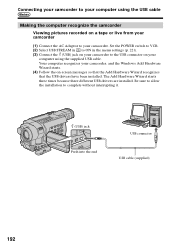
... three times because three different USB drivers are installed. Set the POWER switch to VCR. (2) Select USB STREAM in to ON in the menu settings (p. 221). (3) Connect the (USB) jack on your camcorder to the USB connector on your camcorder. Connecting your camcorder to your computer using the USB cable Making the computer recognize the camcorder Viewing pictures recorded on...
... three times because three different USB drivers are installed. Set the POWER switch to VCR. (2) Select USB STREAM in to ON in the menu settings (p. 221). (3) Connect the (USB) jack on your camcorder to the USB connector on your camcorder. Connecting your camcorder to your computer using the USB cable Making the computer recognize the camcorder Viewing pictures recorded on...
Operating Instructions
Page 193
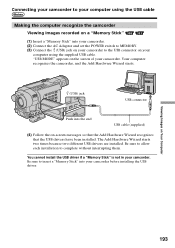
... Wizard recognizes that the USB drivers have been installed. Your computer recognizes the camcorder, and the Add Hardware Wizard starts. (USB) jack USB connector Push into the end USB cable (supplied) (4) Follow the on the screen of your camcorder. You cannot install the USB driver if a "Memory Stick" is not in your camcorder before installing the USB driver. The Add Hardware Wizard...
... Wizard recognizes that the USB drivers have been installed. Your computer recognizes the camcorder, and the Add Hardware Wizard starts. (USB) jack USB connector Push into the end USB cable (supplied) (4) Follow the on the screen of your camcorder. You cannot install the USB driver if a "Memory Stick" is not in your camcorder before installing the USB driver. The Add Hardware Wizard...
Operating Instructions
Page 194
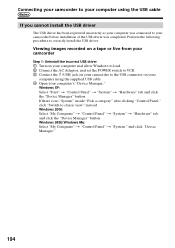
... to load. 2 Connect the AC Adaptor, and set the POWER switch to VCR. 3 Connect the (USB) jack on your camcorder to your camcorder before installation of the USB driver was connected to the USB connector on your computer using the supplied USB cable. 4 Open your computer was completed. Perform the following procedure to classic view" instead. Windows...
... to load. 2 Connect the AC Adaptor, and set the POWER switch to VCR. 3 Connect the (USB) jack on your camcorder to your camcorder before installation of the USB driver was connected to the USB connector on your computer using the supplied USB cable. 4 Open your computer was completed. Perform the following procedure to classic view" instead. Windows...
Operating Instructions
Page 196
... the USB driver" on page 189. 196 mark and delete. Other OS: Select "My Computer" t "Control Panel" t "System," and click "Device Manager." 6 Select "Other devices." Ex: (?)Sony Handycam 7 Turn the POWER switch to OFF (CHG) on your computer using the USB cable ... "Hardware" tab, and click the "Device Manager" button. Step 2: Install the USB driver on the supplied CD-ROM Perform the entire procedure described in "Installing the USB driver" on your camcorder, and then disconnect the USB cable. 7 Restart your computer. Select the device prefixed with the "?" Viewing images recorded...
... the USB driver" on page 189. 196 mark and delete. Other OS: Select "My Computer" t "Control Panel" t "System," and click "Device Manager." 6 Select "Other devices." Ex: (?)Sony Handycam 7 Turn the POWER switch to OFF (CHG) on your computer using the USB cable ... "Hardware" tab, and click the "Device Manager" button. Step 2: Install the USB driver on the supplied CD-ROM Perform the entire procedure described in "Installing the USB driver" on your camcorder, and then disconnect the USB cable. 7 Restart your computer. Select the device prefixed with the "?" Viewing images recorded...
Operating Instructions
Page 197
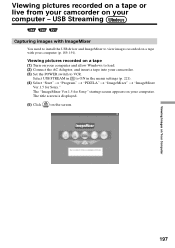
The "ImageMixer Ver.1.5 for Sony." Viewing pictures recorded on a tape or live from your camcorder on your computer. Viewing pictures recorded on a tape (1) Turn on a tape with your camcorder. (3) Set the POWER switch to VCR. USB Streaming Capturing images with ImageMixer You need to install the USB driver and ImageMixer to view images recorded on your computer...
The "ImageMixer Ver.1.5 for Sony." Viewing pictures recorded on a tape or live from your camcorder on your computer. Viewing pictures recorded on a tape (1) Turn on a tape with your camcorder. (3) Set the POWER switch to VCR. USB Streaming Capturing images with ImageMixer You need to install the USB driver and ImageMixer to view images recorded on your computer...
Operating Instructions
Page 201
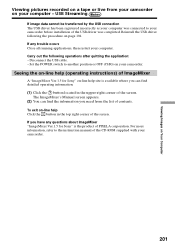
...supplied with your camcorder on -line help Click the button in the upper-right corner of the screen. For more information, refer to the instruction manual of the USB driver was connected to another position or OFF (CHG) on page 194. Reinstall the USB driver following operations ... corner of the screen. If any questions about ImageMixer "ImageMixer Ver.1.5 for Sony" on -line help (operating instructions) of ImageMixer A "ImageMixer Ver.1.5 for Sony" is available where you need from your camcorder. 201 Viewing Images on Your Computer Viewing pictures recorded on a tape or ...
...supplied with your camcorder on -line help Click the button in the upper-right corner of the screen. For more information, refer to the instruction manual of the USB driver was connected to another position or OFF (CHG) on page 194. Reinstall the USB driver following operations ... corner of the screen. If any questions about ImageMixer "ImageMixer Ver.1.5 for Sony" on -line help (operating instructions) of ImageMixer A "ImageMixer Ver.1.5 for Sony" is available where you need from your camcorder. 201 Viewing Images on Your Computer Viewing pictures recorded on a tape or ...
Operating Instructions
Page 205
... be found on Your Computer Connecting your camcorder to your computer in order to connect the camcorder to play back moving pictures. Viewing Images on the CD-ROM supplied, along with the application software required for viewing images. The USB driver can be installed to the computer's USB connector. iBook or Power Mac G4 with...
... be found on Your Computer Connecting your camcorder to your computer in order to connect the camcorder to play back moving pictures. Viewing Images on the CD-ROM supplied, along with the application software required for viewing images. The USB driver can be installed to the computer's USB connector. iBook or Power Mac G4 with...
Operating Instructions
Page 206
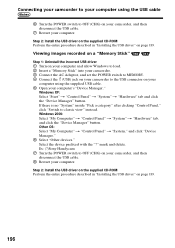
...Handycam" on your computer. (7) Remove the CD-ROM from the computer. (8) Restart your computer. For Mac OS 8.5.1/8.6/9.0 users Do not connect the USB cable to your computer before installation of your computer. Click (5) Select the following two files, and drag and drop them into the System Folder. •Sony Camcorder USB Driver •Sony Camcorder USB... Shim 206 (6) When the message appears, click "OK." The USB driver is completed. (1) Turn on your computer and allow the ...
...Handycam" on your computer. (7) Remove the CD-ROM from the computer. (8) Restart your computer. For Mac OS 8.5.1/8.6/9.0 users Do not connect the USB cable to your computer before installation of your computer. Click (5) Select the following two files, and drag and drop them into the System Folder. •Sony Camcorder USB Driver •Sony Camcorder USB... Shim 206 (6) When the message appears, click "OK." The USB driver is completed. (1) Turn on your computer and allow the ...
Operating Instructions
Page 207
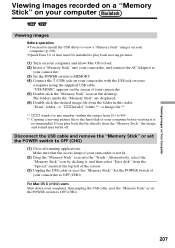
... left of your camcorder is recommended. If you play back moving picture file to OFF (CHG) (1) Close all running applications. Viewing Images on Your Computer Viewing images recorded on a "Memory Stick" on your computer Viewing images Before operation •You need to install the USB driver to view a ..."Memory Stick" images on your computer (p. 206). •QuickTime 3.0 or later must be installed to play back the file directly from the "Memory Stick," the image and sound may break off. Set the POWER switch of your camcorder. (5) Double-click the...
... left of your camcorder is recommended. If you play back moving picture file to OFF (CHG) (1) Close all running applications. Viewing Images on Your Computer Viewing images recorded on a "Memory Stick" on your computer Viewing images Before operation •You need to install the USB driver to view a ..."Memory Stick" images on your computer (p. 206). •QuickTime 3.0 or later must be installed to play back the file directly from the "Memory Stick," the image and sound may break off. Set the POWER switch of your camcorder. (5) Double-click the...
Operating Instructions
Page 230
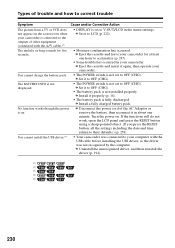
... to their defaults.) (p. 258) You cannot install the USB driver.*5) • Your camcorder was not recognized by the computer. c Uninstall the unrecognized driver, and then reinstall the driver (p. 194). *1) *2) *3) *4) *5) 230 c Eject the cassette and leave your camcorder for five seconds. • Moisture condensation has occurred. ... is set to OFF (CHG). c Disconnect the power cord of other equipment (connected with the USB cable before installing the USB driver, so the driver was connected to acclimatize (p. 247). • Some trouble has occurred in the menu settings.
... to their defaults.) (p. 258) You cannot install the USB driver.*5) • Your camcorder was not recognized by the computer. c Uninstall the unrecognized driver, and then reinstall the driver (p. 194). *1) *2) *3) *4) *5) 230 c Eject the cassette and leave your camcorder for five seconds. • Moisture condensation has occurred. ... is set to OFF (CHG). c Disconnect the power cord of other equipment (connected with the USB cable before installing the USB driver, so the driver was connected to acclimatize (p. 247). • Some trouble has occurred in the menu settings.
Operating Instructions
Page 231
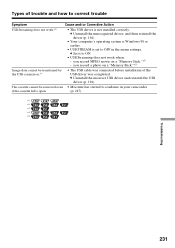
... was completed. c Set it to OFF in your camcorder if the cassette lid is not installed correctly. you record MPEG movie on a "Memory Stick."*3) Image data cannot be removed even • Moisture has started to condense in the menu settings. Types of the USB driver was connected before installation of trouble and how...
... was completed. c Set it to OFF in your camcorder if the cassette lid is not installed correctly. you record MPEG movie on a "Memory Stick."*3) Image data cannot be removed even • Moisture has started to condense in the menu settings. Types of the USB driver was connected before installation of trouble and how...
PIXELA ImageMixer v1.5 Instruction Manual
Page 6
... in a screen area of 800x600 at 16-bit hi-color (65,000 colors); for capturing a movie via USB or IEEE1394. In Windows ® 98, USB capturing is not supported. DirectX must be installed. Direct Draw driver compatible ImageMixer will not be created. Please confirm that of the disc to be displayed correctly. Windows...
... in a screen area of 800x600 at 16-bit hi-color (65,000 colors); for capturing a movie via USB or IEEE1394. In Windows ® 98, USB capturing is not supported. DirectX must be installed. Direct Draw driver compatible ImageMixer will not be created. Please confirm that of the disc to be displayed correctly. Windows...
Marketing Specifications
Page 2
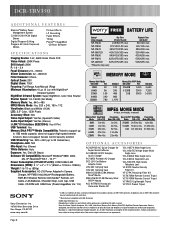
...1GB Memory Stick PRO™ Media ACC-KITFM50 Handycam Camcorder Starter Kit VCL-0637H Wide Angle Lens VCL-...USB Streaming. ©2003 Sony Electronics Inc. Non-metric weights and measures are trademarks of Microsoft Corporation. Reproduction in whole or in part without notice. All rights reserved. DCR-TRV350 ADDITIONAL FEATURES Stamina® Battery Power Management System 12-Bit/16-Bit PCM Digital Stereo Digital..., A/V Cable, 2 AA Batteries, Shoulder Strap, Lens Cap, USB Cable, CD-ROM with USB Driver (Pixela ImageMixer Ver. 1.5) BATTERY LIFE Battery* (Fully charged) ...
...1GB Memory Stick PRO™ Media ACC-KITFM50 Handycam Camcorder Starter Kit VCL-0637H Wide Angle Lens VCL-...USB Streaming. ©2003 Sony Electronics Inc. Non-metric weights and measures are trademarks of Microsoft Corporation. Reproduction in whole or in part without notice. All rights reserved. DCR-TRV350 ADDITIONAL FEATURES Stamina® Battery Power Management System 12-Bit/16-Bit PCM Digital Stereo Digital..., A/V Cable, 2 AA Batteries, Shoulder Strap, Lens Cap, USB Cable, CD-ROM with USB Driver (Pixela ImageMixer Ver. 1.5) BATTERY LIFE Battery* (Fully charged) ...


