Operating Instructions
Page 8
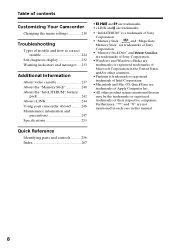
...;Pentium is a trademark of Sony Corporation. • "Memory Stick," and "MagicGate Memory Stick" are trademarks of Sony Corporation. • "Memory Stick Duo" and are trademarks of Sony Corporation. •Windows and Windows Media are trademarks of Apple... Computer Inc. •All other product names mentioned herein may be the trademarks or registered trademarks of their respective companies. Quick Reference Identifying parts and controls 256 Index 267 8 Table of contents Customizing Your Camcorder...
...;Pentium is a trademark of Sony Corporation. • "Memory Stick," and "MagicGate Memory Stick" are trademarks of Sony Corporation. • "Memory Stick Duo" and are trademarks of Sony Corporation. •Windows and Windows Media are trademarks of Apple... Computer Inc. •All other product names mentioned herein may be the trademarks or registered trademarks of their respective companies. Quick Reference Identifying parts and controls 256 Index 267 8 Table of contents Customizing Your Camcorder...

Operating Instructions
Page 10
... the direction of the arrow and open the lid. 2 Push the center of your camcorder outdoors (p. 18). Connecting the power cord (p. 24) Use the battery pack when using your camcorder. Power cord Connect the plug with the cassette window facing up. 3 Close the cassette compartment by pressing on a tape of the cassette back...
... the direction of the arrow and open the lid. 2 Push the center of your camcorder outdoors (p. 18). Connecting the power cord (p. 24) Use the battery pack when using your camcorder. Power cord Connect the plug with the cassette window facing up. 3 Close the cassette compartment by pressing on a tape of the cassette back...
Operating Instructions
Page 17
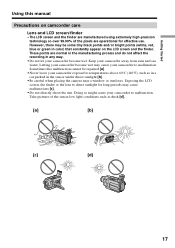
... pixels are operational for long periods may cause your camcorder to malfunction. These points are manufactured using extremely high... way. •Do not let your camcorder exposed to malfunction. Keep your camcorder become wet. Doing so might cause your camcorder to temperatures above 60°C (140&#... [a]. •Never leave your camcorder become wet may cause malfunctions [c]. •Do not directly shoot the sun. Letting your camcorder away from rain and sea water... blue or green in color) that constantly appear on camcorder care Lens and LCD screen/finder • The LCD...
... pixels are operational for long periods may cause your camcorder to malfunction. These points are manufactured using extremely high... way. •Do not let your camcorder exposed to malfunction. Keep your camcorder become wet. Doing so might cause your camcorder to temperatures above 60°C (140&#... [a]. •Never leave your camcorder become wet may cause malfunctions [c]. •Do not directly shoot the sun. Letting your camcorder away from rain and sea water... blue or green in color) that constantly appear on camcorder care Lens and LCD screen/finder • The LCD...

Operating Instructions
Page 28
... cassette Follow the procedure above, and take out the cassette in the direction of the cassette back and insert the cassette properly with the cassette window facing up. (4) Close the cassette compartment by pressing on the cassette compartment. Step 3 Inserting a cassette See page 15 for details about the usable cassettes types...
... cassette Follow the procedure above, and take out the cassette in the direction of the cassette back and insert the cassette properly with the cassette window facing up. (4) Close the cassette compartment by pressing on the cassette compartment. Step 3 Inserting a cassette See page 15 for details about the usable cassettes types...

Operating Instructions
Page 68
... sunsets, general night views, fireworks displays and neon signs. (LANDSCAPE) This mode is for when you record distant subjects such as mountains and prevents your camcorder from focusing on glass or metal mesh in windows when you record a subject behind glass or a screen. 68
... sunsets, general night views, fireworks displays and neon signs. (LANDSCAPE) This mode is for when you record distant subjects such as mountains and prevents your camcorder from focusing on glass or metal mesh in windows when you record a subject behind glass or a screen. 68

Operating Instructions
Page 79
... use and until no indicator appears on the screen. The built-in light automatically turns on and off . The recommended distance between the subject and camcorder is on . It remains hot for a while after the light is turned off according to suit your shooting situation. DANGER Not to be handled by... in light to the ambient brightness. Use with caution to reduce the risk of fire or injury to touch the lighting section, because the plastic window and surrounding surfaces are hot while the light is about 1.5 m (5 feet). CAUTION Be careful not to persons.
... use and until no indicator appears on the screen. The built-in light automatically turns on and off . The recommended distance between the subject and camcorder is on . It remains hot for a while after the light is turned off according to suit your shooting situation. DANGER Not to be handled by... in light to the ambient brightness. Use with caution to reduce the risk of fire or injury to touch the lighting section, because the plastic window and surrounding surfaces are hot while the light is about 1.5 m (5 feet). CAUTION Be careful not to persons.

Operating Instructions
Page 126
.... However, formatting erases all information on other equipment (DCR-TRV890E/ TRV900/TRV900E or DSC-D700/D770) that does not conform with this universal standard. (These models are not sold in this format can record and play back following images with your camcorder conform with other equipment 126 Recording - You can easily... •Image data files recorded on the display of "Memory Stick." You can exchange image data with the Design Rule for details of your camcorder, on Windows OS or Macintosh OS is a file format for a "Memory Stick" (p. 182). -
.... However, formatting erases all information on other equipment (DCR-TRV890E/ TRV900/TRV900E or DSC-D700/D770) that does not conform with this universal standard. (These models are not sold in this format can record and play back following images with your camcorder conform with other equipment 126 Recording - You can easily... •Image data files recorded on the display of "Memory Stick." You can exchange image data with the Design Rule for details of your camcorder, on Windows OS or Macintosh OS is a file format for a "Memory Stick" (p. 182). -
Operating Instructions
Page 187
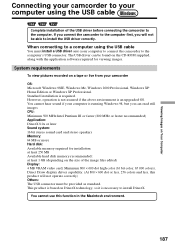
Standard installation is running Windows 98, but you will not operate correctly) Others: The USB connector must install a USB driver onto your computer to connect the camcorder to the computer's USB connector. You cannot hear sound ... To view pictures recorded on DirectX technology, so it is an upgraded OS. If you connect the camcorder to the computer first, you can be able to install DirectX. The USB driver can read still ... This product is based on a tape or live from your camcorder OS: Microsoft Windows 98SE, Windows Me, Windows 2000 Professional, Windows XP Home Edition or...
Standard installation is running Windows 98, but you will not operate correctly) Others: The USB connector must install a USB driver onto your computer to connect the camcorder to the computer's USB connector. You cannot hear sound ... To view pictures recorded on DirectX technology, so it is an upgraded OS. If you connect the camcorder to the computer first, you can be able to install DirectX. The USB driver can read still ... This product is based on a tape or live from your camcorder OS: Microsoft Windows 98SE, Windows Me, Windows 2000 Professional, Windows XP Home Edition or...

Operating Instructions
Page 188
...computer using a hub. •Some equipment may not operate depending on a "Memory Stick" OS: Microsoft Windows 98, Windows 98SE, Windows Me, Windows 2000 Professional, Windows XP Home Edition or Windows XP Professional. Standard installation is used simultaneously. •Operations are not guaranteed for all system requirements mentioned above... (At 800 × 600 dot or less, 256 colors and less, the screen for the Windows environment if you connect two or more USB equipment to your camcorder to a single computer at the same time, or when using the USB cable System requirements To ...
...computer using a hub. •Some equipment may not operate depending on a "Memory Stick" OS: Microsoft Windows 98, Windows 98SE, Windows Me, Windows 2000 Professional, Windows XP Home Edition or Windows XP Professional. Standard installation is used simultaneously. •Operations are not guaranteed for all system requirements mentioned above... (At 800 × 600 dot or less, 256 colors and less, the screen for the Windows environment if you connect two or more USB equipment to your camcorder to a single computer at the same time, or when using the USB cable System requirements To ...

Operating Instructions
Page 189
...application software starts up. If the screen does not appear, double-click "My Computer" and then "ImageMixer" (CD-ROM Drive). (3) Select "Handycam" on page 194. 189 Click The title screen appears. (4) Move the cursor to install the USB driver. (6) Remove the CD-ROM and... Driver" and click. Connect the USB cable according to "Making the computer recognize the camcorder." If you are using Windows 2000, log in with permission of computer administrators. (1) Turn on your computer and allow Windows to load. (2) Insert the supplied CD-ROM in with permission of your computer. Carry...
...application software starts up. If the screen does not appear, double-click "My Computer" and then "ImageMixer" (CD-ROM Drive). (3) Select "Handycam" on page 194. 189 Click The title screen appears. (4) Move the cursor to install the USB driver. (6) Remove the CD-ROM and... Driver" and click. Connect the USB cable according to "Making the computer recognize the camcorder." If you are using Windows 2000, log in with permission of computer administrators. (1) Turn on your computer and allow Windows to load. (2) Insert the supplied CD-ROM in with permission of your computer. Carry...
Operating Instructions
Page 190
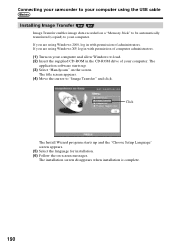
...transferred (copied) to your computer. Connecting your camcorder to your computer using the USB cable Installing Image Transfer Image Transfer enables image data recorded on -screen messages. Click The Install Wizard program starts up . (3) Select "Handycam" on your computer. The title screen appears.... (4) Move the cursor to load. (2) Insert the supplied CD-ROM in with permission of computer administrators. (1) Turn on the screen. If you are using Windows 2000, log in with permission of...
...transferred (copied) to your computer. Connecting your camcorder to your computer using the USB cable Installing Image Transfer Image Transfer enables image data recorded on -screen messages. Click The Install Wizard program starts up . (3) Select "Handycam" on your computer. The title screen appears.... (4) Move the cursor to load. (2) Insert the supplied CD-ROM in with permission of computer administrators. (1) Turn on the screen. If you are using Windows 2000, log in with permission of...
Operating Instructions
Page 191
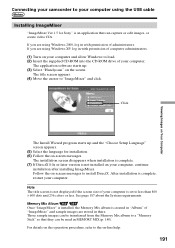
..." screen appears. (5) Select the language for Sony" is set to "ImageMixer" and click. Click The Install Wizard program starts up . (3) Select "Handycam" on the screen. Follow the on-screen ...displayed if the screen size of computer administrators. (1) Turn on your computer and allow Windows to install DirectX. See page 187 about the System requirements. Memory Mix Album Once...capture or edit images, or create video CDs. Viewing Images on Your Computer Connecting your camcorder to your computer using the USB cable Installing ImageMixer "ImageMixer Ver.1.5 for installation. (6)...
..." screen appears. (5) Select the language for Sony" is set to "ImageMixer" and click. Click The Install Wizard program starts up . (3) Select "Handycam" on the screen. Follow the on-screen ...displayed if the screen size of computer administrators. (1) Turn on your computer and allow Windows to install DirectX. See page 187 about the System requirements. Memory Mix Album Once...capture or edit images, or create video CDs. Viewing Images on Your Computer Connecting your camcorder to your computer using the USB cable Installing ImageMixer "ImageMixer Ver.1.5 for installation. (6)...
Operating Instructions
Page 192
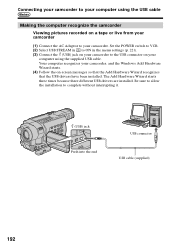
...recognizes that the USB drivers have been installed. The Add Hardware Wizard starts three times because three different USB drivers are installed. Connecting your camcorder to your computer using the supplied USB cable. Set the POWER switch to VCR. (2) Select USB STREAM in to ON in the ...menu settings (p. 221). (3) Connect the (USB) jack on your camcorder to the USB connector on your camcorder, and the Windows Add Hardware Wizard starts. (4) Follow the on a tape or live from your camcorder (1) Connect the AC Adaptor to complete without interrupting it. (USB) jack Push into ...
...recognizes that the USB drivers have been installed. The Add Hardware Wizard starts three times because three different USB drivers are installed. Connecting your camcorder to your computer using the supplied USB cable. Set the POWER switch to VCR. (2) Select USB STREAM in to ON in the ...menu settings (p. 221). (3) Connect the (USB) jack on your camcorder to the USB connector on your camcorder, and the Windows Add Hardware Wizard starts. (4) Follow the on a tape or live from your camcorder (1) Connect the AC Adaptor to complete without interrupting it. (USB) jack Push into ...
Operating Instructions
Page 194
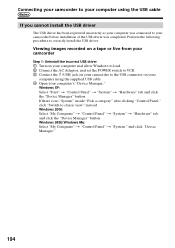
..." tab and click the "Device Manager" button. Viewing images recorded on a tape or live from your camcorder Step 1: Uninstall the incorrect USB driver 1 Turn on your computer and allow Windows to load. 2 Connect the AC Adaptor, and set the POWER switch to VCR. 3 Connect the (USB... "Control Panel," click "Switch to the USB connector on your camcorder to classic view" instead. Perform the following procedure to your camcorder before installation of the USB driver was connected to correctly install the USB driver. Windows 98SE/Windows Me: Select "My Computer" t "Control Panel" t "System...
..." tab and click the "Device Manager" button. Viewing images recorded on a tape or live from your camcorder Step 1: Uninstall the incorrect USB driver 1 Turn on your computer and allow Windows to load. 2 Connect the AC Adaptor, and set the POWER switch to VCR. 3 Connect the (USB... "Control Panel," click "Switch to the USB connector on your camcorder to classic view" instead. Perform the following procedure to your camcorder before installation of the USB driver was connected to correctly install the USB driver. Windows 98SE/Windows Me: Select "My Computer" t "Control Panel" t "System...
Operating Instructions
Page 195
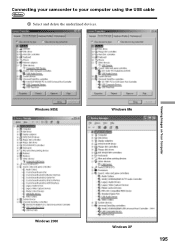
Windows 98SE Windows Me Viewing Images on Your Computer Windows 2000 Windows XP 195 Connecting your camcorder to your computer using the USB cable 5 Select and delete the underlined devices.
Windows 98SE Windows Me Viewing Images on Your Computer Windows 2000 Windows XP 195 Connecting your camcorder to your computer using the USB cable 5 Select and delete the underlined devices.
Operating Instructions
Page 196
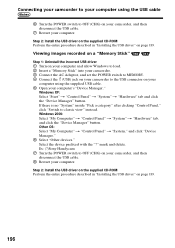
...Viewing images recorded on a "Memory Stick" Step 1: Uninstall the incorrect USB driver 1 Turn on your computer and allow Windows to load. 2 Insert a "Memory Stick" into your camcorder. 3 Connect the AC Adaptor, and set the POWER switch to MEMORY. 4 Connect the (USB) jack on your... camcorder to the USB connector on your camcorder, and then disconnect the USB cable. 8 Restart your computer. Windows 2000: Select "My Computer" t "Control Panel" t "System" t "Hardware" tab, and click the "Device Manager" button. Ex: (?)Sony Handycam 7 Turn the POWER switch to OFF ...
...Viewing images recorded on a "Memory Stick" Step 1: Uninstall the incorrect USB driver 1 Turn on your computer and allow Windows to load. 2 Insert a "Memory Stick" into your camcorder. 3 Connect the AC Adaptor, and set the POWER switch to MEMORY. 4 Connect the (USB) jack on your... camcorder to the USB connector on your camcorder, and then disconnect the USB cable. 8 Restart your computer. Windows 2000: Select "My Computer" t "Control Panel" t "System" t "Hardware" tab, and click the "Device Manager" button. Ex: (?)Sony Handycam 7 Turn the POWER switch to OFF ...
Operating Instructions
Page 197
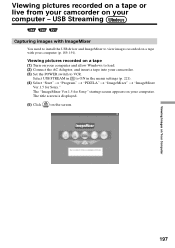
... 197 Select USB STREAM in to ON in the menu settings (p. 221). (4) Select "Start" t "Program" t "PIXELA" t "ImageMixer" t "ImageMixer Ver.1.5 for Sony" startup screen appears on your computer (p. 189, 191). USB Streaming Capturing images with ImageMixer You need to install the USB driver and ImageMixer to view...tape with your computer. Viewing Images on the screen. Viewing pictures recorded on a tape (1) Turn on your computer and allow Windows to load. (2) Connect the AC Adaptor, and insert a tape into your computer - Viewing pictures recorded on a tape or live from your...
... 197 Select USB STREAM in to ON in the menu settings (p. 221). (4) Select "Start" t "Program" t "PIXELA" t "ImageMixer" t "ImageMixer Ver.1.5 for Sony" startup screen appears on your computer (p. 189, 191). USB Streaming Capturing images with ImageMixer You need to install the USB driver and ImageMixer to view...tape with your computer. Viewing Images on the screen. Viewing pictures recorded on a tape (1) Turn on your computer and allow Windows to load. (2) Connect the AC Adaptor, and insert a tape into your computer - Viewing pictures recorded on a tape or live from your...

Operating Instructions
Page 198
USB Streaming (6) Select . Viewing pictures recorded on a tape or live from your camcorder on your computer - Monitor window (7) Connect the USB connector on your computer to the (USB) jack on your camcorder using the supplied USB cable. (USB) jack Push into the end USB connector USB cable (supplied) 198
USB Streaming (6) Select . Viewing pictures recorded on a tape or live from your camcorder on your computer - Monitor window (7) Connect the USB connector on your computer to the (USB) jack on your camcorder using the supplied USB cable. (USB) jack Push into the end USB connector USB cable (supplied) 198
Operating Instructions
Page 199
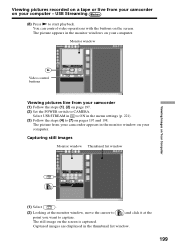
... point you want to CAMERA. The picture appears in the monitor window on the screen. Viewing pictures recorded on a tape or live from your camcorder (1) Follow the steps (1), (2) on the screen is captured. The picture from your camcorder appears in the monitor windows on your computer. You can control video operations with the buttons...
... point you want to CAMERA. The picture appears in the monitor window on the screen. Viewing pictures recorded on a tape or live from your camcorder (1) Follow the steps (1), (2) on the screen is captured. The picture from your camcorder appears in the monitor windows on your computer. You can control video operations with the buttons...

Operating Instructions
Page 200
...ImageMixer" Click in the thumbnail list window. This is inserted. •Indicators on the screen do not appear on images that of the screen. Some images are not displayed correctly due to capture. Viewing pictures recorded on a tape or live from your camcorder on your computer with the USB ...connection, the following may occur. The captured images appear in the upper right corner of your camcorder are not displayed correctly. •When your camcorder is in the standby mode with the cracking noise. - The image shakes up and down. - Notes •When ...
...ImageMixer" Click in the thumbnail list window. This is inserted. •Indicators on the screen do not appear on images that of the screen. Some images are not displayed correctly due to capture. Viewing pictures recorded on a tape or live from your camcorder on your computer with the USB ...connection, the following may occur. The captured images appear in the upper right corner of your camcorder are not displayed correctly. •When your camcorder is in the standby mode with the cracking noise. - The image shakes up and down. - Notes •When ...


