Operating Instructions
Page 6
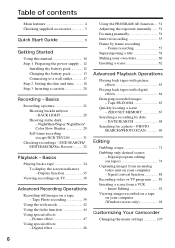
... Advanced Recording Operations Recording still images on your computer - Frame recording 57 Superimposing a title 58 Making your computer (Windows users only 94 Customizing Your Camcorder Changing the menu settings 105 6 Signal convert function 88 Recording video or TV programs ....... 89 Inserting a scene from...Tape PB ZOOM 65 Quickly locating a scene - NightShot/Super NightShot/ Color Slow Shutter 29 Self-timer recording (except DCR-TRV240 31 Checking recordings - ZERO SET MEMORY 67 Searching a recording by frame recording - DATE SEARCH 68 Searching for a photo -
... Advanced Recording Operations Recording still images on your computer - Frame recording 57 Superimposing a title 58 Making your computer (Windows users only 94 Customizing Your Camcorder Changing the menu settings 105 6 Signal convert function 88 Recording video or TV programs ....... 89 Inserting a scene from...Tape PB ZOOM 65 Quickly locating a scene - NightShot/Super NightShot/ Color Slow Shutter 29 Self-timer recording (except DCR-TRV240 31 Checking recordings - ZERO SET MEMORY 67 Searching a recording by frame recording - DATE SEARCH 68 Searching for a photo -
Operating Instructions
Page 8
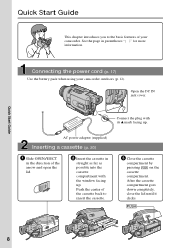
...). After the cassette compartment goes down completely, close the lid until it clicks. Connecting the power cord (p. 17) Use the battery pack when using your camcorder. Open the DC IN jack cover. Push the center of the cassette back to the basic features of the arrow and open the lid. 2 Insert... cassette compartment. See the page in straight as far as possible into the cassette compartment with its v mark facing up . Connect the plug with the window facing up .
...). After the cassette compartment goes down completely, close the lid until it clicks. Connecting the power cord (p. 17) Use the battery pack when using your camcorder. Open the DC IN jack cover. Push the center of the cassette back to the basic features of the arrow and open the lid. 2 Insert... cassette compartment. See the page in straight as far as possible into the cassette compartment with its v mark facing up . Connect the plug with the window facing up .
Operating Instructions
Page 11
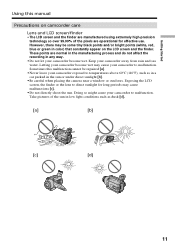
...placing the camera near a window or outdoors. Getting Started Using this malfunction cannot be some tiny black points and/or bright points (white, red, blue or green in color) that constantly appear on camcorder care Lens and LCD screen/finder • The LCD screen and the finder ...for effective use. These points are operational for long periods may cause your camcorder become wet. Doing so might cause your camcorder away from rain and sea water. Keep your camcorder to malfunction. Exposing the LCD screen, the finder or the lens to temperatures above 60°C (140...
...placing the camera near a window or outdoors. Getting Started Using this malfunction cannot be some tiny black points and/or bright points (white, red, blue or green in color) that constantly appear on camcorder care Lens and LCD screen/finder • The LCD screen and the finder ...for effective use. These points are operational for long periods may cause your camcorder become wet. Doing so might cause your camcorder away from rain and sea water. Keep your camcorder to malfunction. Exposing the LCD screen, the finder or the lens to temperatures above 60°C (140...
Operating Instructions
Page 13
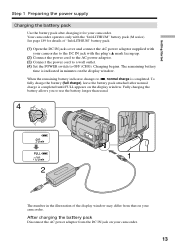
...), leave the battery pack attached after charging it for details of the display window may differ from the DC IN jack on your camcorder. After charging the battery pack Disconnect the AC power adaptor from that on your camcorder to use the battery longer than usual. 4 V POWER 1 2 The ...pack Use the battery pack after normal charge is completed until FULL appears on the display window. Fully charging the battery allows you to the DC IN jack with the "InfoLITHIUM" battery pack (M series). Your camcorder operates only with the plug's v mark facing up. (2) Connect the power cord ...
...), leave the battery pack attached after charging it for details of the display window may differ from the DC IN jack on your camcorder. After charging the battery pack Disconnect the AC power adaptor from that on your camcorder to use the battery longer than usual. 4 V POWER 1 2 The ...pack Use the battery pack after normal charge is completed until FULL appears on the display window. Fully charging the battery allows you to the DC IN jack with the "InfoLITHIUM" battery pack (M series). Your camcorder operates only with the plug's v mark facing up. (2) Connect the power cord ...
Operating Instructions
Page 14
... the battery pack is charged fully The LCD backlight of between 10°C to 30...This unit is "InfoLITHIUM"? Remaining battery time indicator The remaining battery time indicator in the display window. Until your camcorder calculates the actual remaining battery time "- - - - If the power may cause a short...window is not installed correctly. - Recommended charging temperature We recommend charging the battery pack in the following cases: - The "InfoLITHIUM" is wrong with the battery pack. Something is a lithium ion battery pack that the indication on the DC plug of Sony...
... the battery pack is charged fully The LCD backlight of between 10°C to 30...This unit is "InfoLITHIUM"? Remaining battery time indicator The remaining battery time indicator in the display window. Until your camcorder calculates the actual remaining battery time "- - - - If the power may cause a short...window is not installed correctly. - Recommended charging temperature We recommend charging the battery pack in the following cases: - The "InfoLITHIUM" is wrong with the battery pack. Something is a lithium ion battery pack that the indication on the DC plug of Sony...

Operating Instructions
Page 20
...possible into the cassette compartment with the window facing up. The cassette compartment automatically goes down. (5) After the cassette compartment going down . Mosaic pattern noise may appear when you play back the tape on your camcorder is half of indicated time on Hi8...Digital8 system. • The recording time when you use standard 8 tape, be sure to expose the red mark. 20 Push the center of the cassette back to insert. (4) Close the cassette compartment by pressing on the cassette to play back standard 8 tape on other camcorders (including other DCR-TRV240/TRV340...
...possible into the cassette compartment with the window facing up. The cassette compartment automatically goes down. (5) After the cassette compartment going down . Mosaic pattern noise may appear when you play back the tape on your camcorder is half of indicated time on Hi8...Digital8 system. • The recording time when you use standard 8 tape, be sure to expose the red mark. 20 Push the center of the cassette back to insert. (4) Close the cassette compartment by pressing on the cassette to play back standard 8 tape on other camcorders (including other DCR-TRV240/TRV340...

Operating Instructions
Page 51
... minimizes camera shake on glass or metal mesh in tennis or golf. Sunset & moon This mode allows you to suit your camcorder from focusing on fast-moving subjects such as in windows' when you are recording a subject behind glass or a screen. 51 Advanced Recording Operations Using the PROGRAM AE function You can...
... minimizes camera shake on glass or metal mesh in tennis or golf. Sunset & moon This mode allows you to suit your camcorder from focusing on fast-moving subjects such as in windows' when you are recording a subject behind glass or a screen. 51 Advanced Recording Operations Using the PROGRAM AE function You can...
Operating Instructions
Page 94
...camcorder to your computer •Installing the USB driver (p. 96) •Installing "PIXELA ImageMixer Ver.1.0 for Sony" (p. 100) •Capturing images with DirectX technology, so it is compatible with "PIXELA ImageMixer Ver.1.0 for working area (depending on your computer (USB Streaming function). Connecting with USB... 1 GB hard disk space or more recommended for Sony" (p. 101) Recommended computer environment OS: Microsoft Windows 98SE, Windows Me, Windows 2000 Professional, Windows XP Home Edition or Windows XP Professional (standard installation) However, operation is not...
...camcorder to your computer •Installing the USB driver (p. 96) •Installing "PIXELA ImageMixer Ver.1.0 for Sony" (p. 100) •Capturing images with DirectX technology, so it is compatible with "PIXELA ImageMixer Ver.1.0 for working area (depending on your computer (USB Streaming function). Connecting with USB... 1 GB hard disk space or more recommended for Sony" (p. 101) Recommended computer environment OS: Microsoft Windows 98SE, Windows Me, Windows 2000 Professional, Windows XP Home Edition or Windows XP Professional (standard installation) However, operation is not...
Operating Instructions
Page 95
... are trademarks or registered trademarks of USB equipment that is used simultaneously. •Operations are not guaranteed for all the recommended computer environments mentioned above. All other countries. Editing Viewing images recorded on a tape on your computer (Windows users only) Notes •Operations ...are not guaranteed for either the Windows or Macintosh environment if you connect two or more USB equipment to a single computer at the same time, or when using ...
... are trademarks or registered trademarks of USB equipment that is used simultaneously. •Operations are not guaranteed for all the recommended computer environments mentioned above. All other countries. Editing Viewing images recorded on a tape on your computer (Windows users only) Notes •Operations ...are not guaranteed for either the Windows or Macintosh environment if you connect two or more USB equipment to a single computer at the same time, or when using ...
Operating Instructions
Page 96
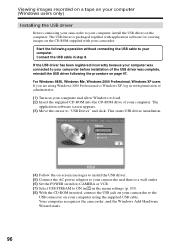
... or VCR. (7) Select USB STREAM to ON in in the menu settings (p. 105). (8) With the CD-ROM inserted, connect the USB jack on your camcorder to the USB connector on your computer, install the USB driver on the computer. Connect the USB cable in with permission of administrator. (1) Turn on your computer and allow Windows to load. (2) Insert...
... or VCR. (7) Select USB STREAM to ON in in the menu settings (p. 105). (8) With the CD-ROM inserted, connect the USB jack on your camcorder to the USB connector on your computer, install the USB driver on the computer. Connect the USB cable in with permission of administrator. (1) Turn on your computer and allow Windows to load. (2) Insert...
Operating Instructions
Page 97
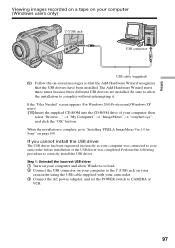
... on page 100. Perform the following procedure to complete without interrupting it. Be sure to allow Windows to load. 2 Connect the USB connector on your computer to the (USB) jack on your camcorder using the USB cable supplied with your computer was completed. t "My Computer" t "ImageMixer" t "sonyhcb....times because three different USB drivers are installed. If you cannot install the USB driver The USB driver has been registered incorrectly as your camcorder. 3 Connect the AC power adaptor, and set the POWER switch to "Installing 'PIXELA ImageMixer Ver.1.0 for Sony'" on -screen ...
... on page 100. Perform the following procedure to complete without interrupting it. Be sure to allow Windows to load. 2 Connect the USB connector on your computer to the (USB) jack on your camcorder using the USB cable supplied with your computer was completed. t "My Computer" t "ImageMixer" t "sonyhcb....times because three different USB drivers are installed. If you cannot install the USB driver The USB driver has been registered incorrectly as your camcorder. 3 Connect the AC power adaptor, and set the POWER switch to "Installing 'PIXELA ImageMixer Ver.1.0 for Sony'" on -screen ...

Operating Instructions
Page 98
... and delete the underlined devices below. Viewing images recorded on a tape on your computer (Windows users only) 4 Open your computer's "Device Manager". For Windows XP: Select "Start" t "Control Panel" t "System" t "Hardware" tab, and click the "Device Manager" button. Windows 98SE Windows Me 98 If there is no "System" inside "Pick a Category" after clicking "Control...
... and delete the underlined devices below. Viewing images recorded on a tape on your computer (Windows users only) 4 Open your computer's "Device Manager". For Windows XP: Select "Start" t "Control Panel" t "System" t "Hardware" tab, and click the "Device Manager" button. Windows 98SE Windows Me 98 If there is no "System" inside "Pick a Category" after clicking "Control...
Operating Instructions
Page 99
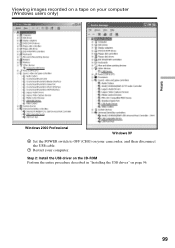
Step 2: Install the USB driver on the CD-ROM Perform the entire procedure described in "Installing the USB driver" on your camcorder, and then disconnect the USB cable. 7 Restart your computer. Viewing images recorded on a tape on your computer (Windows users only) Editing Windows 2000 Professional Windows XP 6 Set the POWER switch to OFF (CHG) on page 96. 99
Step 2: Install the USB driver on the CD-ROM Perform the entire procedure described in "Installing the USB driver" on your camcorder, and then disconnect the USB cable. 7 Restart your computer. Viewing images recorded on a tape on your computer (Windows users only) Editing Windows 2000 Professional Windows XP 6 Set the POWER switch to OFF (CHG) on page 96. 99
Operating Instructions
Page 100
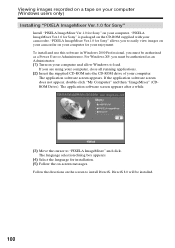
... load. The language selection dialog box appears. (4) Select the language for Sony" is packaged on the CD-ROM supplied with your camcorder. Follow the directions on your computer and allow Windows to easily view images on your camcorder on your computer for Sony" on your computer. If the application software screen does not appear, double...
... load. The language selection dialog box appears. (4) Select the language for Sony" is packaged on the CD-ROM supplied with your camcorder. Follow the directions on your computer and allow Windows to easily view images on your camcorder on your computer for Sony" on your computer. If the application software screen does not appear, double...

Operating Instructions
Page 101
... tape (1) Turn on your computer and allow Windows to load. (2) Connect one end of the USB cable to the (USB) jack on your camcorder. (4) Set the POWER switch to VCR. Select USB STREAM to ON in in Windows 2000 Professional, you must be authorized as a... Power User or Administrator. Editing Viewing images recorded on a tape on your computer (Windows users only) Capturing images with "PIXELA ImageMixer Ver.1.0 for Sony...
... tape (1) Turn on your computer and allow Windows to load. (2) Connect one end of the USB cable to the (USB) jack on your camcorder. (4) Set the POWER switch to VCR. Select USB STREAM to ON in in Windows 2000 Professional, you must be authorized as a... Power User or Administrator. Editing Viewing images recorded on a tape on your computer (Windows users only) Capturing images with "PIXELA ImageMixer Ver.1.0 for Sony...

Operating Instructions
Page 102
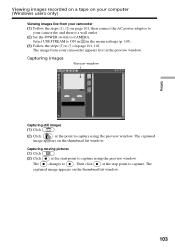
The image from the tape appears in the preview window. 102 Viewing images recorded on a tape on your computer. (7) Click . The "PIXELA ImageMixer Ver.1.0 for Sony" startup screen appears on your computer (Windows users only) (6) Click on your camcorder. Preview window (8) Start playback on the screen.
The image from the tape appears in the preview window. 102 Viewing images recorded on a tape on your computer. (7) Click . The "PIXELA ImageMixer Ver.1.0 for Sony" startup screen appears on your computer (Windows users only) (6) Click on your camcorder. Preview window (8) Start playback on the screen.
Operating Instructions
Page 103
...images recorded on a tape on your computer (Windows users only) Viewing images live from your camcorder appears live in the menu settings (p. 105). (3) Follow the steps (5) to (7) on the thumbnail list window. 103 Capturing images Preview window Capturing still images (1) Click . (2) Click ... click at the point to capture using the preview window. The captured image appears on page 101, 102. Capturing moving pictures (1) Click . (2) Click at the start point to capture using the preview window. The changes to ON in in the preview window. Select USB STREAM to .
...images recorded on a tape on your computer (Windows users only) Viewing images live from your camcorder appears live in the menu settings (p. 105). (3) Follow the steps (5) to (7) on the thumbnail list window. 103 Capturing images Preview window Capturing still images (1) Click . (2) Click ... click at the point to capture using the preview window. The captured image appears on page 101, 102. Capturing moving pictures (1) Click . (2) Click at the start point to capture using the preview window. The changes to ON in in the preview window. Select USB STREAM to .
Operating Instructions
Page 104
... your computer Communications with your computer Communications between your camcorder and your computer may occur. Disconnect the USB cable - Refer to your camcorder before installation of the screen. Viewing images recorded on a tape on your computer (Windows users only) Notes •When you have any ...Ver.1.0 for Sony" is not a malfunction: - Notes on page 97. To close on-line help Click located in the camcorder LCD screen do not appear on your computer with on -line help (operating instructions). (1) Click button located in the upper-right corner of the USB driver was...
... your computer Communications with your computer Communications between your camcorder and your computer may occur. Disconnect the USB cable - Refer to your camcorder before installation of the screen. Viewing images recorded on a tape on your computer (Windows users only) Notes •When you have any ...Ver.1.0 for Sony" is not a malfunction: - Notes on page 97. To close on-line help Click located in the camcorder LCD screen do not appear on your computer with on -line help (operating instructions). (1) Click button located in the upper-right corner of the USB driver was...
Operating Instructions
Page 113
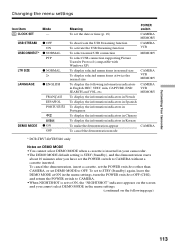
...ON OFF Meaning To set the date or time (p. 18) To deactivate the USB Streaming function To activate the USB Streaming function To select normal USB connection To select USB connection supporting Picture Transfer Protocol (compatible with Windows XP) To display selected menu items in normal size To display selected menu items... CAMERA MEMORY CAMERA VCR MEMORY CAMERA VCR MEMORY CAMERA VCR MEMORY CAMERA * DCR-TRV740/TRV840 only Notes on DEMO MODE •You cannot select DEMO MODE when a cassette is inserted in your camcorder. •The DEMO MODE default setting is STBY (Standby), and the ...
...ON OFF Meaning To set the date or time (p. 18) To deactivate the USB Streaming function To activate the USB Streaming function To select normal USB connection To select USB connection supporting Picture Transfer Protocol (compatible with Windows XP) To display selected menu items in normal size To display selected menu items... CAMERA MEMORY CAMERA VCR MEMORY CAMERA VCR MEMORY CAMERA VCR MEMORY CAMERA * DCR-TRV740/TRV840 only Notes on DEMO MODE •You cannot select DEMO MODE when a cassette is inserted in your camcorder. •The DEMO MODE default setting is STBY (Standby), and the ...
Operating Instructions
Page 115
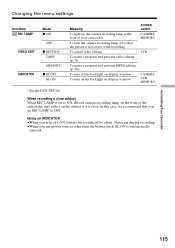
... To light up the camera recording lamp at the front of your camcorder To turn the camera recording lamp off the backlight on display window To turn on the backlight on display window POWER switch CAMERA MEMORY VCR CAMERA VCR MEMORY * Except DCR-TRV240 When recording a close subject When REC LAMP is set REC... use power sources other than the battery pack, BL ON is close. In this case, we recommend that the person is not aware of the camcorder may reflect on INDICATOR •When you select BL ON, battery life is reduced by about 10 percent during recording. •When you set to...
... To light up the camera recording lamp at the front of your camcorder To turn the camera recording lamp off the backlight on display window To turn on the backlight on display window POWER switch CAMERA MEMORY VCR CAMERA VCR MEMORY * Except DCR-TRV240 When recording a close subject When REC LAMP is set REC... use power sources other than the battery pack, BL ON is close. In this case, we recommend that the person is not aware of the camcorder may reflect on INDICATOR •When you select BL ON, battery life is reduced by about 10 percent during recording. •When you set to...


