Sony DCR-TRV340 Support Question
Sony DCR-TRV340 Support Question
Find answers below for this question about Sony DCR-TRV340 - Digital8 Camcorder w/ 2.5" LCD USB Streaming.Need a Sony DCR-TRV340 manual? We have 1 online manual for this item!
Question posted by Benteseaeag on August 14th, 2014
Windows 7 Cannot Connect To Dcr Trv340
The person who posted this question about this Sony product did not include a detailed explanation. Please use the "Request More Information" button to the right if more details would help you to answer this question.
Current Answers
Related Sony DCR-TRV340 Manual Pages
Operating Instructions - Page 1

...
Model No. Serial No.
AC-
DCR-TRV740
TM SERIES
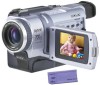
DCR-TRV240/TRV340/TRV740/ TRV840
©2002 Sony Corporation Owner's Record
The model and serial numbers are located on the ...for future reference. Model No. Record the serial number in the space provided below. 3-072-650-12 (1)
Digital Video Camera Recorder
Operating Instructions
Before operating the unit, please read this product.
Operating Instructions - Page 6
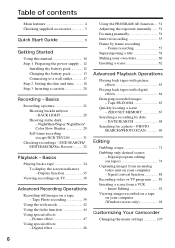
...video unit on tapes 74 Capturing images from a VCR - Basics
Playing back a tape 34 To display the screen indicators - Display function 35
Viewing recordings on TV 38
Advanced Recording Operations
Recording still images on your computer (Windows users only 94
Customizing Your Camcorder...the battery pack 12 Charging the battery pack 13 Connecting to a wall outlet 17 Step 2 Setting the...
Operating Instructions - Page 11
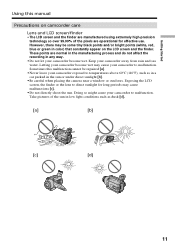
...) that constantly appear on camcorder care
Lens and LCD screen/finder
• The LCD screen and the finder are... manufactured using extremely high-precision technology so over 99.99% of the sun in low light conditions such as in a car parked in the sun or under direct sunlight [b].
•Be careful when placing the camera near a window...
Operating Instructions - Page 18
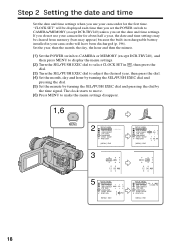
... 4 2002 USB STREAM 5:30:00 PM USBCONNECT LTR SIZE LANGUAGE DEMO MODE RETURN
[MENU] : END
18 Step 2 Setting the date and time
Set the date and time settings when you use your camcorder for the first...the POWER switch to CAMERA or MEMORY (except DCR-TRV240), and then press MENU to display the menu settings.
(2) Turn the SEL/PUSH EXEC dial to select CLOCK SET in your camcorder for about half a ...
Operating Instructions - Page 75
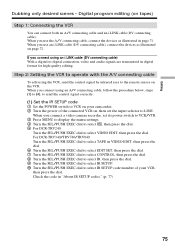
... can connect both an A/V connecting cable and an i.LINK cable (DV connecting cable). If you connect a video camera recorder, set the input selector to -digital connection, video and audio signals are transmitted in page 71. Step 2: Setting the VCR to operate with the A/V connecting cable
To edit using an i.LINK cable (DV connecting cable) With a digital-to LINE. For DCR-TRV340/TRV740...
Operating Instructions - Page 80

...For DCR-TRV340/TRV740/TRV840: Turn the SEL/PUSH EXEC dial to select TAPE in VIDEO EDIT,...connect using i.LINK cable (DV connecting cable) (optional), follow the procedure below. (1) Set the POWER switch to VCR on your camcorder. (2) Turn the power of the connected VCR on tapes) Step 2: Setting the VCR to operate with the i.LINK cable (DV connecting cable)
When you connect a digital video camera...
Operating Instructions - Page 87
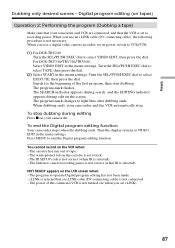
.../PUSH EXEC dial to recording pause. For DCR-TRV340/TRV740/TRV840: Select VIDEO EDIT in the menu settings. Turn the SEL/PUSH EXEC dial to cancel recording pause is not correct (when IR is not connected. - The program mark flashes. To end the Digital program editing function
Your camcorder stops when the dubbing ends. The...
Operating Instructions - Page 94
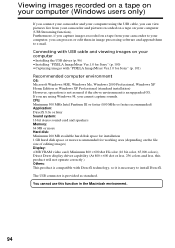
... (USB Streaming function). You cannot use this product will not operate correctly.) Others: This product is compatible with "PIXELA ImageMixer Ver.1.0 for Sony" (p. 100) •Capturing images with DirectX technology, so it is an upgraded OS.
If you are using the USB cable, you can view pictures live from your camcorder to install DirectX. Connecting...
Operating Instructions - Page 96
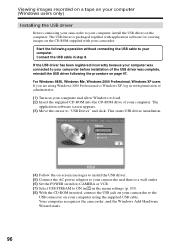
... of your camcorder. For Windows 98SE, Windows Me, Windows 2000 Professional, Windows XP users If you are using the supplied USB cable. This starts USB driver installation.
(4) Follow the on-screen messages to install the USB driver. (5) Connect the AC power adaptor to your camcorder and then to a wall outlet. (6) Set the POWER switch to CAMERA or VCR. (7) Select USB STREAM to ON...
Operating Instructions - Page 97
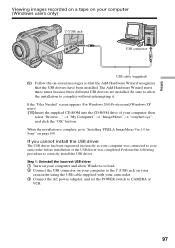
... "OK" button. Be sure to allow Windows to load. 2 Connect the USB connector on your computer to the (USB) jack on your camcorder using the USB cable supplied with your camcorder. 3 Connect the AC power adaptor, and set the POWER switch to CAMERA or VCR.
97 If you cannot install the USB driver The USB driver has been registered incorrectly as...
Operating Instructions - Page 99
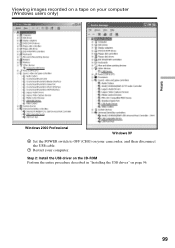
Step 2: Install the USB driver on the CD-ROM Perform the entire procedure described in "Installing the USB driver" on your camcorder, and then disconnect the USB cable.
7 Restart your computer (Windows users only)
Editing
Windows 2000 Professional
Windows XP
6 Set the POWER switch to OFF (CHG) on page 96.
99 Viewing images recorded on a tape on your computer.
Operating Instructions - Page 101

.... Viewing images
Viewing images recorded on a tape (1) Turn on your computer and allow Windows to load. (2) Connect one end of the USB cable to the (USB) jack on your camcorder. (4) Set the POWER switch to VCR.
Select USB STREAM to ON in in Windows 2000 Professional, you must be authorized as a Power User or Administrator. Editing
Viewing images...
Operating Instructions - Page 102

The image from the tape appears in the preview window.
102
The "PIXELA ImageMixer Ver.1.0 for Sony" startup screen appears on the screen. Viewing images recorded on a tape on your computer (Windows users only)
(6) Click
on your camcorder. Preview window
(8) Start playback on your computer. (7) Click .
Operating Instructions - Page 103
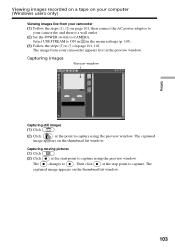
... (5) to CAMERA. Select USB STREAM to ON in in the preview window. The
changes to capture using the preview window. Capturing images
Preview window
Capturing still images
(1) Click
.
(2) Click
at the stop point to capture using the preview window. Then click
at the point to
. The image from your camcorder (1) Follow the steps (1), (2) on page 101, then connect the...
Operating Instructions - Page 104
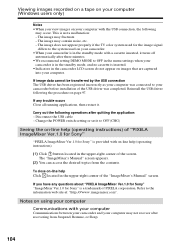
... image may contain noise, etc. - To close on-line help (operating instructions).
(1) Click button located in the camcorder LCD screen do not appear on images that are captured
into your computer.
If image data cannot be transferred by the USB connection The USB driver has been registered incorrectly as your computer was completed. Disconnect the...
Operating Instructions - Page 113
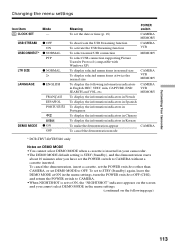
... To activate the USB Streaming function To select normal USB connection To select USB connection supporting Picture Transfer Protocol (compatible with Windows XP) To display selected menu items in normal size To display selected menu items at ON in the menu settings, turn the POWER switch to OFF (CHG), and return the POWER switch to CAMERA. •When...
Operating Instructions - Page 156
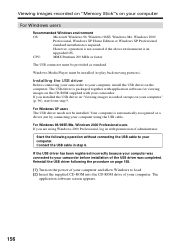
... not assured if the above environment is packaged together with application software for viewing images on the power of your computer and allow Windows to your camcorder before installation of the USB driver was connected to load. (2) Insert the supplied CD-ROM into the CD-ROM drive of administrator.
If you are using the...
Operating Instructions - Page 158
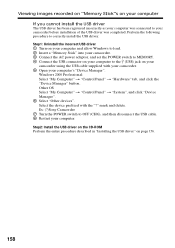
... 1 Turn on your computer and allow Windows to load. 2 Insert a "Memory Stick" into your camcorder. 3 Connect the AC power adaptor, and set the POWER switch to MEMORY. 4 Connect the USB connector on your computer's "Device Manager". mark and delete. Step2: Install the USB driver on the CD-ROM Perform the entire procedure described in "Installing the...
Operating Instructions - Page 187
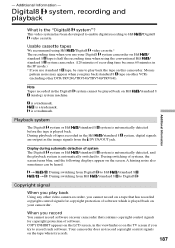
... when you record
You cannot record software on other VCRs (including other DCR-TRV240/TRV340/TRV740/TRV840). COPY INHIBIT appears on the TV screen if you try to Hi8 video cassette.
/Digital8
Usable cassette tapes
We recommend using the conventional Hi8 / standard 8 system camcorder. (120 minutes of systems, the screen turns blue, and the following...
Operating Instructions - Page 199
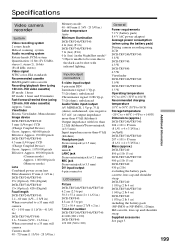
.../Video input/output AV MINIJACK, 1 Vp-p, 75 Ω (ohms), unbalanced, sync negative 327 mV, (at output impedance more than 47 kΩ (kilohms) Headphone jack Stereo minijack (ø 3.5 mm) USB jack mini-B LANC jack Stereo mini-minijack (ø 2.5 mm) MIC jack Stereo minijack (ø 3.5 mm) DV input/output 4-pin connector
LCD screen
Picture DCR-TRV240/TRV340...
Similar Questions

How To Connect Dcr-trv280 To Computer
(Posted by atrraid 9 years ago)

Dcr-trv340 Stops Playing When
(Posted by alexaducat 10 years ago)

Sony Dcr-trv340 Support Question
Dear Reader, I have a Sony DCR 340 which has been a great camera. Recentlyi have transferred a doze...
Dear Reader, I have a Sony DCR 340 which has been a great camera. Recentlyi have transferred a doze...
(Posted by pabmarc 10 years ago)


How To Connect Dcr- Hc 32 Sony Handycam
How to connect DCR- HC 32 sony handycam to window 7, please suggest
How to connect DCR- HC 32 sony handycam to window 7, please suggest
(Posted by reshmaneyamath 11 years ago)