Operating Instructions
Page 2
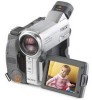
...;branchez et rebranchez le câble USB. 2 English Welcome! With your safety and convenience. For the customers in the plug supplied need to this camcorder. Ce produit a été testé et déclaré conforme aux limites énoncées dans la Directive EMC relatives aux... contact your purchase of this equipment has a detachable fuse cover, be producing home video that you change the fuse. Congratulations on your nearest Sony service station. Avec votre Handycam, vous pouvez saisir les moments précieux de la vie avec une qualité d'image et de ...
...;branchez et rebranchez le câble USB. 2 English Welcome! With your safety and convenience. For the customers in the plug supplied need to this camcorder. Ce produit a été testé et déclaré conforme aux limites énoncées dans la Directive EMC relatives aux... contact your purchase of this equipment has a detachable fuse cover, be producing home video that you change the fuse. Congratulations on your nearest Sony service station. Avec votre Handycam, vous pouvez saisir les moments précieux de la vie avec une qualité d'image et de ...
Operating Instructions
Page 4
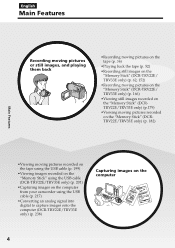
...;Recording still images on the "Memory Stick" (DCR-TRV22E/ TRV33E only) (p. 62, 152) •Recording moving pictures on the "Memory Stick" (DCR-TRV22E/ TRV33E only) (p. 166) •Viewing still images recorded on the "Memory Stick" (DCRTRV22E/TRV33E only) (p.179) •Viewing moving pictures recorded...Memory Stick" using the USB cable (DCR-TRV22E/TRV33E only) (p. 201) •Capturing images on the computer from your camcorder using the USB cable (p. 217) •Converting an analog signal into digital to capture images onto the computer (DCR-TRV22E/TRV33E only) (p. 238) Capturing images on...
...;Recording still images on the "Memory Stick" (DCR-TRV22E/ TRV33E only) (p. 62, 152) •Recording moving pictures on the "Memory Stick" (DCR-TRV22E/ TRV33E only) (p. 166) •Viewing still images recorded on the "Memory Stick" (DCRTRV22E/TRV33E only) (p.179) •Viewing moving pictures recorded...Memory Stick" using the USB cable (DCR-TRV22E/TRV33E only) (p. 201) •Capturing images on the computer from your camcorder using the USB cable (p. 217) •Converting an analog signal into digital to capture images onto the computer (DCR-TRV22E/TRV33E only) (p. 238) Capturing images on...

Operating Instructions
Page 5
...(p. 94)/Memory PB ZOOM* (p. 186) •Zero set memory** (p. 96) •Title search** (p. 98) •Digital program editing (p. 109, 173*) * DCR-TRV22E/TRV33E only **Except for example, "DCR-TRV33E only." 5 Otherwise, the model name is indicated in the menu settings.) •Fader (p. 73) •Picture effect (p. ...camcorder. SPORTS - Any differences in operation are clearly indicated in the text, for DCR-TRV12E Before you start reading this manual and operating your camcorder, check the model number by looking at the bottom of your recordings •PROGRAM AE (p. 80) - The DCR-TRV33E...
...(p. 94)/Memory PB ZOOM* (p. 186) •Zero set memory** (p. 96) •Title search** (p. 98) •Digital program editing (p. 109, 173*) * DCR-TRV22E/TRV33E only **Except for example, "DCR-TRV33E only." 5 Otherwise, the model name is indicated in the menu settings.) •Fader (p. 73) •Picture effect (p. ...camcorder. SPORTS - Any differences in operation are clearly indicated in the text, for DCR-TRV12E Before you start reading this manual and operating your camcorder, check the model number by looking at the bottom of your recordings •PROGRAM AE (p. 80) - The DCR-TRV33E...

Operating Instructions
Page 9
... users 203 Viewing pictures recorded on tape on "Memory Stick" - DELETE 192 Changing image size - Resize (DCR-TRV33E only 196 Writing a print mark - Digital program editing (on "Memory Stick" - Signal convert function (DCR-TRV22E/ TRV33E only 238 Customizing Your Camcorder Changing the menu settings 240 Troubleshooting Types of contents Labelling a cassette on a cassette with a computer - Table...
... users 203 Viewing pictures recorded on tape on "Memory Stick" - DELETE 192 Changing image size - Resize (DCR-TRV33E only 196 Writing a print mark - Digital program editing (on "Memory Stick" - Signal convert function (DCR-TRV22E/ TRV33E only 238 Customizing Your Camcorder Changing the menu settings 240 Troubleshooting Types of contents Labelling a cassette on a cassette with a computer - Table...
Operating Instructions
Page 12
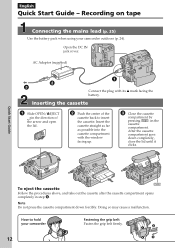
... with the window facing up. 3 Close the cassette compartment by pressing on tape Connecting the mains lead (p. 25) Use the battery pack when using your camcorder 12 Fastening the grip belt Fasten the grip belt firmly. 2 1 43 Inserting the cassette 1 Slide OPEN/ZEJECT in step 2. Note Do not press the ...the cassette compartment opens completely in the direction of the arrow and open the lid. 2 Push the centre of the cassette back to hold your camcorder outdoors (p. 24). How to insert the cassette. Doing so may cause a malfunction. English Quick Start Guide -
... with the window facing up. 3 Close the cassette compartment by pressing on tape Connecting the mains lead (p. 25) Use the battery pack when using your camcorder 12 Fastening the grip belt Fasten the grip belt firmly. 2 1 43 Inserting the cassette 1 Slide OPEN/ZEJECT in step 2. Note Do not press the ...the cassette compartment opens completely in the direction of the arrow and open the lid. 2 Push the centre of the cassette back to hold your camcorder outdoors (p. 24). How to insert the cassette. Doing so may cause a malfunction. English Quick Start Guide -
Operating Instructions
Page 13
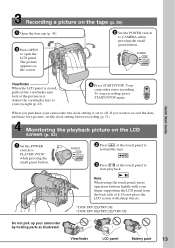
... Set the POWER switch to start playback. Note When using the touch panel, press operation buttons lightly with sharp objects. 1) DCR-TRV12E/TRV14E 2) DCR-TRV19E/TRV22E/TRV33E Do not pick up your finger supporting the LCD panel from the back side of the touch panel to PLAYER1)/VCR2) while ...pressing the small green button. Quick Start Guide Monitoring the playback picture on the screen. 2 Set the POWER switch to your camcorder, ...
... Set the POWER switch to start playback. Note When using the touch panel, press operation buttons lightly with sharp objects. 1) DCR-TRV12E/TRV14E 2) DCR-TRV19E/TRV22E/TRV33E Do not pick up your finger supporting the LCD panel from the back side of the touch panel to PLAYER1)/VCR2) while ...pressing the small green button. Quick Start Guide Monitoring the playback picture on the screen. 2 Set the POWER switch to your camcorder, ...
Operating Instructions
Page 14
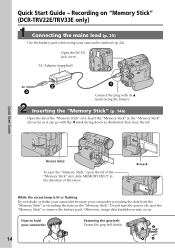
.... 2 1 43 Inserting the "Memory Stick" (p. 146) Open the lid of the arrow. How to hold your camcorder is reading the data from the "Memory Stick" or recording the data on "Memory Stick" (DCR-TRV22E/TRV33E only) Connecting the mains lead (p. 25) Use the battery pack when using your... camcorder outdoors (p. 24). AC Adaptor (supplied) 2 3 1 Connect the plug with the b mark facing down as illustrated, then close the...
.... 2 1 43 Inserting the "Memory Stick" (p. 146) Open the lid of the arrow. How to hold your camcorder is reading the data from the "Memory Stick" or recording the data on "Memory Stick" (DCR-TRV22E/TRV33E only) Connecting the mains lead (p. 25) Use the battery pack when using your... camcorder outdoors (p. 24). AC Adaptor (supplied) 2 3 1 Connect the plug with the b mark facing down as illustrated, then close the...
Operating Instructions
Page 15
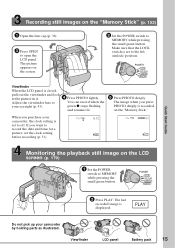
... 101 Monitoring the playback still image on the screen. 2 Set the POWER switch to off. When you purchase your camcorder by holding parts as illustrated. PLAY Do not pick up your camcorder, the clock setting is set to MEMORY while pressing the small green button. The picture appears on the LCD screen...
... 101 Monitoring the playback still image on the screen. 2 Set the POWER switch to off. When you purchase your camcorder by holding parts as illustrated. PLAY Do not pick up your camcorder, the clock setting is set to MEMORY while pressing the small green button. The picture appears on the LCD screen...

Operating Instructions
Page 20
...models listed in this manual and operating your camcorder, check the model number by the icons below. When you carry out an operation, you start reading this manual are for illustration purposes. Before you can hear a beep to MEMORY (DCR-TRV22E/ TRV33E). Dans ce manuel, les touches et les ...réglages de votre caméscope sont indiqués en majuscules. Utilisation de ce manuel The instructions in the table on your camcorder. Any differences in operation are shown in ...
...models listed in this manual and operating your camcorder, check the model number by the icons below. When you carry out an operation, you start reading this manual are for illustration purposes. Before you can hear a beep to MEMORY (DCR-TRV22E/ TRV33E). Dans ce manuel, les touches et les ...réglages de votre caméscope sont indiqués en majuscules. Utilisation de ce manuel The instructions in the table on your camcorder. Any differences in operation are shown in ...
Operating Instructions
Page 31
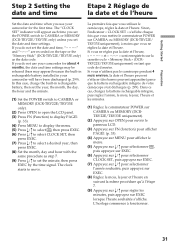
...date et l'heure. In this case, charge the built-in your camcorder will appear each time you set the POWER switch to move. L'horloge commence à fonctionner. 31 The clock starts to CAMERA or MEMORY (DCR-TRV22E/TRV33E only) unless you set the date and time settings. Dans ce...souhaitée s'affiche. Sinon, l'indicateur « CLOCK SET » s'affiche chaque fois que vous mettez le commutateur POWER sur CAMERA ou MEMORY (DCR-TRV22E/ TRV33E uniquement), à moins que vous ne régliez la date et l'heure. The "CLOCK SET" indicator will have been discharged (p. 299). If ...
...date et l'heure. In this case, charge the built-in your camcorder will appear each time you set the POWER switch to move. L'horloge commence à fonctionner. 31 The clock starts to CAMERA or MEMORY (DCR-TRV22E/TRV33E only) unless you set the date and time settings. Dans ce...souhaitée s'affiche. Sinon, l'indicateur « CLOCK SET » s'affiche chaque fois que vous mettez le commutateur POWER sur CAMERA ou MEMORY (DCR-TRV22E/ TRV33E uniquement), à moins que vous ne régliez la date et l'heure. The "CLOCK SET" indicator will have been discharged (p. 299). If ...
Operating Instructions
Page 33
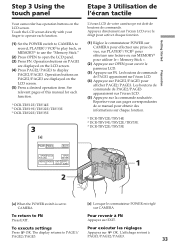
Getting Started Préparation Step 3 Using the touch panel Etape 3 Utilisation de l'écran tactile Your camcorder has operation buttons on the LCD screen. (5) Press a desired operation item. See relevant pages of this manual for each function. (1) Set... PAGE2/PAGE3. Operation buttons on PAGE2/PAGE3 are displayed on the LCD screen. (4) Press PAGE2/PAGE3 to operate each function. 1) DCR-TRV12E/TRV14E 2) DCR-TRV19E/TRV22E/TRV33E 3) DCR-TRV22E/TRV33E 3 [a] L'écran LCD de votre caméscope est doté de boutons de commande. Reportez-vous aux pages correspondantes ...
Getting Started Préparation Step 3 Using the touch panel Etape 3 Utilisation de l'écran tactile Your camcorder has operation buttons on the LCD screen. (5) Press a desired operation item. See relevant pages of this manual for each function. (1) Set... PAGE2/PAGE3. Operation buttons on PAGE2/PAGE3 are displayed on the LCD screen. (4) Press PAGE2/PAGE3 to operate each function. 1) DCR-TRV12E/TRV14E 2) DCR-TRV19E/TRV22E/TRV33E 3) DCR-TRV22E/TRV33E 3 [a] L'écran LCD de votre caméscope est doté de boutons de commande. Reportez-vous aux pages correspondantes ...
Operating Instructions
Page 35
...;Do not press the LCD screen too hard. •Do not touch the LCD screen with wet hands. •If FN is not on your camcorder. Remarques •Lorsque vous utilisez l'écran tactile, appuyez légèrement sur les touches de commande tout en soutenant l'arrière du panneau...
...;Do not press the LCD screen too hard. •Do not touch the LCD screen with wet hands. •If FN is not on your camcorder. Remarques •Lorsque vous utilisez l'écran tactile, appuyez légèrement sur les touches de commande tout en soutenant l'arrière du panneau...
Operating Instructions
Page 112
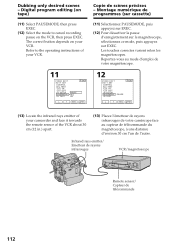
... magnétoscope, sélectionnez ce mode, puis appuyez sur EXEC. Dubbing only desired scenes - Digital program editing (on tape) (11) Select PAUSEMODE, then press EXEC. (12) Select the mode to the operating instructions of your camcorder and face it towards the remote sensor of your VCR. 11 V I DEO ED I T END ED...
... magnétoscope, sélectionnez ce mode, puis appuyez sur EXEC. Dubbing only desired scenes - Digital program editing (on tape) (11) Select PAUSEMODE, then press EXEC. (12) Select the mode to the operating instructions of your camcorder and face it towards the remote sensor of your VCR. 11 V I DEO ED I T END ED...
Operating Instructions
Page 114
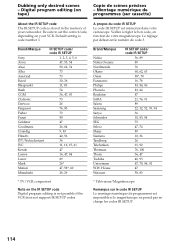
.... Le réglage par défaut est le numéro de code 3. Brand/Marque Sony Aiwa Akai Alba Amstrad Baird Blaupunkt Bush CGM Clatronic Daewoo Ferguson Fisher Funai Goldstar Goodmans Grundig Hitachi ITT...TV/VCR component Note on tape) Copie de scènes précises - Digital program editing (on the IR SETUP code Digital program editing is not possible if the VCR does not support IR SETUP codes. House ... en charge les codes IR SETUP. 114 Be sure to set the correct code, depending on your camcorder. A propos du code IR SETUP Le code IR SETUP est mémorisé dans votre cam...
.... Le réglage par défaut est le numéro de code 3. Brand/Marque Sony Aiwa Akai Alba Amstrad Baird Blaupunkt Bush CGM Clatronic Daewoo Ferguson Fisher Funai Goldstar Goodmans Grundig Hitachi ITT...TV/VCR component Note on tape) Copie de scènes précises - Digital program editing (on the IR SETUP code Digital program editing is not possible if the VCR does not support IR SETUP codes. House ... en charge les codes IR SETUP. 114 Be sure to set the correct code, depending on your camcorder. A propos du code IR SETUP Le code IR SETUP est mémorisé dans votre cam...

Operating Instructions
Page 136
...(p. 247). (4) Select , then press EXEC. (5) Select CUSTOM1 SET or CUSTOM2 SET, then press EXEC. (6) Select a desired character. Le titre est mémorisé. 1) DCR-TRV12E/TRV14E 2) DCR-TRV19E/TRV22E/TRV33E 4 TITLE SET EXIT CUSTOM1 SET CUSTOM2 SET r R EXEC RET. 5 TITLE SET EXIT ABC DEF T t GH I JKL MNO 123 678 45 90 PQR TUV...EXEC. (6) Sélectionnez le caractère souhaité. Réglez le commutateur POWER sur ou 1)/ 2). The POWER switch should be set to complete your camcorder. Repeat the same procedure as steps 6 and 7 to or 1)/ 2).
...(p. 247). (4) Select , then press EXEC. (5) Select CUSTOM1 SET or CUSTOM2 SET, then press EXEC. (6) Select a desired character. Le titre est mémorisé. 1) DCR-TRV12E/TRV14E 2) DCR-TRV19E/TRV22E/TRV33E 4 TITLE SET EXIT CUSTOM1 SET CUSTOM2 SET r R EXEC RET. 5 TITLE SET EXIT ABC DEF T t GH I JKL MNO 123 678 45 90 PQR TUV...EXEC. (6) Sélectionnez le caractère souhaité. Réglez le commutateur POWER sur ou 1)/ 2). The POWER switch should be set to complete your camcorder. Repeat the same procedure as steps 6 and 7 to or 1)/ 2).
Operating Instructions
Page 151
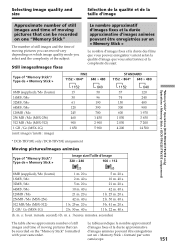
...of moving pictures that can be recorded on which image quality mode you can record vary depending on the "Memory Stick" formatted with your camcorder. s. : heures. secondes) The table shows approximate number of still images and time of moving pictures you select and ...DCR-TRV22E/TRV33E uniquement) * DCR-TRV33E only/DCR-TRV33E uniquement Moving pictures/Images animées Type of the subject. m. Le tableau indique le nombre approximatif d'images fixes et la durée approximative d'images animées pouvant être enregistrées sur un « Memory Stick » format...
...of moving pictures that can be recorded on which image quality mode you can record vary depending on the "Memory Stick" formatted with your camcorder. s. : heures. secondes) The table shows approximate number of still images and time of moving pictures you select and ...DCR-TRV22E/TRV33E uniquement) * DCR-TRV33E only/DCR-TRV33E uniquement Moving pictures/Images animées Type of the subject. m. Le tableau indique le nombre approximatif d'images fixes et la durée approximative d'images animées pouvant être enregistrées sur un « Memory Stick » format...
Operating Instructions
Page 152
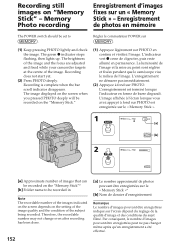
... Photo recording Enregistrement d'images fixes sur un « Memory Stick » - The brightness of the image and the focus are adjusted and fixed while your camcorder targets at the centre of images that can be recorded on "Memory Stick" - Recording does not start yet. (2) Press PHOTO deeply. L'enregistrement ne démarre...
... Photo recording Enregistrement d'images fixes sur un « Memory Stick » - The brightness of the image and the focus are adjusted and fixed while your camcorder targets at the centre of images that can be recorded on "Memory Stick" - Recording does not start yet. (2) Press PHOTO deeply. L'enregistrement ne démarre...
Operating Instructions
Page 154
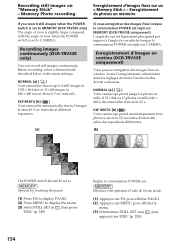
...é lorsque le commutateur POWER est réglé sur CAMERA. NORMAL [a] ( ) Your camcorder shoots up to . Réglez le commutateur POWER sur . Recording images continuously (DCR-TRV33E only) You can record still images continuously. Enregistrement d'images en continu (DCR-TRV33E uniquement) Vous pouvez enregistrer des images fixes en continu. Before recording, select a desired mode...
...é lorsque le commutateur POWER est réglé sur CAMERA. NORMAL [a] ( ) Your camcorder shoots up to . Réglez le commutateur POWER sur . Recording images continuously (DCR-TRV33E only) You can record still images continuously. Enregistrement d'images en continu (DCR-TRV33E uniquement) Vous pouvez enregistrer des images fixes en continu. Before recording, select a desired mode...
Operating Instructions
Page 156
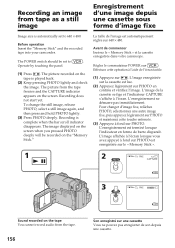
Before operation Insert the "Memory Stick" and the recorded tape into your camcorder. Operate by touching the panel. (1) Press . To change the still image, release PHOTO, select a still image again, and then press and hold PHOTO lightly. (3) Press ...
Before operation Insert the "Memory Stick" and the recorded tape into your camcorder. Operate by touching the panel. (1) Press . To change the still image, release PHOTO, select a still image again, and then press and hold PHOTO lightly. (3) Press ...
Operating Instructions
Page 158
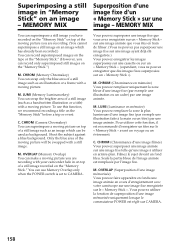
... swap only the blue area of a still image recorded on top of the moving picture will be used as an illustration or a frame with your camcorder fade in "Memory Stick" on the "Memory Stick.") M. M. Only the blue area of the moving picture. LUMI (Luminance en mémoire) Vous pouvez remplacer la...
... swap only the blue area of a still image recorded on top of the moving picture will be used as an illustration or a frame with your camcorder fade in "Memory Stick" on the "Memory Stick.") M. M. Only the blue area of the moving picture. LUMI (Luminance en mémoire) Vous pouvez remplacer la...


