
Camera Operations Guide
Page 3
...found to which can use . Consult a Sony dealer or an experienced radio/TV technician for a Class B digital device, pursuant to Subpart B of Part ...to direct sunlight for a digital device pursuant to Part 15 of FCC Rules. To view your camcorder to other materials may appear...window or outdoors. • Do not aim at dusk. CAUTION You are cautioned that appear constantly on the LCD screen and the viewfinder. Increase the separation between the equipment and receiver. - CCD-TRV128: TRV128 CCD-TRV228: TRV228 CCD-TRV328: TRV328 CCD-TRV428: TRV428 DCR-TRV260: TRV260 DCR...
...found to which can use . Consult a Sony dealer or an experienced radio/TV technician for a Class B digital device, pursuant to Subpart B of Part ...to direct sunlight for a digital device pursuant to Part 15 of FCC Rules. To view your camcorder to other materials may appear...window or outdoors. • Do not aim at dusk. CAUTION You are cautioned that appear constantly on the LCD screen and the viewfinder. Increase the separation between the equipment and receiver. - CCD-TRV128: TRV128 CCD-TRV228: TRV228 CCD-TRV328: TRV328 CCD-TRV428: TRV428 DCR-TRV260: TRV260 DCR...

Camera Operations Guide
Page 8
... facing Close the cassette lid after direction of the arrow until it clicks. 2 Insert a cassette into the camcorder. comes out automatically. OPEN/EJECT lever Window-side 8 Quick Start Guide of the back of the slides back in the direction of the arrow up the viewfinder. To charge the battery, see ...
... facing Close the cassette lid after direction of the arrow until it clicks. 2 Insert a cassette into the camcorder. comes out automatically. OPEN/EJECT lever Window-side 8 Quick Start Guide of the back of the slides back in the direction of the arrow up the viewfinder. To charge the battery, see ...
Camera Operations Guide
Page 19
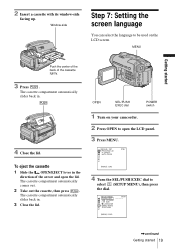
...,continued Getting started Push the center of the back of the arrow and open the LCD panel. 3 Press MENU. 2 Insert a cassette with its window-side facing up. The cassette compartment automatically slides back in the direction of the cassette lightly. 3 Press . OPEN SEL/PUSH EXEC dial POWER switch 1... Turn on your camcorder. 2 Press OPEN to be used on the LCD screen. To eject the cassette 1 Slide the OPEN/EJECT lever in . 4 Close the lid...
...,continued Getting started Push the center of the back of the arrow and open the LCD panel. 3 Press MENU. 2 Insert a cassette with its window-side facing up. The cassette compartment automatically slides back in the direction of the cassette lightly. 3 Press . OPEN SEL/PUSH EXEC dial POWER switch 1... Turn on your camcorder. 2 Press OPEN to be used on the LCD screen. To eject the cassette 1 Slide the OPEN/EJECT lever in . 4 Close the lid...
Camera Operations Guide
Page 28
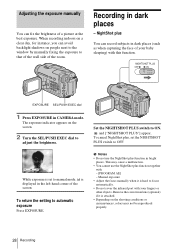
... screen. 2 Turn the SEL/PUSH EXEC dial to adjust the brightness. Adjusting the exposure manually You can avoid backlight shadows on people next to the window by manually fixing the exposure to that of the wall side of the room. To cancel NightShot plus function together with this function. Set the...
... screen. 2 Turn the SEL/PUSH EXEC dial to adjust the brightness. Adjusting the exposure manually You can avoid backlight shadows on people next to the window by manually fixing the exposure to that of the wall side of the room. To cancel NightShot plus function together with this function. Set the...
Camera Operations Guide
Page 29
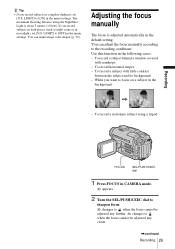
LIGHT] to focus on a subject in the background. - To record horizontal stripes. - If you record subjects in complete darkness, set [N.S. To record a subject behind a window covered with little contrast between the subject and its background. - To record a subject with raindrops. - To record a stationary subject using the NightShot Light is adjusted ...
LIGHT] to focus on a subject in the background. - To record horizontal stripes. - If you record subjects in complete darkness, set [N.S. To record a subject behind a window covered with little contrast between the subject and its background. - To record a subject with raindrops. - To record a stationary subject using the NightShot Light is adjusted ...
Camera Operations Guide
Page 44
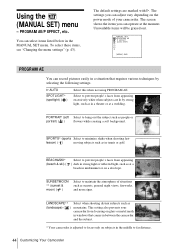
...AE P EFFECT AUTO SHTR [MENU] : END PROGRAM AE You can select items listed below in a situation that comes in between the camcorder and the subject. * Your camcorder is adjusted to minimize shake when shooting fast- LANDSCAPE** Select when shooting distant subjects such as people or portrait) ( ) flowers while creating... the menu settings" (p. 43). BEACH&SKI* (beach & ski) ( Select to prevent people's faces from focusing on glass or metal mesh in windows that requires various techniques by strong light, such as in midsummer or on subjects in a theater or at the moment.
...AE P EFFECT AUTO SHTR [MENU] : END PROGRAM AE You can select items listed below in a situation that comes in between the camcorder and the subject. * Your camcorder is adjusted to minimize shake when shooting fast- LANDSCAPE** Select when shooting distant subjects such as people or portrait) ( ) flowers while creating... the menu settings" (p. 43). BEACH&SKI* (beach & ski) ( Select to prevent people's faces from focusing on glass or metal mesh in windows that requires various techniques by strong light, such as in midsummer or on subjects in a theater or at the moment.
Camera Operations Guide
Page 85
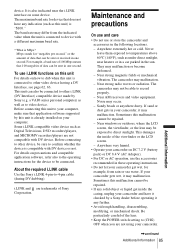
...camcorder may differ from rain or sea water. If sand or dust gets in the sun. Before connecting this malfunction cannot be repaired. • If any solid object or liquid get wet, for device that does not have it checked by a Sony dealer before operating it any indication (such as Digital... how to dub when this unit For details on precautions and compatible application software, refer also to device with DV device. The camcorder may occur. - Near windows or outdoors, where the LCD screen, the viewfinder, or the lens may malfunction or become deformed. - For example, a baud...
...camcorder may differ from rain or sea water. If sand or dust gets in the sun. Before connecting this malfunction cannot be repaired. • If any solid object or liquid get wet, for device that does not have it checked by a Sony dealer before operating it any indication (such as Digital... how to dub when this unit For details on precautions and compatible application software, refer also to device with DV device. The camcorder may occur. - Near windows or outdoors, where the LCD screen, the viewfinder, or the lens may malfunction or become deformed. - For example, a baud...
Computer Applications Guide
Page 2
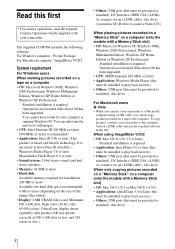
... For Macintosh computer : ImageMixer VCD2 System requirement For Windows users When viewing pictures recorded on a tape on a tape to the computer. You cannot hear sound if your computer is based on DirectX technology. To copy pictures, connect your camcorder to play back movies.) • Others: USB...cable), disc drive (you connect your camcorder. You can only transfer and view still images. • CPU: Intel Pentium III 500 MHz or faster (800 MHz or faster recommended) • Application: DirectX 9.0b or later (This product is running Windows 98. The supplied CD-ROM includes...
... For Macintosh computer : ImageMixer VCD2 System requirement For Windows users When viewing pictures recorded on a tape on a tape to the computer. You cannot hear sound if your computer is based on DirectX technology. To copy pictures, connect your camcorder to play back movies.) • Others: USB...cable), disc drive (you connect your camcorder. You can only transfer and view still images. • CPU: Intel Pentium III 500 MHz or faster (800 MHz or faster recommended) • Application: DirectX 9.0b or later (This product is running Windows 98. The supplied CD-ROM includes...
Computer Applications Guide
Page 3
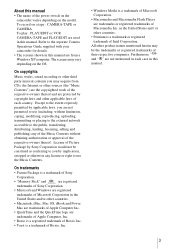
... About this manual • The name of the power switch on the camcorder varies depending on the OS. The screens may vary depending on the model. License of Picture Package by Sony Corporation would not be construed as conferring to the extent expressly permitted by... of each case in each country. On trademarks • Picture Package is a trademark of Sony Corporation. • "Memory Stick" and are registered trademarks of Sony Corporation. • Microsoft and Windows are registered trademarks of Microsoft Corporation in the United States and/or other sources (the "Music...
... About this manual • The name of the power switch on the camcorder varies depending on the OS. The screens may vary depending on the model. License of Picture Package by Sony Corporation would not be construed as conferring to the extent expressly permitted by... of each case in each country. On trademarks • Picture Package is a trademark of Sony Corporation. • "Memory Stick" and are registered trademarks of Sony Corporation. • Microsoft and Windows are registered trademarks of Microsoft Corporation in the United States and/or other sources (the "Music...
Computer Applications Guide
Page 4
...(only the models with a Memory Stick slot 29 Installing software on CD-R - Picture Package Viewer 17 Creating an original video - Digital convert function 33 4 Picture Package Auto Slide 21 Saving the images on a computer 29 Other functions Creating a DVD (Direct Access ... - Table of Contents Read this first 2 Connecting to a Windows computer Introduction to editing pictures on a computer 6 Features ...6 Overview of the preparation 7 Step 1: Installing the software on a computer 8 Step 2: Connecting your camcorder to a computer 10 Using the USB cable (supplied) when ...
...(only the models with a Memory Stick slot 29 Installing software on CD-R - Picture Package Viewer 17 Creating an original video - Digital convert function 33 4 Picture Package Auto Slide 21 Saving the images on a computer 29 Other functions Creating a DVD (Direct Access ... - Table of Contents Read this first 2 Connecting to a Windows computer Introduction to editing pictures on a computer 6 Features ...6 Overview of the preparation 7 Step 1: Installing the software on a computer 8 Step 2: Connecting your camcorder to a computer 10 Using the USB cable (supplied) when ...
Computer Applications Guide
Page 6
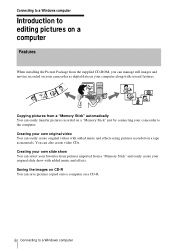
Connecting to a Windows computer Introduction to editing pictures on a computer Features When installing the Picture Package from the supplied CD-ROM, you can manage still images and movies recorded on your camcorder as materials. You can save pictures copied onto a computer on a "Memory Stick" just by connecting your computer along... videos with added music and effects. Creating your own slide show with added music and effects using pictures recorded on a tape as digital data on CD-R You can also create video CDs. Saving the images on your camcorder to a Windows computer
Connecting to a Windows computer Introduction to editing pictures on a computer Features When installing the Picture Package from the supplied CD-ROM, you can manage still images and movies recorded on your camcorder as materials. You can save pictures copied onto a computer on a "Memory Stick" just by connecting your computer along... videos with added music and effects. Creating your own slide show with added music and effects using pictures recorded on a tape as digital data on CD-R You can also create video CDs. Saving the images on your camcorder to a Windows computer

Computer Applications Guide
Page 7
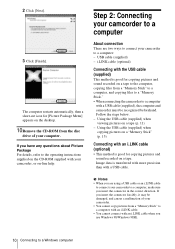
... Step1 ! * These illustrations are two ways to connect your camcorder to a computer. • Connecting with a USB cable (supplied) • Connecting with a Handycam Station. For models with a Handycam Station, place your camcorder on a computer CD-ROM (supplied) Connecting to a Windows computer On your camcorder Step 2: Connecting your camcorder to a computer There are of the preparation Follow the steps...
... Step1 ! * These illustrations are two ways to connect your camcorder to a computer. • Connecting with a USB cable (supplied) • Connecting with a Handycam Station. For models with a Handycam Station, place your camcorder on a computer CD-ROM (supplied) Connecting to a Windows computer On your camcorder Step 2: Connecting your camcorder to a computer There are of the preparation Follow the steps...

Computer Applications Guide
Page 8
... on the computer before installing the software. 1 Turn on the computer. Step 1: Installing the software on a computer You need to connect your camcorder and the computer. The installation is required only for installation, then click [Next]. 5 Click [Next]. From the second time on the computer... names (such as Administrators for installation. The installation screen appears. 3 Click [Install]. 4 Select the language for the first time. For Windows 2000/Windows XP Log on as (E:)) may vary depending on , you only need to install the software to your computer to have fun with your ...
... on the computer before installing the software. 1 Turn on the computer. Step 1: Installing the software on a computer You need to connect your camcorder and the computer. The installation is required only for installation, then click [Next]. 5 Click [Next]. From the second time on the computer... names (such as Administrators for installation. The installation screen appears. 3 Click [Install]. 4 Select the language for the first time. For Windows 2000/Windows XP Log on as (E:)) may vary depending on , you only need to install the software to your computer to have fun with your ...

Computer Applications Guide
Page 9
... now.] is not installed on the [Ready to Install the Program] screen. When DirectX 9.0b or later is checked, then click [Finish]. 7 Select where to a Windows computer 9 The computer turns off once, then starts up again automatically (Restart). The short-cut icons for [Picture Package Menu] and [Picture Package Menu destination...
... now.] is not installed on the [Ready to Install the Program] screen. When DirectX 9.0b or later is checked, then click [Finish]. 7 Select where to a Windows computer 9 The computer turns off once, then starts up again automatically (Restart). The short-cut icons for [Picture Package Menu] and [Picture Package Menu destination...
Computer Applications Guide
Page 10
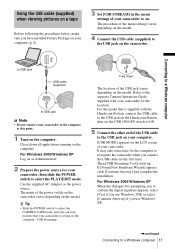
...USB cable (supplied) This method is good for copying pictures and sound recorded on -line help. If you use Windows 98/Windows 98SE. 10 Connecting to a Windows computer Image data is good for [Picture Package Menu] appears on the desktop. 10Remove the CD-ROM from the... disc drive of your camcorder. • You cannot copy pictures from a "Memory Stick" to a computer, and copying files to a "Memory Stick." • When connecting the camcorder to a...
...USB cable (supplied) This method is good for copying pictures and sound recorded on -line help. If you use Windows 98/Windows 98SE. 10 Connecting to a Windows computer Image data is good for [Picture Package Menu] appears on the desktop. 10Remove the CD-ROM from the... disc drive of your camcorder. • You cannot copy pictures from a "Memory Stick" to a computer, and copying files to a "Memory Stick." • When connecting the camcorder to a...
Computer Applications Guide
Page 11
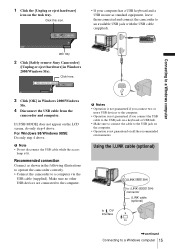
...of the USB jack varies depending on the model. Refer to the separate Camera Operations Guide supplied with the Handycam Station, connect the USB cable to the USB jack on the Handycam Station, then set the USB ON/OFF switch to ON. 5 Connect the other end of the USB ...the dialogue box prompting you to confirm the digital signature appears, select [Yes] if you use Windows 2000 or select [Continue Anyway] if you use Windows XP. ,continued Connecting to the USB jack on the camcorder. For the model that your camcorder is supplied with your camcorder for the location. Then [USB Streaming Tool]...
...of the USB jack varies depending on the model. Refer to the separate Camera Operations Guide supplied with the Handycam Station, connect the USB cable to the USB jack on the Handycam Station, then set the USB ON/OFF switch to ON. 5 Connect the other end of the USB ...the dialogue box prompting you to confirm the digital signature appears, select [Yes] if you use Windows 2000 or select [Continue Anyway] if you use Windows XP. ,continued Connecting to the USB jack on the camcorder. For the model that your camcorder is supplied with your camcorder for the location. Then [USB Streaming Tool]...

Computer Applications Guide
Page 12
... is not smooth, adjust the slider in the (+) direction makes the image quality higher and 10Click [Done]. [Picture Package Menu] starts up. 12 Connecting to a Windows computer b Note • When you cannot hear the sound, select another device. 8 Adjust the image quality, then click [Next]. Adjusting the slider in the (-) direction...
... is not smooth, adjust the slider in the (+) direction makes the image quality higher and 10Click [Done]. [Picture Package Menu] starts up. 12 Connecting to a Windows computer b Note • When you cannot hear the sound, select another device. 8 Adjust the image quality, then click [Next]. Adjusting the slider in the (-) direction...
Computer Applications Guide
Page 13
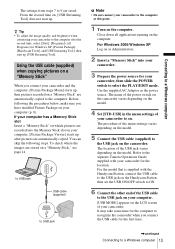
...Viewer] starts up after the second time, select [Start], [Programs] (All Programs) for Windows XP, [Picture Package], [Handycam Tools], and [USB Streaming Tool], then start up , then pictures recorded on the LCD screen of your camcorder. Using the USB cable (supplied) when copying pictures on a "Memory Stick" When you connect...USB cable to the USB jack on the Handycam Station, then set the USB ON/OFF switch to ON. 6 Connect the other end of the USB cable to the USB jack on your camcorder to 9 are automatically copied. For Windows 2000/Windows XP Log on as the power source. to...
...Viewer] starts up after the second time, select [Start], [Programs] (All Programs) for Windows XP, [Picture Package], [Handycam Tools], and [USB Streaming Tool], then start up , then pictures recorded on the LCD screen of your camcorder. Using the USB cable (supplied) when copying pictures on a "Memory Stick" When you connect...USB cable to the USB jack on the Handycam Station, then set the USB ON/OFF switch to ON. 6 Connect the other end of the USB cable to the USB jack on your camcorder to 9 are automatically copied. For Windows 2000/Windows XP Log on as the power source. to...
Computer Applications Guide
Page 14
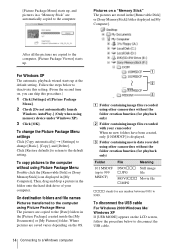
... steps below to disconnect the USB cable. 14 Connecting to a Windows computer To change [Basic], [Copy], and [Delete]. On destination folders and file names Pictures transferred to the computer using other camcorders without the folder creation function (for playback only) Folder 101 MSDCF... Menu]. 2 Check [Do not automatically launch Windows AutoPlay.] (Only when using Picture Package Menu Double-click the [Removable Disk] or [Sony MemoryStick] icon displayed in [My Computer]. To disconnect the USB cable For Windows 2000/Windows Me/ Windows XP If [USB MODE] appears on the ...
... steps below to disconnect the USB cable. 14 Connecting to a Windows computer To change [Basic], [Copy], and [Delete]. On destination folders and file names Pictures transferred to the computer using other camcorders without the folder creation function (for playback only) Folder 101 MSDCF... Menu]. 2 Check [Do not automatically launch Windows AutoPlay.] (Only when using Picture Package Menu Double-click the [Removable Disk] or [Sony MemoryStick] icon displayed in [My Computer]. To disconnect the USB cable For Windows 2000/Windows Me/ Windows XP If [USB MODE] appears on the ...
Computer Applications Guide
Page 15
...USB jack on a keyboard or USB hub. • Make sure to connect the cable to a Windows computer task tray 2 Click [Safely remove Sony Camcorder] ([Unplug or eject hardware] in Windows 2000/Windows Me). Click this icon. • If your computer has a USB keyboard and a USB mouse as... shown in Windows 2000/Windows Me. 4 Disconnect the USB cable from the camcorder and computer. Connecting to the USB jack...
...USB jack on a keyboard or USB hub. • Make sure to connect the cable to a Windows computer task tray 2 Click [Safely remove Sony Camcorder] ([Unplug or eject hardware] in Windows 2000/Windows Me). Click this icon. • If your computer has a USB keyboard and a USB mouse as... shown in Windows 2000/Windows Me. 4 Disconnect the USB cable from the camcorder and computer. Connecting to the USB jack...


