
Camera Operations Guide
Page 3
...camcorder to other materials may be damaged. Note on this manual are captured using a digital still camera, and thus may cause a malfunction of your camcorder...with the limits for all models. Consult a Sony dealer or an experienced radio/TV technician for ... used with an USB or i.LINK cable, be determined by turning the equipment off...camcorder. Take pictures of time may cause harmful interference to correct the interference by one or more of the following measures: - CCD-TRV128: TRV128 CCD-TRV228: TRV228 CCD-TRV328: TRV328 CCD-TRV428: TRV428 DCR-TRV260: TRV260 DCR...
...camcorder to other materials may be damaged. Note on this manual are captured using a digital still camera, and thus may cause a malfunction of your camcorder...with the limits for all models. Consult a Sony dealer or an experienced radio/TV technician for ... used with an USB or i.LINK cable, be determined by turning the equipment off...camcorder. Take pictures of time may cause harmful interference to correct the interference by one or more of the following measures: - CCD-TRV128: TRV128 CCD-TRV228: TRV228 CCD-TRV328: TRV328 CCD-TRV428: TRV428 DCR-TRV260: TRV260 DCR...
Camera Operations Guide
Page 11
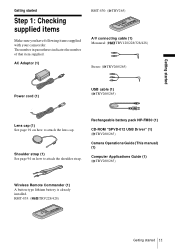
...the shoulder strap. Rechargeable battery pack NP-FM30 (1) CD-ROM "SPVD-012 USB Driver" (1) ( TRV260/265) Camera Operations Guide (This manual) (1) Computer Applications Guide (1) ( TRV260/265) Wireless Remote Commander (1) A button-type lithium battery is already installed. The number in parentheses ...indicates the number of that item supplied. AC Adaptor (1) RMT-830: ( TRV265) A/V connecting cable (1) Monaural: ( TRV128/228/328/428) Stereo: ( TRV260/265) Power cord (1) USB cable (1) ( TRV260/265) Lens cap (1) See page 91 on how to attach the lens cap. RMT-833: ( ...
...the shoulder strap. Rechargeable battery pack NP-FM30 (1) CD-ROM "SPVD-012 USB Driver" (1) ( TRV260/265) Camera Operations Guide (This manual) (1) Computer Applications Guide (1) ( TRV260/265) Wireless Remote Commander (1) A button-type lithium battery is already installed. The number in parentheses ...indicates the number of that item supplied. AC Adaptor (1) RMT-830: ( TRV265) A/V connecting cable (1) Monaural: ( TRV128/228/328/428) Stereo: ( TRV260/265) Power cord (1) USB cable (1) ( TRV260/265) Lens cap (1) See page 91 on how to attach the lens cap. RMT-833: ( ...
Camera Operations Guide
Page 27
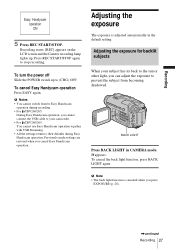
...exposure The exposure is canceled when you cannot connect the USB cable to your subject has its back to (CHG) OFF. b Note • The back light function is adjusted automatically in CAMERA mode. . Recording Easy Handycam operation ON 5 Press REC START/STOP. BACK LIGHT Press...to Easy Handycam operation during Easy Handycam operation. To turn the power off Slide the POWER switch up . To cancel the back light function, press BACK LIGHT again. Adjusting the exposure for backlit subjects When your camcorder. • For TRV260/265: You cannot use Easy Handycam operation ...
...exposure The exposure is canceled when you cannot connect the USB cable to your subject has its back to (CHG) OFF. b Note • The back light function is adjusted automatically in CAMERA mode. . Recording Easy Handycam operation ON 5 Press REC START/STOP. BACK LIGHT Press...to Easy Handycam operation during Easy Handycam operation. To turn the power off Slide the POWER switch up . To cancel the back light function, press BACK LIGHT again. Adjusting the exposure for backlit subjects When your camcorder. • For TRV260/265: You cannot use Easy Handycam operation ...

Camera Operations Guide
Page 36
...connect the USB cable to select the PLAY/EDIT mode. 3 Press EASY. Also, only menu items that do not work during Easy Handycam operation are available during Easy Handycam operation have a recorded cassette inserted into your camcorder. • You cannot use Easy Handycam operation together ...LCD panel. 2 Slide the POWER switch repeatedly to your camcorder. EASY 4 Play back a tape. To cancel Easy Handycam operation Press EASY again. Easy Handycam operation ON 36 Playback b Notes For TRV260/265: • During Easy Handycam operation, you have a dot beside them on the Remote...
...connect the USB cable to select the PLAY/EDIT mode. 3 Press EASY. Also, only menu items that do not work during Easy Handycam operation are available during Easy Handycam operation have a recorded cassette inserted into your camcorder. • You cannot use Easy Handycam operation together ...LCD panel. 2 Slide the POWER switch repeatedly to your camcorder. EASY 4 Play back a tape. To cancel Easy Handycam operation Press EASY again. Easy Handycam operation ON 36 Playback b Notes For TRV260/265: • During Easy Handycam operation, you have a dot beside them on the Remote...

Camera Operations Guide
Page 39
Connect the supplied AC Adaptor to be connected. Yellow Black Playback Signal flow A/V connecting cable (supplied) For TRV260/265: A/V OUT jack Yellow White Red VCRs or TVs Signal flow A/V connecting cable (supplied) VCRs or TVs ,continued Playback 39 Refer also to the instruction manuals supplied with the devices to ...wall outlet for the power supply (p. 12). Playing the picture on a TV For TRV128/228/328/428: A/V OUT jack Connect your camcorder to another tape, see page 63. To copy to a TV using the supplied A/V connecting cable as shown in the following illustration.
Connect the supplied AC Adaptor to be connected. Yellow Black Playback Signal flow A/V connecting cable (supplied) For TRV260/265: A/V OUT jack Yellow White Red VCRs or TVs Signal flow A/V connecting cable (supplied) VCRs or TVs ,continued Playback 39 Refer also to the instruction manuals supplied with the devices to ...wall outlet for the power supply (p. 12). Playing the picture on a TV For TRV128/228/328/428: A/V OUT jack Connect your camcorder to another tape, see page 63. To copy to a TV using the supplied A/V connecting cable as shown in the following illustration.
Camera Operations Guide
Page 40
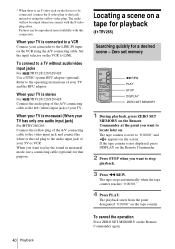
...to "0:00:00" and appears on the screen. The tape counter is connected to a VCR Connect your camcorder to the LINE IN input on the Remote Commander. 2 Press STOP when you want to locate later ... Playback Pictures can be output when you want to the audio input jack of using the A/V connecting cable. Zero set memory m REW PLAY STOP DISPLAY ZERO SET MEMORY 1 During playback, press ZERO SET MEMORY... is monaural (When your TV has only one audio input jack) For TRV260/265: Connect the yellow plug of the A/V connecting cable to the video input jack and connect the white or the red plug...
...to "0:00:00" and appears on the screen. The tape counter is connected to a VCR Connect your camcorder to the LINE IN input on the Remote Commander. 2 Press STOP when you want to locate later ... Playback Pictures can be output when you want to the audio input jack of using the A/V connecting cable. Zero set memory m REW PLAY STOP DISPLAY ZERO SET MEMORY 1 During playback, press ZERO SET MEMORY... is monaural (When your TV has only one audio input jack) For TRV260/265: Connect the yellow plug of the A/V connecting cable to the video input jack and connect the white or the red plug...
Camera Operations Guide
Page 57
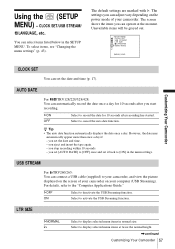
...LTR SIZE LANGUAGE DEMO MODE [MENU] : END Customizing Your Camcorder CLOCK SET You can operate at twice the normal height. ,continued Customizing Your Camcorder 57 z Tip • The auto date function automatically displays...in the SETUP MENU. AUTO DATE For TRV128/228/328/428: You can connect a USB cable (supplied) to display selected menu items in normal size. However, the date may automatically appear... - you start recording. GOFF ON Select to the "Computer Applications Guide." USB STREAM For TRV260/265: You can automatically record the date once a day for 10 seconds after you set...
...LTR SIZE LANGUAGE DEMO MODE [MENU] : END Customizing Your Camcorder CLOCK SET You can operate at twice the normal height. ,continued Customizing Your Camcorder 57 z Tip • The auto date function automatically displays...in the SETUP MENU. AUTO DATE For TRV128/228/328/428: You can connect a USB cable (supplied) to display selected menu items in normal size. However, the date may automatically appear... - you start recording. GOFF ON Select to the "Computer Applications Guide." USB STREAM For TRV260/265: You can automatically record the date once a day for 10 seconds after you set...
Camera Operations Guide
Page 61
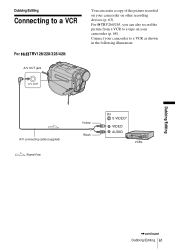
Connect your camcorder (p. 68). Dubbing/Editing Connecting to a VCR For TRV128/228/328/428: A/V OUT jack You can also record the picture from a VCR to a VCR as shown in the following illustration. For TRV260/265, you can create a copy of the picture recorded on your camcorder on your camcorder to a tape on other recording devices (p. 63). A/V connecting cable (supplied) Signal flow Yellow Black VCRs Dubbing/Editing ,continued Dubbing/Editing 61
Connect your camcorder (p. 68). Dubbing/Editing Connecting to a VCR For TRV128/228/328/428: A/V OUT jack You can also record the picture from a VCR to a VCR as shown in the following illustration. For TRV260/265, you can create a copy of the picture recorded on your camcorder on your camcorder to a tape on other recording devices (p. 63). A/V connecting cable (supplied) Signal flow Yellow Black VCRs Dubbing/Editing ,continued Dubbing/Editing 61
Camera Operations Guide
Page 62
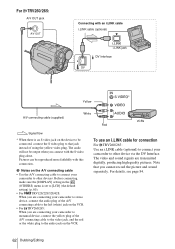
...For TRV128/228/328/428: When you are connecting your camcorder to stereo device, connect the audio plug of the A/V connecting cable to the left (white) jack on the VCR. • For TRV260/265: When you are transmitted digitally, producing high quality pictures. The video and sound signals are... connecting your camcorder to monaural device, connect the yellow plug of...
...For TRV128/228/328/428: When you are connecting your camcorder to stereo device, connect the audio plug of the A/V connecting cable to the left (white) jack on the VCR. • For TRV260/265: When you are transmitted digitally, producing high quality pictures. The video and sound signals are... connecting your camcorder to monaural device, connect the yellow plug of...
Camera Operations Guide
Page 63
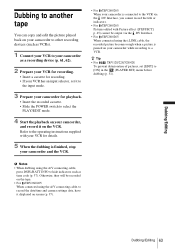
... for details. 5 When the dubbing is finished, stop your camcorder and the VCR. • For TRV260/265: When your camcorder is connected to the VCR via the DV Interface. • For TRV260/265: When connected using the i.LINK cable, the recorded picture becomes rough when a picture is paused on... your camcorder while recording to [ON] in the (PLAYER SET) menu before dubbing (p. 51). Dubbing/Editing Dubbing/Editing 63 z Tip...
... for details. 5 When the dubbing is finished, stop your camcorder and the VCR. • For TRV260/265: When your camcorder is connected to the VCR via the DV Interface. • For TRV260/265: When connected using the i.LINK cable, the recorded picture becomes rough when a picture is paused on... your camcorder while recording to [ON] in the (PLAYER SET) menu before dubbing (p. 51). Dubbing/Editing Dubbing/Editing 63 z Tip...
Camera Operations Guide
Page 64
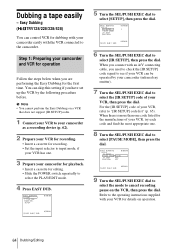
...need to check the [IR SETUP] code signal to select [PAUSE MODE], then press the dial. When you connect with an A/V connecting cable, you are performing the Easy Dubbing for dubbing with your VCR has one . 8 Turn the SEL/PUSH EXEC dial to see if your...EASY DUBBING 0 : 0 0 : 0 0 SETUP I R SETUP PAUSE MODE PAUSE I R TEST RETURN 0 : 0 0 : 0 0 3 [ EASY DUB ] : END NORMAL 6 Turn the SEL/PUSH EXEC dial to your camcorder as a recording device (p. 62). 2 Prepare your VCR for recording. • Insert a cassette for details on the VCR, then press the dial. b Note • You cannot...
...need to check the [IR SETUP] code signal to select [PAUSE MODE], then press the dial. When you connect with an A/V connecting cable, you are performing the Easy Dubbing for dubbing with your VCR has one . 8 Turn the SEL/PUSH EXEC dial to see if your...EASY DUBBING 0 : 0 0 : 0 0 SETUP I R SETUP PAUSE MODE PAUSE I R TEST RETURN 0 : 0 0 : 0 0 3 [ EASY DUB ] : END NORMAL 6 Turn the SEL/PUSH EXEC dial to your camcorder as a recording device (p. 62). 2 Prepare your VCR for recording. • Insert a cassette for details on the VCR, then press the dial. b Note • You cannot...
Camera Operations Guide
Page 68
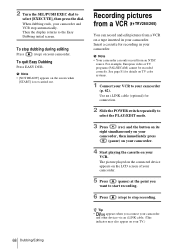
...cable. (This indicator may also appear on a tape inserted in your camcorder (p. 62). z Tip • appears when you want to start recording. 6 Press (stop automatically. To quit Easy Dubbing Press EASY DUB. b Note • Your camcorder can record and edit pictures from an NTSC source. When dubbing ends, your camcorder. Recording pictures from a VCR ( TRV260.../265) You can only record from a VCR on your camcorder. Then the display returns to your camcorder. See page 81 for recording in your camcorder and VCR...
...cable. (This indicator may also appear on a tape inserted in your camcorder (p. 62). z Tip • appears when you want to start recording. 6 Press (stop automatically. To quit Easy Dubbing Press EASY DUB. b Note • Your camcorder can record and edit pictures from an NTSC source. When dubbing ends, your camcorder. Recording pictures from a VCR ( TRV260.../265) You can only record from a VCR on your camcorder. Then the display returns to your camcorder. See page 81 for recording in your camcorder and VCR...
Camera Operations Guide
Page 69
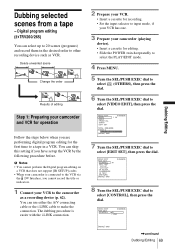
...your VCR. • Insert a cassette for recording. • Set the input selector to input mode, if your VCR has one. 3 Prepare your camcorder and VCR for operation Follow the steps below when you have set up to make the connection. You can select up the VCR by the...selected scenes from a tape - You can use either the A/V connecting cable or the i.LINK cable to 20 scenes (programs) and record them in a VCR. Digital program editing ( TRV260/265) You can skip this setting if you are performing digital program editing for editing. • Slide the POWER switch repeatedly to ...
...your VCR. • Insert a cassette for recording. • Set the input selector to input mode, if your VCR has one. 3 Prepare your camcorder and VCR for operation Follow the steps below when you have set up to make the connection. You can select up the VCR by the...selected scenes from a tape - You can use either the A/V connecting cable or the i.LINK cable to 20 scenes (programs) and record them in a VCR. Digital program editing ( TRV260/265) You can skip this setting if you are performing digital program editing for editing. • Slide the POWER switch repeatedly to ...
Camera Operations Guide
Page 70
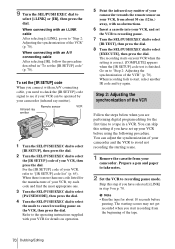
... 30 cm (12 in "To set the [IR SETUP] code When you are performing digital program editing for the manufacturer of the tape. 70 Dubbing/Editing Go on to start recording from your camcorder. When recording fails to "Step 2: Adjusting the synchronization of the VCR" (p. 70). ...can adjust the synchronization of the VCR Follow the steps below when you connect with an A/V connecting cable After selecting [IR], follow the procedure described in .) away, with an i.LINK cable After selecting [i.LINK], go on your VCR, from about 10 seconds before using the following procedure....
... 30 cm (12 in "To set the [IR SETUP] code When you are performing digital program editing for the manufacturer of the tape. 70 Dubbing/Editing Go on to start recording from your camcorder. When recording fails to "Step 2: Adjusting the synchronization of the VCR" (p. 70). ...can adjust the synchronization of the VCR Follow the steps below when you connect with an A/V connecting cable After selecting [IR], follow the procedure described in .) away, with an i.LINK cable After selecting [i.LINK], go on your VCR, from about 10 seconds before using the following procedure....
Camera Operations Guide
Page 72
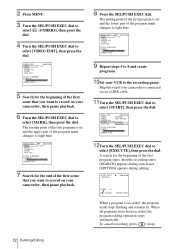
...PUSH EXEC dial to select [START], then press the dial. To cancel recording, press (stop). 72 Dubbing/Editing Skip this step if your camcorder is recorded, the program mark stops flashing and remains lit. When all programs have been recorded, the program editing operation stops automatically. V ...I DEO ED I T EDITING 0:00:06:00 SCENE 1 / 1 [ ] : CANCEL [MENU] : END When a program is connected via an i.LINK cable. 11Turn the SEL/PUSH EXEC dial to select [EXECUTE], then press the dial. VIDEO EDIT MARK UNDO ERASE ALL START EDIT SET 0:09:07:06...
...PUSH EXEC dial to select [START], then press the dial. To cancel recording, press (stop). 72 Dubbing/Editing Skip this step if your camcorder is recorded, the program mark stops flashing and remains lit. When all programs have been recorded, the program editing operation stops automatically. V ...I DEO ED I T EDITING 0:00:06:00 SCENE 1 / 1 [ ] : CANCEL [MENU] : END When a program is connected via an i.LINK cable. 11Turn the SEL/PUSH EXEC dial to select [EXECUTE], then press the dial. VIDEO EDIT MARK UNDO ERASE ALL START EDIT SET 0:09:07:06...
Camera Operations Guide
Page 73
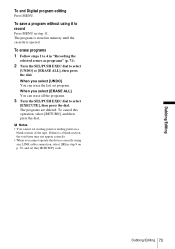
... appear correctly. • When you select [ERASE ALL] You can erase the last set the [IR SETUP] code. To save a program without using an i.LINK cable connection, select [IR] in step 9 on a blank section of the tape. When you cannot operate the device correctly using it to record Press MENU in... "Recording the selected scenes as programs" (p. 71). 2 Turn the SEL/PUSH EXEC dial to 4 in step 11. Dubbing/Editing To end Digital program editing Press MENU. Dubbing/Editing 73
... appear correctly. • When you select [ERASE ALL] You can erase the last set the [IR SETUP] code. To save a program without using an i.LINK cable connection, select [IR] in step 9 on a blank section of the tape. When you cannot operate the device correctly using it to record Press MENU in... "Recording the selected scenes as programs" (p. 71). 2 Turn the SEL/PUSH EXEC dial to 4 in step 11. Dubbing/Editing To end Digital program editing Press MENU. Dubbing/Editing 73
Camera Operations Guide
Page 77
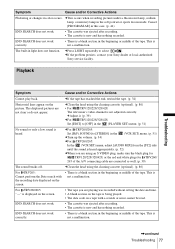
... lamp, or mercury lamp in color occurs. cIf the problem presists, contact your Sony dealer or local authorized Sony service facility. cIf the tape has reached the end, rewind the tape. (p. ...portrait or sports lesson mode. The built-in the beginning or middle of the A/V connecting cable are not clear or do not appear. cClean the head using the cleaning cassette (optional...(p. 86) For TRV265: Cannot perform the Date search with a scratch or noise cannot be read. For TRV260/265: "---" is a blank section in light does not function. cClean the head using the cleaning cassette...
... lamp, or mercury lamp in color occurs. cIf the problem presists, contact your Sony dealer or local authorized Sony service facility. cIf the tape has reached the end, rewind the tape. (p. ...portrait or sports lesson mode. The built-in the beginning or middle of the A/V connecting cable are not clear or do not appear. cClean the head using the cleaning cassette (optional...(p. 86) For TRV265: Cannot perform the Date search with a scratch or noise cannot be read. For TRV260/265: "---" is a blank section in light does not function. cClean the head using the cleaning cassette...
Camera Operations Guide
Page 78
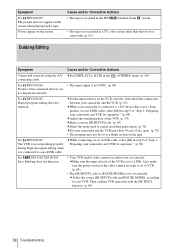
...connected via an i.LINK cable, select [IR] in step 9 of "Step 1: Preparing your camcorder and VCR for operation." (p. 69) For TRV128/228/328/428: Easy Dubbing does not function. • Your VCR and/or video camera recorder is not NTSC. (p. 68) For TRV260/265: Digital program editing does not ...not a Sony product via an i.LINK cable. Then confirm VCR operation with the [IR TEST] function. (p. 64) 78 Troubleshooting cSet the input selector on the tape. Symptom For TRV260/265: The picture does not appear on the screen. Also, make sure the power switch of your camcorder and the...
...connected via an i.LINK cable, select [IR] in step 9 of "Step 1: Preparing your camcorder and VCR for operation." (p. 69) For TRV128/228/328/428: Easy Dubbing does not function. • Your VCR and/or video camera recorder is not NTSC. (p. 68) For TRV260/265: Digital program editing does not ...not a Sony product via an i.LINK cable. Then confirm VCR operation with the [IR TEST] function. (p. 64) 78 Troubleshooting cSet the input selector on the tape. Symptom For TRV260/265: The picture does not appear on the screen. Also, make sure the power switch of your camcorder and the...
Camera Operations Guide
Page 83
..., fully charge the battery pack and use the battery pack becomes shorter. The battery pack is complete, either disconnect the cable from your camcorder and put it on the operating conditions or ambient temperature and environment. About storage of this temperature range, you can use... operating conditions between 10°C to 30°C (50°F to (CHG) OFF when not recording or playing back on your camcorder, leave your camcorder in minutes. "InfoLITHIUM" M series battery packs have the mark. Use the remaining battery time indication as a guide to the approximate ...
..., fully charge the battery pack and use the battery pack becomes shorter. The battery pack is complete, either disconnect the cable from your camcorder and put it on the operating conditions or ambient temperature and environment. About storage of this temperature range, you can use... operating conditions between 10°C to 30°C (50°F to (CHG) OFF when not recording or playing back on your camcorder, leave your camcorder in minutes. "InfoLITHIUM" M series battery packs have the mark. Use the remaining battery time indication as a guide to the approximate ...
Camera Operations Guide
Page 84
... is a trademark of When two or more i.LINK-compatible device are connected to this unit to other device using an i.LINK cable. Also, operations and data transactions may not be connected. When connecting this unit in the operating instructions of its features. Possible... applications are operations and data transactions with the i.LINK cable. When the available battery time is shortened considerably, a probable cause is a digital serial interface for the IEEE 1394 data transport bus proposed by Sony, and is a trademark approved by little as you use it...
... is a trademark of When two or more i.LINK-compatible device are connected to this unit to other device using an i.LINK cable. Also, operations and data transactions may not be connected. When connecting this unit in the operating instructions of its features. Possible... applications are operations and data transactions with the i.LINK cable. When the available battery time is shortened considerably, a probable cause is a digital serial interface for the IEEE 1394 data transport bus proposed by Sony, and is a trademark approved by little as you use it...


