Operating Instructions
Page 6
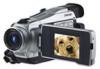
...Focusing manually 61 Interval recording 62 Frame by title - PHOTO SEARCH/PHOTO SCAN 73 Editing Dubbing a tape 75 Dubbing only desired scenes - Digital program editing (on tapes 78 Recording video or TV programs ....... 89 Inserting a scene from a tape as a still image 117 Superimposing ... - BACK LIGHT 33 Shooting in the "Memory Stick" on a "Memory Stick" (except DCR-TRV16 10 Getting Started Using this manual 12 Checking supplied accessories 15 Step 1 Preparing the power supply ... 16 Installing the battery pack 16 Charging the battery pack 17 Connecting to a wall outlet...
...Focusing manually 61 Interval recording 62 Frame by title - PHOTO SEARCH/PHOTO SCAN 73 Editing Dubbing a tape 75 Dubbing only desired scenes - Digital program editing (on tapes 78 Recording video or TV programs ....... 89 Inserting a scene from a tape as a still image 117 Superimposing ... - BACK LIGHT 33 Shooting in the "Memory Stick" on a "Memory Stick" (except DCR-TRV16 10 Getting Started Using this manual 12 Checking supplied accessories 15 Step 1 Preparing the power supply ... 16 Installing the battery pack 16 Charging the battery pack 17 Connecting to a wall outlet...
Operating Instructions
Page 8
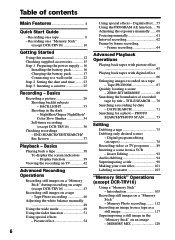
... open the lid. 2 Push the center of the cassette back to record on a tape of your camcorder outdoors (p. 16). Connecting the power cord (p. 22) Use the battery pack when using your camcorder. Quick Start Guide AC power adaptor (supplied) Connect the plug with the window facing up . Recording on the cassette compartment. Open the DC...
... open the lid. 2 Push the center of the cassette back to record on a tape of your camcorder outdoors (p. 16). Connecting the power cord (p. 22) Use the battery pack when using your camcorder. Quick Start Guide AC power adaptor (supplied) Connect the plug with the window facing up . Recording on the cassette compartment. Open the DC...
Operating Instructions
Page 10
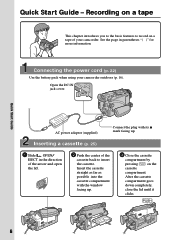
...DCR-TRV16 This chapter introduces you to the basic features to record on a "Memory Stick" - See the page in the "Memory Stick" slot as far as it can go with its v mark facing up as illustrated. Connecting the power cord (p. 22) Use the battery pack when using your camcorder... the DC IN jack cover. Recording on a "Memory Stick" of your camcorder outdoors (p. 16). Inserting a "Memory Stick" (p. 106) Insert a "Memory Stick" in parentheses "( )" for more information. Quick Start Guide AC power adaptor (supplied) Connect the plug with the B mark facing up . Quick Start Guide ...
...DCR-TRV16 This chapter introduces you to the basic features to record on a "Memory Stick" - See the page in the "Memory Stick" slot as far as it can go with its v mark facing up as illustrated. Connecting the power cord (p. 22) Use the battery pack when using your camcorder... the DC IN jack cover. Recording on a "Memory Stick" of your camcorder outdoors (p. 16). Inserting a "Memory Stick" (p. 106) Insert a "Memory Stick" in parentheses "( )" for more information. Quick Start Guide AC power adaptor (supplied) Connect the plug with the B mark facing up . Quick Start Guide ...
Operating Instructions
Page 15
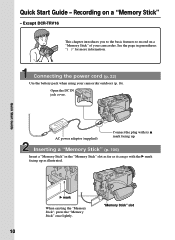
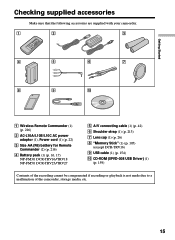
... Make sure that the following accessories are supplied with your camcorder. 1 2 3 4 5 6 7 8 9 0 1 Wireless Remote Commander (1) (p. 216) 2 AC-L10A/L10B/L10C AC power adaptor (1), Power cord (1) (p. 22) 3 Size AA (R6) battery for Remote Commander (2) (p. 216) 4 Battery pack (1) (p. 16, 17) NP-FM30: DCR-TRV16/TRV18 NP-FM50: DCR-TRV25/TRV27 5 A/V connecting cable (1) (p. 42) 6 Shoulder strap (1) (p. 213) 7 Lens cap (1) (p. 26) 8 "Memory...
... Make sure that the following accessories are supplied with your camcorder. 1 2 3 4 5 6 7 8 9 0 1 Wireless Remote Commander (1) (p. 216) 2 AC-L10A/L10B/L10C AC power adaptor (1), Power cord (1) (p. 22) 3 Size AA (R6) battery for Remote Commander (2) (p. 216) 4 Battery pack (1) (p. 16, 17) NP-FM30: DCR-TRV16/TRV18 NP-FM50: DCR-TRV25/TRV27 5 A/V connecting cable (1) (p. 42) 6 Shoulder strap (1) (p. 213) 7 Lens cap (1) (p. 26) 8 "Memory...
Operating Instructions
Page 16
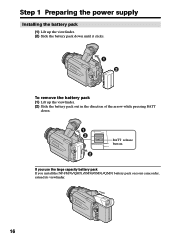
Step 1 Preparing the power supply Installing the battery pack (1) Lift up the viewfinder. (2) Slide the battery pack down until it clicks. 1 2 To remove the battery pack (1) Lift up the viewfinder. (2) Slide the battery pack out in the direction of the arrow while pressing BATT down. 1 2 2 BATT release button If you use the large capacity battery pack If you install the NP-FM70/QM71/FM90/FM91/QM91 battery pack on your camcorder, extend its viewfinder. 16
Step 1 Preparing the power supply Installing the battery pack (1) Lift up the viewfinder. (2) Slide the battery pack down until it clicks. 1 2 To remove the battery pack (1) Lift up the viewfinder. (2) Slide the battery pack out in the direction of the arrow while pressing BATT down. 1 2 2 BATT release button If you use the large capacity battery pack If you install the NP-FM70/QM71/FM90/FM91/QM91 battery pack on your camcorder, extend its viewfinder. 16
Operating Instructions
Page 17
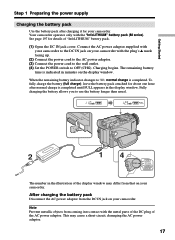
... illustration of the display window may cause a short-circuit, damaging the AC power adaptor. 17 The remaining battery time is indicated in minutes on your camcorder. Fully charging the battery allows you to OFF (CHG). Getting Started Step 1 Preparing the power supply Charging the battery pack Use the battery pack after normal charge is...
... illustration of the display window may cause a short-circuit, damaging the AC power adaptor. 17 The remaining battery time is indicated in minutes on your camcorder. Fully charging the battery allows you to OFF (CHG). Getting Started Step 1 Preparing the power supply Charging the battery pack Use the battery pack after normal charge is...

Operating Instructions
Page 18
...plug from the wall outlet as soon as possible to charge an empty battery pack. When you use the AC power adaptor Place the AC power adaptor near a wall outlet. Charging time Battery pack NP-FM30*1) NP-FM50*2) NP-FM70 NP-QM71 NP-FM90 ...increase if the battery's temperature is extremely high or low because of the ambient temperature. *1) DCR-TRV16/TRV18 supplied *2) DCR-TRV25/TRV27 supplied 18 Step 1 Preparing the power supply Remaining battery time indicator The remaining battery time indicator in the display window. Until your camcorder calculates the actual remaining battery time "- - - -
...plug from the wall outlet as soon as possible to charge an empty battery pack. When you use the AC power adaptor Place the AC power adaptor near a wall outlet. Charging time Battery pack NP-FM30*1) NP-FM50*2) NP-FM70 NP-QM71 NP-FM90 ...increase if the battery's temperature is extremely high or low because of the ambient temperature. *1) DCR-TRV16/TRV18 supplied *2) DCR-TRV25/TRV27 supplied 18 Step 1 Preparing the power supply Remaining battery time indicator The remaining battery time indicator in the display window. Until your camcorder calculates the actual remaining battery time "- - - -
Operating Instructions
Page 19
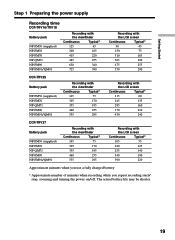
The actual battery life may be shorter. 19 Getting Started Step 1 Preparing the power supply Recording time DCR-TRV16/TRV18 Battery pack NP-FM30 (supplied) NP-FM50 NP-FM70 NP-QM71 NP-FM90 NP-FM91/QM91 Recording with the viewfinder Continuous Typical* 125 65 200 105 415 220 485 255... 630 340 725 390 Recording with the LCD screen Continuous Typical* 90 45 150 75 310 165 365 190 475 255 550 290 DCR-TRV25 Battery pack NP-FM50 (supplied) NP-FM70 NP-QM71 NP-FM90 NP-FM91/QM91 Recording with the viewfinder Continuous Typical* 145 75 305 170 355 195 460 255...
The actual battery life may be shorter. 19 Getting Started Step 1 Preparing the power supply Recording time DCR-TRV16/TRV18 Battery pack NP-FM30 (supplied) NP-FM50 NP-FM70 NP-QM71 NP-FM90 NP-FM91/QM91 Recording with the viewfinder Continuous Typical* 125 65 200 105 415 220 485 255... 630 340 725 390 Recording with the LCD screen Continuous Typical* 90 45 150 75 310 165 365 190 475 255 550 290 DCR-TRV25 Battery pack NP-FM50 (supplied) NP-FM70 NP-QM71 NP-FM90 NP-FM91/QM91 Recording with the viewfinder Continuous Typical* 145 75 305 170 355 195 460 255...
Operating Instructions
Page 20
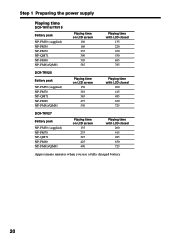
Step 1 Preparing the power supply Playing time DCR-TRV16/TRV18 Battery pack NP-FM30 (supplied) NP-FM50 NP-FM70 NP-QM71 NP-FM90 NP-FM91/QM91 Playing time on LCD screen 100 160 335 390 505 585 Playing time with LCD closed 135 220 450 530 685 785 DCR-TRV25 Battery pack NP-FM50 (supplied) NP-FM70 NP...-QM71 NP-FM90 NP-FM91/QM91 Playing time on LCD screen 150 310 365 475 550 Playing time with LCD closed 200 415 485 630 725 DCR-TRV27 Battery pack NP-FM50 (supplied) NP-FM70 NP-QM71 NP-FM90...
Step 1 Preparing the power supply Playing time DCR-TRV16/TRV18 Battery pack NP-FM30 (supplied) NP-FM50 NP-FM70 NP-QM71 NP-FM90 NP-FM91/QM91 Playing time on LCD screen 100 160 335 390 505 585 Playing time with LCD closed 135 220 450 530 685 785 DCR-TRV25 Battery pack NP-FM50 (supplied) NP-FM70 NP...-QM71 NP-FM90 NP-FM91/QM91 Playing time on LCD screen 150 310 365 475 550 Playing time with LCD closed 200 415 485 630 725 DCR-TRV27 Battery pack NP-FM50 (supplied) NP-FM70 NP-QM71 NP-FM90...

Operating Instructions
Page 21
...remaining battery time indicator is a lithium ion battery pack that can exchange data such as battery consumption with compatible electronic equipment. Your camcorder operates only with the "InfoLITHIUM" battery pack (M series). "InfoLITHIUM" M series battery packs have the mark. TM SERIES "InfoLITHIUM"...pack has enough power to 86 °F). Getting Started Step 1 Preparing the power supply Note Approximate recording time and continuous playing time at 25 °C (77 °F). The battery life will be shorter if you use your camcorder in an ambient temperature of Sony Corporation. 21...
...remaining battery time indicator is a lithium ion battery pack that can exchange data such as battery consumption with compatible electronic equipment. Your camcorder operates only with the "InfoLITHIUM" battery pack (M series). "InfoLITHIUM" M series battery packs have the mark. TM SERIES "InfoLITHIUM"...pack has enough power to 86 °F). Getting Started Step 1 Preparing the power supply Note Approximate recording time and continuous playing time at 25 °C (77 °F). The battery life will be shorter if you use your camcorder in an ambient temperature of Sony Corporation. 21...
Operating Instructions
Page 22
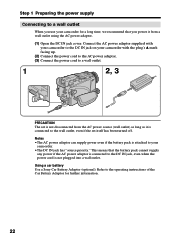
... battery Use a Sony Car Battery Adaptor (optional). Connect the AC power adaptor supplied with your camcorder to the DC IN jack on your camcorder with the plug's v mark facing up. (2) Connect the power cord to the AC power adaptor. (3) Connect the power cord to a wall outlet. 1 2, 3 PRECAUTION The set is not disconnected from the AC power source (wall outlet...
... battery Use a Sony Car Battery Adaptor (optional). Connect the AC power adaptor supplied with your camcorder to the DC IN jack on your camcorder with the plug's v mark facing up. (2) Connect the power cord to the AC power adaptor. (3) Connect the power cord to a wall outlet. 1 2, 3 PRECAUTION The set is not disconnected from the AC power source (wall outlet...
Operating Instructions
Page 25
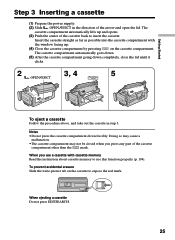
... tab on the cassette compartment. When you press any part of the cassette compartment other than the mark. Getting Started Step 3 Inserting a cassette (1) Prepare the power supply. (2) Slide OPEN/EJECT in step 3. Notes •Do not press the cassette compartment down completely, close the lid until it clicks. 2 3, 4 5 OPEN/EJECT To eject...
... tab on the cassette compartment. When you press any part of the cassette compartment other than the mark. Getting Started Step 3 Inserting a cassette (1) Prepare the power supply. (2) Slide OPEN/EJECT in step 3. Notes •Do not press the cassette compartment down completely, close the lid until it clicks. 2 3, 4 5 OPEN/EJECT To eject...
Operating Instructions
Page 26
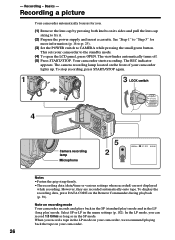
... recording. The camera recording lamp located on your camcorder. 26 To stop recording, press START/STOP again. 1 3 LOCK switch 4 POWER VCR OFF(CHG) CAMERA MEMORY Camera recording lamp Microphone 5 2 50min REC 0:00:01 Notes •Fasten the grip strap... mode. (4) To open the LCD panel, press OPEN. This sets your camcorder lights up. Recording a picture Your camcorder automatically focuses for more information (p. 16 to p. 25). (3) Set the POWER switch to fix it. (2) Prepare the power supply and insert a cassette. The REC indicator appears. However, they are not ...
... recording. The camera recording lamp located on your camcorder. 26 To stop recording, press START/STOP again. 1 3 LOCK switch 4 POWER VCR OFF(CHG) CAMERA MEMORY Camera recording lamp Microphone 5 2 50min REC 0:00:01 Notes •Fasten the grip strap... mode. (4) To open the LCD panel, press OPEN. This sets your camcorder lights up. Recording a picture Your camcorder automatically focuses for more information (p. 16 to p. 25). (3) Set the POWER switch to fix it. (2) Prepare the power supply and insert a cassette. The REC indicator appears. However, they are not ...

Operating Instructions
Page 38
... To turn the volume down + : To turn the LCD panel over and move it back to the camcorder body with your camcorder. (1) Prepare the power supply and insert the recorded tape. (2) Set the POWER switch to VCR while pressing the small green button. (3) Open the LCD panel while pressing OPEN. (4) Press...for a long time Your camcorder gets warm. Playback - You can monitor the playback picture in the viewfinder. When monitoring on VOLUME. When you can control playback using the Remote Commander supplied with the LCD screen facing out. - If you leave the power on the screen. Playing ...
... To turn the volume down + : To turn the LCD panel over and move it back to the camcorder body with your camcorder. (1) Prepare the power supply and insert the recorded tape. (2) Set the POWER switch to VCR while pressing the small green button. (3) Open the LCD panel while pressing OPEN. (4) Press...for a long time Your camcorder gets warm. Playback - You can monitor the playback picture in the viewfinder. When monitoring on VOLUME. When you can control playback using the Remote Commander supplied with the LCD screen facing out. - If you leave the power on the screen. Playing ...
Operating Instructions
Page 42
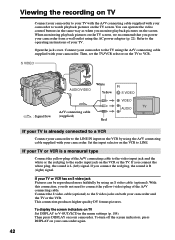
...TV. If your TV or VCR is already connected to a VCR Connect your camcorder to watch playback pictures on the TV screen. If your camcorder from a wall outlet using the AC power adaptor (p. 22). If you power your TV or VCR has an S video jack Pictures can operate the video control...TV Set DISPLAY to connect the yellow (video) plug of your TV. You can be reproduced more faithfully by using the A/V connecting cable supplied with your camcorder. When monitoring playback pictures on the TV screen, we recommend that you connect the white plug, the sound is R (right) signal. With...
...TV. If your TV or VCR is already connected to a VCR Connect your camcorder to watch playback pictures on the TV screen. If your camcorder from a wall outlet using the AC power adaptor (p. 22). If you power your TV or VCR has an S video jack Pictures can operate the video control...TV Set DISPLAY to connect the yellow (video) plug of your TV. You can be reproduced more faithfully by using the A/V connecting cable supplied with your camcorder. When monitoring playback pictures on the TV screen, we recommend that you connect the white plug, the sound is R (right) signal. With...

Operating Instructions
Page 96
... RETURN [MENU] : END (3) Turn the SEL/PUSH EXEC dial to 5. The green X indicator appears on screen. (5) Press X on your camcorder. (3) Locate the recording start playing back the audio you disconnect the power supply or remove the battery pack, the AUDIO MIX setting returns to original sound (ST1) only. Audio dubbing Adding audio on...
... RETURN [MENU] : END (3) Turn the SEL/PUSH EXEC dial to 5. The green X indicator appears on screen. (5) Press X on your camcorder. (3) Locate the recording start playing back the audio you disconnect the power supply or remove the battery pack, the AUDIO MIX setting returns to original sound (ST1) only. Audio dubbing Adding audio on...

Operating Instructions
Page 178
... between the stereo 1 and stereo 2 (p. 96) VCR VCR A/V t DV OUT z OFF ON LCD/VF SET LCD BRIGHT - Even if you use power supplies other than the battery pack, BRIGHT is automatically selected. z BRT NORMAL To set the brightness on the LCD screen to normal BRIGHT To brighten the...EXEC dial VCR CAMERA MEMORY To darken To lighten LCD B.L. ST 1 ST 2 To output digital images and sound in analog format using your camcorder To output analog images and sound in digital format using your camcorder (p. 174) VCR To adjust the brightness on the LCD screen, turn and press the ...
... between the stereo 1 and stereo 2 (p. 96) VCR VCR A/V t DV OUT z OFF ON LCD/VF SET LCD BRIGHT - Even if you use power supplies other than the battery pack, BRIGHT is automatically selected. z BRT NORMAL To set the brightness on the LCD screen to normal BRIGHT To brighten the...EXEC dial VCR CAMERA MEMORY To darken To lighten LCD B.L. ST 1 ST 2 To output digital images and sound in analog format using your camcorder To output analog images and sound in digital format using your camcorder (p. 174) VCR To adjust the brightness on the LCD screen, turn and press the ...
Operating Instructions
Page 188
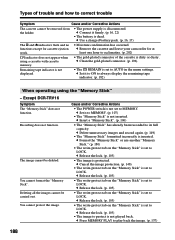
...-protect tab on the "Memory Stick" is set to its full capacity. Except DCR-TRV16 Symptom The "Memory Stick" does not function. You cannot protect the image. Cause and/or Corrective Actions • The POWER switch is not set to LOCK. c Insert a "Memory Stick". (p. 106)... trouble Symptom Cause and/or Corrective Actions The cassette cannot be removed from the holder. • The power supply is not played back. c Remove the cassette and leave your camcorder for cassette ejection work. • Moisture condensation has occurred. You cannot format the "Memory Stick".
...-protect tab on the "Memory Stick" is set to its full capacity. Except DCR-TRV16 Symptom The "Memory Stick" does not function. You cannot protect the image. Cause and/or Corrective Actions • The POWER switch is not set to LOCK. c Insert a "Memory Stick". (p. 106)... trouble Symptom Cause and/or Corrective Actions The cassette cannot be removed from the holder. • The power supply is not played back. c Remove the cassette and leave your camcorder for cassette ejection work. • Moisture condensation has occurred. You cannot format the "Memory Stick".

Operating Instructions
Page 191
... dirty. c Remove the cassette and insert it again, then operate your Sony dealer or local authorized Sony service facility. c Disconnect the power cord of a letter and figures) in the display window. After reconnecting the power supply, operate your camcorder as a 5-digit code (a combination of the AC power adaptor or remove the battery pack. This function displays the current...
... dirty. c Remove the cassette and insert it again, then operate your Sony dealer or local authorized Sony service facility. c Disconnect the power cord of a letter and figures) in the display window. After reconnecting the power supply, operate your camcorder as a 5-digit code (a combination of the AC power adaptor or remove the battery pack. This function displays the current...

Operating Instructions
Page 211
... slot* (p. 106) Notes on the intelligent accessory shoe •The intelligent accessory shoe supplies power to optional accessories such as a video light, microphone or printer.* •The intelligent accessory shoe is linked to the POWER switch, allowing you to the end, and then tighten the screw. •To remove...accessory, loosen the screw, and then press down and pull out the accessory. * Except DCR-TRV16 Quick Reference 211 To connect an accessory, press down and push it to turn the power supplied by the shoe on and off. Refer to the operating instructions of the accessory for ...
... slot* (p. 106) Notes on the intelligent accessory shoe •The intelligent accessory shoe supplies power to optional accessories such as a video light, microphone or printer.* •The intelligent accessory shoe is linked to the POWER switch, allowing you to the end, and then tighten the screw. •To remove...accessory, loosen the screw, and then press down and pull out the accessory. * Except DCR-TRV16 Quick Reference 211 To connect an accessory, press down and push it to turn the power supplied by the shoe on and off. Refer to the operating instructions of the accessory for ...


