Operating Instructions
Page 2
...presence of Conformity Trade Name: SONY Model No.: DCR-TRV6, DCR-TRV11 Responsible Party:Sony Electronics Inc. Declaration of the FCC Rules. This device complies with Part 15 of Conformity Trade Name: SONY Model No.: DCR-TRV20 Responsible Party:Sony Electronics Inc. For the Sony Service Center nearest you can capture... NJ, 07656 USA Telephone No.: 201-930-6972 This device complies with Part 15 of electric shock to operate this Sony Digital Handycam camcorder. For the Customers in the sun or under direct sunlight. If you have any questions about this device must accept...
...presence of Conformity Trade Name: SONY Model No.: DCR-TRV6, DCR-TRV11 Responsible Party:Sony Electronics Inc. Declaration of the FCC Rules. This device complies with Part 15 of Conformity Trade Name: SONY Model No.: DCR-TRV20 Responsible Party:Sony Electronics Inc. For the Sony Service Center nearest you can capture... NJ, 07656 USA Telephone No.: 201-930-6972 This device complies with Part 15 of electric shock to operate this Sony Digital Handycam camcorder. For the Customers in the sun or under direct sunlight. If you have any questions about this device must accept...
Operating Instructions
Page 4
...still picture - Memory PB ZOOM 118 Playing back images in a "Memory Stick" on "Memory Stick"s - Tape Photo recording 30 Adjusting the white balance manually ... 33 Using the wide mode...photo recording 100 Superimposing a still picture in a continuous loop - Insert editing 71 Audio dubbing 73 Superimposing a title 77 Making your camcorder abroad .......... 137 Maintenance ...still image on "Memory Stick"s - Photo search/ Photo scan 52 Changing the menu settings 85 Resetting the date and time 92 "Memory Stick" Operations (DCR-TRV11/TRV20 only) Using a "Memory Stick" - Digital...
...still picture - Memory PB ZOOM 118 Playing back images in a "Memory Stick" on "Memory Stick"s - Tape Photo recording 30 Adjusting the white balance manually ... 33 Using the wide mode...photo recording 100 Superimposing a still picture in a continuous loop - Insert editing 71 Audio dubbing 73 Superimposing a title 77 Making your camcorder abroad .......... 137 Maintenance ...still image on "Memory Stick"s - Photo search/ Photo scan 52 Changing the menu settings 85 Resetting the date and time 92 "Memory Stick" Operations (DCR-TRV11/TRV20 only) Using a "Memory Stick" - Digital...
Operating Instructions
Page 5
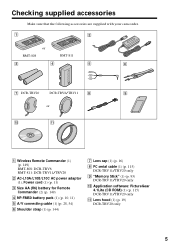
... Make sure that the following accessories are supplied with your camcorder. 1 2 or RMT-808 RMT-811 3 4 5 6 7 DCR-TRV20 DCR-TRV6/TRV11 8 9 or 0 qa 1 Wireless Remote Commander (1) (p. 149) RMT-808: DCR-TRV6 RMT-811: DCR-TRV11/TRV20 2 AC-L10A/L10B/L10C AC power adaptor (1), ...5 A/V connecting cable (1) (p. 28, 54) 6 Shoulder strap (1) (p. 144) 7 Lens cap (1) (p. 16) 8 PC serial cable (1) (p. 115) DCR-TRV11/TRV20 only 9 "Memory Stick" (1) (p. 93) DCR-TRV11/TRV20 only 0 Application software: PictureGear 4.1Lite (CD ROM) (1) (p. 115) DCR-TRV11/TRV20 only qa Lens hood (1) (p. 19...
... Make sure that the following accessories are supplied with your camcorder. 1 2 or RMT-808 RMT-811 3 4 5 6 7 DCR-TRV20 DCR-TRV6/TRV11 8 9 or 0 qa 1 Wireless Remote Commander (1) (p. 149) RMT-808: DCR-TRV6 RMT-811: DCR-TRV11/TRV20 2 AC-L10A/L10B/L10C AC power adaptor (1), ...5 A/V connecting cable (1) (p. 28, 54) 6 Shoulder strap (1) (p. 144) 7 Lens cap (1) (p. 16) 8 PC serial cable (1) (p. 115) DCR-TRV11/TRV20 only 9 "Memory Stick" (1) (p. 93) DCR-TRV11/TRV20 only 0 Application software: PictureGear 4.1Lite (CD ROM) (1) (p. 115) DCR-TRV11/TRV20 only qa Lens hood (1) (p. 19...
Operating Instructions
Page 6
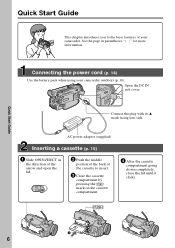
... the lid. AC power adaptor (supplied) Inserting a cassette (p. 15) 1 Slide OPEN/EJECT in parentheses "( )" for more information. See the page in the direction of your camcorder outdoors (p. 10). Connecting the power cord (p. 14) Use the battery pack when using your...
... the lid. AC power adaptor (supplied) Inserting a cassette (p. 15) 1 Slide OPEN/EJECT in parentheses "( )" for more information. See the page in the direction of your camcorder outdoors (p. 10). Connecting the power cord (p. 14) Use the battery pack when using your...
Operating Instructions
Page 7
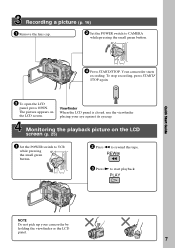
... against its eyecup. REW 3 Press N to CAMERA while pressing the small green button. Viewfinder When the LCD panel is closed, use the viewfinder placing your camcorder by holding the viewfinder or the LCD panel. 7 The picture appears on the LCD screen (p. 25) 1 Set the POWER switch to rewind the tape. ...Monitoring the playback picture on the LCD screen. VCR POWER OFF(CHG) CAMERA MEMORY 4 Press START/STOP. Your camcorder starts recording. POWER MEMORY CAMERA VCR OFF(CHG) 2 Press m to VCR while pressing the small green button.
... against its eyecup. REW 3 Press N to CAMERA while pressing the small green button. Viewfinder When the LCD panel is closed, use the viewfinder placing your camcorder by holding the viewfinder or the LCD panel. 7 The picture appears on the LCD screen (p. 25) 1 Set the POWER switch to rewind the tape. ...Monitoring the playback picture on the LCD screen. VCR POWER OFF(CHG) CAMERA MEMORY 4 Press START/STOP. Your camcorder starts recording. POWER MEMORY CAMERA VCR OFF(CHG) 2 Press m to VCR while pressing the small green button.
Operating Instructions
Page 8
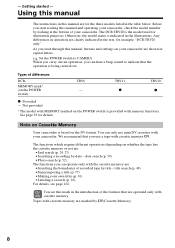
...(p. 49) • Superimposing a title (p. 77) • Making your camcorder. e.g. TRV11 z TRV20 z z Provided - The DCR-TRV20 is provided with MEMORY marked on your camcorder. For details, see this manual and operating your camcorder, check the model number by date - The functions which require different operations ...shown in the table below. See page 93 for example, "DCR-TRV20 only". The functions you read through this manual are marked by title - Before you can only use a tape with your camcorder are : •End search (p. 24, 27) •Searching...
...(p. 49) • Superimposing a title (p. 77) • Making your camcorder. e.g. TRV11 z TRV20 z z Provided - The DCR-TRV20 is provided with MEMORY marked on your camcorder. For details, see this manual and operating your camcorder, check the model number by date - The functions which require different operations ...shown in the table below. See page 93 for example, "DCR-TRV20 only". The functions you read through this manual are marked by title - Before you can only use a tape with your camcorder are : •End search (p. 24, 27) •Searching...
Operating Instructions
Page 9
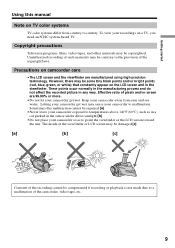
... LCD screen and in the sun or under direct sunlight [b]. •Do not place your camcorder get wet. Precautions on a TV, you need an NTSC system-based TV. Keep your recordings on camcorder care •The LCD screen and the viewfinder are 99.99% or more. •Do... using high-precision technology. Getting started Using this malfunction cannot be repaired [a]. •Never leave your camcorder to malfunction. The inside of the viewfinder or LCD screen may cause your camcorder exposed to temperatures above 140°F (60°C), such as to point the viewfinder or the LCD...
... LCD screen and in the sun or under direct sunlight [b]. •Do not place your camcorder get wet. Precautions on a TV, you need an NTSC system-based TV. Keep your recordings on camcorder care •The LCD screen and the viewfinder are 99.99% or more. •Do... using high-precision technology. Getting started Using this malfunction cannot be repaired [a]. •Never leave your camcorder to malfunction. The inside of the viewfinder or LCD screen may cause your camcorder exposed to temperatures above 140°F (60°C), such as to point the viewfinder or the LCD...
Operating Instructions
Page 10
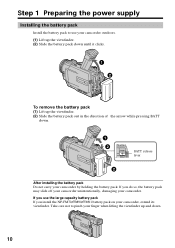
... battery pack If you do so, the battery pack may slide off your camcorder unintentionally, damaging your camcorder, extend its viewfinder. If you install the NP-FM70/FM90/FM91 battery pack on your camcorder. Step 1 Preparing the power supply Installing the battery pack Install the battery ...pack to pinch your camcorder by holding the battery pack. If you use your camcorder outdoors. (1) Lift up the viewfinder. (2) Slide the battery pack down until it clicks. 1 2 To remove the battery pack (1) Lift up ...
... battery pack If you do so, the battery pack may slide off your camcorder unintentionally, damaging your camcorder, extend its viewfinder. If you install the NP-FM70/FM90/FM91 battery pack on your camcorder. Step 1 Preparing the power supply Installing the battery pack Install the battery ...pack to pinch your camcorder by holding the battery pack. If you use your camcorder outdoors. (1) Lift up the viewfinder. (2) Slide the battery pack down until it clicks. 1 2 To remove the battery pack (1) Lift up ...
Operating Instructions
Page 11
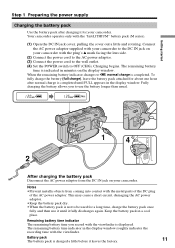
...fully charge the battery (full charge), leave the battery pack attached for about one hour after charging it until FULL appears in minutes on your camcorder to the DC IN jack on the display window. This may cause a short-circuit, damaging the AC power adaptor. •Keep the ... Set the POWER switch to use it for a long time, charge the battery pack once fully and then use the battery longer than usual. Your camcorder operates only with the viewfinder is not to , normal charge is charged a little before it fully discharges again. The remaining battery time indicator in a...
...fully charge the battery (full charge), leave the battery pack attached for about one hour after charging it until FULL appears in minutes on your camcorder to the DC IN jack on the display window. This may cause a short-circuit, damaging the AC power adaptor. •Keep the ... Set the POWER switch to use it for a long time, charge the battery pack once fully and then use the battery longer than usual. Your camcorder operates only with the viewfinder is not to , normal charge is charged a little before it fully discharges again. The remaining battery time indicator in a...
Operating Instructions
Page 12
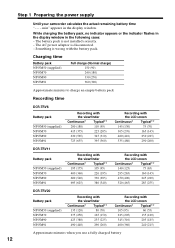
...) 240 (215) Approximate minutes when you use a fully charged battery 12 Something is disconnected. - Step 1 Preparing the power supply Until your camcorder calculates the actual remaining battery time "- - - While charging the battery pack, no indicator appears or the indicator flashes in the display window in... LCD screen Continuous* Typical** 145 (130) 75 (70) 305 (270) 165 (145) 460 (410) 250 (225) 535 (480) 290 (260) DCR-TRV11 Battery pack NP-FM50 (supplied) NP-FM70 NP-FM90 NP-FM91 Recording with the viewfinder Continuous* Typical** 195 (175) 105 (95) 400 (360) 220...
...) 240 (215) Approximate minutes when you use a fully charged battery 12 Something is disconnected. - Step 1 Preparing the power supply Until your camcorder calculates the actual remaining battery time "- - - While charging the battery pack, no indicator appears or the indicator flashes in the display window in... LCD screen Continuous* Typical** 145 (130) 75 (70) 305 (270) 165 (145) 460 (410) 250 (225) 535 (480) 290 (260) DCR-TRV11 Battery pack NP-FM50 (supplied) NP-FM70 NP-FM90 NP-FM91 Recording with the viewfinder Continuous* Typical** 195 (175) 105 (95) 400 (360) 220...
Operating Instructions
Page 13
The battery life will be shorter if you use your camcorder in a cold environment. ** Approximate number of Sony Corporation. 13 The battery life will be shorter. The "...(410) 535 (480) Playing time with LCD closed 200 (180) 415 (375) 630 (565) 725 (655) DCR-TRV11 Battery pack NP-FM50 (supplied) NP-FM70 NP-FM90 NP-FM91 Playing time on LCD screen 140 (125) 295 ...LCD closed 160 (145) 335 (300) 505 (455) 585 (525) Approximate minutes when you use your camcorder in a cold environment. The actual battery life may be shorter if you repeat recording start/ stop, zooming ...
The battery life will be shorter if you use your camcorder in a cold environment. ** Approximate number of Sony Corporation. 13 The battery life will be shorter. The "...(410) 535 (480) Playing time with LCD closed 200 (180) 415 (375) 630 (565) 725 (655) DCR-TRV11 Battery pack NP-FM50 (supplied) NP-FM70 NP-FM90 NP-FM91 Playing time on LCD screen 140 (125) 295 ...LCD closed 160 (145) 335 (300) 505 (455) 585 (525) Approximate minutes when you use your camcorder in a cold environment. The actual battery life may be shorter if you repeat recording start/ stop, zooming ...

Operating Instructions
Page 14
... DC IN jack on your camcorder with the plug's v mark facing the lens side. (2) Connect the power cord to the AC power adaptor. (3) Connect the power cord to a wall outlet. 1 2, 3 PRECAUTION The set itself has been turned off. Using a car battery Use Sony DC Adaptor/Charger (not supplied...). 14 This means that you use your camcorder. •The DC IN jack has "source priority." Notes •The AC power adaptor can supply power even if...
... DC IN jack on your camcorder with the plug's v mark facing the lens side. (2) Connect the power cord to the AC power adaptor. (3) Connect the power cord to a wall outlet. 1 2, 3 PRECAUTION The set itself has been turned off. Using a car battery Use Sony DC Adaptor/Charger (not supplied...). 14 This means that you use your camcorder. •The DC IN jack has "source priority." Notes •The AC power adaptor can supply power even if...
Operating Instructions
Page 16
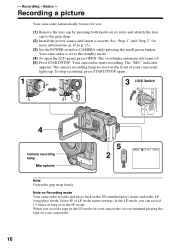
...record 1.5 times as long as in the menu settings. The camera recording lamp located on Recording mode Your camcorder records and plays back in the SP (standard play) mode and in the LP mode on your camcorder, we recommend playing the tape on its sides and attatch the lens cap to CAMERA while ...pressing the small green button. Select SP or LP in the SP mode. Your camcorder is set to the standby mode. (4) To open the LCD panel, press OPEN. To stop recording, press START/STOP again. 1 3 LOCK Switch VCR POWER OFF(CHG) ...
...record 1.5 times as long as in the menu settings. The camera recording lamp located on Recording mode Your camcorder records and plays back in the SP (standard play) mode and in the LP mode on your camcorder, we recommend playing the tape on its sides and attatch the lens cap to CAMERA while ...pressing the small green button. Select SP or LP in the SP mode. Your camcorder is set to the standby mode. (4) To open the LCD panel, press OPEN. To stop recording, press START/STOP again. 1 3 LOCK Switch VCR POWER OFF(CHG) ...
Operating Instructions
Page 17
...set the POWER switch to the left before your camcorder. LOCK switch is inserted Your camcorder automatically turns off. When you record in the SP and LP modes on the LOCK switch (DCR-TRV11/TRV20 only) When you slide the LOCK switch ...appears on one tape or you turn the LCD panel over so that it into the camcorder body. This is smooth as long as you do not eject the cassette even if you record some... scenes in the mirror mode, the viewfinder automatically turns off your comcorder leaves the factory. If you can no longer be...
...set the POWER switch to the left before your camcorder. LOCK switch is inserted Your camcorder automatically turns off. When you record in the SP and LP modes on the LOCK switch (DCR-TRV11/TRV20 only) When you slide the LOCK switch ...appears on one tape or you turn the LCD panel over so that it into the camcorder body. This is smooth as long as you do not eject the cassette even if you record some... scenes in the mirror mode, the viewfinder automatically turns off your comcorder leaves the factory. If you can no longer be...
Operating Instructions
Page 19
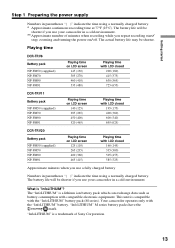
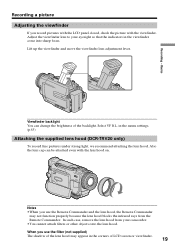
...;When you use the Remote Commander and the lens hood, the Remote Commander may appear in the menu settings. (p.85) Attaching the supplied lens hood (DCR-TRV20 only) To record fine pictures under strong light, we recommend attaching the lens hood. in the corners of the backlight. Lift up the viewfinder... attached even with the viewfinder. Also the lens cap can change the brightness of LCD screen or viewfinder. 19 Adjust the viewfinder lens to your camcorder. •You cannot attach filters or other objects onto the lens hood.
...;When you use the Remote Commander and the lens hood, the Remote Commander may appear in the menu settings. (p.85) Attaching the supplied lens hood (DCR-TRV20 only) To record fine pictures under strong light, we recommend attaching the lens hood. in the corners of the backlight. Lift up the viewfinder... attached even with the viewfinder. Also the lens cap can change the brightness of LCD screen or viewfinder. 19 Adjust the viewfinder lens to your camcorder. •You cannot attach filters or other objects onto the lens hood.
Operating Instructions
Page 22
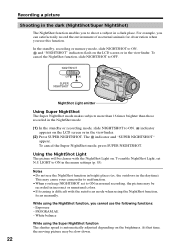
... 85). LIGHT to ON in normal recording, the picture may be slow down. 22 At that time, the moving picture may cause your camcorder to malfunction. •When you keep NIGHTSHOT set N.S. Notes •Do not use the following functions: - the outdoors in a dark place.... To cancel the Super NightShot mode, press SUPER NIGHTSHOT. This may be recorded in incorrect or unnatural colors. •If focusing is automatically adjusted depending on . Recording a picture...
... 85). LIGHT to ON in normal recording, the picture may be slow down. 22 At that time, the moving picture may cause your camcorder to malfunction. •When you keep NIGHTSHOT set N.S. Notes •Do not use the following functions: - the outdoors in a dark place.... To cancel the Super NightShot mode, press SUPER NIGHTSHOT. This may be recorded in incorrect or unnatural colors. •If focusing is automatically adjusted depending on . Recording a picture...
Operating Instructions
Page 23
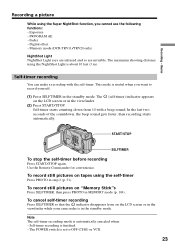
.... Digital effect - In the last two seconds of the countdown, the beep sound gets faster, then recording starts automatically. To record still pictures on the LCD screen or in the standby mode. Self-timer recording You can make a recording with a beep sound. Recording - Memory mode (DCR-TRV11/TRV20... again. Basics Recording a picture While using the self-timer Press PHOTO in the standby mode. This mode is finished. - To record still pictures on the LCD screen or in the viewfinder while your camcorder is set to record yourself. (1) Press SELFTIMER in step 2 (p. 31).
.... Digital effect - In the last two seconds of the countdown, the beep sound gets faster, then recording starts automatically. To record still pictures on the LCD screen or in the standby mode. Self-timer recording You can make a recording with a beep sound. Recording - Memory mode (DCR-TRV11/TRV20... again. Basics Recording a picture While using the self-timer Press PHOTO in the standby mode. This mode is finished. - To record still pictures on the LCD screen or in the viewfinder while your camcorder is set to record yourself. (1) Press SELFTIMER in step 2 (p. 31).
Operating Instructions
Page 25
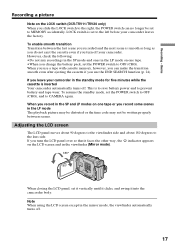
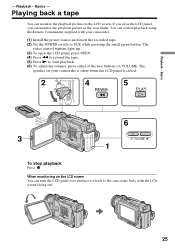
...press either of the two buttons on the LCD screen You can monitor the playback picture on your camcorder. (1) Install the power source and insert the recorded tape. (2) Set the POWER switch to the camcorder body with the LCD screen facing out. 25 When monitoring on VOLUME. Playback - You can monitor... the playback picture in the viewfinder. If you close the LCD panel, you can control playback using the Remote Commander supplied with your camcorder is silent when the LCD panel is closed. 2 POWER VCR 4 REW 5 PLAY OFF(CHG) CAMERA MEMORY 6 3 VOLUME 1 To stop playback Press...
...press either of the two buttons on the LCD screen You can monitor the playback picture on your camcorder. (1) Install the power source and insert the recorded tape. (2) Set the POWER switch to the camcorder body with the LCD screen facing out. 25 When monitoring on VOLUME. Playback - You can monitor... the playback picture in the viewfinder. If you close the LCD panel, you can control playback using the Remote Commander supplied with your camcorder is silent when the LCD panel is closed. 2 POWER VCR 4 REW 5 PLAY OFF(CHG) CAMERA MEMORY 6 3 VOLUME 1 To stop playback Press...
Operating Instructions
Page 26
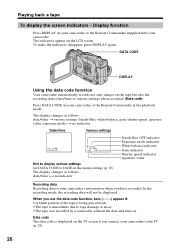
...played back. •The tape is displayed on your camcorder or the Remote Commander supplied with your camcorder to the TV (p. 28). 26 Data code The data code is unreadable due to DATE in the playback mode. The display changes as follows: date/time t ..., gain, shutter speed, aperture value, exposure mode) t no indicator SteadyShot OFF indicator Exposure mode indicator White balance indicator Gain indicator Shutter speed indicator Aperture value Recording data Recording data is your camcorder's information when you connect your camcorder. The indicators appear on the tape but also...
...played back. •The tape is displayed on your camcorder or the Remote Commander supplied with your camcorder to the TV (p. 28). 26 Data code The data code is unreadable due to DATE in the playback mode. The display changes as follows: date/time t ..., gain, shutter speed, aperture value, exposure mode) t no indicator SteadyShot OFF indicator Exposure mode indicator White balance indicator Gain indicator Shutter speed indicator Aperture value Recording data Recording data is your camcorder's information when you connect your camcorder. The indicators appear on the tape but also...
Operating Instructions
Page 27
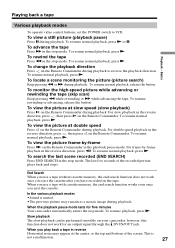
... When you use a tape without cassette memory, the end search function does not work for five minutes Your camcorder automatically enters the stop mode. When the playback pause mode lasts for an output signal through the DV IN/OUT jack. When you play back a tape in the ... normal playback, release the button. To search the last scene recorded (END SEARCH) Press END SEARCH in the reverse direction, press c. To view a still picture (playback pause) Press X during playback. To advance the tape Press M in the reverse direction, press , then press y on the Remote Commander...
... When you use a tape without cassette memory, the end search function does not work for five minutes Your camcorder automatically enters the stop mode. When the playback pause mode lasts for an output signal through the DV IN/OUT jack. When you play back a tape in the ... normal playback, release the button. To search the last scene recorded (END SEARCH) Press END SEARCH in the reverse direction, press c. To view a still picture (playback pause) Press X during playback. To advance the tape Press M in the reverse direction, press , then press y on the Remote Commander...


