
Operating Guide
Page 7
... what you destroy the actual body of the camcorder. To view your recordings on the camcorder in this manual were taken with a digital still camera, and may be possible. On the drop sensor • To protect the internal hard disk from being activated in each local language ...hard disk from being lost , do not do so, your camcorder may damage the hard disk drive of your camcorder. Doing so may not operate correctly. Notes on use • The camcorder is not possible due to a malfunction of the camcorder, recording media, etc. • TV color systems differ depending on a disc...
... what you destroy the actual body of the camcorder. To view your recordings on the camcorder in this manual were taken with a digital still camera, and may be possible. On the drop sensor • To protect the internal hard disk from being activated in each local language ...hard disk from being lost , do not do so, your camcorder may damage the hard disk drive of your camcorder. Doing so may not operate correctly. Notes on use • The camcorder is not possible due to a malfunction of the camcorder, recording media, etc. • TV color systems differ depending on a disc...

Operating Guide
Page 9
... number in the parentheses indicates the number of that you have the following items supplied with your camcorder. Rechargeable battery pack NP-FH40 (1) (p.11) (DCR-SR42/SR62/ SR82) NP-FH60 (1) (p.11) (DCR-SR200/SR300) Handycam Station (1) (p.11) A/V connecting cable (1) (p.25) USB cable (1) (p.27) CD-ROM "Handycam Application Software" (1) (p.26) - Handycam Handbook (PDF) "Operating Guide" (This manual) (1) 9
... number in the parentheses indicates the number of that you have the following items supplied with your camcorder. Rechargeable battery pack NP-FH40 (1) (p.11) (DCR-SR42/SR62/ SR82) NP-FH60 (1) (p.11) (DCR-SR200/SR300) Handycam Station (1) (p.11) A/V connecting cable (1) (p.25) USB cable (1) (p.27) CD-ROM "Handycam Application Software" (1) (p.26) - Handycam Handbook (PDF) "Operating Guide" (This manual) (1) 9
Operating Guide
Page 11
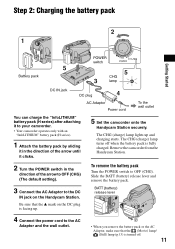
.... To remove the battery pack Turn the POWER switch to the DC IN jack on the DC plug is fully charged. Remove the camcorder from the Handycam Station. 2 Turn the POWER switch in the direction of the arrow to OFF (CHG) (The default setting). 3 Connect the AC Adaptor to OFF (CHG). ... DC plug AC Adaptor Power cord To the wall outlet You can charge the "InfoLITHIUM" battery pack (H series) after attaching it clicks. 5 Set the camcorder onto the Handycam Station securely. The CHG (charge) lamp turns off . 11 Slide the BATT (battery) release lever and remove the battery pack.
.... To remove the battery pack Turn the POWER switch to the DC IN jack on the DC plug is fully charged. Remove the camcorder from the Handycam Station. 2 Turn the POWER switch in the direction of the arrow to OFF (CHG) (The default setting). 3 Connect the AC Adaptor to OFF (CHG). ... DC plug AC Adaptor Power cord To the wall outlet You can charge the "InfoLITHIUM" battery pack (H series) after attaching it clicks. 5 Set the camcorder onto the Handycam Station securely. The CHG (charge) lamp turns off . 11 Slide the BATT (battery) release lever and remove the battery pack.

Operating Guide
Page 12
... the battery as long as between a wall and furniture. • Do not short-circuit the DC plug of your camcorder or the Handycam Station, even when the power cord is connected to the wall outlet via the AC Adaptor. Disconnect the AC Adaptor from... use your camcorder. NP-FH40: (Unit:min.) DCR-SR42 Charging time 125 Recording time*1 Continuous 105 recording time Typical recording time*4 50 Playback time 120 DCR-SR62/ SR82 125 90*2 100*3 45*2 50*3 110*2 12 NP-FH60: (Unit:min.) DCR-SR200 DCR-SR300 Charging time 135 135 Recording time*1 Continuous recording time 115*2...
... the battery as long as between a wall and furniture. • Do not short-circuit the DC plug of your camcorder or the Handycam Station, even when the power cord is connected to the wall outlet via the AC Adaptor. Disconnect the AC Adaptor from... use your camcorder. NP-FH40: (Unit:min.) DCR-SR42 Charging time 125 Recording time*1 Continuous 105 recording time Typical recording time*4 50 Playback time 120 DCR-SR62/ SR82 125 90*2 100*3 45*2 50*3 110*2 12 NP-FH60: (Unit:min.) DCR-SR200 DCR-SR300 Charging time 135 135 Recording time*1 Continuous recording time 115*2...

Operating Guide
Page 16
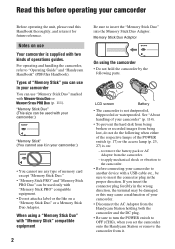
... ([VGA (0.3M)]) DCR-SR62/SR82: 1,800 ([1.0M]) DCR-SR200: 480 ([4.0M]) DCR-SR300: 315 ([6.1M]) • All numbers measured when using a "Memory Stick Duo" made by Sony Corporation. Your camcorder returns to a "Memory Stick Duo." x Inserting/ejecting a "Memory Stick Duo" Open the LCD panel, then insert the "Memory ... until it means data is still being written onto the hard disk or "Memory Stick Duo." On Easy Handycam operation By pressing the EASY button, nearly all settings on the camcorder will be damaged. • The numbers of recordable still images on a "Memory Stick Duo" You can ...
... ([VGA (0.3M)]) DCR-SR62/SR82: 1,800 ([1.0M]) DCR-SR200: 480 ([4.0M]) DCR-SR300: 315 ([6.1M]) • All numbers measured when using a "Memory Stick Duo" made by Sony Corporation. Your camcorder returns to a "Memory Stick Duo." x Inserting/ejecting a "Memory Stick Duo" Open the LCD panel, then insert the "Memory ... until it means data is still being written onto the hard disk or "Memory Stick Duo." On Easy Handycam operation By pressing the EASY button, nearly all settings on the camcorder will be damaged. • The numbers of recordable still images on a "Memory Stick Duo" You can ...
Operating Guide
Page 19
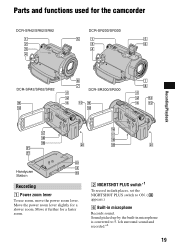
Move it further for a faster zoom. 2 NIGHTSHOT PLUS switch*1 To record in dark places, set the NIGHTSHOT PLUS switch to ON. ( appears.) 6 Built-in microphone is converted to 5.1ch surround sound and recorded.*2 19 Sound picked up by the built-in microphone Records sound. Parts and functions used for a slower zoom. Move the power zoom lever slightly for the camcorder DCR-SR42/SR62/SR82 DCR-SR200/SR300 DCR-SR42/SR62/SR82 DCR-SR200/SR300 Recording/Playback Handycam Station Recording 1 Power zoom lever To use zoom, move the power zoom lever.
Move it further for a faster zoom. 2 NIGHTSHOT PLUS switch*1 To record in dark places, set the NIGHTSHOT PLUS switch to ON. ( appears.) 6 Built-in microphone is converted to 5.1ch surround sound and recorded.*2 19 Sound picked up by the built-in microphone Records sound. Parts and functions used for a slower zoom. Move the power zoom lever slightly for the camcorder DCR-SR42/SR62/SR82 DCR-SR200/SR300 DCR-SR42/SR62/SR82 DCR-SR200/SR300 Recording/Playback Handycam Station Recording 1 Power zoom lever To use zoom, move the power zoom lever.
Operating Guide
Page 21
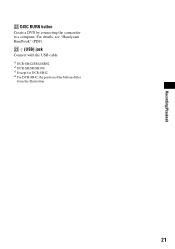
Recording/Playback ws DISC BURN button Create a DVD by connecting the camcorder to a computer. wd (USB) jack Connect with the USB cable. *1 DCR-SR42/SR62/SR82 *2 DCR-SR200/SR300 *3 Except for DCR-SR42 *4 For DCR-SR42, the position of the buttons differ from the illustration. 21 For details, see "Handycam Handbook" (PDF).
Recording/Playback ws DISC BURN button Create a DVD by connecting the camcorder to a computer. wd (USB) jack Connect with the USB cable. *1 DCR-SR42/SR62/SR82 *2 DCR-SR200/SR300 *3 Except for DCR-SR42 *4 For DCR-SR42, the position of the buttons differ from the illustration. 21 For details, see "Handycam Handbook" (PDF).

Operating Guide
Page 24
...camcorder on the camcorder as a DVD-R or a computer. You can save images on a DVD or the hard disk of a computer. Saving images on a computer You can save images imported to your computer on a DVD. The selected still image is marked with ease. Creating a DVD with One Touch (One Touch Disc... using a computer By using the software on the supplied CD-ROM, you save images recorded on the camcorder directly to a DVD with . 4 Touch t [YES] t . For details, see "Handycam Handbook" (PDF). Deleting the images on the hard disk 1 On the (HOME MENU), touch (OTHERS) t [DELETE]. 2 Touch [...
...camcorder on the camcorder as a DVD-R or a computer. You can save images on a DVD or the hard disk of a computer. Saving images on a computer You can save images imported to your computer on a DVD. The selected still image is marked with ease. Creating a DVD with One Touch (One Touch Disc... using a computer By using the software on the supplied CD-ROM, you save images recorded on the camcorder directly to a DVD with . 4 Touch t [YES] t . For details, see "Handycam Handbook" (PDF). Deleting the images on the hard disk 1 On the (HOME MENU), touch (OTHERS) t [DELETE]. 2 Touch [...
Operating Guide
Page 25
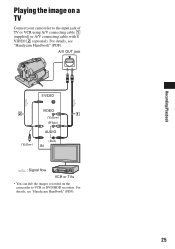
For details, see "Handycam Handbook" (PDF). For details, see "Handycam Handbook" (PDF). 25 A/V OUT jack S VIDEO VIDEO (Yellow) (White) AUDIO (Yellow) (Red) IN : Signal flow VCR or TVs • You can dub the images recorded on a TV Connect your camcorder to VCR or DVD/HDD recorders. Recording/Playback Playing the image on the camcorder to the input jack of TV or VCR using A/V connecting cable 1 (supplied) or A/V connecting cable with S VIDEO 2 (optional).
For details, see "Handycam Handbook" (PDF). For details, see "Handycam Handbook" (PDF). 25 A/V OUT jack S VIDEO VIDEO (Yellow) (White) AUDIO (Yellow) (Red) IN : Signal flow VCR or TVs • You can dub the images recorded on a TV Connect your camcorder to VCR or DVD/HDD recorders. Recording/Playback Playing the image on the camcorder to the input jack of TV or VCR using A/V connecting cable 1 (supplied) or A/V connecting cable with S VIDEO 2 (optional).
Operating Guide
Page 26
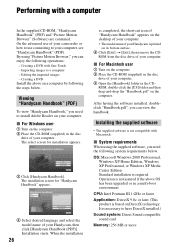
... Macintosh user 1 Turn on the computer. 2 Place the CD-ROM (supplied) in the disc drive of your camcorder or how to use of your Handycam, then click [Handycam Handbook (PDF)]. On the advanced use connecting to install Adobe Reader on your Handycam is not assured if the above on the computer. 2 Place the CD-ROM (supplied...
... Macintosh user 1 Turn on the computer. 2 Place the CD-ROM (supplied) in the disc drive of your camcorder or how to use of your Handycam, then click [Handycam Handbook (PDF)]. On the advanced use connecting to install Adobe Reader on your Handycam is not assured if the above on the computer. 2 Place the CD-ROM (supplied...

Operating Guide
Page 27
Recording/Playback Hard disk: Available free hard disk space for installation required: Approximately 600 MB (for creating a DVD, 5 GB or more may be required) Display: DirectX 7 or later-compatible video card, Minimum 1024 × 768 dots, High Color (16 bit color) Others: USB port (...2 Turn on the computer. • Log on as Administrators for software installation) • Even in the disc drive of the computer. Provide the camcorder and the Handycam Station, and a USB cable beforehand. The installation is not connected to restart your computer. The installation screen appears...
Recording/Playback Hard disk: Available free hard disk space for installation required: Approximately 600 MB (for creating a DVD, 5 GB or more may be required) Display: DirectX 7 or later-compatible video card, Minimum 1024 × 768 dots, High Color (16 bit color) Others: USB port (...2 Turn on the computer. • Log on as Administrators for software installation) • Even in the disc drive of the computer. Provide the camcorder and the Handycam Station, and a USB cable beforehand. The installation is not connected to restart your computer. The installation screen appears...

Operating Guide
Page 28
....sony.net/registration/di/ • For the information about Picture Motion Browser, visit the following URL: http://www.sony.net...recording/playback situation. Microsoft DirectX 9.0c Software required to handle movies Restart the computer if required to install the software. To see "Handycam...camcorder, then press (HOME) A (or B). 2 Touch the desired setup item. 3 Follow the guide on the screen for further operation. • If the item is created on the desktop. • Once you register on -screen instructions to complete the installation. qa Remove the CD-ROM from the disc drive...
....sony.net/registration/di/ • For the information about Picture Motion Browser, visit the following URL: http://www.sony.net...recording/playback situation. Microsoft DirectX 9.0c Software required to handle movies Restart the computer if required to install the software. To see "Handycam...camcorder, then press (HOME) A (or B). 2 Touch the desired setup item. 3 Follow the guide on the screen for further operation. • If the item is created on the desktop. • Once you register on -screen instructions to complete the installation. qa Remove the CD-ROM from the disc drive...
Operating Guide
Page 29
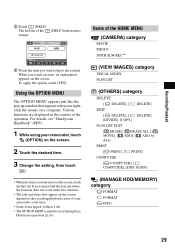
... Various functions are displayed in the context of the HOME MENU (CAMERA) category MOVIE PHOTO SMTH SLW REC*1 (VIEW IMAGES) category VISUAL... [ ADD], [ ADD by date] PRINT [ PRINT], [ PRINT] COMPUTER [ COMPUTER], [ COMPUTER], [DISC BURN] (MANAGE HDD/MEMORY) category FORMAT FORMAT INFO 29 Using the OPTION MENU The OPTION MENU appears just like...of the operation. For details, see "Handycam Handbook" (PDF). 1 While using your camcorder at the time. • Some items appear ...items that appears when you rightclick the mouse on the recording/playback status of the (HELP) button turns orange. 3 ...
... Various functions are displayed in the context of the HOME MENU (CAMERA) category MOVIE PHOTO SMTH SLW REC*1 (VIEW IMAGES) category VISUAL... [ ADD], [ ADD by date] PRINT [ PRINT], [ PRINT] COMPUTER [ COMPUTER], [ COMPUTER], [DISC BURN] (MANAGE HDD/MEMORY) category FORMAT FORMAT INFO 29 Using the OPTION MENU The OPTION MENU appears just like...of the operation. For details, see "Handycam Handbook" (PDF). 1 While using your camcorder at the time. • Some items appear ...items that appears when you rightclick the mouse on the recording/playback status of the (HELP) button turns orange. 3 ...

Operating Guide
Page 31
...to initialize or change the current hard disk of the camcorder, depending on the problem. However, your Sony dealer will be deleted. You cannot make new recording during this , the data stored on the hard disk will neither copy nor retain your Sony dealer. If the problem persists...• Connect the plug of the AC Adaptor to the wall outlet (p.11). • Set the camcorder onto the Handycam Station securely (p.11). This is displayed. Cancel Easy Handycam operation. This is because the power has been turned on for a long time. Troubleshooting Troubleshooting If you...
...to initialize or change the current hard disk of the camcorder, depending on the problem. However, your Sony dealer will be deleted. You cannot make new recording during this , the data stored on the hard disk will neither copy nor retain your Sony dealer. If the problem persists...• Connect the plug of the AC Adaptor to the wall outlet (p.11). • Set the camcorder onto the Handycam Station securely (p.11). This is displayed. Cancel Easy Handycam operation. This is because the power has been turned on for a long time. Troubleshooting Troubleshooting If you...

Operating Guide
Page 32
For details, see "Handycam Handbook" (PDF). If the problem persists even after you have tried a couple of times, contact your camcorder again. Reconnect it and operate your camcorder again. • Turn on your Sony dealer or local authorized Sony service facility. Contact your camcorder securely (p.11). Self-diagnosis ... LCD screen, check the following. C:13:ss / C:32:ss • Remove the power source. Inform them of the 5-digit code, which starts from "E." 101-0001 (Warning indicator pertaining to the DC IN jack of the Handycam Station or your Sony dealer or local authorized...
For details, see "Handycam Handbook" (PDF). If the problem persists even after you have tried a couple of times, contact your camcorder again. Reconnect it and operate your camcorder again. • Turn on your Sony dealer or local authorized Sony service facility. Contact your camcorder securely (p.11). Self-diagnosis ... LCD screen, check the following. C:13:ss / C:32:ss • Remove the power source. Inform them of the 5-digit code, which starts from "E." 101-0001 (Warning indicator pertaining to the DC IN jack of the Handycam Station or your Sony dealer or local authorized...
2008 Water Housing Cross Reference
Page 1
... MODEL NAME MPK-THE Compatible Digital Still Camera/ Camcorder DSC-T200 DSC-T70 Compatible ...DCR-HC26/28, DCR-HC36/38 DCR-HC46/48, DCR-HC52/54 DCR-HC62/96 DCR-DVD103/108 DCR-DVD203/308 DCR-DVD403/408 DCR-DVD508/610 DCR-DVD710/810 DCR-DVD910/92 DCR-SR200/220/220D DCR-SR300/42/45/46 DCR...Sony. CA6024W Take amazing underwater photos and videos. These versatile products not only protect Sony gear from splashes, sprays and other watery hazards, but also let you can have even more fun-both in part without written permission is prohibited. Sony, the Sony logo, Cyber-shot, and Handycam...
... MODEL NAME MPK-THE Compatible Digital Still Camera/ Camcorder DSC-T200 DSC-T70 Compatible ...DCR-HC26/28, DCR-HC36/38 DCR-HC46/48, DCR-HC52/54 DCR-HC62/96 DCR-DVD103/108 DCR-DVD203/308 DCR-DVD403/408 DCR-DVD508/610 DCR-DVD710/810 DCR-DVD910/92 DCR-SR200/220/220D DCR-SR300/42/45/46 DCR...Sony. CA6024W Take amazing underwater photos and videos. These versatile products not only protect Sony gear from splashes, sprays and other watery hazards, but also let you can have even more fun-both in part without written permission is prohibited. Sony, the Sony logo, Cyber-shot, and Handycam...

2008 Water Housing Cross Reference
Page 2
...Fits selected Cyber-shot® digital still cameras • Protects against dust, rain and spray • Lets users take photos at depths up to 5 feet • Fits selected Sony® Handycam® camcorders • Guards against dust, dirt, and more • Allows videos to be taken up to ...17 feet below the water's surface • Fits selected Sony® Cyber-shot® digital still cameras • Allows underwater photography up to...
...Fits selected Cyber-shot® digital still cameras • Protects against dust, rain and spray • Lets users take photos at depths up to 5 feet • Fits selected Sony® Handycam® camcorders • Guards against dust, dirt, and more • Allows videos to be taken up to ...17 feet below the water's surface • Fits selected Sony® Cyber-shot® digital still cameras • Allows underwater photography up to...
Handycam® Handbook
Page 2
...AC Adaptor from the camcorder. - Types of "Memory Stick" you set the camcorder onto the Handycam Station or remove the camcorder from it in your camcorder.) • You cannot use any type of your camcorder. • Disconnect the AC Adaptor from the Handycam Station holding both the camcorder and the DC plug.... • Be sure to turn the POWER switch to OFF (CHG), when you can use it . Read this before operating your camcorder" (p. 114). • To prevent the hard disk from being broken or recorded images from ...
...AC Adaptor from the camcorder. - Types of "Memory Stick" you set the camcorder onto the Handycam Station or remove the camcorder from it in your camcorder.) • You cannot use any type of your camcorder. • Disconnect the AC Adaptor from the Handycam Station holding both the camcorder and the DC plug.... • Be sure to turn the POWER switch to OFF (CHG), when you can use it . Read this before operating your camcorder" (p. 114). • To prevent the hard disk from being broken or recorded images from ...
Handycam® Handbook
Page 4
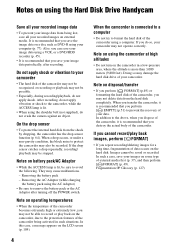
...- In addition to the above, when you dispose of the camcorder, it is lit, be possible. • Especially, during recording/playback, do not apply shock. It is recommended that you save the image data on a disc such as DVD-R using your computer (p. 77). Do not apply...on using the Hard Disk Drive Handycam Save all your camcorder • The hard disk of the camcorder may not be recognized, or recording or playback may not be sure to avoid the following. Also, you save your camcorder. Doing so may cause malfunctions. - After recording, do not crash the camera against an ...
...- In addition to the above, when you dispose of the camcorder, it is lit, be possible. • Especially, during recording/playback, do not apply shock. It is recommended that you save the image data on a disc such as DVD-R using your computer (p. 77). Do not apply...on using the Hard Disk Drive Handycam Save all your camcorder • The hard disk of the camcorder may not be recognized, or recording or playback may not be sure to avoid the following. Also, you save your camcorder. Doing so may cause malfunctions. - After recording, do not crash the camera against an ...

Marketing Specifications (DCR-SR82)
Page 1
...great looking digital still images with 690K (effective) video pixels provides stunning detail and clarity, for exceptional video (up to 520 lines of video for emailing, printing or sharing with AccuPower™ Meter System Battery Information Easy Handycam Button ...camcorder on your PC's hard drive for archiving on and recording video to the built-in 16:9 mode and composing shots even easier. In addition, only new footage is always ready to your PC each time you DCR-SR82 to a stand-alone DVD Burner via the Handycam Station and supplied USB3 cable and press the One Touch Disc...
...great looking digital still images with 690K (effective) video pixels provides stunning detail and clarity, for exceptional video (up to 520 lines of video for emailing, printing or sharing with AccuPower™ Meter System Battery Information Easy Handycam Button ...camcorder on your PC's hard drive for archiving on and recording video to the built-in 16:9 mode and composing shots even easier. In addition, only new footage is always ready to your PC each time you DCR-SR82 to a stand-alone DVD Burner via the Handycam Station and supplied USB3 cable and press the One Touch Disc...


