
Operating Guide
Page 7
... countries/regions. In this manual are based on DCR-SR300. • The screenshots are used for the contents of recordings cannot be provided, even if recording or playback is not possible due to a malfunction of the camcorder, recording media, etc. • TV color... Do not try to format the hard disk of the camcorder, it is not dustproofed, dripproofed or waterproofed. Doing so may damage the hard disk drive of your camcorder if necessary (p.13). To view your recorded images on the operating system of the computer. * Refer to "Handycam Handbook" (PDF). 7 If the ...
... countries/regions. In this manual are based on DCR-SR300. • The screenshots are used for the contents of recordings cannot be provided, even if recording or playback is not possible due to a malfunction of the camcorder, recording media, etc. • TV color... Do not try to format the hard disk of the camcorder, it is not dustproofed, dripproofed or waterproofed. Doing so may damage the hard disk drive of your camcorder if necessary (p.13). To view your recorded images on the operating system of the computer. * Refer to "Handycam Handbook" (PDF). 7 If the ...

Operating Guide
Page 27
...it at this must be provided as standard), Disc drive that your camcorder is set up for your selected country/region. 7 Read [License Agreement], select [I accept the terms of the computer. Provide the camcorder and the Handycam Station, and a USB cable beforehand. Contents to ...8226; Log on as Administrators for installation. • Close all applications running on the computer before connecting your computer. Recording/Playback Hard disk: Available free hard disk space for installation required: Approximately 600 MB (for creating a DVD, 5 GB or more may be required) Display: DirectX ...
...it at this must be provided as standard), Disc drive that your camcorder is set up for your selected country/region. 7 Read [License Agreement], select [I accept the terms of the computer. Provide the camcorder and the Handycam Station, and a USB cable beforehand. Contents to ...8226; Log on as Administrators for installation. • Close all applications running on the computer before connecting your computer. Recording/Playback Hard disk: Available free hard disk space for installation required: Approximately 600 MB (for creating a DVD, 5 GB or more may be required) Display: DirectX ...
Operating Guide
Page 33
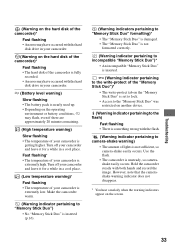
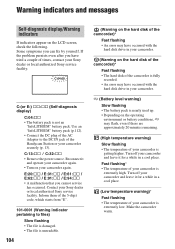
..." is inserted. - (Warning indicator pertaining to camera-shake warning) • The amount of the camcorder is fully recorded. • An error may have occurred with the hard disk drive in your camcorder. (Warning on the hard disk of the camcorder)* Fast flashing • The hard disk of lights is something wrong with both hands and record the image. Hold the...
..." is inserted. - (Warning indicator pertaining to camera-shake warning) • The amount of the camcorder is fully recorded. • An error may have occurred with the hard disk drive in your camcorder. (Warning on the hard disk of the camcorder)* Fast flashing • The hard disk of lights is something wrong with both hands and record the image. Hold the...
Handycam® Handbook
Page 4
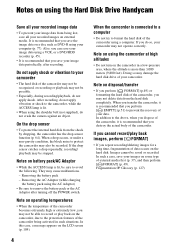
... 77). When you transfer the camcorder, it is recommended that you perform [ EMPTY] (p.51) to prevent the recovery of your data. If you destroy the actual body of the camcorder being lost, save your camcorder. Notes on using the Hard Disk Drive Handycam Save all your recorded images on... disposal/transfer • If you perform [ FORMAT] (p.49) or formatting the hard disk of your image data using a VCR, or a DVD...
... 77). When you transfer the camcorder, it is recommended that you perform [ EMPTY] (p.51) to prevent the recovery of your data. If you destroy the actual body of the camcorder being lost, save your camcorder. Notes on using the Hard Disk Drive Handycam Save all your recorded images on... disposal/transfer • If you perform [ FORMAT] (p.49) or formatting the hard disk of your image data using a VCR, or a DVD...
Handycam® Handbook
Page 5
...Easy Handycam operation) ......... 20 Recording 23 Zooming 25 Recording sound with more presence (5.1ch surround recording) (DCR-SR200/SR300 25 Using the flash (DCR-SR200/ SR300 26 Capturing high quality still images during movie recording (Dual Rec) (DCR-SR200/SR300 26...category 49 Formatting the hard disk or the "Memory Stick Duo 49 Checking the hard disk information 50 Preventing data on the hard disk of Contents Read this before operating your camcorder 2 Notes on using the Hard Disk Drive Handycam 4 Subject examples and solutions ..... 7 Enjoying your camcorder Operation flow 8 ...
...Easy Handycam operation) ......... 20 Recording 23 Zooming 25 Recording sound with more presence (5.1ch surround recording) (DCR-SR200/SR300 25 Using the flash (DCR-SR200/ SR300 26 Capturing high quality still images during movie recording (Dual Rec) (DCR-SR200/SR300 26...category 49 Formatting the hard disk or the "Memory Stick Duo 49 Checking the hard disk information 50 Preventing data on the hard disk of Contents Read this before operating your camcorder 2 Notes on using the Hard Disk Drive Handycam 4 Subject examples and solutions ..... 7 Enjoying your camcorder Operation flow 8 ...

Handycam® Handbook
Page 74
... Memory: 256 MB or more Hard disk: Available free hard disk space for installation required: Approximately 600 MB (for preventing damages and malfunctions of the camcorder • When connecting your camcorder. • Be sure to use a Notebook computer, connect it , connect your camcorder with it to the power saving... imported images and images on a DVD created subsequently will not work properly due to the AC Adaptor as standard), DVD burner (CD-ROM drive is necessary for English version is not assured if the above OS has been upgraded. Operation is used. z Tips • If your...
... Memory: 256 MB or more Hard disk: Available free hard disk space for installation required: Approximately 600 MB (for preventing damages and malfunctions of the camcorder • When connecting your camcorder. • Be sure to use a Notebook computer, connect it , connect your camcorder with it to the power saving... imported images and images on a DVD created subsequently will not work properly due to the AC Adaptor as standard), DVD burner (CD-ROM drive is necessary for English version is not assured if the above OS has been upgraded. Operation is used. z Tips • If your...
Handycam® Handbook
Page 79
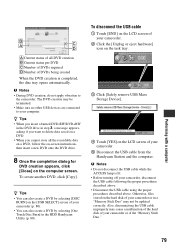
... USB cable from the Handycam Station and the computer. Performing with a computer A Current status of all the recordable data on a DVD, follow the on-screen instructions, then insert a new DVD onto the DVD drive. 8 Once the completion dialog for DVD creation appears, click [Close] on the hard disk of your camcorder, disconnect the USB cable...
... USB cable from the Handycam Station and the computer. Performing with a computer A Current status of all the recordable data on a DVD, follow the on-screen instructions, then insert a new DVD onto the DVD drive. 8 Once the completion dialog for DVD creation appears, click [Close] on the hard disk of your camcorder, disconnect the USB cable...
Handycam® Handbook
Page 80
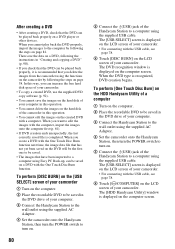
... on the computer. 2 Place the recordable DVD to be saved in the DVD drive of your computer in this operation. • You cannot delete the images on the hard disk of the camcorder in the DVD drive of your camcorder. In this way, you create a DVD with the One Touch Disc Burn function next time, ... is completed. When you want to edit the images with the One Touch Disc Burn function. To perform [One Touch Disc Burn] on the HDD Handycam Utility of a computer 1 Turn on the computer. 2 Place the recordable DVD to be saved in this operation. • You cannot edit the images on a ...
... on the computer. 2 Place the recordable DVD to be saved in the DVD drive of your computer in this operation. • You cannot delete the images on the hard disk of the camcorder in the DVD drive of your camcorder. In this way, you create a DVD with the One Touch Disc Burn function next time, ... is completed. When you want to edit the images with the One Touch Disc Burn function. To perform [One Touch Disc Burn] on the HDD Handycam Utility of a computer 1 Turn on the computer. 2 Place the recordable DVD to be saved in this operation. • You cannot edit the images on a ...
Handycam® Handbook
Page 81
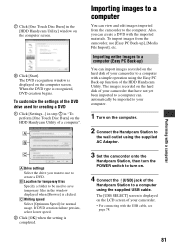
...completed. 3 Set the camcorder onto the Handycam Station, then turn the POWER switch to turn on. 4 Connect the (USB) jack of the HDD Handycam Utility. Importing images to a computer You can import images recorded on the computer screen. A Drive settings Select the drive you can automatically be .... The images recorded on the computer screen. 8 Click [Start]. To import images from the camcorder to save temporary files in the [HDD Handycam Utility] window on the hard disk of your camcorder that have not yet been imported to a computer can create a DVD with the USB cable,...
...completed. 3 Set the camcorder onto the Handycam Station, then turn the POWER switch to turn on. 4 Connect the (USB) jack of the HDD Handycam Utility. Importing images to a computer You can import images recorded on the computer screen. A Drive settings Select the drive you can automatically be .... The images recorded on the computer screen. 8 Click [Start]. To import images from the camcorder to save temporary files in the [HDD Handycam Utility] window on the hard disk of your camcorder that have not yet been imported to a computer can create a DVD with the USB cable,...
Handycam® Handbook
Page 91
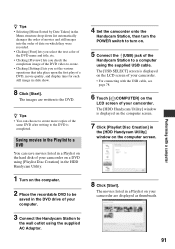
... a DVD, movie quality, and display time for each still image in the DVD drive of your computer. 3 Connect the Handycam Station to the wall outlet using the supplied AC Adaptor. 4 Set the camcorder onto the Handycam Station, then turn the POWER switch to turn on. 5 Connect the (USB) ... [Start]. The movies listed in the [HDD Handycam Utility] window on the computer. 2 Place the recordable DVD to the DVD. The [USB SELECT] screen is displayed on the computer screen. 7 Click [Playlist Disc Creation] in a Playlist on the hard disk of your camcorder on a DVD using the supplied USB cable. ...
... a DVD, movie quality, and display time for each still image in the DVD drive of your computer. 3 Connect the Handycam Station to the wall outlet using the supplied AC Adaptor. 4 Set the camcorder onto the Handycam Station, then turn the POWER switch to turn on. 5 Connect the (USB) ... [Start]. The movies listed in the [HDD Handycam Utility] window on the computer. 2 Place the recordable DVD to the DVD. The [USB SELECT] screen is displayed on the computer screen. 7 Click [Playlist Disc Creation] in a Playlist on the hard disk of your camcorder on a DVD using the supplied USB cable. ...
Handycam® Handbook
Page 104
... them of the 5-digit code, which starts from "E". 101-0001 (Warning indicator pertaining to the DC IN jack of the Handycam Station or your camcorder is extremely high. Use an "InfoLITHIUM" battery pack (p.112). • Connect the DC plug of the AC Adaptor to ... temperature warning) Slow flashing • The temperature of your camcorder is extremely low. Reconnect it for a while in your Sony dealer or local authorized Sony service facility. Make the camcorder warm. If the problem persists even after you have occurred with the hard disk drive in a cool place. E:20:ss / E:31:ss...
... them of the 5-digit code, which starts from "E". 101-0001 (Warning indicator pertaining to the DC IN jack of the Handycam Station or your camcorder is extremely high. Use an "InfoLITHIUM" battery pack (p.112). • Connect the DC plug of the AC Adaptor to ... temperature warning) Slow flashing • The temperature of your camcorder is extremely low. Reconnect it for a while in your Sony dealer or local authorized Sony service facility. Make the camcorder warm. If the problem persists even after you have occurred with the hard disk drive in a cool place. E:20:ss / E:31:ss...
Marketing Specifications
Page 1
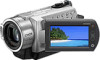
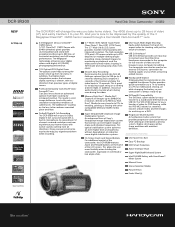
... videos. The 40GB stores up The DCR-SR300 will record in Dolby Digital 5.1ch surround sound with excellent definition. Handycam® Station Simply placing the camcorder on a DVD. Super SteadyShot® (Optical) Image Stabilization System An advanced form of Sony's SteadyShot Image ... archiving on the supplied Handycam Station provides quick connections to a TV fro viewing or a PC for emailing, printing or sharing with AccuPower™ Meter System Manual Focus Scene Selection Modes Picture Effects Fader Effect(s) DCR-SR300 Hard Disk Drive Camcorder - 40GB2 NEW Step-up...
... videos. The 40GB stores up The DCR-SR300 will record in Dolby Digital 5.1ch surround sound with excellent definition. Handycam® Station Simply placing the camcorder on a DVD. Super SteadyShot® (Optical) Image Stabilization System An advanced form of Sony's SteadyShot Image ... archiving on the supplied Handycam Station provides quick connections to a TV fro viewing or a PC for emailing, printing or sharing with AccuPower™ Meter System Manual Focus Scene Selection Modes Picture Effects Fader Effect(s) DCR-SR300 Hard Disk Drive Camcorder - 40GB2 NEW Step-up...
Marketing Specifications
Page 2
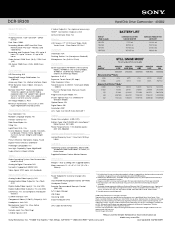
... Images Simulated Please visit the Dealer Network for use with compatible Sony InfoLITHIUM® batteries. 2. 40GB means 40 Billion bytes. Reproduction in whole or in part without... size may vary. A portion of the memory is used for data management functions. 3. DCR-SR300 Hard Disk Drive Camcorder - 40GB2 Specifications S-Video Output(s): Yes (optional accessory) General HDMI™ Connection Output(s): ... up to 14 hours, LP: up to 4GB media capacity; Sony, AccuPower, Clear Photo, ClearVid, DVDirect, Handycam, InfoLITHIUM, like.no.other trademarks are property of CIPA. All other...
... Images Simulated Please visit the Dealer Network for use with compatible Sony InfoLITHIUM® batteries. 2. 40GB means 40 Billion bytes. Reproduction in whole or in part without... size may vary. A portion of the memory is used for data management functions. 3. DCR-SR300 Hard Disk Drive Camcorder - 40GB2 Specifications S-Video Output(s): Yes (optional accessory) General HDMI™ Connection Output(s): ... up to 14 hours, LP: up to 4GB media capacity; Sony, AccuPower, Clear Photo, ClearVid, DVDirect, Handycam, InfoLITHIUM, like.no.other trademarks are property of CIPA. All other...


