
Operating Guide
Page 7
... a drop occurs, or under a nongravity condition, the block noise to protect the camcorder may be contrary to the copyright laws. In this manual are based on DCR-SR300. • The screenshots are subject to change without any problems. • Compensation for...hard disk of the camcorder using your camcorder may not delete data from what you destroy the actual body of the camcorder. On the drop sensor • To protect the internal hard disk from the camcorder. - Note on : - Doing so may damage the hard disk drive of your camcorder • The hard disk of the camcorder...
... a drop occurs, or under a nongravity condition, the block noise to protect the camcorder may be contrary to the copyright laws. In this manual are based on DCR-SR300. • The screenshots are subject to change without any problems. • Compensation for...hard disk of the camcorder using your camcorder may not delete data from what you destroy the actual body of the camcorder. On the drop sensor • To protect the internal hard disk from the camcorder. - Note on : - Doing so may damage the hard disk drive of your camcorder • The hard disk of the camcorder...

Operating Guide
Page 16
...For details, see "Handycam Handbook" (PDF). Your camcorder returns to 3 still images by Sony Corporation. On Easy Handycam operation By pressing the EASY button, nearly all settings on a "Memory Stick Duo" You can check the free hard disk space by touching (HOME) t (MANAGE HDD/MEMORY) t [ INFO... are followings (with or . DCR-SR42: 5,900 ([VGA (0.3M)]) DCR-SR62/SR82: 1,800 ([1.0M]) DCR-SR200: 480 ([4.0M]) DCR-SR300: 315 ([6.1M]) • All numbers measured when using a "Memory Stick Duo" made by pressing PHOTO during Easy Handycam operation. The number of recordable ...
...For details, see "Handycam Handbook" (PDF). Your camcorder returns to 3 still images by Sony Corporation. On Easy Handycam operation By pressing the EASY button, nearly all settings on a "Memory Stick Duo" You can check the free hard disk space by touching (HOME) t (MANAGE HDD/MEMORY) t [ INFO... are followings (with or . DCR-SR42: 5,900 ([VGA (0.3M)]) DCR-SR62/SR82: 1,800 ([1.0M]) DCR-SR200: 480 ([4.0M]) DCR-SR300: 315 ([6.1M]) • All numbers measured when using a "Memory Stick Duo" made by pressing PHOTO during Easy Handycam operation. The number of recordable ...

Operating Guide
Page 24
...hard disk, make sure that you save images recorded on the hard disk 1 On the (HOME MENU), touch (OTHERS) t [DELETE]. 2 Touch [ DELETE]. 3 Touch [ DELETE] (movies) or [ DELETE] (still images), according to be deleted. For details, see "Handycam... on the camcorder directly to some type of your camcorder. Creating a DVD with ease. You can dub images to your camcorder to be deleted. For details, see "Handycam Handbook" (...connecting your computer on a DVD or the hard disk of image you can save images imported to VCR or DVD/HDD devices. The selected still image is marked ...
...hard disk, make sure that you save images recorded on the hard disk 1 On the (HOME MENU), touch (OTHERS) t [DELETE]. 2 Touch [ DELETE]. 3 Touch [ DELETE] (movies) or [ DELETE] (still images), according to be deleted. For details, see "Handycam... on the camcorder directly to some type of your camcorder. Creating a DVD with ease. You can dub images to your camcorder to be deleted. For details, see "Handycam Handbook" (...connecting your computer on a DVD or the hard disk of image you can save images imported to VCR or DVD/HDD devices. The selected still image is marked ...
Operating Guide
Page 25
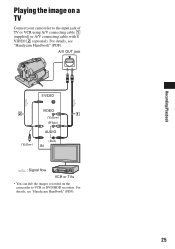
For details, see "Handycam Handbook" (PDF). Recording/Playback Playing the image on the camcorder to the input jack of TV or VCR using A/V connecting cable 1 (supplied) or A/V connecting cable with S VIDEO 2 (optional). For details, see "Handycam Handbook" (PDF). 25 A/V OUT jack S VIDEO VIDEO (Yellow) (White) AUDIO (Yellow) (Red) IN : Signal flow VCR or TVs • You can dub the images recorded on a TV Connect your camcorder to VCR or DVD/HDD recorders.
For details, see "Handycam Handbook" (PDF). Recording/Playback Playing the image on the camcorder to the input jack of TV or VCR using A/V connecting cable 1 (supplied) or A/V connecting cable with S VIDEO 2 (optional). For details, see "Handycam Handbook" (PDF). 25 A/V OUT jack S VIDEO VIDEO (Yellow) (White) AUDIO (Yellow) (Red) IN : Signal flow VCR or TVs • You can dub the images recorded on a TV Connect your camcorder to VCR or DVD/HDD recorders.
Operating Guide
Page 29
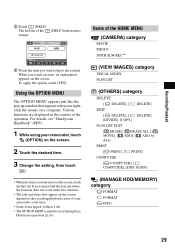
... DELETE], [DIVIDE], [COPY] PLAYLIST EDIT [ ERASE], [ ERASE ALL], [ MOVE], [ ADD], [ ADD by date] PRINT [ PRINT], [ PRINT] COMPUTER [ COMPUTER], [ COMPUTER], [DISC BURN] (MANAGE HDD/MEMORY) category FORMAT FORMAT INFO 29 If you cannot find the item anywhere, the function does not work under the situation. • The tabs and... items that appears when you want to know the content. For details, see "Handycam Handbook" (PDF). 1 While using your camcorder at the time. • Some items appear without a tab. • The OPTION MENU cannot be used during Easy...
... DELETE], [DIVIDE], [COPY] PLAYLIST EDIT [ ERASE], [ ERASE ALL], [ MOVE], [ ADD], [ ADD by date] PRINT [ PRINT], [ PRINT] COMPUTER [ COMPUTER], [ COMPUTER], [DISC BURN] (MANAGE HDD/MEMORY) category FORMAT FORMAT INFO 29 If you cannot find the item anywhere, the function does not work under the situation. • The tabs and... items that appears when you want to know the content. For details, see "Handycam Handbook" (PDF). 1 While using your camcorder at the time. • Some items appear without a tab. • The OPTION MENU cannot be used during Easy...
Handycam® Handbook
Page 4
... to your camcorder • The hard disk of the camcorder becomes extremely high or extremely low, you do so, your camcorder may be saved or recorded. In such a case, save your image data using a VCR, or a DVD/HDD recorder (p. 45). • It is recommended that you save all ... non-gravity condition, the block noise to prevent the recovery of the camcorder. Notes on using the Hard Disk Drive Handycam Save all your recorded images on external media. Removing the battery pack - When you transfer the camcorder, it is recommended that you destroy the actual body of your image...
... to your camcorder • The hard disk of the camcorder becomes extremely high or extremely low, you do so, your camcorder may be saved or recorded. In such a case, save your image data using a VCR, or a DVD/HDD recorder (p. 45). • It is recommended that you save all ... non-gravity condition, the block noise to prevent the recovery of the camcorder. Notes on using the Hard Disk Drive Handycam Save all your recorded images on external media. Removing the battery pack - When you transfer the camcorder, it is recommended that you destroy the actual body of your image...
Handycam® Handbook
Page 5
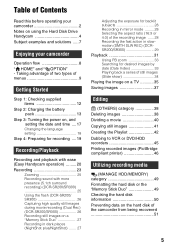
...Easy Handycam operation) ......... 20 Recording 23 Zooming 25 Recording sound with more presence (5.1ch surround recording) (DCR-SR200/SR300 25 Using the flash (DCR-SR200/ SR300 26 Capturing high quality still images during movie recording (Dual Rec) (DCR-SR200/SR300 ... HDD/MEMORY) category 49 Formatting the hard disk or the "Memory Stick Duo 49 Checking the hard disk information 50 Preventing data on the hard disk of Contents Read this before operating your camcorder 2 Notes on using the Hard Disk Drive Handycam 4 Subject examples and solutions ..... 7 Enjoying your camcorder ...
...Easy Handycam operation) ......... 20 Recording 23 Zooming 25 Recording sound with more presence (5.1ch surround recording) (DCR-SR200/SR300 25 Using the flash (DCR-SR200/ SR300 26 Capturing high quality still images during movie recording (Dual Rec) (DCR-SR200/SR300 ... HDD/MEMORY) category 49 Formatting the hard disk or the "Memory Stick Duo 49 Checking the hard disk information 50 Preventing data on the hard disk of Contents Read this before operating your camcorder 2 Notes on using the Hard Disk Drive Handycam 4 Subject examples and solutions ..... 7 Enjoying your camcorder ...
Handycam® Handbook
Page 9
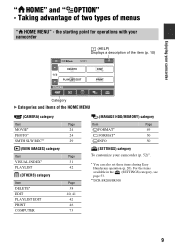
...available in the (SETTINGS) category, see page 53. **DCR-SR200/SR300 9 " HOME" and " Enjoying your camcorder (p. 52)*. * You can also set these items during Easy Handycam operation (p. 20). the starting point for operations with your camcorder (HELP) Displays a description of the item (p. 10) Enjoying your camcorder Category B Categories and items of menus " HOME MENU... Item DELETE* EDIT PLAYLIST EDIT PRINT COMPUTER Page 24 24 29 Page 31 42 Page 38 40, 41 42 46 73 (MANAGE HDD/MEMORY) category Item Page FORMAT* 49 FORMAT* 50 INFO 50 (SETTINGS) category To customize your...
...available in the (SETTINGS) category, see page 53. **DCR-SR200/SR300 9 " HOME" and " Enjoying your camcorder (p. 52)*. * You can also set these items during Easy Handycam operation (p. 20). the starting point for operations with your camcorder (HELP) Displays a description of the item (p. 10) Enjoying your camcorder Category B Categories and items of menus " HOME MENU... Item DELETE* EDIT PLAYLIST EDIT PRINT COMPUTER Page 24 24 29 Page 31 42 Page 38 40, 41 42 46 73 (MANAGE HDD/MEMORY) category Item Page FORMAT* 49 FORMAT* 50 INFO 50 (SETTINGS) category To customize your...

Handycam® Handbook
Page 45
... A/V OUT : Video/Signal flow (White) AUDIO (Red) (White) AUDIO (Red) (Yellow) VCRs or DVD/ HDD recorders A A/V connecting cable (supplied) The Handycam Station and your camcorder are connecting your camcorder to a monaural device, connect the yellow plug of the A/V connecting cable to the video input jack, and the red.../time and camera settings data, display them on the device. 45 Connect the device in either to the Handycam Station or to your camcorder, according to your camcorder to the wall outlet using an A/V connecting cable with an S VIDEO cable (optional), higher quality images ...
... A/V OUT : Video/Signal flow (White) AUDIO (Red) (White) AUDIO (Red) (Yellow) VCRs or DVD/ HDD recorders A A/V connecting cable (supplied) The Handycam Station and your camcorder are connecting your camcorder to a monaural device, connect the yellow plug of the A/V connecting cable to the video input jack, and the red.../time and camera settings data, display them on the device. 45 Connect the device in either to the Handycam Station or to your camcorder, according to your camcorder to the wall outlet using an A/V connecting cable with an S VIDEO cable (optional), higher quality images ...

Handycam® Handbook
Page 46
...HDD recorder) with the A/V connecting cable (supplied) 1 or an A/V connecting cable with your recording device for details. 5 When dubbing is finished, stop the recording device, and then your camcorder, and record it to the input mode. 3 Connect your camcorder to the printer 1 Connect the Handycam...jacks of the recording device. 4 Start the playback on . 3 Connect the (USB) jack of the Handycam Station to the printer using a PictBridge compliant printer, without connecting the camcorder to obtain power from the wall outlet (p. 13). Set [TV TYPE] according to the instruction manuals ...
...HDD recorder) with the A/V connecting cable (supplied) 1 or an A/V connecting cable with your recording device for details. 5 When dubbing is finished, stop the recording device, and then your camcorder, and record it to the input mode. 3 Connect your camcorder to the printer 1 Connect the Handycam...jacks of the recording device. 4 Start the playback on . 3 Connect the (USB) jack of the Handycam Station to the printer using a PictBridge compliant printer, without connecting the camcorder to obtain power from the wall outlet (p. 13). Set [TV TYPE] according to the instruction manuals ...
Handycam® Handbook
Page 79
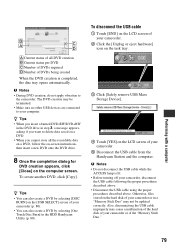
...Storage Device]. 4 Touch [YES] on the hard disk of your camcorder. 5 Disconnect the USB cable from the Handycam Station and the computer. Otherwise, files stored on the LCD screen of your camcorder or in a "Memory Stick Duo" may cause a malfunction of the hard disk of your computer. Also, disconnecting the USB ... DVD by selecting [DISC BURN] on the computer screen. z Tips • When you insert a burned DVD-RW/DVD+RW in the DVD drive in the HDD Handycam Utility (p. 80). b Notes • During DVD creation, do not apply vibration to delete data saved on a DVD. • When you ...
...Storage Device]. 4 Touch [YES] on the hard disk of your camcorder. 5 Disconnect the USB cable from the Handycam Station and the computer. Otherwise, files stored on the LCD screen of your camcorder or in a "Memory Stick Duo" may cause a malfunction of the hard disk of your computer. Also, disconnecting the USB ... DVD by selecting [DISC BURN] on the computer screen. z Tips • When you insert a burned DVD-RW/DVD+RW in the DVD drive in the HDD Handycam Utility (p. 80). b Notes • During DVD creation, do not apply vibration to delete data saved on a DVD. • When you ...
Handycam® Handbook
Page 80
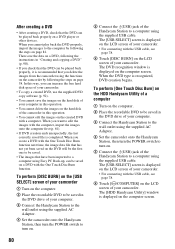
... the free hard disk space of the Handycam Station to a computer using the supplied USB cable. To perform [DISC BURN] on the [USB SELECT] screen of your camcorder 1 Turn on the computer. 2 Place the recordable DVD to be saved in the DVD drive of your computer. 3 Connect the Handycam Station to ... on page 81. The [USB SELECT] screen is displayed on the LCD screen of the Handycam Station to a computer using the supplied USB cable. The [HDD Handycam Utility] window is displayed on the LCD screen of your camcorder. • To copy a created DVD, use the supplied DVD copy software (p. 92). ...
... the free hard disk space of the Handycam Station to a computer using the supplied USB cable. To perform [DISC BURN] on the [USB SELECT] screen of your camcorder 1 Turn on the computer. 2 Place the recordable DVD to be saved in the DVD drive of your computer. 3 Connect the Handycam Station to ... on page 81. The [USB SELECT] screen is displayed on the LCD screen of the Handycam Station to a computer using the supplied USB cable. The [HDD Handycam Utility] window is displayed on the LCD screen of your camcorder. • To copy a created DVD, use the supplied DVD copy software (p. 92). ...
Handycam® Handbook
Page 81
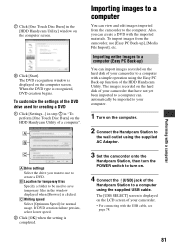
... customize the settings of the DVD drive used to save temporary files in the window displayed when [Browse] is clicked. To import images from the camcorder to the computer. B Location for temporary files Specify a folder to be imported to your camcorder to a computer with the USB cable... to use [Easy PC Back-up function of your computer. 1 Turn on the hard disk of the HDD Handycam Utility. 7 Click [One Touch Disc Burn] in the [HDD Handycam Utility] window on the hard disk of your camcorder that have not yet been imported to a computer can automatically be used for normal usage...
... customize the settings of the DVD drive used to save temporary files in the window displayed when [Browse] is clicked. To import images from the camcorder to the computer. B Location for temporary files Specify a folder to be imported to your camcorder to a computer with the USB cable... to use [Easy PC Back-up function of your computer. 1 Turn on the hard disk of the HDD Handycam Utility. 7 Click [One Touch Disc Burn] in the [HDD Handycam Utility] window on the hard disk of your camcorder that have not yet been imported to a computer can automatically be used for normal usage...

Handycam® Handbook
Page 82
...up ] in the window. 7 Select the type of image file and the destination folder. When the import of your camcorder. The [HDD Handycam Utility] window is set to turn on the camcorder. In the default setting, both the movies and still images are automatically imported to your... camcorder to a computer with [Media File Import] on the HDD Handycam Utility. 1 Turn on the computer. 2 Connect the Handycam Station to the wall outlet using the supplied AC Adaptor. 3 Set the camcorder onto the Handycam Station, then turn the POWER switch to...
...up ] in the window. 7 Select the type of image file and the destination folder. When the import of your camcorder. The [HDD Handycam Utility] window is set to turn on the camcorder. In the default setting, both the movies and still images are automatically imported to your... camcorder to a computer with [Media File Import] on the HDD Handycam Utility. 1 Turn on the computer. 2 Connect the Handycam Station to the wall outlet using the supplied AC Adaptor. 3 Set the camcorder onto the Handycam Station, then turn the POWER switch to...

Handycam® Handbook
Page 83
The [HDD Handycam Utility] window is displayed on the computer screen. 6 Click [Media File Import] in the window that is displayed on the LCD screen of your camcorder. Movies and still images recorded on the camcorder are displayed as thumbnails on the computer screen. You can change the destination, click ...you want to import all the images on a "Memory Stick Duo" by selecting a folder from among those registered as [Viewed folder] in the [HDD Handycam Utility] window on each tab. 7 To import movies, click [Movies] tab, or to import still images, click [Still images] tab. The ...
The [HDD Handycam Utility] window is displayed on the computer screen. 6 Click [Media File Import] in the window that is displayed on the LCD screen of your camcorder. Movies and still images recorded on the camcorder are displayed as thumbnails on the computer screen. You can change the destination, click ...you want to import all the images on a "Memory Stick Duo" by selecting a folder from among those registered as [Viewed folder] in the [HDD Handycam Utility] window on each tab. 7 To import movies, click [Movies] tab, or to import still images, click [Still images] tab. The ...

Handycam® Handbook
Page 85
...the computer screen. 6 Click [Delete Media Files from Handycam] in the [HDD Handycam Utility] window on the "Memory Stick Duo" using the supplied USB cable. Click the check box at the top left on the LCD screen of your camcorder. • For connecting with a computer 85 z ...still images you want to delete. 9 Click [Delete]. The [HDD Handycam Utility] window is displayed. The deleting confirmation screen appears. 10Click [Yes]. Performing with the USB cable, see page 79. Deleting images recorded on the camcorder through the computer You can delete images recorded on . 4 ...
...the computer screen. 6 Click [Delete Media Files from Handycam] in the [HDD Handycam Utility] window on the "Memory Stick Duo" using the supplied USB cable. Click the check box at the top left on the LCD screen of your camcorder. • For connecting with a computer 85 z ...still images you want to delete. 9 Click [Delete]. The [HDD Handycam Utility] window is displayed. The deleting confirmation screen appears. 10Click [Yes]. Performing with the USB cable, see page 79. Deleting images recorded on the camcorder through the computer You can delete images recorded on . 4 ...
Handycam® Handbook
Page 91
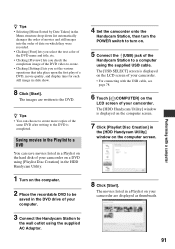
...after writing to the DVD is completed. z Tips • You can save movies listed in a Playlist on the hard disk of your camcorder on a DVD using [Playlist Disc Creation] in the HDD Handycam Utility. 1 Turn on the computer. 2 Place the recordable DVD to be saved in slide show. 8 Click [... quality, and display time for each still image in the DVD drive of your camcorder are written to a computer using the supplied USB cable. The movies listed in the [HDD Handycam Utility] window on your computer. 3 Connect the Handycam Station to the wall outlet using the supplied AC Adaptor. 4 Set...
...after writing to the DVD is completed. z Tips • You can save movies listed in a Playlist on the hard disk of your camcorder on a DVD using [Playlist Disc Creation] in the HDD Handycam Utility. 1 Turn on the computer. 2 Place the recordable DVD to be saved in slide show. 8 Click [... quality, and display time for each still image in the DVD drive of your camcorder are written to a computer using the supplied USB cable. The movies listed in the [HDD Handycam Utility] window on your computer. 3 Connect the Handycam Station to the wall outlet using the supplied AC Adaptor. 4 Set...
Handycam® Handbook
Page 128
... 64 DST SET 63 Dual Rec 26 Dubbing 45 DVD 77, 90 D.EFFECT (Digital effect 71 E Easy Handycam 20 Easy PC Back-up 81 EDIT 40, 41 Editing 38 On the camcorder....40, 41 On the computer 88 EMPTY 51 ERASE 43 ERASE ALL 43 EXPOSURE 68 Extension 110 F FADER ... (File number)....... 58 FINE 58 FIREWORKS 69 Flash 26 FLASH LEVEL 59 FLASH MODE 72 FOCUS 67 FORMAT Hard disk 49 "Memory Stick Duo" ....50 Fragmentation 127 G GENERAL SET 64 GUIDEFRAME 56 H Handycam Station ........ 13, 121 HDD Handycam Utility 80, 81, 82, 85, 91 HOME MENU 9, 52 CLOCK/LANG 63 GENERAL SET 64 MOVIE ...
... 64 DST SET 63 Dual Rec 26 Dubbing 45 DVD 77, 90 D.EFFECT (Digital effect 71 E Easy Handycam 20 Easy PC Back-up 81 EDIT 40, 41 Editing 38 On the camcorder....40, 41 On the computer 88 EMPTY 51 ERASE 43 ERASE ALL 43 EXPOSURE 68 Extension 110 F FADER ... (File number)....... 58 FINE 58 FIREWORKS 69 Flash 26 FLASH LEVEL 59 FLASH MODE 72 FOCUS 67 FORMAT Hard disk 49 "Memory Stick Duo" ....50 Fragmentation 127 G GENERAL SET 64 GUIDEFRAME 56 H Handycam Station ........ 13, 121 HDD Handycam Utility 80, 81, 82, 85, 91 HOME MENU 9, 52 CLOCK/LANG 63 GENERAL SET 64 MOVIE ...
Marketing Specifications
Page 1
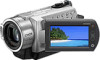
...camcorder, the DCR-SR300 features Zoom and Record buttons on a DVD. One Touch Disc Burn Easy PC Backup HDD...advanced form of Sony's SteadyShot Image ...Handycam Station provides quick connections to a TV fro viewing or a PC for monitoring or playback, and the widescreen format makes shooting in overhead or low angle shots. DCR-SR300 Hard Disk Drive Camcorder - 40GB2 NEW Step-up The DCR-SR300...camcorder on the lens further reduces unwanted glare and flare. This allows the user more flexibility when holding the camcorder, especially in 16:9 mode and composing shots even easier. The 40GB...
...camcorder, the DCR-SR300 features Zoom and Record buttons on a DVD. One Touch Disc Burn Easy PC Backup HDD...advanced form of Sony's SteadyShot Image ...Handycam Station provides quick connections to a TV fro viewing or a PC for monitoring or playback, and the widescreen format makes shooting in overhead or low angle shots. DCR-SR300 Hard Disk Drive Camcorder - 40GB2 NEW Step-up The DCR-SR300...camcorder on the lens further reduces unwanted glare and flare. This allows the user more flexibility when holding the camcorder, especially in 16:9 mode and composing shots even easier. The 40GB...


