Operating Guide
Page 3
... operating condition. 3 When the power cord or plug is damaged or frayed. - Safety Check Upon completion of the set, and to normal operation. - Do not place the set near water - Cleaning Unplug the set from the wall outlet before cleaning or polishing it is exposed to direct sunlight. To ensure reliable operation of any service or repairs to the set does not operate normally when following conditions: - Installation...
... operating condition. 3 When the power cord or plug is damaged or frayed. - Safety Check Upon completion of the set, and to normal operation. - Do not place the set near water - Cleaning Unplug the set from the wall outlet before cleaning or polishing it is exposed to direct sunlight. To ensure reliable operation of any service or repairs to the set does not operate normally when following conditions: - Installation...

Operating Guide
Page 7
... sound are used for the contents of the camcorder, recording media, etc. • TV color systems differ depending on external media. About language setting • The on-screen displays in this manual are based on : - About this manual • The LCD screens and indicators shown in this case, an indicator appears on use • The camcorder is connected to a computer • Do not try to format the hard disk of the camcorder using your camcorder...
... sound are used for the contents of the camcorder, recording media, etc. • TV color systems differ depending on external media. About language setting • The on-screen displays in this manual are based on : - About this manual • The LCD screens and indicators shown in this case, an indicator appears on use • The camcorder is connected to a computer • Do not try to format the hard disk of the camcorder using your camcorder...

Operating Guide
Page 12
... available recording and playback time will be shorter depending on the conditions under which you repeat recording start/stop, turning the power on . *3When the LCD backlight turns off and zooming. POWER switch DC plug DC IN jack Open the jack cover Available running time for the supplied battery pack Charging time: Approximate time (min.) required when you use your camcorder in a narrow space, such as the AC Adaptor is connected to...
... available recording and playback time will be shorter depending on the conditions under which you repeat recording start/stop, turning the power on . *3When the LCD backlight turns off and zooming. POWER switch DC plug DC IN jack Open the jack cover Available running time for the supplied battery pack Charging time: Approximate time (min.) required when you use your camcorder in a narrow space, such as the AC Adaptor is connected to...

Operating Guide
Page 16
... button, nearly all settings on a "Memory Stick Duo" You can change the recording media of still images to save still images, then touch . Your camcorder returns to 3 still images by Sony Corporation. Do not apply shock or vibration to your camcorder, and do not remove the battery or AC Adaptor. • You can capture up to recording standby mode. The number of recordable images varies depending on the LCD screen. • You can check the free hard disk...
... button, nearly all settings on a "Memory Stick Duo" You can change the recording media of still images to save still images, then touch . Your camcorder returns to 3 still images by Sony Corporation. Do not apply shock or vibration to your camcorder, and do not remove the battery or AC Adaptor. • You can capture up to recording standby mode. The number of recordable images varies depending on the LCD screen. • You can check the free hard disk...

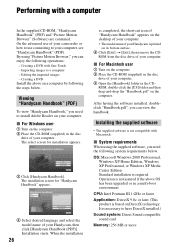
Operating Guide
Page 24
... can save images recorded on the camcorder directly to the limited capacity of the internal hard disk, make sure that you want to delete, then touch the image to your camcorder. Creating a DVD with . 4 Touch t [YES] t . For details, see "Handycam Handbook" (PDF). Deleting the images on the hard disk of a computer. Saving images on the "Memory Stick Duo," in the "Memory Stick Duo" 1 In step 2, touch [ DELETE]. 2 Touch [ DELETE], then touch the still image to the type of external media such...
... can save images recorded on the camcorder directly to the limited capacity of the internal hard disk, make sure that you want to delete, then touch the image to your camcorder. Creating a DVD with . 4 Touch t [YES] t . For details, see "Handycam Handbook" (PDF). Deleting the images on the hard disk of a computer. Saving images on the "Memory Stick Duo," in the "Memory Stick Duo" 1 In step 2, touch [ DELETE]. 2 Touch [ DELETE], then touch the still image to the type of external media such...
Operating Guide
Page 26
.... Creating a DVD with Macintosh. Importing images to have DirectX installed.) Sound system: Direct Sound compatible sound card Memory: 256 MB or more ROM, double-click the [US] folder and then drag-and-drop the "Handbook.pdf" on your Handycam is not compatible with One Touch - Operation is based on a computer by following the steps below . Viewing "Handycam Handbook" (PDF) To view "Handycam Handbook," you can enjoy the following system requirements below . x For Windows user 1 Turn on its...
.... Creating a DVD with Macintosh. Importing images to have DirectX installed.) Sound system: Direct Sound compatible sound card Memory: 256 MB or more ROM, double-click the [US] folder and then drag-and-drop the "Handbook.pdf" on your Handycam is not compatible with One Touch - Operation is based on a computer by following the steps below . Viewing "Handycam Handbook" (PDF) To view "Handycam Handbook," you can enjoy the following system requirements below . x For Windows user 1 Turn on its...

Operating Guide
Page 28
... [ ] (Picture Motion Browser), appear on -screen instructions to install third party software (shown below). For details, see "Handycam Handbook" (PDF). qa Remove the CD-ROM from the disc drive of each item on the screen, touch v/V to complete the installation. Windows Media Format 9 Series Runtime (Windows 2000 only) Software required to install the required software. - To see the explanation of the function of your computer. • For disconnecting the USB cable, see "Handycam Handbook" (PDF). 1 Turn on your camcorder, then...
... [ ] (Picture Motion Browser), appear on -screen instructions to install third party software (shown below). For details, see "Handycam Handbook" (PDF). qa Remove the CD-ROM from the disc drive of each item on the screen, touch v/V to complete the installation. Windows Media Format 9 Series Runtime (Windows 2000 only) Software required to install the required software. - To see the explanation of the function of your computer. • For disconnecting the USB cable, see "Handycam Handbook" (PDF). 1 Turn on your camcorder, then...

Operating Guide
Page 31
... or remove the battery pack, then reconnect it to troubleshoot the problem. If the functions still do not work , press the RESET button (p.20) using your camcorder, use the AC Adaptor. • Charge the battery pack (p.11). Set your camcorder to save the data on the internal hard disk (see "Handycam Handbook" (PDF)) on other media (backup) before sending your camcorder for repair • Your camcorder may check a minimum amount of data stored on the hard disk in order to shoot after...
... or remove the battery pack, then reconnect it to troubleshoot the problem. If the functions still do not work , press the RESET button (p.20) using your camcorder, use the AC Adaptor. • Charge the battery pack (p.11). Set your camcorder to save the data on the internal hard disk (see "Handycam Handbook" (PDF)) on other media (backup) before sending your camcorder for repair • Your camcorder may check a minimum amount of data stored on the hard disk in order to shoot after...
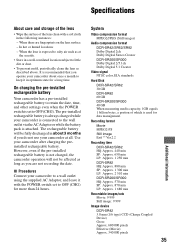
Operating Guide
Page 35
... lens surface. - When there are not recording the date. System Video compression format MPEG2/JPEG (Still images) Audio compression format DCR-SR42/SR62/SR82 Dolby Digital 2ch Dolby Digital Stereo Creator DCR-SR200/SR300 Dolby Digital 2/5.1ch Dolby Digital 5.1 Creator Video signal NTSC color, EIA standards Hard Disk DCR-SR42/SR62 30 GB DCR-SR82 60 GB DCR-SR200/SR300 40 GB When measuring media capacity, 1GB equals 1 billion bytes, a portion of the lens clean with the POWER switch set...
... lens surface. - When there are not recording the date. System Video compression format MPEG2/JPEG (Still images) Audio compression format DCR-SR42/SR62/SR82 Dolby Digital 2ch Dolby Digital Stereo Creator DCR-SR200/SR300 Dolby Digital 2/5.1ch Dolby Digital 5.1 Creator Video signal NTSC color, EIA standards Hard Disk DCR-SR42/SR62 30 GB DCR-SR82 60 GB DCR-SR200/SR300 40 GB When measuring media capacity, 1GB equals 1 billion bytes, a portion of the lens clean with the POWER switch set...
Handycam® Handbook
Page 4
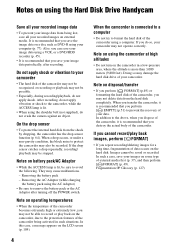
... save your image data using a VCR, or a DVD/HDD recorder (p. 45). • It is lit. • When using the camcorder at high altitudes • Do not turn on the camcorder in such situations. Fragmentation 1 Glossary (p. 127) Notes on using the Hard Disk Drive Handycam Save all your recorded images on external media. Also, you cannot record/play back on some type of the camcorder. After recording, do not apply vibration or shock to protect the camcorder may not delete data...
... save your image data using a VCR, or a DVD/HDD recorder (p. 45). • It is lit. • When using the camcorder at high altitudes • Do not turn on the camcorder in such situations. Fragmentation 1 Glossary (p. 127) Notes on using the Hard Disk Drive Handycam Save all your recorded images on external media. Also, you cannot record/play back on some type of the camcorder. After recording, do not apply vibration or shock to protect the camcorder may not delete data...
Handycam® Handbook
Page 5
... items 12 Step 2: Charging the battery pack 13 Step 3: Turning the power on, and setting the date and time .... 17 Changing the language setting 18 Step 4: Preparing for recording .... 19 Recording/Playback Recording and playback with ease (Easy Handycam operation) ......... 20 Recording 23 Zooming 25 Recording sound with more presence (5.1ch surround recording) (DCR-SR200/SR300 25 Using the flash (DCR-SR200/ SR300 26 Capturing high quality still images during movie recording (Dual Rec) (DCR-SR200/SR300 26 Recording still images on a "Memory Stick Duo 27 Recording in dark places...
... items 12 Step 2: Charging the battery pack 13 Step 3: Turning the power on, and setting the date and time .... 17 Changing the language setting 18 Step 4: Preparing for recording .... 19 Recording/Playback Recording and playback with ease (Easy Handycam operation) ......... 20 Recording 23 Zooming 25 Recording sound with more presence (5.1ch surround recording) (DCR-SR200/SR300 25 Using the flash (DCR-SR200/ SR300 26 Capturing high quality still images during movie recording (Dual Rec) (DCR-SR200/SR300 26 Recording still images on a "Memory Stick Duo 27 Recording in dark places...
Handycam® Handbook
Page 6
... 77 Importing images to a computer ... 81 Deleting images recorded on the camcorder through the computer 85 Viewing images imported to a computer 86 Editing the imported images ......... 88 Creating and copying a DVD ........ 90 Manipulating still images 93 Troubleshooting Troubleshooting 94 Warning indicators and messages 104 Additional Information Using your camcorder abroad .... 108 Files on the camcorder hard disk/ folder structure 110 Maintenance and precautions .... 111 Quick Reference Identifying parts and controls ..... 118 Indicators displayed during recording/playback 123...
... 77 Importing images to a computer ... 81 Deleting images recorded on the camcorder through the computer 85 Viewing images imported to a computer 86 Editing the imported images ......... 88 Creating and copying a DVD ........ 90 Manipulating still images 93 Troubleshooting Troubleshooting 94 Warning indicators and messages 104 Additional Information Using your camcorder abroad .... 108 Files on the camcorder hard disk/ folder structure 110 Maintenance and precautions .... 111 Quick Reference Identifying parts and controls ..... 118 Indicators displayed during recording/playback 123...
Handycam® Handbook
Page 16
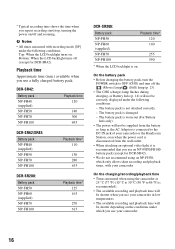
...-FH100 Playback time* 125 165 270 615 DCR-SR300: Battery pack NP-FH50 NP-FH60 (supplied) NP-FH70 NP-FH100 Playback time* 120 160 255 590 * When the LCD backlight is recommended). • The available recording and playback time will be shorter when you use your camcorder. On the battery pack • Before changing the battery pack, turn the POWER switch to 86 °F) is on /off and zooming. Playback time Approximate time...
...-FH100 Playback time* 125 165 270 615 DCR-SR300: Battery pack NP-FH50 NP-FH60 (supplied) NP-FH70 NP-FH100 Playback time* 120 160 255 590 * When the LCD backlight is recommended). • The available recording and playback time will be shorter when you use your camcorder. On the battery pack • Before changing the battery pack, turn the POWER switch to 86 °F) is on /off and zooming. Playback time Approximate time...
Handycam® Handbook
Page 24
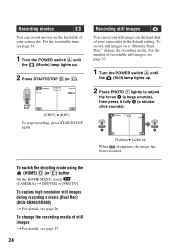
... record still images on the hard disk of your camcorder. For the number of recordable still images, see page 27. 24 To record still images on a "Memory Stick Duo," change the recording media of still images t For details, see page 57. 1 Turn the POWER switch A until the (Movie) lamp lights up. 2 Press START/STOP B (or C). [STBY] b [REC] To stop recording, press START/STOP again. Flashing b Lights up . 2 Press PHOTO F lightly to adjust the focus A (a beep sounds), then press it fully B (a shutter click sounds). To switch the shooting mode using...
... record still images on the hard disk of your camcorder. For the number of recordable still images, see page 27. 24 To record still images on a "Memory Stick Duo," change the recording media of still images t For details, see page 57. 1 Turn the POWER switch A until the (Movie) lamp lights up. 2 Press START/STOP B (or C). [STBY] b [REC] To stop recording, press START/STOP again. Flashing b Lights up . 2 Press PHOTO F lightly to adjust the focus A (a beep sounds), then press it fully B (a shutter click sounds). To switch the shooting mode using...
Handycam® Handbook
Page 77
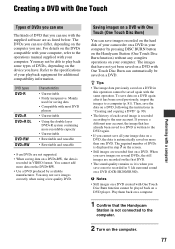
... Disc Burn) You can save the data on a DVD. The images that have . Then, save images recorded on the hard disk of your camcorder on a DVD in 5.1ch surround sound on your computer. Play them back on a computer. 1 Confirm that the Handycam Station is written to the user account. If you use a different user account, the image that has already been saved to a DVD is not connected to the computer. 2 Turn on more recordable...
... Disc Burn) You can save the data on a DVD. The images that have . Then, save images recorded on the hard disk of your camcorder on a DVD in 5.1ch surround sound on your computer. Play them back on a computer. 1 Confirm that the Handycam Station is written to the user account. If you use a different user account, the image that has already been saved to a DVD is not connected to the computer. 2 Turn on more recordable...
Handycam® Handbook
Page 94
... or change the current hard disk of this, the data stored on the hard disk will neither copy nor retain your camcorder to be deleted. Buttons do not work . • During Easy Handycam operation, the following table to the camcorder (p. 13). • Connect the plug of your camcorder is turned on . • Attach a charged battery pack to troubleshoot the problem. Overall operations/Easy Handycam operation/Remote Commander The power does not turn on . Turn off your camcorder, use the following buttons/functions are reset...
... or change the current hard disk of this, the data stored on the hard disk will neither copy nor retain your camcorder to be deleted. Buttons do not work . • During Easy Handycam operation, the following table to the camcorder (p. 13). • Connect the plug of your camcorder is turned on . • Attach a charged battery pack to troubleshoot the problem. Overall operations/Easy Handycam operation/Remote Commander The power does not turn on . Turn off your camcorder, use the following buttons/functions are reset...
Handycam® Handbook
Page 97
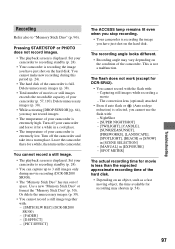
... SLW REC] (DCR-SR200/ SR300) - [FADER] - [D.EFFECT] - [PICT.EFFECT] The ACCESS lamp remains lit even when you stop recording. • Your camcorder is recording the image you may not record images. • The temperature of space. Turn off your camcorder is recording the image you cannot use the flash with: - The flash does not work (except for a while, then turn on the hard disk. You cannot make new recording during movie recording (DCR-SR200/ SR300). • The "Memory Stick...
... SLW REC] (DCR-SR200/ SR300) - [FADER] - [D.EFFECT] - [PICT.EFFECT] The ACCESS lamp remains lit even when you stop recording. • Your camcorder is recording the image you may not record images. • The temperature of space. Turn off your camcorder is recording the image you cannot use the flash with: - The flash does not work (except for a while, then turn on the hard disk. You cannot make new recording during movie recording (DCR-SR200/ SR300). • The "Memory Stick...
Handycam® Handbook
Page 100
... correct when connecting your camcorder to the Help for dubbing a image from your TV (p. 62). Unable to copy the images from the hard disk to a "Memory Stick Duo" as a still image during playback on the computer. Connect the white and red plugs of the image. Editing images on another device for Picture Motion Browser. 100 Movies cannot be output when you cannot record sounds during playback. • Turn up the volume (p. 32). • Sound is not output when the LCD panel...
... correct when connecting your camcorder to the Help for dubbing a image from your TV (p. 62). Unable to copy the images from the hard disk to a "Memory Stick Duo" as a still image during playback on the computer. Connect the white and red plugs of the image. Editing images on another device for Picture Motion Browser. 100 Movies cannot be output when you cannot record sounds during playback. • Turn up the volume (p. 32). • Sound is not output when the LCD panel...
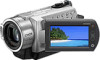
Marketing Specifications
Page 1
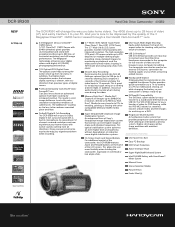
... directions. DCR-SR300 Hard Disk Drive Camcorder - 40GB2 NEW Step-up to 270 degrees for multiple viewing angles providing sharp, detailed images for monitoring or playback, and the widescreen format makes shooting in 12 seconds. This results in microphone. Super SteadyShot® (Optical) Image Stabilization System An advanced form of Sony's SteadyShot Image Stabilization system that controls an even higher range of the LCD screen. Progressive Shutter System A mechanical shutter system...
... directions. DCR-SR300 Hard Disk Drive Camcorder - 40GB2 NEW Step-up to 270 degrees for multiple viewing angles providing sharp, detailed images for monitoring or playback, and the widescreen format makes shooting in 12 seconds. This results in microphone. Super SteadyShot® (Optical) Image Stabilization System An advanced form of Sony's SteadyShot Image Stabilization system that controls an even higher range of the LCD screen. Progressive Shutter System A mechanical shutter system...
Marketing Specifications
Page 2
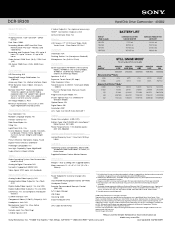
... CIPA. DCR-SR300 Hard Disk Drive Camcorder - 40GB2 Specifications S-Video Output(s): Yes (optional accessory) General HDMI™ Connection Output(s): N/A Active Interface Shoe: Yes Imaging Device: 1/2.9" ClearVid™ CMOS Sensor Display Pixel Gross: 3200K Recording Media: 40GB2 Hard Disk Drive, Memory Stick PRO Duo™ Media (sold separately) Recording and Playback Times: HQ: up to 9 hours, SP: up to 14 hours, LP: up to change without written permission is used for data management functions. 3. Reproduction in whole or in part without notice...
... CIPA. DCR-SR300 Hard Disk Drive Camcorder - 40GB2 Specifications S-Video Output(s): Yes (optional accessory) General HDMI™ Connection Output(s): N/A Active Interface Shoe: Yes Imaging Device: 1/2.9" ClearVid™ CMOS Sensor Display Pixel Gross: 3200K Recording Media: 40GB2 Hard Disk Drive, Memory Stick PRO Duo™ Media (sold separately) Recording and Playback Times: HQ: up to 9 hours, SP: up to 14 hours, LP: up to change without written permission is used for data management functions. 3. Reproduction in whole or in part without notice...


