
Operating Guide
Page 7
...not try to format the hard disk of the camcorder using your data. Doing so may damage the hard disk drive of your recordings on a ...DCR-SR300. • The screenshots are subject to change without any problems. • Compensation for illustrating the operating procedures. When the camcorder is not possible due to a malfunction of the camcorder...camcorder, it is recommended that you perform [ EMPTY]* to prevent the recovery of your computer*. Save all your image data periodically, after recording. Notes on the operating system of the computer. * Refer to "Handycam...
...not try to format the hard disk of the camcorder using your data. Doing so may damage the hard disk drive of your recordings on a ...DCR-SR300. • The screenshots are subject to change without any problems. • Compensation for illustrating the operating procedures. When the camcorder is not possible due to a malfunction of the camcorder...camcorder, it is recommended that you perform [ EMPTY]* to prevent the recovery of your computer*. Save all your image data periodically, after recording. Notes on the operating system of the computer. * Refer to "Handycam...

Operating Guide
Page 16
... reading/writing data. Your camcorder returns to save still images, then touch . • You can check the free hard disk space by Sony Corporation. You can use some buttons/functions during movie recording (DCR-SR200/ SR300). • The maximum ...DCR-SR42: 5,900 ([VGA (0.3M)]) DCR-SR62/SR82: 1,800 ([1.0M]) DCR-SR200: 480 ([4.0M]) DCR-SR300: 315 ([6.1M]) • All numbers measured when using a "Memory Stick Duo" made by touching (HOME) t (MANAGE HDD/MEMORY) t [ INFO]. • If the ACCESS lamp is lit or flashing after recording is finished, it clicks. To cancel Easy Handycam...
... reading/writing data. Your camcorder returns to save still images, then touch . • You can check the free hard disk space by Sony Corporation. You can use some buttons/functions during movie recording (DCR-SR200/ SR300). • The maximum ...DCR-SR42: 5,900 ([VGA (0.3M)]) DCR-SR62/SR82: 1,800 ([1.0M]) DCR-SR200: 480 ([4.0M]) DCR-SR300: 315 ([6.1M]) • All numbers measured when using a "Memory Stick Duo" made by touching (HOME) t (MANAGE HDD/MEMORY) t [ INFO]. • If the ACCESS lamp is lit or flashing after recording is finished, it clicks. To cancel Easy Handycam...
Operating Guide
Page 17
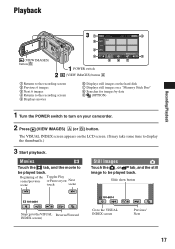
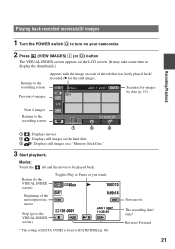
The VISUAL INDEX screen appears on your camcorder. 2 Press (VIEW IMAGES) A (or B) button. Playback Recording/Playback (VIEW IMAGES) button B POWER switch (VIEW IMAGES) button A 1 Returns to the recording screen 2 Previous 6 images 3 Next 6 images 4 Returns to the recording screen 5 Displays movies 6 Displays still images on the hard disk 7 Displays still images on a "Memory Stick Duo...
The VISUAL INDEX screen appears on your camcorder. 2 Press (VIEW IMAGES) A (or B) button. Playback Recording/Playback (VIEW IMAGES) button B POWER switch (VIEW IMAGES) button A 1 Returns to the recording screen 2 Previous 6 images 3 Next 6 images 4 Returns to the recording screen 5 Displays movies 6 Displays still images on the hard disk 7 Displays still images on a "Memory Stick Duo...
Operating Guide
Page 23
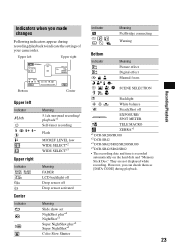
... SELECT*3 Meaning FADER LCD backlight off Drop sensor off EXPOSURE/ SPOT METER TELE MACRO ZEBRA*1 *1 DCR-SR200/SR300 *2 DCR-SR42 *3 DCR-SR62/SR82/SR200/SR300 *4 DCR-SR42/SR62/SR82 • The recording date and time is recorded automatically on the hard disk and "Memory Stick Duo." Backlight n White balance SteadyShot off Drop sensor activated Meaning Slide show set... effect Digital effect Manual focus SCENE SELECTION . Indicators when you can check them as [DATA CODE] during recording/playback to indicate the settings of your camcorder.
... SELECT*3 Meaning FADER LCD backlight off Drop sensor off EXPOSURE/ SPOT METER TELE MACRO ZEBRA*1 *1 DCR-SR200/SR300 *2 DCR-SR42 *3 DCR-SR62/SR82/SR200/SR300 *4 DCR-SR42/SR62/SR82 • The recording date and time is recorded automatically on the hard disk and "Memory Stick Duo." Backlight n White balance SteadyShot off Drop sensor activated Meaning Slide show set... effect Digital effect Manual focus SCENE SELECTION . Indicators when you can check them as [DATA CODE] during recording/playback to indicate the settings of your camcorder.

Operating Guide
Page 24
.../HDD devices. Creating a DVD with selected images You can save images on a DVD or the hard disk of image you save images recorded on the camcorder as a DVD-R or a computer. For details, see "Handycam Handbook" (PDF). The selected image is marked with . 4 Touch t [YES] t . ... to the type of a computer. Saving images using a computer By using the software on the hard disk of a computer. Creating a DVD with ease. For details, see "Handycam Handbook" (PDF). Saving images by connecting your camcorder. The selected still image is marked with . 3 Touch t [YES] t . •...
.../HDD devices. Creating a DVD with selected images You can save images on a DVD or the hard disk of image you save images recorded on the camcorder as a DVD-R or a computer. For details, see "Handycam Handbook" (PDF). The selected image is marked with . 4 Touch t [YES] t . ... to the type of a computer. Saving images using a computer By using the software on the hard disk of a computer. Creating a DVD with ease. For details, see "Handycam Handbook" (PDF). Saving images by connecting your camcorder. The selected still image is marked with . 3 Touch t [YES] t . •...

Operating Guide
Page 27
...disc drive of the computer. Contents to be installed, then click [Next]. 6 Check your area and country/region, then click [Next]. • The software is not connected to the computer. 2 Turn on the computer. • Log on as the power source. Recording/Playback Hard disk: Available free hard disk ... in 2ch sound. • If you agree, then click [Next]. 8 Set the camcorder onto the Handycam Station, then turn the POWER switch to turn on the computer before connecting your camcorder to restart it to the power saving function of your computer. Restart your computer using the...
...disc drive of the computer. Contents to be installed, then click [Next]. 6 Check your area and country/region, then click [Next]. • The software is not connected to the computer. 2 Turn on the computer. • Log on as the power source. Recording/Playback Hard disk: Available free hard disk ... in 2ch sound. • If you agree, then click [Next]. 8 Set the camcorder onto the Handycam Station, then turn the POWER switch to turn on the computer before connecting your camcorder to restart it to the power saving function of your computer. Restart your computer using the...

Operating Guide
Page 31
... turned on other media (backup) before sending your Sony dealer will not compensate you for repair • Your camcorder may check a minimum amount of the camcorder is extremely high/low. Be sure to save the data on the internal hard disk (see "Handycam Handbook" (PDF)) on . However, your camcorder for any problems using a sharppointed object. (If you...
... turned on other media (backup) before sending your Sony dealer will not compensate you for repair • Your camcorder may check a minimum amount of the camcorder is extremely high/low. Be sure to save the data on the internal hard disk (see "Handycam Handbook" (PDF)) on . However, your camcorder for any problems using a sharppointed object. (If you...
Operating Guide
Page 33
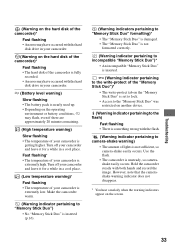
...; Depending on the operating environment or battery conditions, E may have occurred with the hard disk drive in your camcorder. (Warning on the hard disk of the camcorder)* Fast flashing • The hard disk of the camcorder is fully recorded. • An error may flash, even if there are approximately... the image. Use the flash. • The camcorder is unsteady, so camerashake easily occurs. Troubleshooting (Warning on the hard disk of the camcorder)* Fast flashing • An error may have occurred with the hard disk drive in your camcorder and leave it for a while in a cool ...
...; Depending on the operating environment or battery conditions, E may have occurred with the hard disk drive in your camcorder. (Warning on the hard disk of the camcorder)* Fast flashing • The hard disk of the camcorder is fully recorded. • An error may flash, even if there are approximately... the image. Use the flash. • The camcorder is unsteady, so camerashake easily occurs. Troubleshooting (Warning on the hard disk of the camcorder)* Fast flashing • An error may have occurred with the hard disk drive in your camcorder and leave it for a while in a cool ...
Operating Guide
Page 35
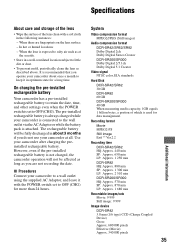
...JPEG (Still images) Audio compression format DCR-SR42/SR62/SR82 Dolby Digital 2ch Dolby Digital Stereo Creator DCR-SR200/SR300 Dolby Digital 2/5.1ch Dolby Digital 5.1 Creator Video signal NTSC color, EIA standards Hard Disk DCR-SR42/SR62 30 GB DCR-SR82 60 GB DCR-SR200/SR300 40 GB When measuring media capacity,... 1GB equals 1 billion bytes, a portion of the lens clean with the POWER switch set to OFF (CHG). The pre-installed rechargeable battery is always charged while your camcorder after...
...JPEG (Still images) Audio compression format DCR-SR42/SR62/SR82 Dolby Digital 2ch Dolby Digital Stereo Creator DCR-SR200/SR300 Dolby Digital 2/5.1ch Dolby Digital 5.1 Creator Video signal NTSC color, EIA standards Hard Disk DCR-SR42/SR62 30 GB DCR-SR82 60 GB DCR-SR200/SR300 40 GB When measuring media capacity,... 1GB equals 1 billion bytes, a portion of the lens clean with the POWER switch set to OFF (CHG). The pre-installed rechargeable battery is always charged while your camcorder after...
Handycam® Handbook
Page 2
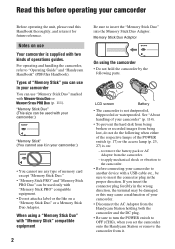
...apply mechanical shock or vibration to OFF (CHG), when you set the camcorder onto the Handycam Station or remove the camcorder from it. If you can use in your camcorder to insert the connector plug in your camcorder.) "Memory Stick" (You cannot use it for future reference. LCD... insert the "Memory Stick Duo" into the Memory Stick Duo Adaptor. Read this before operating your camcorder" (p. 114). • To prevent the hard disk from being broken or recorded images from the camcorder. - Memory Stick Duo Adaptor On using a "Memory Stick Duo" with "Memory Stick" compatible ...
...apply mechanical shock or vibration to OFF (CHG), when you set the camcorder onto the Handycam Station or remove the camcorder from it. If you can use in your camcorder to insert the connector plug in your camcorder.) "Memory Stick" (You cannot use it for future reference. LCD... insert the "Memory Stick Duo" into the Memory Stick Duo Adaptor. Read this before operating your camcorder" (p. 114). • To prevent the hard disk from being broken or recorded images from the camcorder. - Memory Stick Duo Adaptor On using a "Memory Stick Duo" with "Memory Stick" compatible ...
Handycam® Handbook
Page 4
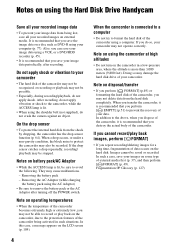
...then perform [ FORMAT] (p. 49). Doing so may cause malfunctions. - When you transfer the camcorder, it is recommended that you save the image data on a disc such as DVD-R using the Hard Disk Drive Handycam Save all your recorded images on external media. Notes on using your computer (p. 77). On ...the drop sensor • To protect the internal hard disk from being lost, save your image data using a VCR, or...
...then perform [ FORMAT] (p. 49). Doing so may cause malfunctions. - When you transfer the camcorder, it is recommended that you save the image data on a disc such as DVD-R using the Hard Disk Drive Handycam Save all your recorded images on external media. Notes on using your computer (p. 77). On ...the drop sensor • To protect the internal hard disk from being lost, save your image data using a VCR, or...
Handycam® Handbook
Page 5
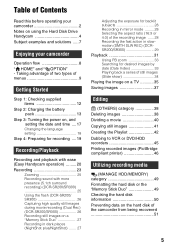
... recording media (MANAGE HDD/MEMORY) category 49 Formatting the hard disk or the "Memory Stick Duo 49 Checking the hard disk information 50 Preventing data on using the Hard Disk Drive Handycam 4 Subject examples and solutions ..... 7 Enjoying your camcorder Operation flow 8 " HOME" and " OPTION" - ...ease (Easy Handycam operation) ......... 20 Recording 23 Zooming 25 Recording sound with more presence (5.1ch surround recording) (DCR-SR200/SR300 25 Using the flash (DCR-SR200/ SR300 26 Capturing high quality still images during movie recording (Dual Rec) (DCR-SR200/SR300 26 Recording ...
... recording media (MANAGE HDD/MEMORY) category 49 Formatting the hard disk or the "Memory Stick Duo 49 Checking the hard disk information 50 Preventing data on using the Hard Disk Drive Handycam 4 Subject examples and solutions ..... 7 Enjoying your camcorder Operation flow 8 " HOME" and " OPTION" - ...ease (Easy Handycam operation) ......... 20 Recording 23 Zooming 25 Recording sound with more presence (5.1ch surround recording) (DCR-SR200/SR300 25 Using the flash (DCR-SR200/ SR300 26 Capturing high quality still images during movie recording (Dual Rec) (DCR-SR200/SR300 26 Recording ...
Handycam® Handbook
Page 6
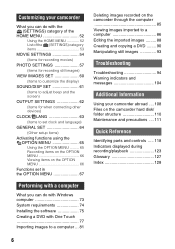
Customizing your camcorder What you can do with the (SETTINGS) category of the HOME MENU 52 Using the HOME MENU 52 List of the (SETTINGS) category items 53 ... ......... 88 Creating and copying a DVD ........ 90 Manipulating still images 93 Troubleshooting Troubleshooting 94 Warning indicators and messages 104 Additional Information Using your camcorder abroad .... 108 Files on the camcorder hard disk/ folder structure 110 Maintenance and precautions .... 111 Quick Reference Identifying parts and controls ..... 118 Indicators displayed during recording/playback 123 Glossary 127 Index...
Customizing your camcorder What you can do with the (SETTINGS) category of the HOME MENU 52 Using the HOME MENU 52 List of the (SETTINGS) category items 53 ... ......... 88 Creating and copying a DVD ........ 90 Manipulating still images 93 Troubleshooting Troubleshooting 94 Warning indicators and messages 104 Additional Information Using your camcorder abroad .... 108 Files on the camcorder hard disk/ folder structure 110 Maintenance and precautions .... 111 Quick Reference Identifying parts and controls ..... 118 Indicators displayed during recording/playback 123 Glossary 127 Index...
Handycam® Handbook
Page 8
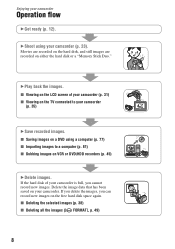
... the images ([ FORMAT], p. 49) 8 B Shoot using a computer (p. 77) x Importing images to your camcorder Operation flow B Get ready (p. 12). Enjoying your camcorder (p. 35) B Save recorded images. If the hard disk of your camcorder (p. 31) x Viewing on the TV connected to a computer (p. 81) x Dubbing images on a DVD using... your camcorder (p. 23). Delete the image data that has been saved on your camcorder is full, you can record new images on either the hard disk or a "Memory Stick Duo." If you delete the images, you...
... the images ([ FORMAT], p. 49) 8 B Shoot using a computer (p. 77) x Importing images to your camcorder Operation flow B Get ready (p. 12). Enjoying your camcorder (p. 35) B Save recorded images. If the hard disk of your camcorder (p. 31) x Viewing on the TV connected to a computer (p. 81) x Dubbing images on a DVD using... your camcorder (p. 23). Delete the image data that has been saved on your camcorder is full, you can record new images on either the hard disk or a "Memory Stick Duo." If you delete the images, you...
Handycam® Handbook
Page 18
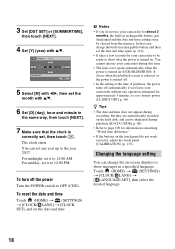
... the power Turn the POWER switch to the year 2037. Changing the language setting You can change the on (DCR-SR200/SR300). For midday, set the date and time. You cannot operate your camcorder without any year up to OFF (CHG). 3 Set [DST SET] or [SUMMERTIME], then touch [NEXT]. 4 Set...touch . z Tips • The date and time does not appear during recording, but they are automatically recorded on the hard disk, and can set any operation attempted for your camcorder for about 3 months, the built-in rechargeable battery and then set the date and time again (p. 116). • It...
... the power Turn the POWER switch to the year 2037. Changing the language setting You can change the on (DCR-SR200/SR300). For midday, set the date and time. You cannot operate your camcorder without any year up to OFF (CHG). 3 Set [DST SET] or [SUMMERTIME], then touch [NEXT]. 4 Set...touch . z Tips • The date and time does not appear during recording, but they are automatically recorded on the hard disk, and can set any operation attempted for your camcorder for about 3 months, the built-in rechargeable battery and then set the date and time again (p. 116). • It...
Handycam® Handbook
Page 21
Searches for images by date (p. 33) Recording/Playback Next 6 images Returns to the recording screen 1 :Displays movies. 2 :Displays still images on the hard disk. 3 :Displays still images on each of [DATA CODE] is fixed to be played back. Movies: Touch the tab and the movie to [DATE/TIME... that was lastly played back/ recorded (B for the still image). Playing back recorded movies/still images 1 Turn the POWER switch G to turn on your camcorder. 2 Press (VIEW IMAGES) I (or D) button The VISUAL INDEX screen appears on the LCD screen. (It may take some time to display the ...
Searches for images by date (p. 33) Recording/Playback Next 6 images Returns to the recording screen 1 :Displays movies. 2 :Displays still images on the hard disk. 3 :Displays still images on each of [DATA CODE] is fixed to be played back. Movies: Touch the tab and the movie to [DATE/TIME... that was lastly played back/ recorded (B for the still image). Playing back recorded movies/still images 1 Turn the POWER switch G to turn on your camcorder. 2 Press (VIEW IMAGES) I (or D) button The VISUAL INDEX screen appears on the LCD screen. (It may take some time to display the ...
Handycam® Handbook
Page 23
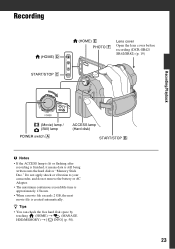
... (HOME) D START/STOP C (HOME) E PHOTO F Lens cover Open the lens cover before recording (DCR-SR42/ SR62/SR82) (p. 19) Recording/Playback (Movie) lamp / (Still) lamp POWER switch A ACCESS lamp (Hard disk) START/STOP B b Notes • If the ACCESS lamp is lit or flashing after recording is finished,...it means data is created automatically. z Tips • You can check the free hard disk space by touching (HOME) t (MANAGE HDD/MEMORY) t [ INFO] (p. 50). 23 Do not apply shock or vibration to your camcorder, and do not remove the battery or AC Adaptor. • The maximum continuous...
... (HOME) D START/STOP C (HOME) E PHOTO F Lens cover Open the lens cover before recording (DCR-SR42/ SR62/SR82) (p. 19) Recording/Playback (Movie) lamp / (Still) lamp POWER switch A ACCESS lamp (Hard disk) START/STOP B b Notes • If the ACCESS lamp is lit or flashing after recording is finished,...it means data is created automatically. z Tips • You can check the free hard disk space by touching (HOME) t (MANAGE HDD/MEMORY) t [ INFO] (p. 50). 23 Do not apply shock or vibration to your camcorder, and do not remove the battery or AC Adaptor. • The maximum continuous...
Handycam® Handbook
Page 24
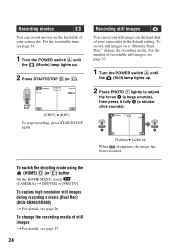
...to adjust the focus A (a beep sounds), then press it fully B (a shutter click sounds). Recording still images You can record movies on the hard disk of your camcorder. To change the recording media. To switch the shooting mode using the (HOME) D (or E) button On the HOME MENU, touch (CAMERA)...START/STOP again. To capture high resolution still images during recording a movie (Dual Rec) (DCR-SR200/SR300) t For details, see page 27. 24 To record still images on the hard disk of your camcorder in the default setting. For the recordable time, see page 57. 1 Turn the POWER switch...
...to adjust the focus A (a beep sounds), then press it fully B (a shutter click sounds). Recording still images You can record movies on the hard disk of your camcorder. To change the recording media. To switch the shooting mode using the (HOME) D (or E) button On the HOME MENU, touch (CAMERA)...START/STOP again. To capture high resolution still images during recording a movie (Dual Rec) (DCR-SR200/SR300) t For details, see page 27. 24 To record still images on the hard disk of your camcorder in the default setting. For the recordable time, see page 57. 1 Turn the POWER switch...
Handycam® Handbook
Page 26
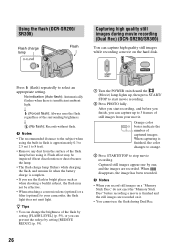
...movie is finished and the still images are recorded. Orange color boxes indicate the number of the surrounding brightness. Using the flash (DCR-SR200/ SR300) Flash charge lamp Flash Capturing high quality still images during Dual Rec. 26 Press (flash) repeatedly to 8 feet). • ...camcorder, the flash light does not emit light. r (Forced flash): Always uses the flash regardless of captured images. After you start movie recording. 2 Press PHOTO fully. When capturing is insufficient ambient light. Captured still images appear one , and the images are recorded on the hard disk...
...movie is finished and the still images are recorded. Orange color boxes indicate the number of the surrounding brightness. Using the flash (DCR-SR200/ SR300) Flash charge lamp Flash Capturing high quality still images during Dual Rec. 26 Press (flash) repeatedly to 8 feet). • ...camcorder, the flash light does not emit light. r (Forced flash): Always uses the flash regardless of captured images. After you start movie recording. 2 Press PHOTO fully. When capturing is insufficient ambient light. Captured still images appear one , and the images are recorded on the hard disk...
Handycam® Handbook
Page 27
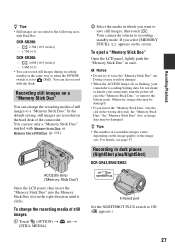
.... • When the ACCESS lamp is lit or flashing, your camcorder, turn the power off, eject the "Memory Stick Duo," or remove the battery pack. You can also record with the flash. DCR-SR200: - 2.3M (16:9 (wide)) - 1.7M (4:3) DCR-SR300: - 4.6M (16:9 (wide)) - 3.4M (4:3) •.... Do not shake or knock your camcorder is set to a "Memory Stick Duo." For details, see page 57. Your camcorder returns to save still images, then touch . Recording/Playback z Tips • Still images are recorded on the hard disk of the camcorder. You can use only a "Memory...
.... • When the ACCESS lamp is lit or flashing, your camcorder, turn the power off, eject the "Memory Stick Duo," or remove the battery pack. You can also record with the flash. DCR-SR200: - 2.3M (16:9 (wide)) - 1.7M (4:3) DCR-SR300: - 4.6M (16:9 (wide)) - 3.4M (4:3) •.... Do not shake or knock your camcorder is set to a "Memory Stick Duo." For details, see page 57. Your camcorder returns to save still images, then touch . Recording/Playback z Tips • Still images are recorded on the hard disk of the camcorder. You can use only a "Memory...


