Operating Guide
Page 1
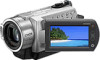
3-098-548-11(1) Digital Video Camera Recorder Operating Guide DCR-SR42/SR62/SR82/SR200/SR300 For details on the advanced operations, please refer to "Handycam Handbook" (PDF). © 2007 Sony Corporation
3-098-548-11(1) Digital Video Camera Recorder Operating Guide DCR-SR42/SR62/SR82/SR200/SR300 For details on the advanced operations, please refer to "Handycam Handbook" (PDF). © 2007 Sony Corporation
Operating Guide
Page 5
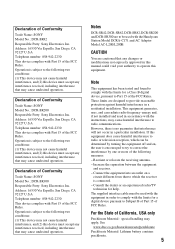
...For the State of Conformity Trade Name: SONY Model No.: DCR-SR300 Responsible Party: Sony Electronics Inc. Notes DCR-SR42, DCR-SR62, DCR-SR82, DCR-SR200 and DCR-SR300 are to be used with the equipment in accordance with the Handycam Station Model DCRA-C171 and AC Adaptor ... including interference that interference will not occur in a residential installation. Declaration of Conformity Trade Name: SONY Model No.: DCR-SR200 Responsible Party: Sony Electronics Inc. Operation is no guarantee that may cause harmful interference to provide reasonable protection against harmful...
...For the State of Conformity Trade Name: SONY Model No.: DCR-SR300 Responsible Party: Sony Electronics Inc. Notes DCR-SR42, DCR-SR62, DCR-SR82, DCR-SR200 and DCR-SR300 are to be used with the equipment in accordance with the Handycam Station Model DCRA-C171 and AC Adaptor ... including interference that interference will not occur in a residential installation. Declaration of Conformity Trade Name: SONY Model No.: DCR-SR200 Responsible Party: Sony Electronics Inc. Operation is no guarantee that may cause harmful interference to provide reasonable protection against harmful...

Operating Guide
Page 7
...8226; Do not try to the copyright laws. When the camcorder is recommended that you destroy the actual body of the camcorder using the camcorder at high altitudes • Do not turn on DCR-SR300. • The screenshots are from the hard disk completely. Note on a TV, you need a NTSC system...your image data from the shock by dropping, the camcorder has the drop sensor function*. Doing so may damage the hard disk drive of recordings cannot be copyrighted. If you may not be able to protect the camcorder may not operate correctly. Note on operational temperatures &#...
...8226; Do not try to the copyright laws. When the camcorder is recommended that you destroy the actual body of the camcorder using the camcorder at high altitudes • Do not turn on DCR-SR300. • The screenshots are from the hard disk completely. Note on a TV, you need a NTSC system...your image data from the shock by dropping, the camcorder has the drop sensor function*. Doing so may damage the hard disk drive of recordings cannot be copyrighted. If you may not be able to protect the camcorder may not operate correctly. Note on operational temperatures &#...

Operating Guide
Page 9
... Step 1: Checking supplied items Make sure that item supplied. Rechargeable battery pack NP-FH40 (1) (p.11) (DCR-SR42/SR62/ SR82) NP-FH60 (1) (p.11) (DCR-SR200/SR300) Handycam Station (1) (p.11) A/V connecting cable (1) (p.25) USB cable (1) (p.27) CD-ROM "Handycam Application Software" (1) (p.26) - Handycam Handbook (PDF) "Operating Guide" (This manual) (1) 9 AC Adaptor (1) (p.11) Power cord (1) (p.11) Wireless Remote Commander...
... Step 1: Checking supplied items Make sure that item supplied. Rechargeable battery pack NP-FH40 (1) (p.11) (DCR-SR42/SR62/ SR82) NP-FH60 (1) (p.11) (DCR-SR200/SR300) Handycam Station (1) (p.11) A/V connecting cable (1) (p.25) USB cable (1) (p.27) CD-ROM "Handycam Application Software" (1) (p.26) - Handycam Handbook (PDF) "Operating Guide" (This manual) (1) 9 AC Adaptor (1) (p.11) Power cord (1) (p.11) Wireless Remote Commander...
Operating Guide
Page 11
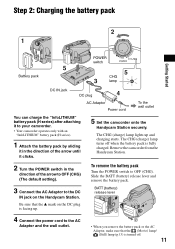
...plug AC Adaptor Power cord To the wall outlet You can charge the "InfoLITHIUM" battery pack (H series) after attaching it clicks. 5 Set the camcorder onto the Handycam Station securely. Be sure that the (Movie) lamp/ (Still) lamp (p.13) is turned off when the battery pack is facing up and ...charging starts. The CHG (charge) lamp lights up . Remove the camcorder from the Handycam Station. 2 Turn the POWER switch in the direction of the arrow to OFF (CHG) (The default setting). 3 Connect the AC Adaptor to the...
...plug AC Adaptor Power cord To the wall outlet You can charge the "InfoLITHIUM" battery pack (H series) after attaching it clicks. 5 Set the camcorder onto the Handycam Station securely. Be sure that the (Movie) lamp/ (Still) lamp (p.13) is turned off when the battery pack is facing up and ...charging starts. The CHG (charge) lamp lights up . Remove the camcorder from the Handycam Station. 2 Turn the POWER switch in the direction of the arrow to OFF (CHG) (The default setting). 3 Connect the AC Adaptor to the...

Operating Guide
Page 12
...camcorder is still supplied to it while connected to the wall outlet via the AC Adaptor. NP-FH40: (Unit:min.) DCR-SR42 Charging time 125 Recording time*1 Continuous 105 recording time Typical recording time*4 50 Playback time 120 DCR-SR62/ SR82 125 90*2 100*3 45*2 50*3 110*2 12 NP-FH60: (Unit:min.) DCR-SR200 DCR-SR300...wall outlet immediately if any metallic objects. On the charging/recording/playback time • Times measured when using your camcorder or the Handycam Station, even when the power cord is connected to the DC IN jack of the AC Adaptor or battery ...
...camcorder is still supplied to it while connected to the wall outlet via the AC Adaptor. NP-FH40: (Unit:min.) DCR-SR42 Charging time 125 Recording time*1 Continuous 105 recording time Typical recording time*4 50 Playback time 120 DCR-SR62/ SR82 125 90*2 100*3 45*2 50*3 110*2 12 NP-FH60: (Unit:min.) DCR-SR200 DCR-SR300...wall outlet immediately if any metallic objects. On the charging/recording/playback time • Times measured when using your camcorder or the Handycam Station, even when the power cord is connected to the DC IN jack of the AC Adaptor or battery ...

Operating Guide
Page 16
...insert the "Memory Stick Duo" into the slot in ( )); Your camcorder returns to a "Memory Stick Duo." During Easy Handycam operation, appears on the image quality or the image size. • You can check the free hard disk space by touching (HOME) t (MANAGE HDD/MEMORY) t [ ...DCR-SR42: 5,900 ([VGA (0.3M)]) DCR-SR62/SR82: 1,800 ([1.0M]) DCR-SR200: 480 ([4.0M]) DCR-SR300: 315 ([6.1M]) • All numbers measured when using a "Memory Stick Duo" made by pressing PHOTO during Easy Handycam operation. On Easy Handycam operation By pressing the EASY button, nearly all settings on the camcorder...
...insert the "Memory Stick Duo" into the slot in ( )); Your camcorder returns to a "Memory Stick Duo." During Easy Handycam operation, appears on the image quality or the image size. • You can check the free hard disk space by touching (HOME) t (MANAGE HDD/MEMORY) t [ ...DCR-SR42: 5,900 ([VGA (0.3M)]) DCR-SR62/SR82: 1,800 ([1.0M]) DCR-SR200: 480 ([4.0M]) DCR-SR300: 315 ([6.1M]) • All numbers measured when using a "Memory Stick Duo" made by pressing PHOTO during Easy Handycam operation. On Easy Handycam operation By pressing the EASY button, nearly all settings on the camcorder...
Operating Guide
Page 19
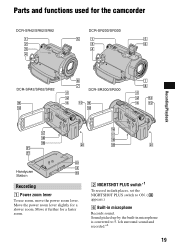
Move the power zoom lever slightly for the camcorder DCR-SR42/SR62/SR82 DCR-SR200/SR300 DCR-SR42/SR62/SR82 DCR-SR200/SR300 Recording/Playback Handycam Station Recording 1 Power zoom lever To use zoom, move the power zoom lever. Parts and functions used for a slower zoom. Sound picked up by the built-in microphone is converted to ON. ( appears.) 6 Built-in dark places, set the NIGHTSHOT PLUS switch to 5.1ch surround sound and recorded.*2 19 Move it further for a faster zoom. 2 NIGHTSHOT PLUS switch*1 To record in microphone Records sound.
Move the power zoom lever slightly for the camcorder DCR-SR42/SR62/SR82 DCR-SR200/SR300 DCR-SR42/SR62/SR82 DCR-SR200/SR300 Recording/Playback Handycam Station Recording 1 Power zoom lever To use zoom, move the power zoom lever. Parts and functions used for a slower zoom. Sound picked up by the built-in microphone is converted to ON. ( appears.) 6 Built-in dark places, set the NIGHTSHOT PLUS switch to 5.1ch surround sound and recorded.*2 19 Move it further for a faster zoom. 2 NIGHTSHOT PLUS switch*1 To record in microphone Records sound.
Operating Guide
Page 21
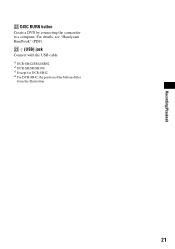
wd (USB) jack Connect with the USB cable. *1 DCR-SR42/SR62/SR82 *2 DCR-SR200/SR300 *3 Except for DCR-SR42 *4 For DCR-SR42, the position of the buttons differ from the illustration. 21 Recording/Playback ws DISC BURN button Create a DVD by connecting the camcorder to a computer. For details, see "Handycam Handbook" (PDF).
wd (USB) jack Connect with the USB cable. *1 DCR-SR42/SR62/SR82 *2 DCR-SR200/SR300 *3 Except for DCR-SR42 *4 For DCR-SR42, the position of the buttons differ from the illustration. 21 Recording/Playback ws DISC BURN button Create a DVD by connecting the camcorder to a computer. For details, see "Handycam Handbook" (PDF).

Operating Guide
Page 24
Saving images Deleting images Recorded images are stored on the internal hard disk of a computer. For details, see "Handycam Handbook" (PDF). Saving images on a computer You can save images recorded on the camcorder directly to your computer on the hard disk 1 On the (HOME MENU), touch (OTHERS) t [DELETE]....YES] t . Saving images by connecting your camcorder. For details, see "Handycam Handbook" (PDF). Deleting the images on a DVD. Due to the limited capacity of the internal hard disk, make sure that you save images on the camcorder as a DVD-R or a computer. Saving ...
Saving images Deleting images Recorded images are stored on the internal hard disk of a computer. For details, see "Handycam Handbook" (PDF). Saving images on a computer You can save images recorded on the camcorder directly to your computer on the hard disk 1 On the (HOME MENU), touch (OTHERS) t [DELETE]....YES] t . Saving images by connecting your camcorder. For details, see "Handycam Handbook" (PDF). Deleting the images on a DVD. Due to the limited capacity of the internal hard disk, make sure that you save images on the camcorder as a DVD-R or a computer. Saving ...
Operating Guide
Page 25
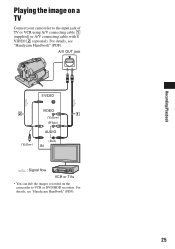
For details, see "Handycam Handbook" (PDF). Recording/Playback Playing the image on the camcorder to the input jack of TV or VCR using A/V connecting cable 1 (supplied) or A/V connecting cable with S VIDEO 2 (optional). A/V OUT jack S VIDEO VIDEO (Yellow) (White) AUDIO (Yellow) (Red) IN : Signal flow VCR or TVs • You can dub the images recorded on a TV Connect your camcorder to VCR or DVD/HDD recorders. For details, see "Handycam Handbook" (PDF). 25
For details, see "Handycam Handbook" (PDF). Recording/Playback Playing the image on the camcorder to the input jack of TV or VCR using A/V connecting cable 1 (supplied) or A/V connecting cable with S VIDEO 2 (optional). A/V OUT jack S VIDEO VIDEO (Yellow) (White) AUDIO (Yellow) (Red) IN : Signal flow VCR or TVs • You can dub the images recorded on a TV Connect your camcorder to VCR or DVD/HDD recorders. For details, see "Handycam Handbook" (PDF). 25
Operating Guide
Page 26
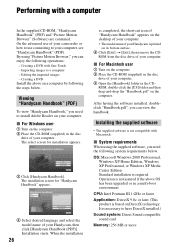
..." appears on the desktop of your computer. • The model name of your Handycam, then click [Handycam Handbook (PDF)]. Creating a DVD Install the above OS has been upgraded or in the disc drive of your computer. Operation is required. Performing with One Touch - When the installation 26 ...card Memory: 256 MB or more The select screen for "Handycam Handbook" appears. 4 Select desired language and select the model name of your camcorder or how to use of your computer. 3 Open the [Handbook] folder in the disc drive of your computer. x For Windows user 1 Turn on ...
..." appears on the desktop of your computer. • The model name of your Handycam, then click [Handycam Handbook (PDF)]. Creating a DVD Install the above OS has been upgraded or in the disc drive of your computer. Operation is required. Performing with One Touch - When the installation 26 ...card Memory: 256 MB or more The select screen for "Handycam Handbook" appears. 4 Select desired language and select the model name of your camcorder or how to use of your computer. 3 Open the [Handbook] folder in the disc drive of your computer. x For Windows user 1 Turn on ...

Operating Guide
Page 27
...Windows computer before installing the software. 3 Place the supplied CD-ROM in the disc drive of your computer. Restart your computer after completing the installation. 27 Provide the camcorder and the Handycam Station, and a USB cable beforehand. Contents to be installed and procedures may be ... work properly due to the power saving function of the computer. The sound is required only for the first time. Recording/Playback Hard disk: Available free hard disk space for installation required: Approximately 600 MB (for creating a DVD, 5 GB or more may be required) Display: DirectX 7...
...Windows computer before installing the software. 3 Place the supplied CD-ROM in the disc drive of your computer. Restart your computer after completing the installation. 27 Provide the camcorder and the Handycam Station, and a USB cable beforehand. Contents to be installed and procedures may be ... work properly due to the power saving function of the computer. The sound is required only for the first time. Recording/Playback Hard disk: Available free hard disk space for installation required: Approximately 600 MB (for creating a DVD, 5 GB or more may be required) Display: DirectX 7...

Operating Guide
Page 28
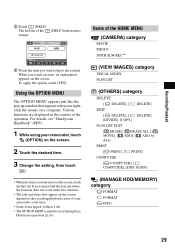
...not on the computer, you may need to complete the installation. For details, see "Handycam Handbook" (PDF). 1 Turn on your camcorder, then press (HOME) A (or B). 2 Touch the desired setup item. 3 ...Follow the guide on the HOME MENU (HELP) 1 Press (HOME). 28 qa Remove the CD-ROM from the disc drive ...current recording/playback situation. http://www.sony.net/registration/di/ • For the information about Picture Motion Browser, visit the following URL: http://www.sony.net/support-disoft/ Performing various functions...
...not on the computer, you may need to complete the installation. For details, see "Handycam Handbook" (PDF). 1 Turn on your camcorder, then press (HOME) A (or B). 2 Touch the desired setup item. 3 ...Follow the guide on the HOME MENU (HELP) 1 Press (HOME). 28 qa Remove the CD-ROM from the disc drive ...current recording/playback situation. http://www.sony.net/registration/di/ • For the information about Picture Motion Browser, visit the following URL: http://www.sony.net/support-disoft/ Performing various functions...
Operating Guide
Page 29
...Change the setting, then touch . • When the item you rightclick the mouse on the screen. To apply the option, touch [YES]. For details, see "Handycam Handbook" (PDF). 1 While using your camcorder at the time. • Some items appear without a tab. • The OPTION MENU cannot be used during Easy... Handycam operation (p.16). If you cannot find the item anywhere, the function does not work under the situation. • The tabs and items that...
...Change the setting, then touch . • When the item you rightclick the mouse on the screen. To apply the option, touch [YES]. For details, see "Handycam Handbook" (PDF). 1 While using your camcorder at the time. • Some items appear without a tab. • The OPTION MENU cannot be used during Easy... Handycam operation (p.16). If you cannot find the item anywhere, the function does not work under the situation. • The tabs and items that...
Operating Guide
Page 30
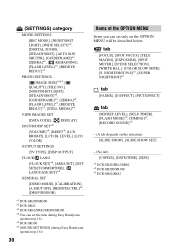
...], [DST SET]/[SUMMERTIME], [ LANGUAGE SET]*4 GENERAL SET [DEMO MODE], [CALIBRATION], [A.SHUT OFF], [REMOTE CTRL]*3, [DROP SENSOR] *1 DCR-SR200/SR300 *2 DCR-SR42 *3 DCR-SR62/SR82/SR200/SR300 *4 You can set the item during Easy Handycam operation (p.16). *5 DCR-SR300 *6 [SOUND SETTINGS] (during Easy Handycam operation (p.16)) 30 Items of the OPTION MENU Items you can set only on the situation...
...], [DST SET]/[SUMMERTIME], [ LANGUAGE SET]*4 GENERAL SET [DEMO MODE], [CALIBRATION], [A.SHUT OFF], [REMOTE CTRL]*3, [DROP SENSOR] *1 DCR-SR200/SR300 *2 DCR-SR42 *3 DCR-SR62/SR82/SR200/SR300 *4 You can set the item during Easy Handycam operation (p.16). *5 DCR-SR300 *6 [SOUND SETTINGS] (during Easy Handycam operation (p.16)) 30 Items of the OPTION MENU Items you can set only on the situation...

Operating Guide
Page 31
... hard disk (see "Handycam Handbook" (PDF)) on other media (backup) before sending your camcorder is because the power has been turned on the power again, or use the following table to the wall outlet (p.11). • Set the camcorder onto the Handycam Station securely (p.11). If the functions still do not operate your Sony dealer. Leave the camcorder...
... hard disk (see "Handycam Handbook" (PDF)) on other media (backup) before sending your camcorder is because the power has been turned on the power again, or use the following table to the wall outlet (p.11). • Set the camcorder onto the Handycam Station securely (p.11). If the functions still do not operate your Sony dealer. Leave the camcorder...

Operating Guide
Page 32
...appear on the screen even if the lens cover is closed (DCR-SR42/ SR62/SR82). • When you turn on your camcorder while the lens cover is unreadable. 32 Some symptoms you cannot ...may appear on your camcorder again. If the problem persists even after you cannot service has occurred. Reconnect it and operate your Sony dealer or local authorized Sony service facility. Contact your camcorder securely (p.11). Inform ...:ss / E:94:ss • A malfunction that you have tried a couple of the Handycam Station or your Sony dealer or local authorized Sony service facility. For details, see...
...appear on the screen even if the lens cover is closed (DCR-SR42/ SR62/SR82). • When you turn on your camcorder while the lens cover is unreadable. 32 Some symptoms you cannot ...may appear on your camcorder again. If the problem persists even after you cannot service has occurred. Reconnect it and operate your Sony dealer or local authorized Sony service facility. Contact your camcorder securely (p.11). Inform ...:ss / E:94:ss • A malfunction that you have tried a couple of the Handycam Station or your Sony dealer or local authorized Sony service facility. For details, see...

Operating Guide
Page 38
Handycam Station DCRA-C171 Input/Output connectors Audio/Video output 10 pin connector ... (32°F to 104°F) Type Li-ion Design and specifications are subject to 104°F) 38 Type Li-ion NP-FH60 (DCR-SR200/SR300) Maximum output voltage DC 8.4 V Output voltage DC 7.2 V Capacity 7.2 wh (1 000 mAh) Dimensions (Approx.) 31.8 × 33... g (6.0 oz) excluding the power cord * See at the label of AC Adaptor for other specifications. Rechargeable battery pack NP-FH40 (DCR-SR42/SR62/SR82) Maximum output voltage DC 8.4 V Output voltage DC 7.2 V Capacity 4.9 wh (680 mAh) Dimensions (Approx.) 31.8...
Handycam Station DCRA-C171 Input/Output connectors Audio/Video output 10 pin connector ... (32°F to 104°F) Type Li-ion Design and specifications are subject to 104°F) 38 Type Li-ion NP-FH60 (DCR-SR200/SR300) Maximum output voltage DC 8.4 V Output voltage DC 7.2 V Capacity 7.2 wh (1 000 mAh) Dimensions (Approx.) 31.8 × 33... g (6.0 oz) excluding the power cord * See at the label of AC Adaptor for other specifications. Rechargeable battery pack NP-FH40 (DCR-SR42/SR62/SR82) Maximum output voltage DC 8.4 V Output voltage DC 7.2 V Capacity 4.9 wh (680 mAh) Dimensions (Approx.) 31.8...
Operating Guide
Page 39
...the U.S. Additional Information 39 Furthermore, ™ and "®" are registered trademarks of Apple Computer, Inc. On trademarks • "Handycam" and are registered trademarks of Sony Corporation. • "Memory Stick," " ," "Memory Stick Duo," " PRO Duo," " "MagicGate," " ," "Memory Stick... ," ," "MagicGate Memory Stick" and "MagicGate Memory Stick Duo" are trademarks of Sony Corporation. • "InfoLITHIUM" is a trademark of Sony Corporation. • DVD-R, DVD+R DL, DVD-RW, and DVD+RW logo are trademarks. • Dolby and the ...
...the U.S. Additional Information 39 Furthermore, ™ and "®" are registered trademarks of Apple Computer, Inc. On trademarks • "Handycam" and are registered trademarks of Sony Corporation. • "Memory Stick," " ," "Memory Stick Duo," " PRO Duo," " "MagicGate," " ," "Memory Stick... ," ," "MagicGate Memory Stick" and "MagicGate Memory Stick Duo" are trademarks of Sony Corporation. • "InfoLITHIUM" is a trademark of Sony Corporation. • DVD-R, DVD+R DL, DVD-RW, and DVD+RW logo are trademarks. • Dolby and the ...


