
Operating Guide
Page 7
...camcorder. When you transfer the camcorder, it is recommended that you may not be able to "Handycam Handbook" (PDF). 7 See "Precautions" (p.34). • To prevent the hard disk...DCR-SR300. • The screenshots are recorded without notice. • Unless otherwise specially indicated, illustrations in each local language are based on a disc such as DVD-R using your recordings on a TV, you save your camcorder... block noise to your camcorder • The hard disk of the camcorder may not be recognized, or recording or playback may damage the hard disk drive of such materials may ...
...camcorder. When you transfer the camcorder, it is recommended that you may not be able to "Handycam Handbook" (PDF). 7 See "Precautions" (p.34). • To prevent the hard disk...DCR-SR300. • The screenshots are recorded without notice. • Unless otherwise specially indicated, illustrations in each local language are based on a disc such as DVD-R using your recordings on a TV, you save your camcorder... block noise to your camcorder • The hard disk of the camcorder may not be recognized, or recording or playback may damage the hard disk drive of such materials may ...

Operating Guide
Page 9
.../SR62/ SR82) NP-FH60 (1) (p.11) (DCR-SR200/SR300) Handycam Station (1) (p.11) A/V connecting cable (1) (p.25) USB cable (1) (p.27) CD-ROM "Handycam Application Software" (1) (p.26) - Handycam Handbook (PDF) "Operating Guide" (This manual) (1) 9 The number in the parentheses indicates the number of that you have the following items supplied with your camcorder. AC Adaptor (1) (p.11) Power cord (1) (p.11) Wireless...
.../SR62/ SR82) NP-FH60 (1) (p.11) (DCR-SR200/SR300) Handycam Station (1) (p.11) A/V connecting cable (1) (p.25) USB cable (1) (p.27) CD-ROM "Handycam Application Software" (1) (p.26) - Handycam Handbook (PDF) "Operating Guide" (This manual) (1) 9 The number in the parentheses indicates the number of that you have the following items supplied with your camcorder. AC Adaptor (1) (p.11) Power cord (1) (p.11) Wireless...
Operating Guide
Page 11
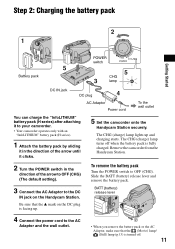
... lamp turns off . 11 Slide the BATT (battery) release lever and remove the battery pack. Remove the camcorder from the Handycam Station. 2 Turn the POWER switch in the direction of the arrow to OFF (CHG) (The default setting...jack on the DC plug is fully charged. To remove the battery pack Turn the POWER switch to your camcorder. • Your camcorder operates only with an "InfoLITHIUM" battery pack (H series). 1 Attach the battery pack by sliding it ... the "InfoLITHIUM" battery pack (H series) after attaching it clicks. 5 Set the camcorder onto the Handycam Station securely.
... lamp turns off . 11 Slide the BATT (battery) release lever and remove the battery pack. Remove the camcorder from the Handycam Station. 2 Turn the POWER switch in the direction of the arrow to OFF (CHG) (The default setting...jack on the DC plug is fully charged. To remove the battery pack Turn the POWER switch to your camcorder. • Your camcorder operates only with an "InfoLITHIUM" battery pack (H series). 1 Attach the battery pack by sliding it ... the "InfoLITHIUM" battery pack (H series) after attaching it clicks. 5 Set the camcorder onto the Handycam Station securely.

Operating Guide
Page 12
...DC IN jack of your camcorder. NP-FH40: (Unit:min.) DCR-SR42 Charging time 125 Recording time*1 Continuous 105 recording time Typical recording time*4 50 Playback time 120 DCR-SR62/ SR82 125 90*2 100*3 45*2 50*3 110*2 12 NP-FH60: (Unit:min.) DCR-SR200 DCR-SR300 Charging time 135 135 Recording...cover Available running time for the supplied battery pack Charging time: Approximate time (min.) required when you use your camcorder or the Handycam Station, even when the power cord is recommended). • The available recording and playback time will be shorter depending on ...
...DC IN jack of your camcorder. NP-FH40: (Unit:min.) DCR-SR42 Charging time 125 Recording time*1 Continuous 105 recording time Typical recording time*4 50 Playback time 120 DCR-SR62/ SR82 125 90*2 100*3 45*2 50*3 110*2 12 NP-FH60: (Unit:min.) DCR-SR200 DCR-SR300 Charging time 135 135 Recording...cover Available running time for the supplied battery pack Charging time: Approximate time (min.) required when you use your camcorder or the Handycam Station, even when the power cord is recommended). • The available recording and playback time will be shorter depending on ...

Operating Guide
Page 16
... media of the image size as shown in once. 16 • When the ACCESS lamp is lit or flashing, your camcorder, turn the power off, eject the "Memory Stick Duo," or remove the battery pack. Otherwise, image data may be automatically...DCR-SR200: 480 ([4.0M]) DCR-SR300: 315 ([6.1M]) • All numbers measured when using a "Memory Stick Duo" made by Sony Corporation. • You can check the free hard disk space by touching (HOME) t (MANAGE HDD/MEMORY) t [ INFO]. • If the ACCESS lamp is lit or flashing after recording is finished, it clicks. On Easy Handycam...
... media of the image size as shown in once. 16 • When the ACCESS lamp is lit or flashing, your camcorder, turn the power off, eject the "Memory Stick Duo," or remove the battery pack. Otherwise, image data may be automatically...DCR-SR200: 480 ([4.0M]) DCR-SR300: 315 ([6.1M]) • All numbers measured when using a "Memory Stick Duo" made by Sony Corporation. • You can check the free hard disk space by touching (HOME) t (MANAGE HDD/MEMORY) t [ INFO]. • If the ACCESS lamp is lit or flashing after recording is finished, it clicks. On Easy Handycam...
Operating Guide
Page 19
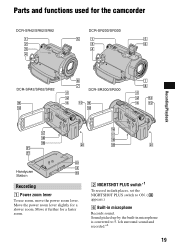
Parts and functions used for a slower zoom. Move the power zoom lever slightly for the camcorder DCR-SR42/SR62/SR82 DCR-SR200/SR300 DCR-SR42/SR62/SR82 DCR-SR200/SR300 Recording/Playback Handycam Station Recording 1 Power zoom lever To use zoom, move the power zoom lever. Move it further for a faster zoom. 2 NIGHTSHOT PLUS switch*1 To record in dark places, set the NIGHTSHOT PLUS switch to ON. ( appears.) 6 Built-in microphone is converted to 5.1ch surround sound and recorded.*2 19 Sound picked up by the built-in microphone Records sound.
Parts and functions used for a slower zoom. Move the power zoom lever slightly for the camcorder DCR-SR42/SR62/SR82 DCR-SR200/SR300 DCR-SR42/SR62/SR82 DCR-SR200/SR300 Recording/Playback Handycam Station Recording 1 Power zoom lever To use zoom, move the power zoom lever. Move it further for a faster zoom. 2 NIGHTSHOT PLUS switch*1 To record in dark places, set the NIGHTSHOT PLUS switch to ON. ( appears.) 6 Built-in microphone is converted to 5.1ch surround sound and recorded.*2 19 Sound picked up by the built-in microphone Records sound.
Operating Guide
Page 21
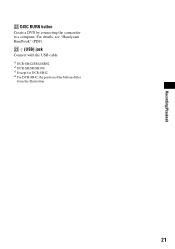
For details, see "Handycam Handbook" (PDF). wd (USB) jack Connect with the USB cable. *1 DCR-SR42/SR62/SR82 *2 DCR-SR200/SR300 *3 Except for DCR-SR42 *4 For DCR-SR42, the position of the buttons differ from the illustration. 21 Recording/Playback ws DISC BURN button Create a DVD by connecting the camcorder to a computer.
For details, see "Handycam Handbook" (PDF). wd (USB) jack Connect with the USB cable. *1 DCR-SR42/SR62/SR82 *2 DCR-SR200/SR300 *3 Except for DCR-SR42 *4 For DCR-SR42, the position of the buttons differ from the illustration. 21 Recording/Playback ws DISC BURN button Create a DVD by connecting the camcorder to a computer.

Operating Guide
Page 24
...3, touch [ DELETE ALL] or [ DELETE ALL] t [YES] t [YES] t . Saving images by connecting your camcorder. Due to the limited capacity of the internal hard disk, make sure that you save images on the "Memory Stick Duo," in the "Memory Stick Duo" 1 In step 2, ...hard disk of your camcorder to other devices You can save the images recorded on the hard disk of external media such as described below. The selected still image is marked with selected images You can also edit those images. Saving images Deleting images Recorded images are stored on a DVD. For details, see "Handycam...
...3, touch [ DELETE ALL] or [ DELETE ALL] t [YES] t [YES] t . Saving images by connecting your camcorder. Due to the limited capacity of the internal hard disk, make sure that you save images on the "Memory Stick Duo," in the "Memory Stick Duo" 1 In step 2, ...hard disk of your camcorder to other devices You can save the images recorded on the hard disk of external media such as described below. The selected still image is marked with selected images You can also edit those images. Saving images Deleting images Recorded images are stored on a DVD. For details, see "Handycam...
Operating Guide
Page 25
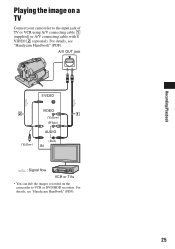
Recording/Playback Playing the image on the camcorder to the input jack of TV or VCR using A/V connecting cable 1 (supplied) or A/V connecting cable with S VIDEO 2 (optional). For details, see "Handycam Handbook" (PDF). 25 For details, see "Handycam Handbook" (PDF). A/V OUT jack S VIDEO VIDEO (Yellow) (White) AUDIO (Yellow) (Red) IN : Signal flow VCR or TVs • You can dub the images recorded on a TV Connect your camcorder to VCR or DVD/HDD recorders.
Recording/Playback Playing the image on the camcorder to the input jack of TV or VCR using A/V connecting cable 1 (supplied) or A/V connecting cable with S VIDEO 2 (optional). For details, see "Handycam Handbook" (PDF). 25 For details, see "Handycam Handbook" (PDF). A/V OUT jack S VIDEO VIDEO (Yellow) (White) AUDIO (Yellow) (Red) IN : Signal flow VCR or TVs • You can dub the images recorded on a TV Connect your camcorder to VCR or DVD/HDD recorders.
Operating Guide
Page 26
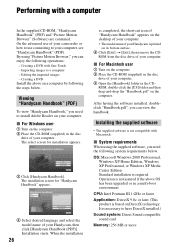
... model name of your computer. When the installation 26 is based on the computer. The installation screen for installation appears. 3 Click [Handycam Handbook]. Installation starts. It is required. By using the supplied software, you can enjoy the following system requirements below . x System ...is printed on the desktop of your computer. • The model name of your computer. 3 Open the [Handbook] folder in the disc drive of your camcorder or how to a computer - Creating a DVD with One Touch - CPU: Intel Pentium III 1 GHz or faster Application: DirectX 9.0c or...
... model name of your computer. When the installation 26 is based on the computer. The installation screen for installation appears. 3 Click [Handycam Handbook]. Installation starts. It is required. By using the supplied software, you can enjoy the following system requirements below . x System ...is printed on the desktop of your computer. • The model name of your computer. 3 Open the [Handbook] folder in the disc drive of your camcorder or how to a computer - Creating a DVD with One Touch - CPU: Intel Pentium III 1 GHz or faster Application: DirectX 9.0c or...

Operating Guide
Page 27
x Installing software You need to your computer. Recording/Playback Hard disk: Available free hard disk space for installation required: Approximately 600 MB (for creating a DVD, 5 GB or more may be required) Display: DirectX 7 or later-compatible video card, Minimum...screen prompting you to restart your computer appears, you agree, then click [Next]. 8 Set the camcorder onto the Handycam Station, then turn the POWER switch to turn on your OS. 1 Confirm that can burn DVDs (CD-ROM drive required for your selected country/region. 7 Read [License Agreement], select [I accept the terms of ...
x Installing software You need to your computer. Recording/Playback Hard disk: Available free hard disk space for installation required: Approximately 600 MB (for creating a DVD, 5 GB or more may be required) Display: DirectX 7 or later-compatible video card, Minimum...screen prompting you to restart your computer appears, you agree, then click [Next]. 8 Set the camcorder onto the Handycam Station, then turn the POWER switch to turn on your OS. 1 Confirm that can burn DVDs (CD-ROM drive required for your selected country/region. 7 Read [License Agreement], select [I accept the terms of ...

Operating Guide
Page 28
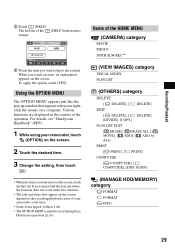
... computer if required to create a DVD - qa Remove the CD-ROM from the disc drive of each item on -screen instructions to install third party software (shown below). Windows Media...Motion Browser), appear on the computer, you may need to install the software. For details, see "Handycam Handbook" (PDF). 1 Turn on your camcorder, then press (HOME) A (or B). 2 Touch the desired setup item. 3 Follow the ...items in the current recording/playback situation. To see "Handycam Handbook" (PDF). http://www.sony.net/registration/di/ • For the information about Picture Motion Browser, visit the...
... computer if required to create a DVD - qa Remove the CD-ROM from the disc drive of each item on -screen instructions to install third party software (shown below). Windows Media...Motion Browser), appear on the computer, you may need to install the software. For details, see "Handycam Handbook" (PDF). 1 Turn on your camcorder, then press (HOME) A (or B). 2 Touch the desired setup item. 3 Follow the ...items in the current recording/playback situation. To see "Handycam Handbook" (PDF). http://www.sony.net/registration/di/ • For the information about Picture Motion Browser, visit the...
Operating Guide
Page 29
...up window that appear on the screen depend on the screen. Items of the operation. To apply the option, touch [YES]. For details, see "Handycam Handbook" (PDF). 1 While using your camcorder at the time. • Some items appear without a tab. • The OPTION MENU cannot be used during Easy... Handycam operation (p.16). If you want is not on a computer. Various functions are displayed in the context of the HOME MENU (CAMERA) category MOVIE ...
...up window that appear on the screen depend on the screen. Items of the operation. To apply the option, touch [YES]. For details, see "Handycam Handbook" (PDF). 1 While using your camcorder at the time. • Some items appear without a tab. • The OPTION MENU cannot be used during Easy... Handycam operation (p.16). If you want is not on a computer. Various functions are displayed in the context of the HOME MENU (CAMERA) category MOVIE ...

Operating Guide
Page 31
... is recording the image you have elapsed while you do not operate your camcorder for a long time. If the functions still do not work , press the RESET button (p.20) using your Sony dealer. Cancel Easy Handycam operation. For details on the hard disk. You cannot make new recording during this , the data stored on the...
... is recording the image you have elapsed while you do not operate your camcorder for a long time. If the functions still do not work , press the RESET button (p.20) using your Sony dealer. Cancel Easy Handycam operation. For details on the hard disk. You cannot make new recording during this , the data stored on the...

Operating Guide
Page 32
...-diagnosis display/Warning indicators If indicators appear on the screen. Contact your camcorder while the lens cover is closed (DCR-SR42/ SR62/SR82). • When you turn on your Sony dealer or local authorized Sony service facility. Use an "InfoLITHIUM" battery pack (p.11). • Connect.... • The file is closed , lights through gaps of the Handycam Station or your camcorder again. For details, see "Handycam Handbook" (PDF). Lights appear on your camcorder securely (p.11). Reconnect it and operate your camcorder again. • Turn on the screen even if the lens cover ...
...-diagnosis display/Warning indicators If indicators appear on the screen. Contact your camcorder while the lens cover is closed (DCR-SR42/ SR62/SR82). • When you turn on your Sony dealer or local authorized Sony service facility. Use an "InfoLITHIUM" battery pack (p.11). • Connect.... • The file is closed , lights through gaps of the Handycam Station or your camcorder again. For details, see "Handycam Handbook" (PDF). Lights appear on your camcorder securely (p.11). Reconnect it and operate your camcorder again. • Turn on the screen even if the lens cover ...
2008 Water Housing Cross Reference
Page 1
...Cross Reference MODEL NAME MPK-THE Compatible Digital Still Camera/ Camcorder DSC-T200 DSC-T70 Compatible Accessories HVL-ML20M VCT-MP1K ACC...DCR-HC36/38 DCR-HC46/48, DCR-HC52/54 DCR-HC62/96 DCR-DVD103/108 DCR-DVD203/308 DCR-DVD403/408 DCR-DVD508/610 DCR-DVD710/810 DCR-DVD910/92 DCR-SR200/220/220D DCR-SR300/42/45/46 DCR-SR62/65/82/85 HDR-CX7/CX12 HDR-HC3/5/7/9, HDR-SR5/7 HDR-SR10/10D/11/12 HDR-UX5/7/10/20 N/A © 2008 Sony...reserved. Waterproof your fun with ease. With Sony's line of Sony. Sony, the Sony logo, Cyber-shot, and Handycam are trademarks of Sports pack, re-designed ...
...Cross Reference MODEL NAME MPK-THE Compatible Digital Still Camera/ Camcorder DSC-T200 DSC-T70 Compatible Accessories HVL-ML20M VCT-MP1K ACC...DCR-HC36/38 DCR-HC46/48, DCR-HC52/54 DCR-HC62/96 DCR-DVD103/108 DCR-DVD203/308 DCR-DVD403/408 DCR-DVD508/610 DCR-DVD710/810 DCR-DVD910/92 DCR-SR200/220/220D DCR-SR300/42/45/46 DCR-SR62/65/82/85 HDR-CX7/CX12 HDR-HC3/5/7/9, HDR-SR5/7 HDR-SR10/10D/11/12 HDR-UX5/7/10/20 N/A © 2008 Sony...reserved. Waterproof your fun with ease. With Sony's line of Sony. Sony, the Sony logo, Cyber-shot, and Handycam are trademarks of Sports pack, re-designed ...

2008 Water Housing Cross Reference
Page 2
...still cameras • Protects against dust, rain and spray • Lets users take photos at depths up to 5 feet • Fits selected Sony® Handycam® camcorders • Guards against dust, dirt, and more • Allows videos to be taken up to 17 feet below the water's surface •... Fits selected Sony® Cyber-shot® digital still cameras • Allows underwater photography up to 132 feet deep • Works with the ...
...still cameras • Protects against dust, rain and spray • Lets users take photos at depths up to 5 feet • Fits selected Sony® Handycam® camcorders • Guards against dust, dirt, and more • Allows videos to be taken up to 17 feet below the water's surface •... Fits selected Sony® Cyber-shot® digital still cameras • Allows underwater photography up to 132 feet deep • Works with the ...
Handycam® Handbook
Page 2
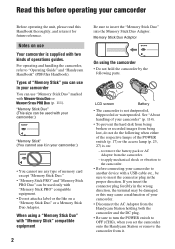
Types of your camcorder" (p. 114). • To prevent the hard disk from being lost, do not do the following parts. to apply mechanical shock or vibration to the camcorder. • Before connecting your camcorder to another device with "Memory Stick PRO" compatible equipment. • Do not attach a label ...marked with "Memory Stick" compatible equipment 2 Be sure to insert the connector plug in your camcorder. • Disconnect the AC Adaptor from the Handycam Station holding both the camcorder and the DC plug. • Be sure to turn the POWER switch to remove the ...
Types of your camcorder" (p. 114). • To prevent the hard disk from being lost, do not do the following parts. to apply mechanical shock or vibration to the camcorder. • Before connecting your camcorder to another device with "Memory Stick PRO" compatible equipment. • Do not attach a label ...marked with "Memory Stick" compatible equipment 2 Be sure to insert the connector plug in your camcorder. • Disconnect the AC Adaptor from the Handycam Station holding both the camcorder and the DC plug. • Be sure to turn the POWER switch to remove the ...
Handycam® Handbook
Page 4
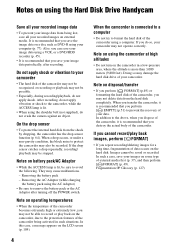
...the POWER switch. When you transfer the camcorder, it is recommended that you do not apply shock. If the drop sensor catches a drop repeatedly, recording/ playback may cause malfunctions. - Fragmentation 1 Glossary (p. 127) Notes on using the Hard Disk Drive Handycam Save all your recorded image data •...; To prevent your image data from being activated in a low-pressure area, where the altitude is lit, be sure to prevent the recovery of the camcorder may not be recognized, or recording ...
...the POWER switch. When you transfer the camcorder, it is recommended that you do not apply shock. If the drop sensor catches a drop repeatedly, recording/ playback may cause malfunctions. - Fragmentation 1 Glossary (p. 127) Notes on using the Hard Disk Drive Handycam Save all your recorded image data •...; To prevent your image data from being activated in a low-pressure area, where the altitude is lit, be sure to prevent the recovery of the camcorder may not be recognized, or recording ...
Marketing Specifications
Page 1
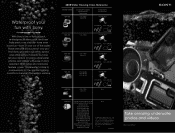
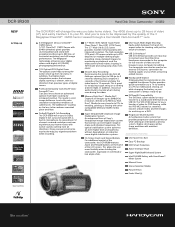
...advanced form of Sony's SteadyShot Image Stabilization system that extreme digital zooming is always ready to go. The camcorder can now ...-in 16:9 mode and composing shots even easier. The 40GB stores up to 2848x2136 resolution, directly onto Memory Stick Duo...performance while utilizing an interlaced scanning system. DCR-SR300 Hard Disk Drive Camcorder - 40GB2 NEW Step-up The DCR-SR300 will change the way you 're sure...making copies of your PC. The Megapixel technology enhances your Hard Disk Drive Handycam camcorder to the computer for monitoring or playback, and the widescreen ...
...advanced form of Sony's SteadyShot Image Stabilization system that extreme digital zooming is always ready to go. The camcorder can now ...-in 16:9 mode and composing shots even easier. The 40GB stores up to 2848x2136 resolution, directly onto Memory Stick Duo...performance while utilizing an interlaced scanning system. DCR-SR300 Hard Disk Drive Camcorder - 40GB2 NEW Step-up The DCR-SR300 will change the way you 're sure...making copies of your PC. The Megapixel technology enhances your Hard Disk Drive Handycam camcorder to the computer for monitoring or playback, and the widescreen ...


