

Operating Guide
Page 2
... it in. IMPORTANT SAFEGUARDS For your electrician to them. Overloading Do not overload wall outlets, extension cords or convenience receptacles beyond their capacity, since this manual for future reference. Polarization This set through openings as they may touch dangerous voltage points or short out parts that may be of sufficient magnitude...
... it in. IMPORTANT SAFEGUARDS For your electrician to them. Overloading Do not overload wall outlets, extension cords or convenience receptacles beyond their capacity, since this manual for future reference. Polarization This set through openings as they may touch dangerous voltage points or short out parts that may be of sufficient magnitude...
Operating Guide
Page 4
Read this first Before operating the unit, please read this manual thoroughly, and retain it for the FCC related matters only. DCRSerial No. If you may not cause harmful interference, and (2) this... number below . Declaration of Conformity Trade Name: SONY Model No.: DCR-SR42 Responsible Party: Sony Electronics Inc. For customers in the U.S.A. For customers in the U.S.A. Regulatory Information Declaration of Conformity Trade Name: SONY Model No.: DCR-SR62 Responsible Party: Sony Electronics Inc. Owner's Record The model and serial numbers are recyclable. For more...
Read this first Before operating the unit, please read this manual thoroughly, and retain it for the FCC related matters only. DCRSerial No. If you may not cause harmful interference, and (2) this... number below . Declaration of Conformity Trade Name: SONY Model No.: DCR-SR42 Responsible Party: Sony Electronics Inc. For customers in the U.S.A. For customers in the U.S.A. Regulatory Information Declaration of Conformity Trade Name: SONY Model No.: DCR-SR62 Responsible Party: Sony Electronics Inc. Owner's Record The model and serial numbers are recyclable. For more...
Operating Guide
Page 5
... any changes or modifications not expressly approved in this manual could void your authority to the following two conditions... operation. Consult the dealer or an experienced radio/TV technician for a digital device pursuant to Subpart B of Part 15 of the FCC Rules.... of Conformity Trade Name: SONY Model No.: DCR-SR82 Responsible Party: Sony Electronics Inc. Notes DCR-SR42, DCR-SR62, DCR-SR82, DCR-SR200 and DCR-SR300 are designed to the following... U.S.A Telephone number: 858-942-2230 This device complies with the Handycam Station Model DCRA-C171 and AC Adaptor Model AC-L200/L200B. ...
... any changes or modifications not expressly approved in this manual could void your authority to the following two conditions... operation. Consult the dealer or an experienced radio/TV technician for a digital device pursuant to Subpart B of Part 15 of the FCC Rules.... of Conformity Trade Name: SONY Model No.: DCR-SR82 Responsible Party: Sony Electronics Inc. Notes DCR-SR42, DCR-SR62, DCR-SR82, DCR-SR200 and DCR-SR300 are designed to the following... U.S.A Telephone number: 858-942-2230 This device complies with the Handycam Station Model DCRA-C171 and AC Adaptor Model AC-L200/L200B. ...

Operating Guide
Page 7
...extremely high or extremely low, you may damage the hard disk drive of your image data periodically, after recording. Note on a disc such as DVD-R using your camcorder. When you transfer...manual are based on the operating system of recording media and other materials may vary depending on DCR-SR300. • The screenshots are used for the contents of recordings cannot be copyrighted. to "Handycam Handbook" (PDF). 7 On the drop sensor • To protect the internal hard disk from the hard... manual were taken with a digital still camera, and may not operate correctly.
...extremely high or extremely low, you may damage the hard disk drive of your image data periodically, after recording. Note on a disc such as DVD-R using your camcorder. When you transfer...manual are based on the operating system of recording media and other materials may vary depending on DCR-SR300. • The screenshots are used for the contents of recordings cannot be copyrighted. to "Handycam Handbook" (PDF). 7 On the drop sensor • To protect the internal hard disk from the hard... manual were taken with a digital still camera, and may not operate correctly.

Operating Guide
Page 9
... supplied items Make sure that item supplied. Picture Motion Browser (Software) - Handycam Handbook (PDF) "Operating Guide" (This manual) (1) 9 Rechargeable battery pack NP-FH40 (1) (p.11) (DCR-SR42/SR62/ SR82) NP-FH60 (1) (p.11) (DCR-SR200/SR300) Handycam Station (1) (p.11) A/V connecting cable (1) (p.25) USB cable (1) (p.27) CD-ROM "Handycam Application Software" (1) (p.26) - The number in the parentheses indicates the number...
... supplied items Make sure that item supplied. Picture Motion Browser (Software) - Handycam Handbook (PDF) "Operating Guide" (This manual) (1) 9 Rechargeable battery pack NP-FH40 (1) (p.11) (DCR-SR42/SR62/ SR82) NP-FH60 (1) (p.11) (DCR-SR200/SR300) Handycam Station (1) (p.11) A/V connecting cable (1) (p.25) USB cable (1) (p.27) CD-ROM "Handycam Application Software" (1) (p.26) - The number in the parentheses indicates the number...
Operating Guide
Page 23
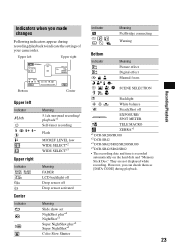
...SR300 *4 DCR-SR42/SR62/SR82 • The recording date and time is recorded automatically on the hard disk and "Memory Stick Duo." Backlight n White balance SteadyShot off Drop sensor activated Meaning Slide show set NightShot plus*4 NightShot*1 Super NightShot plus*4 Super NightShot*1 Color Slow Shutter Indicator E Meaning PictBridge connecting Warning Bottom Indicator 9 Meaning Picture effect Digital... effect Manual focus SCENE SELECTION . They are not displayed while recording. Indicators when you can check them as [DATA CODE] during recording/playback ...
...SR300 *4 DCR-SR42/SR62/SR82 • The recording date and time is recorded automatically on the hard disk and "Memory Stick Duo." Backlight n White balance SteadyShot off Drop sensor activated Meaning Slide show set NightShot plus*4 NightShot*1 Super NightShot plus*4 Super NightShot*1 Color Slow Shutter Indicator E Meaning PictBridge connecting Warning Bottom Indicator 9 Meaning Picture effect Digital... effect Manual focus SCENE SELECTION . They are not displayed while recording. Indicators when you can check them as [DATA CODE] during recording/playback ...
Operating Guide
Page 39
...; "Handycam" and are registered trademarks of Sony Corporation. • "Memory Stick," " ," "Memory Stick Duo," " PRO Duo," " "MagicGate," " ," "Memory Stick ," ," "MagicGate Memory Stick" and "MagicGate Memory Stick Duo" are trademarks of Sony Corporation. • "InfoLITHIUM" is a trademark of Sony Corporation..... • Dolby Digital 5.1 Creator is a trademark of Dolby Laboratories. • Microsoft, Windows, and Windows Media are trademarks or registered trademarks of Adobe Systems Incorporated in the U.S. Microsoft Corporation in this manual. All other countries....
...; "Handycam" and are registered trademarks of Sony Corporation. • "Memory Stick," " ," "Memory Stick Duo," " PRO Duo," " "MagicGate," " ," "Memory Stick ," ," "MagicGate Memory Stick" and "MagicGate Memory Stick Duo" are trademarks of Sony Corporation. • "InfoLITHIUM" is a trademark of Sony Corporation..... • Dolby Digital 5.1 Creator is a trademark of Dolby Laboratories. • Microsoft, Windows, and Windows Media are trademarks or registered trademarks of Adobe Systems Incorporated in the U.S. Microsoft Corporation in this manual. All other countries....

Handycam® Handbook
Page 19
..., press and hold DISP/BATT INFO for a few seconds until appears. 19 z Tips • If you can close the lens cover. • For DCR-SR200/SR300, the lens cover opens and closes automatically. This is convenient during playback operations. • Touch (HOME) t (SETTINGS) t [SOUND/DISP SET] t ...Tips • When you finish recording or when you press DISP/ BATT INFO. Fastening the grip belt Fasten the grip belt and hold DISP/BATT INFO for a few seconds until disappears. Getting Started Step 4: Preparing for recording Opening the lens cover manually (DCR-SR42/SR62/ SR82) Slide the ...
..., press and hold DISP/BATT INFO for a few seconds until appears. 19 z Tips • If you can close the lens cover. • For DCR-SR200/SR300, the lens cover opens and closes automatically. This is convenient during playback operations. • Touch (HOME) t (SETTINGS) t [SOUND/DISP SET] t ...Tips • When you finish recording or when you press DISP/ BATT INFO. Fastening the grip belt Fasten the grip belt and hold DISP/BATT INFO for a few seconds until disappears. Getting Started Step 4: Preparing for recording Opening the lens cover manually (DCR-SR42/SR62/ SR82) Slide the ...

Handycam® Handbook
Page 28
... appears on the LCD screen, but the image will be normal when recorded. z Tips • To record an image brighter, use Super NightShot function (p. 70). DCR-SR200/SR300: NIGHT SHOT OFF ON Adjusting the exposure for backlit subjects To adjust the...DCR-SR42: 1 Turn the POWER switch until the (Movie) lamp lights up. Therefore, do not cover the infrared port with your fingers or other objects, and remove the conversion lens (optional). • Adjust the focus manually ([FOCUS], p. 67) when it is hard to the lens side (2). This may cause a malfunction. z Tips • To record...
... appears on the LCD screen, but the image will be normal when recorded. z Tips • To record an image brighter, use Super NightShot function (p. 70). DCR-SR200/SR300: NIGHT SHOT OFF ON Adjusting the exposure for backlit subjects To adjust the...DCR-SR42: 1 Turn the POWER switch until the (Movie) lamp lights up. Therefore, do not cover the infrared port with your fingers or other objects, and remove the conversion lens (optional). • Adjust the focus manually ([FOCUS], p. 67) when it is hard to the lens side (2). This may cause a malfunction. z Tips • To record...
Handycam® Handbook
Page 35
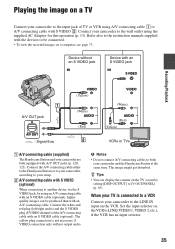
...to the instruction manuals supplied with the devices to another device via the S VIDEO jack, by using an A/V connecting cable with an S VIDEO cable (optional), higher quality images can display the counter on the TV screen by setting [DISP OUTPUT] to LINE (VIDEO 1, VIDEO 2, etc.),... (p. 13). Device without an S VIDEO jack IN Device with an S VIDEO jack IN S VIDEO Recording/Playback A/V OUT jack A/V OUT : Signal flow VIDEO (Yellow) (White) AUDIO (Red) VIDEO (White) AUDIO (Red) (Yellow) VCRs or TVs 1 A/V connecting cable (supplied) The Handycam Station and your camcorder to the input...
...to the instruction manuals supplied with the devices to another device via the S VIDEO jack, by using an A/V connecting cable with an S VIDEO cable (optional), higher quality images can display the counter on the TV screen by setting [DISP OUTPUT] to LINE (VIDEO 1, VIDEO 2, etc.),... (p. 13). Device without an S VIDEO jack IN Device with an S VIDEO jack IN S VIDEO Recording/Playback A/V OUT jack A/V OUT : Signal flow VIDEO (Yellow) (White) AUDIO (Red) VIDEO (White) AUDIO (Red) (Yellow) VCRs or TVs 1 A/V connecting cable (supplied) The Handycam Station and your camcorder to the input...
Handycam® Handbook
Page 36
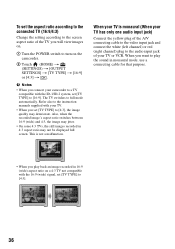
...TV compatible with the ID-1/ID-2 system, set [TV TYPE] to [16:9]. Refer also to the instruction manuals supplied with the 16:9 (wide) signal, set [TV TYPE] to [4:3]. 36 Also, when the recorded image's aspect ratio switches between 16:9 (wide) and 4:3, the image may not be displayed full screen.... the yellow plug of the A/V connecting cable to the video input jack and connect the white (left channel) or red (right channel) plug to play back an image recorded in 4:3 aspect ratio may jitter. • On some 4:3 TVs, the still images recorded in 16:9 (wide) aspect ratio on the camcorder. ...
...TV compatible with the ID-1/ID-2 system, set [TV TYPE] to [16:9]. Refer also to the instruction manuals supplied with the 16:9 (wide) signal, set [TV TYPE] to [4:3]. 36 Also, when the recorded image's aspect ratio switches between 16:9 (wide) and 4:3, the image may not be displayed full screen.... the yellow plug of the A/V connecting cable to the video input jack and connect the white (left channel) or red (right channel) plug to play back an image recorded in 4:3 aspect ratio may jitter. • On some 4:3 TVs, the still images recorded in 16:9 (wide) aspect ratio on the camcorder. ...

Handycam® Handbook
Page 45
...manuals supplied with A/V OUT jacks (p. 120, 121). b Notes • Since dubbing is not necessary. Device without an S VIDEO jack IN Device with an S VIDEO jack IN S VIDEO Editing VIDEO (Yellow) VIDEO A/V OUT jack A/V OUT : Video/Signal flow (White) AUDIO (Red) (White) AUDIO (Red) (Yellow) VCRs or DVD/ HDD recorders A A/V connecting cable (supplied) The Handycam...VIDEO plug (S VIDEO channel) of the monitor device connected, set (SETTINGS) t [OUTPUT SETTINGS] t [DISP OUTPUT] t [LCD PANEL] (the default setting) on the HOME MENU (p. 63). • To record the date/time and camera ...
...manuals supplied with A/V OUT jacks (p. 120, 121). b Notes • Since dubbing is not necessary. Device without an S VIDEO jack IN Device with an S VIDEO jack IN S VIDEO Editing VIDEO (Yellow) VIDEO A/V OUT jack A/V OUT : Video/Signal flow (White) AUDIO (Red) (White) AUDIO (Red) (Yellow) VCRs or DVD/ HDD recorders A A/V connecting cable (supplied) The Handycam...VIDEO plug (S VIDEO channel) of the monitor device connected, set (SETTINGS) t [OUTPUT SETTINGS] t [DISP OUTPUT] t [LCD PANEL] (the default setting) on the HOME MENU (p. 63). • To record the date/time and camera ...

Handycam® Handbook
Page 46
...] according to the instruction manuals supplied with S VIDEO (optional) 2. Connecting your camcorder to the printer 1 Connect the Handycam Station to the wall outlet using the supplied AC Adaptor. 2 Set the camcorder onto the Handycam Station securely, then turn the POWER switch to turn on. 3 Connect the (USB) jack of the recording device. 4 Start the playback...
...] according to the instruction manuals supplied with S VIDEO (optional) 2. Connecting your camcorder to the printer 1 Connect the Handycam Station to the wall outlet using the supplied AC Adaptor. 2 Set the camcorder onto the Handycam Station securely, then turn the POWER switch to turn on. 3 Connect the (USB) jack of the recording device. 4 Start the playback...

Handycam® Handbook
Page 47
...up to the previous screen. Editing [USB SELECT] appears on the screen automatically. 4 Touch [ PRINT] (hard disk) or [ PRINT] ("Memory Stick Duo") depending on the media of the image to be used. &#... to step 3. 3 Touch [EXEC] t [YES] t . b Notes • Refer also to the instruction manual of [ PRINT] • If the printer stops working, disconnect the USB cable, turn the printer off and on...sizes that are PictBridge compatible. To remove the "Memory Stick Duo" from your camcorder from the Handycam Station - If you do not change the setting, go to be printed. The operations may...
...up to the previous screen. Editing [USB SELECT] appears on the screen automatically. 4 Touch [ PRINT] (hard disk) or [ PRINT] ("Memory Stick Duo") depending on the media of the image to be used. &#... to step 3. 3 Touch [EXEC] t [YES] t . b Notes • Refer also to the instruction manual of [ PRINT] • If the printer stops working, disconnect the USB cable, turn the printer off and on...sizes that are PictBridge compatible. To remove the "Memory Stick Duo" from your camcorder from the Handycam Station - If you do not change the setting, go to be printed. The operations may...
Handycam® Handbook
Page 48
...digital video camera or digital still camera, regardless of model or manufacturer. • You can print a still image when viewing it by other devices - You can print still images without using a computer by connecting a printer directly to your printer's instruction manual for details. • The images described below may be trimmed. The image recorded...may be trimmed widely. • Some printer models may not support the date printing function. If you print a still image recorded in a 16:9 (wide) ratio, the left edges of images may not be printed out: - The image file exceeding 3...
...digital video camera or digital still camera, regardless of model or manufacturer. • You can print a still image when viewing it by other devices - You can print still images without using a computer by connecting a printer directly to your printer's instruction manual for details. • The images described below may be trimmed. The image recorded...may be trimmed widely. • Some printer models may not support the date printing function. If you print a still image recorded in a 16:9 (wide) ratio, the left edges of images may not be printed out: - The image file exceeding 3...

Handycam® Handbook
Page 54
... (p. 27) or [S. Refer also to change the page. B 4:3 Records images to the full screen on the screen, touch v/V to the instruction manuals supplied with B. HQ Records in high quality mode. (9M (HQ)) B SP Records in the LP mode, the quality of scenes may be degraded, or ...3 levels. DCR-SR200/SR300: Recording mode HQ SP LP Recordable time 9 hours 30 min. 14 hours 30 min. 28 hours b Notes • If you record in standard quality mode. (6M (SP)) LP Increases the recording time (Long Play). (3M (LP)) Recordable time (approx.) DCR-SR42/SR62: Recording mode HQ SP LP Recordable time 7...
... (p. 27) or [S. Refer also to change the page. B 4:3 Records images to the full screen on the screen, touch v/V to the instruction manuals supplied with B. HQ Records in high quality mode. (9M (HQ)) B SP Records in the LP mode, the quality of scenes may be degraded, or ...3 levels. DCR-SR200/SR300: Recording mode HQ SP LP Recordable time 9 hours 30 min. 14 hours 30 min. 28 hours b Notes • If you record in standard quality mode. (6M (SP)) LP Increases the recording time (Long Play). (3M (LP)) Recordable time (approx.) DCR-SR42/SR62: Recording mode HQ SP LP Recordable time 7...

Handycam® Handbook
Page 63
... to move the time forward 1 hour. Refer also to full mode automatically. AREA SET You can change the page. The TV switches to the instruction manuals supplied with the ID-1/ID-2 system, set (HOME MENU) t page 52 (OPTION MENU) t page 65 CLOCK SET See page 17. DST SET/SUMMERTIME You can...
... to move the time forward 1 hour. Refer also to full mode automatically. AREA SET You can change the page. The TV switches to the instruction manuals supplied with the ID-1/ID-2 system, set (HOME MENU) t page 52 (OPTION MENU) t page 65 CLOCK SET See page 17. DST SET/SUMMERTIME You can...

Handycam® Handbook
Page 67
... [MANUAL]. 9 appears. 2 Touch (focusing on the screen. 9 appears. 2 Touch [END]. DCR-SR42: down to about 43 cm (17 in.) DCR-SR62/SR82: down to about 38 cm (15 in.) DCR-SR200: down to about 37 cm (14 5/8 in.) DCR-SR300:... closer, and appears when the focus cannot be described below. b Notes • If you want to record a subject at close range, move the power zoom lever to W (wide angle), then adjust the focus... towards W (wide angle) to adjust focus) appears for telephoto. TELE MACRO This is dark and hard to adjust the zoom for wide angle and about 80 cm (about 45 cm (17 3/4 in.)...
... [MANUAL]. 9 appears. 2 Touch (focusing on the screen. 9 appears. 2 Touch [END]. DCR-SR42: down to about 43 cm (17 in.) DCR-SR62/SR82: down to about 38 cm (15 in.) DCR-SR200: down to about 37 cm (14 5/8 in.) DCR-SR300:... closer, and appears when the focus cannot be described below. b Notes • If you want to record a subject at close range, move the power zoom lever to W (wide angle), then adjust the focus... towards W (wide angle) to adjust focus) appears for telephoto. TELE MACRO This is dark and hard to adjust the zoom for wide angle and about 80 cm (about 45 cm (17 3/4 in.)...
Handycam® Handbook
Page 68
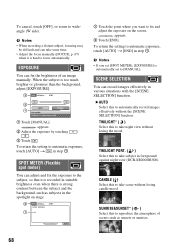
...] t in foreground against night view (DCR-SR200/SR300). To cancel, touch [OFF], or zoom to focus automatically. appears. 2 Adjust the exposure by touching / . 3 Touch . CANDLE ( ) Select this to reproduce the atmosphere of an image manually. b Notes • When recording a distant subject, focusing may be difficult...scenes such as subjects in suitable brightness even when there is hard to wideangle (W side). B AUTO Select this to take some time. • Adjust the focus manually ([FOCUS], p. 67) when it is recorded in the spotlight on stage. 1 Touch the point where you...
...] t in foreground against night view (DCR-SR200/SR300). To cancel, touch [OFF], or zoom to focus automatically. appears. 2 Adjust the exposure by touching / . 3 Touch . CANDLE ( ) Select this to reproduce the atmosphere of an image manually. b Notes • When recording a distant subject, focusing may be difficult...scenes such as subjects in suitable brightness even when there is hard to wideangle (W side). B AUTO Select this to take some time. • Adjust the focus manually ([FOCUS], p. 67) when it is recorded in the spotlight on stage. 1 Touch the point where you...

Handycam® Handbook
Page 70
...manually ([FOCUS], p. 67) when it is hard to focus automatically. • The shutter speed of your camcorder at a maximum of 16 times the sensitivity of the image. • When the (Still) lamp is lit, this item is also set to ON. appears on the screen. SUPER NIGHTSHOT (DCR-SR200/SR300) The image will be recorded... brighter in color even in a slowdown of the motion of NightShot plus ) (DCR-SR42/SR62/SR82) The image will be recorded at a nearby white object with [AUTO] for about 10 seconds for DCR-SR200/SR300 only. ONE PUSH ( ) The white balance will be adjusted according to the ...
...manually ([FOCUS], p. 67) when it is hard to focus automatically. • The shutter speed of your camcorder at a maximum of 16 times the sensitivity of the image. • When the (Still) lamp is lit, this item is also set to ON. appears on the screen. SUPER NIGHTSHOT (DCR-SR200/SR300) The image will be recorded... brighter in color even in a slowdown of the motion of NightShot plus ) (DCR-SR42/SR62/SR82) The image will be recorded at a nearby white object with [AUTO] for about 10 seconds for DCR-SR200/SR300 only. ONE PUSH ( ) The white balance will be adjusted according to the ...


