Camera Operations Guide
Page 31
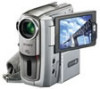
... screen, touch / . Recording REC START/STOP 1 Touch . 2 Touch [SELF-TIMER]. If you can start recording after a delay of about 10 seconds (The count down Touch [RESET] or press REC START/STOP. appears. 60min STBY 0:00:00 P-MENU Recording 31
... screen, touch / . Recording REC START/STOP 1 Touch . 2 Touch [SELF-TIMER]. If you can start recording after a delay of about 10 seconds (The count down Touch [RESET] or press REC START/STOP. appears. 60min STBY 0:00:00 P-MENU Recording 31

Camera Operations Guide
Page 34
You will hear a beep sound counting down Touch [RESET]. When bars of about 10 seconds (The count down indication begins from the (CAMERA SET) menu. 60min 1152 FINE 30 SELF-TIMER: OFF OFF ON ...
You will hear a beep sound counting down Touch [RESET]. When bars of about 10 seconds (The count down indication begins from the (CAMERA SET) menu. 60min 1152 FINE 30 SELF-TIMER: OFF OFF ON ...
Camera Operations Guide
Page 61
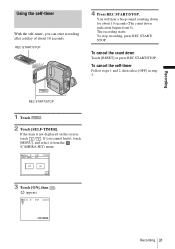
... switch repeatedly to "0:00:00" and appears on the tape counter. Playback Locating a scene on . Zero set memory will not function correctly if there is reset to select the PLAY/EDIT mode. 2 Press SEARCH M.
... switch repeatedly to "0:00:00" and appears on the tape counter. Playback Locating a scene on . Zero set memory will not function correctly if there is reset to select the PLAY/EDIT mode. 2 Press SEARCH M.
Camera Operations Guide
Page 73
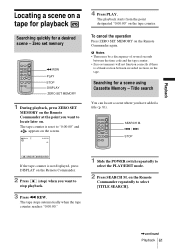
... is replaced with another one. To cancel creation, select [NO]. 2 Touch . Move the POWER switch to select other power modes. - Select to reset the file number to 999MSDCF) on the "Memory Stick Duo." ,continued Using the Menu 73 Operate any buttons. - Eject the "Memory Stick Duo." &#... page 128. 1 Touch [YES] twice. FILE NO. The file number is reset when a new folder is created or the recording folder is changed. b Notes • You cannot delete the created folders using your camcorder. Eject the "Memory Stick Duo." For details on the "Memory Stick Duo" ...
... is replaced with another one. To cancel creation, select [NO]. 2 Touch . Move the POWER switch to select other power modes. - Select to reset the file number to 999MSDCF) on the "Memory Stick Duo." ,continued Using the Menu 73 Operate any buttons. - Eject the "Memory Stick Duo." &#... page 128. 1 Touch [YES] twice. FILE NO. The file number is reset when a new folder is created or the recording folder is changed. b Notes • You cannot delete the created folders using your camcorder. Eject the "Memory Stick Duo." For details on the "Memory Stick Duo" ...
Camera Operations Guide
Page 90
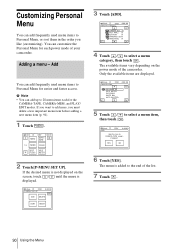
... . 60min MENU STBY 0:00:00 EXPO- The available items vary depending on the screen, touch / until the menu is added to the end of the camcorder. If the desired menu is not displayed on the power mode of the list. 7 Touch . 90 Using the Menu PROGRAM AE SPOT METER EXPOSURE WHITE... BAL. EDIT/PLAY STANDARD SET TIME/LANGU. The menu is displayed. 60min STBY P-MENU SET UP 0:00:00 END ADD DELETE SORT RESET 3 Touch [ADD]. 60min STBY 0:00:00 Select the category. SURE 1/3 FADER FOCUS SPOT SPOT FOCUS METER 2 Touch [P-MENU SET UP]. You can customize the ...
... . 60min MENU STBY 0:00:00 EXPO- The available items vary depending on the screen, touch / until the menu is added to the end of the camcorder. If the desired menu is not displayed on the power mode of the list. 7 Touch . 90 Using the Menu PROGRAM AE SPOT METER EXPOSURE WHITE... BAL. EDIT/PLAY STANDARD SET TIME/LANGU. The menu is displayed. 60min STBY P-MENU SET UP 0:00:00 END ADD DELETE SORT RESET 3 Touch [ADD]. 60min STBY 0:00:00 Select the category. SURE 1/3 FADER FOCUS SPOT SPOT FOCUS METER 2 Touch [P-MENU SET UP]. You can customize the ...
Camera Operations Guide
Page 91
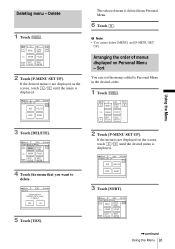
... menu is not displayed on the screen, touch / until the desired menu is displayed. 60min STBY P-MENU SET UP 0:00:00 END ADD DELETE SORT RESET 3 Touch [SORT]. 60min STBY 0:00:00 Select button to delete. 0:00:00 MENU EXPO- YES NO 5 Touch [YES]. If the menu is not displayed on... FOCUS SPOT SPOT FOCUS METER 2 Touch [P-MENU SET UP]. The selected menu is displayed. 60min STBY P-MENU SET UP 0:00:00 END ADD DELETE SORT RESET 3 Touch [DELETE]. 60min STBY Select button to move. SURE 1/3 FADER FOCUS SPOT SPOT FOCUS METER 2 Touch [P-MENU SET UP].
... menu is not displayed on the screen, touch / until the desired menu is displayed. 60min STBY P-MENU SET UP 0:00:00 END ADD DELETE SORT RESET 3 Touch [SORT]. 60min STBY 0:00:00 Select button to delete. 0:00:00 MENU EXPO- YES NO 5 Touch [YES]. If the menu is not displayed on... FOCUS SPOT SPOT FOCUS METER 2 Touch [P-MENU SET UP]. The selected menu is displayed. 60min STBY P-MENU SET UP 0:00:00 END ADD DELETE SORT RESET 3 Touch [DELETE]. 60min STBY Select button to move. SURE 1/3 FADER FOCUS SPOT SPOT FOCUS METER 2 Touch [P-MENU SET UP].
Camera Operations Guide
Page 92
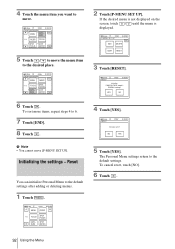
...Initializing the settings - SPOT SURE METER 5 Touch [YES]. YES NO 6 Touch . Reset You can initialize Personal Menu to the default settings. 4 Touch the menu item you sure... to move [P-MENU SET UP]. To sort more items, repeat steps 4 to 6. 7 Touch [END]. 8 Touch . 4 Touch [YES]. 60min RESET STBY 0:00:00 Are you want to the desired place. 60min STBY 0:00:00 Select new location. 1 2 END MENU FADER 1/3 3 FOCUS ... P-MENU SET UP 0:00:00 END ADD DELETE SORT RESET 3 Touch [RESET]. 60min RESET STBY 0:00:00 Initialize CAMERA-TAPE mode's P-MENU setting? To cancel...
...Initializing the settings - SPOT SURE METER 5 Touch [YES]. YES NO 6 Touch . Reset You can initialize Personal Menu to the default settings. 4 Touch the menu item you sure... to move [P-MENU SET UP]. To sort more items, repeat steps 4 to 6. 7 Touch [END]. 8 Touch . 4 Touch [YES]. 60min RESET STBY 0:00:00 Are you want to the desired place. 60min STBY 0:00:00 Select new location. 1 2 END MENU FADER 1/3 3 FOCUS ... P-MENU SET UP 0:00:00 END ADD DELETE SORT RESET 3 Touch [RESET]. 60min RESET STBY 0:00:00 Initialize CAMERA-TAPE mode's P-MENU setting? To cancel...
Camera Operations Guide
Page 113
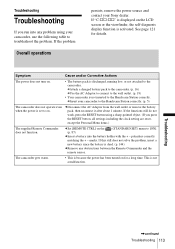
... a battery into any obstructions between the Remote Commander and the remote sensor. marks. cInsert your Sony dealer. This is set to the Handycam Station correctly. cAttach a charged battery pack to the camcorder. (p. 16) cUse the AC Adaptor to connect to the wall outlet. (p. 19) •...continued Troubleshooting 113 polarities correctly matching the + - If the functions still do not work, press the RESET button using your camcorder, use the following table to the camcorder. If this still does not solve the problem, insert a new battery since the battery is displayed on...
... a battery into any obstructions between the Remote Commander and the remote sensor. marks. cInsert your Sony dealer. This is set to the Handycam Station correctly. cAttach a charged battery pack to the camcorder. (p. 16) cUse the AC Adaptor to connect to the wall outlet. (p. 19) •...continued Troubleshooting 113 polarities correctly matching the + - If the functions still do not work, press the RESET button using your camcorder, use the following table to the camcorder. If this still does not solve the problem, insert a new battery since the battery is displayed on...
Camera Operations Guide
Page 121
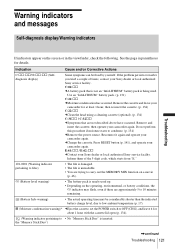
... 131) C:21:ss cMoisture condensation has occurred. Press RESET button (p. 141), and operate your camcorder again. Warning indicators and messages Self-diagnosis display/Warning indicators... the cassette, then operate your camcorder again. Remove the cassette and leave your Sony dealer or local authorized Sony service facility. E:61:ss / E:62:ss cContact your camcorder for at least 1 hour, ...134) cRemove the power source. If the problem persists even after you tried a couple of the 5-digit code, which starts from "E." 101-0001 (Warning indicator pertaining to files) • The file is ...
... 131) C:21:ss cMoisture condensation has occurred. Press RESET button (p. 141), and operate your camcorder again. Warning indicators and messages Self-diagnosis display/Warning indicators... the cassette, then operate your camcorder again. Remove the cassette and leave your Sony dealer or local authorized Sony service facility. E:61:ss / E:62:ss cContact your camcorder for at least 1 hour, ...134) cRemove the power source. If the problem persists even after you tried a couple of the 5-digit code, which starts from "E." 101-0001 (Warning indicator pertaining to files) • The file is ...
Camera Operations Guide
Page 141
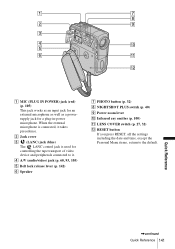
... release lever (p. 142) F Speaker G PHOTO button (p. 32) H NIGHTSHOT PLUS switch (p. 40) I Power zoom lever J Infrared ray emitter (p. 100) K LENS COVER switch (p. 27, 32) L RESET button If you press RESET, all the settings including the date and time, except the Personal Menu items, return to it takes precedence. B Jack cover C (LANC) jack (blue...
... release lever (p. 142) F Speaker G PHOTO button (p. 32) H NIGHTSHOT PLUS switch (p. 40) I Power zoom lever J Infrared ray emitter (p. 100) K LENS COVER switch (p. 27, 32) L RESET button If you press RESET, all the settings including the date and time, except the Personal Menu items, return to it takes precedence. B Jack cover C (LANC) jack (blue...
Camera Operations Guide
Page 148
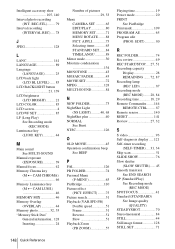
..., 87 Recording lamp (REC LED 87 Recording mode (REC MODE) ....... 28, 84 Recording time 18, 29 Remote Commander........ 144 REMOTE CTRL......... 87 Remote sensor 140 RESET 141 Review 27, 32 S S video 93 Self-diagnosis display ..... 121 Self-timer recording (SELF-TIMER) .... 31, 34 Skip scan 51 SLIDE SHOW 76 Slow shutter...
..., 87 Recording lamp (REC LED 87 Recording mode (REC MODE) ....... 28, 84 Recording time 18, 29 Remote Commander........ 144 REMOTE CTRL......... 87 Remote sensor 140 RESET 141 Review 27, 32 S S video 93 Self-diagnosis display ..... 121 Self-timer recording (SELF-TIMER) .... 31, 34 Skip scan 51 SLIDE SHOW 76 Slow shutter...


