
Camera Operations Guide
Page 2
... data transfer to the collection and recycling location nearest you. You can help preserve our environment by returning your used rechargeable batteries to discontinue midway (fail), restart the application or disconnect and connect the USB cable again. Operation is subject to the following... more information regarding recycling of the FCC Rules. For customers in the literature accompanying the appliance. This Class B digital apparatus complies with Part 15 of rechargeable batteries, call toll free 1-800-822- 8837, or visit http://www.rbrc.org/ Caution: Do not handle damaged...
... data transfer to the collection and recycling location nearest you. You can help preserve our environment by returning your used rechargeable batteries to discontinue midway (fail), restart the application or disconnect and connect the USB cable again. Operation is subject to the following... more information regarding recycling of the FCC Rules. For customers in the literature accompanying the appliance. This Class B digital apparatus complies with Part 15 of rechargeable batteries, call toll free 1-800-822- 8837, or visit http://www.rbrc.org/ Caution: Do not handle damaged...
Camera Operations Guide
Page 5
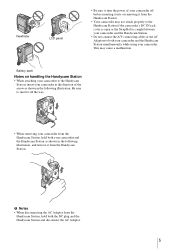
Battery pack Notes on handling the Handycam Station • When attaching your camcorder to insert it all the way. • When removing your camcorder from the Handycam Station, hold both your camcorder and the Handycam Station simultaneously while using your camcorder off before inserting it into or removing it from the Handycam Station. Be sure to the Handycam Station, insert your...
Battery pack Notes on handling the Handycam Station • When attaching your camcorder to insert it all the way. • When removing your camcorder from the Handycam Station, hold both your camcorder and the Handycam Station simultaneously while using your camcorder off before inserting it into or removing it from the Handycam Station. Be sure to the Handycam Station, insert your...
Camera Operations Guide
Page 6
...for a longer time 29 Using zoom ...29 Recording in mirror mode 30 Using the self-timer ...31 Recording still images - Table of Easy Handycam operation 37 6 Read this first 2 Quick Start Guide Recording movies 10 Recording still images 12 Recording/Playing back with ease 14 Getting started Step... 1: Checking supplied items 15 Step 2: Charging the battery pack 16 Using an outside power source 19 Step 3: Turning the power on a tape 35 Recording with ease - Memory photo recording ...
...for a longer time 29 Using zoom ...29 Recording in mirror mode 30 Using the self-timer ...31 Recording still images - Table of Easy Handycam operation 37 6 Read this first 2 Quick Start Guide Recording movies 10 Recording still images 12 Recording/Playing back with ease 14 Getting started Step... 1: Checking supplied items 15 Step 2: Charging the battery pack 16 Using an outside power source 19 Step 3: Turning the power on a tape 35 Recording with ease - Memory photo recording ...
Camera Operations Guide
Page 8
... - TITLE/ TAPE TITLE, etc 80 Using the (STANDARD SET) menu - Digital program editing 98 Dubbing sound to a recorded tape 105 Deleting recorded pictures .........107 Marking recorded images with your camcorder: • Editing images with specific information - PROGRAM AE/WHITE BAL./16:9... Troubleshooting 113 Warning indicators and messages ...121 Additional Information Using your camcorder abroad .........126 Usable cassette tapes 127 About the "Memory Stick 128 About the "InfoLITHIUM" battery pack 131 About i.LINK 132 Maintenance and precautions ..........133 Specification 136...
... - TITLE/ TAPE TITLE, etc 80 Using the (STANDARD SET) menu - Digital program editing 98 Dubbing sound to a recorded tape 105 Deleting recorded pictures .........107 Marking recorded images with your camcorder: • Editing images with specific information - PROGRAM AE/WHITE BAL./16:9... Troubleshooting 113 Warning indicators and messages ...121 Additional Information Using your camcorder abroad .........126 Usable cassette tapes 127 About the "Memory Stick 128 About the "InfoLITHIUM" battery pack 131 About i.LINK 132 Maintenance and precautions ..........133 Specification 136...

Camera Operations Guide
Page 10
... cover. of the back of the up, then push the center the cassette compartment arrow to the camcorder. To charge the battery, see page 16. BATT (battery release) lever 2 Insert a cassette into the camcorder. comes out automatically. ZEJECT lever in by itself. The cassette compartment cassette. as shown in the illustration and press down...
... cover. of the back of the up, then push the center the cassette compartment arrow to the camcorder. To charge the battery, see page 16. BATT (battery release) lever 2 Insert a cassette into the camcorder. comes out automatically. ZEJECT lever in by itself. The cassette compartment cassette. as shown in the illustration and press down...

Camera Operations Guide
Page 12
BATT (battery release) lever 2 Insert a "Memory Stick Duo" into the camcorder. Recording still images 1 Attach the charged battery pack to the camcorder. Insert it clicks. B mark 12 Quick Start Guide as shown in until it so that the B mark is at the upper right corner. Push in the illustration and press down the battery pack until it clicks. To charge the battery, see page 16. a Slide the BATT (battery release) b Attach the battery pack with its lever and remove the battery terminal side facing your camcorder terminal cover.
BATT (battery release) lever 2 Insert a "Memory Stick Duo" into the camcorder. Recording still images 1 Attach the charged battery pack to the camcorder. Insert it clicks. B mark 12 Quick Start Guide as shown in until it so that the B mark is at the upper right corner. Push in the illustration and press down the battery pack until it clicks. To charge the battery, see page 16. a Slide the BATT (battery release) b Attach the battery pack with its lever and remove the battery terminal side facing your camcorder terminal cover.
Camera Operations Guide
Page 15
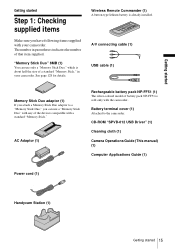
... page 128 for details. AC Adaptor (1) Rechargeable battery pack NP-FF51 (1) The silver-colored model of that item supplied. The number in your camcorder. CD-ROM "SPVD-012 USB Driver" (1) Cleaning cloth (1) Camera Operations Guide (This manual) (1) Computer Applications Guide (1) Power cord (1) Handycam Station (1) Getting started Step 1: Checking supplied items Make sure you...
... page 128 for details. AC Adaptor (1) Rechargeable battery pack NP-FF51 (1) The silver-colored model of that item supplied. The number in your camcorder. CD-ROM "SPVD-012 USB Driver" (1) Cleaning cloth (1) Camera Operations Guide (This manual) (1) Computer Applications Guide (1) Power cord (1) Handycam Station (1) Getting started Step 1: Checking supplied items Make sure you...

Camera Operations Guide
Page 16
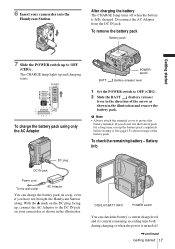
... camcorder as shown in the following illustration and press down the battery pack until it clicks. Step 2: Charging the battery pack You can charge the battery by attaching the "InfoLITHIUM" battery pack (F series) to the wall outlet. BATT (battery release) lever 2 Attach the battery ...pack with any malfunction occurs. 1 Slide the BATT (battery release) lever and remove the battery terminal cover. DC plug DC IN jack Handycam...
... camcorder as shown in the following illustration and press down the battery pack until it clicks. Step 2: Charging the battery pack You can charge the battery by attaching the "InfoLITHIUM" battery pack (F series) to the wall outlet. BATT (battery release) lever 2 Attach the battery ...pack with any malfunction occurs. 1 Slide the BATT (battery release) lever and remove the battery terminal cover. DC plug DC IN jack Handycam...
Camera Operations Guide
Page 17
... POWER switch You can charge the battery pack on your camcorder into the Handycam Station. To remove the battery pack Battery pack Getting started 17 The CHARGE lamp lights up , connect the AC Adaptor to OFF (CHG) . To charge the battery pack using only the AC Adaptor BATT POWER switch (battery release) lever 1 Set the POWER switch...
... POWER switch You can charge the battery pack on your camcorder into the Handycam Station. To remove the battery pack Battery pack Getting started 17 The CHARGE lamp lights up , connect the AC Adaptor to OFF (CHG) . To charge the battery pack using only the AC Adaptor BATT POWER switch (battery release) lever 1 Set the POWER switch...
Camera Operations Guide
Page 18
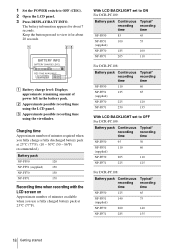
... Recording time when recording with the LCD screen on Approximate number of power left in the battery pack. The battery information appears for about 7 seconds. 1 Set the POWER switch to OFF For DCR-PC109: Battery pack Continuous Typical* recording recording time time NP-FF50 95 50 NP-FF51 110 60 (...NP-FF51 140 75 (supplied) NP-FF70 260 140 NP-FF71 285 155 18 Getting started With LCD BACKLIGHT set to ON For DCR-PC109: Battery pack Continuous Typical* recording recording time time NP-FF50 85 45 NP-FF51 100 55 (supplied) NP-FF70 185 100 NP-FF71 205...
... Recording time when recording with the LCD screen on Approximate number of power left in the battery pack. The battery information appears for about 7 seconds. 1 Set the POWER switch to OFF For DCR-PC109: Battery pack Continuous Typical* recording recording time time NP-FF50 95 50 NP-FF51 110 60 (...NP-FF51 140 75 (supplied) NP-FF70 260 140 NP-FF71 285 155 18 Getting started With LCD BACKLIGHT set to ON For DCR-PC109: Battery pack Continuous Typical* recording recording time time NP-FF50 85 45 NP-FF51 100 55 (supplied) NP-FF70 185 100 NP-FF71 205...
Camera Operations Guide
Page 19
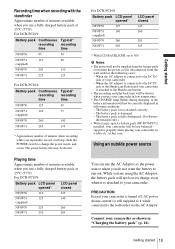
... at 25°C (77°F). Connect your camcorder as the power source when you do not want the battery to the Handycam Station • The recording and playback time will not be less balanced support it while connected to your camcorder in following cases: - For DCR-PC109: Battery pack Continuous Typical* recording recording time time NP-FF50...
... at 25°C (77°F). Connect your camcorder as the power source when you do not want the battery to the Handycam Station • The recording and playback time will not be less balanced support it while connected to your camcorder in following cases: - For DCR-PC109: Battery pack Continuous Typical* recording recording time time NP-FF50...

Camera Operations Guide
Page 21
This setting saves battery power. • Even if you adjust the LCD screen backlight, the recorded picture will not be affected. • You can turn off the LCD screen backlight ( appears on the screen.). Open the LCD panel 90 degrees to the camcorder, then rotate it to see. Maximum ... lens adjustment lever until the picture is hard to the desired position. If you use your camcorder in the (STANDARD SET) menu to [OFF] (p. 87). Getting started 21 Use the viewfinder when the battery is running out, or when the screen is clear. ,continued Getting started Step 4: Adjusting ...
This setting saves battery power. • Even if you adjust the LCD screen backlight, the recorded picture will not be affected. • You can turn off the LCD screen backlight ( appears on the screen.). Open the LCD panel 90 degrees to the camcorder, then rotate it to see. Maximum ... lens adjustment lever until the picture is hard to the desired position. If you use your camcorder in the (STANDARD SET) menu to [OFF] (p. 87). Getting started 21 Use the viewfinder when the battery is running out, or when the screen is clear. ,continued Getting started Step 4: Adjusting ...

Camera Operations Guide
Page 22
...1 Turn on the viewfinder. If you do not use the viewfinder during operation When you are using this camcorder for about 3 months, the built-in rechargeable button-type battery gets discharged and the date and time settings may be cleared from the memory. SURE 1/3 FADER FOCUS SPOT ... METER 22 Getting started In that case, charge the rechargeable button-type battery (p. 136) and then set . • [EXPOSURE]: Adjust with the screen facing out. EXPO- The LCD screen is turned off ?] appears on your camcorder (p. 20). 2 Open the LCD panel. Have the LCD panel rotated...
...1 Turn on the viewfinder. If you do not use the viewfinder during operation When you are using this camcorder for about 3 months, the built-in rechargeable button-type battery gets discharged and the date and time settings may be cleared from the memory. SURE 1/3 FADER FOCUS SPOT ... METER 22 Getting started In that case, charge the rechargeable button-type battery (p. 136) and then set . • [EXPOSURE]: Adjust with the screen facing out. EXPO- The LCD screen is turned off ?] appears on your camcorder (p. 20). 2 Open the LCD panel. Have the LCD panel rotated...

Camera Operations Guide
Page 25
... SH 1/2 FRAN ÇAIS ENG [SIMP] ESPA ÑOL ,continued Getting started POWER switch 1 Turn on your camcorder, turn the power off, eject the "Memory Stick Duo," or remove the battery pack. Otherwise, image data may be damaged. • Do not insert anything other than a "Memory Stick Duo" ...into the "Memory Stick Duo" slot. Doing so may cause a malfunction of your camcorder. • When the access lamp is lit or flashing, your camcorder is not displayed on the LCD screen. Do not shake or knock your camcorder. 2 Open the LCD panel. 3 Touch . 60min MENU STBY 0:00:00 EXPO...
... SH 1/2 FRAN ÇAIS ENG [SIMP] ESPA ÑOL ,continued Getting started POWER switch 1 Turn on your camcorder, turn the power off, eject the "Memory Stick Duo," or remove the battery pack. Otherwise, image data may be damaged. • Do not insert anything other than a "Memory Stick Duo" ...into the "Memory Stick Duo" slot. Doing so may cause a malfunction of your camcorder. • When the access lamp is lit or flashing, your camcorder is not displayed on the LCD screen. Do not shake or knock your camcorder. 2 Open the LCD panel. 3 Touch . 60min MENU STBY 0:00:00 EXPO...

Camera Operations Guide
Page 28
..."Memory Stick Duo," the only menu items available will not be recorded on the tape. When you do not operate the camcorder for Cassette Memory cassettes B Remaining battery The indicated time may not be correct depending on the environment of use. C Recording status ([STBY] (standby) or ... (p. 87) G Personal Menu button (p. 63) H END SEARCH/EDIT SEARCH/Rec review display switch button (p. 48) A Recording folder B Remaining battery The indicated time may not be correct depending on the environment of the "Memory Stick Duo" G "Memory Stick Duo" recording start indicator (appears for...
..."Memory Stick Duo," the only menu items available will not be recorded on the tape. When you do not operate the camcorder for Cassette Memory cassettes B Remaining battery The indicated time may not be correct depending on the environment of use. C Recording status ([STBY] (standby) or ... (p. 87) G Personal Menu button (p. 63) H END SEARCH/EDIT SEARCH/Rec review display switch button (p. 48) A Recording folder B Remaining battery The indicated time may not be correct depending on the environment of the "Memory Stick Duo" G "Memory Stick Duo" recording start indicator (appears for...

Camera Operations Guide
Page 51
...) during frame playback. *Horizontal lines may see mosaic-like images of the screen. Indicators displayed during tape playback 60min 0:00:00:15 60min P-MENU A Remaining battery B Recording mode (SP or LP) C Tape transport indicator D Time code (hour: minute: second: frame) or tape counter (hour: minute: second) E Personal Menu button (p. 63) F Video...
...) during frame playback. *Horizontal lines may see mosaic-like images of the screen. Indicators displayed during tape playback 60min 0:00:00:15 60min P-MENU A Remaining battery B Recording mode (SP or LP) C Tape transport indicator D Time code (hour: minute: second: frame) or tape counter (hour: minute: second) E Personal Menu button (p. 63) F Video...

Camera Operations Guide
Page 54
... to the index screen. Index Screen Touch . Indicators displayed during "Memory Stick Duo" playback 60min 1152 101-0010 10 / 10 101 0:00:00 P-MENU A Remaining battery B Image size C Picture number/Total number of recorded pictures in the current playback folder D Playback folder E Playing time (movies only) F Previous/next folder icon The...
... to the index screen. Index Screen Touch . Indicators displayed during "Memory Stick Duo" playback 60min 1152 101-0010 10 / 10 101 0:00:00 P-MENU A Remaining battery B Image size C Picture number/Total number of recorded pictures in the current playback folder D Playback folder E Playing time (movies only) F Previous/next folder icon The...

Camera Operations Guide
Page 67
...PUSH]. - FLASH SET Note that these settings will not function with external flashes that do not support the following settings. You bring your camcorder at a nearby white object for about 10 seconds after setting the POWER switch to trigger the flash (optional) automatically. You changed the ...goes off prematurely to trigger the flash (optional) regardless of the brightness of the surroundings. You remove the battery pack for details. FOCUS See page 42 for details. For DCR-PC109: Select to CAMERA-TAPE when: - The flash goes off prematurely to [AUTO] or [ONE PUSH] under...
...PUSH]. - FLASH SET Note that these settings will not function with external flashes that do not support the following settings. You bring your camcorder at a nearby white object for about 10 seconds after setting the POWER switch to trigger the flash (optional) automatically. You changed the ...goes off prematurely to trigger the flash (optional) regardless of the brightness of the surroundings. You remove the battery pack for details. FOCUS See page 42 for details. For DCR-PC109: Select to CAMERA-TAPE when: - The flash goes off prematurely to [AUTO] or [ONE PUSH] under...
Camera Operations Guide
Page 79
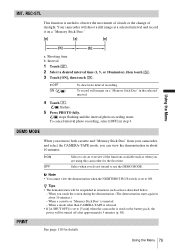
Your camcorder will shoot a still image at a selected interval and record it on the battery pack, the power will be turned off after approximately 5 minutes (p. 88). GON OFF Select to see an overview of daylight. See page 110 for the ...first time. Using the Menu INT. stops flashing and the interval photo recording starts. GOFF ON ( ) To deactivate interval recording. When you are using this camcorder...
Your camcorder will shoot a still image at a selected interval and record it on the battery pack, the power will be turned off after approximately 5 minutes (p. 88). GON OFF Select to see an overview of daylight. See page 110 for the ...first time. Using the Menu INT. stops flashing and the interval photo recording starts. GOFF ON ( ) To deactivate interval recording. When you are using this camcorder...

Camera Operations Guide
Page 82
... to erase, then touch [YES]. If you are using / , then touch . 2 Confirm the title is set [A.SHUT OFF] on the battery pack and do not want to delete using your camcorder on the (STANDARD SET) menu to display the title when a scene superimposed with other video device. • When you are entering...
... to erase, then touch [YES]. If you are using / , then touch . 2 Confirm the title is set [A.SHUT OFF] on the battery pack and do not want to delete using your camcorder on the (STANDARD SET) menu to display the title when a scene superimposed with other video device. • When you are entering...


