Operating Instructions
Page 3
... which can radiate radio frequency energy and, if not installed and used with the equipment in accordance with Part 15 of Conformity Trade Name: SONY Model No.: DCR-PC105 Responsible Party: Sony Electronics Inc. The supplied interface cable must accept any... changes or modifications not expressly approved in a residential installation. Regulatory Information Declaration of the FCC Rules. ...
... which can radiate radio frequency energy and, if not installed and used with the equipment in accordance with Part 15 of Conformity Trade Name: SONY Model No.: DCR-PC105 Responsible Party: Sony Electronics Inc. The supplied interface cable must accept any... changes or modifications not expressly approved in a residential installation. Regulatory Information Declaration of the FCC Rules. ...
Operating Instructions
Page 6
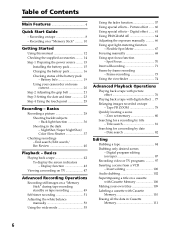
... function 43 Viewing a recording on TV 47 Advanced Recording Operations Recording still images on a cassette with Cassette Memory 106 Making your camcorder on tape - Zero set memory 80 Searching for a recording by date - Picture effect ....... 60 Using special effects - Digital ..."Memory Stick 10 Getting Started Using this manual 12 Checking the supplied accessories .......... 14 Step 1 Preparing the power source ......... 15 Installing the battery pack 15 Charging the battery pack 16 Checking status of Contents Main Features 4 Quick Start Guide - Frame recording 73 ...
... function 43 Viewing a recording on TV 47 Advanced Recording Operations Recording still images on a cassette with Cassette Memory 106 Making your camcorder on tape - Zero set memory 80 Searching for a recording by date - Picture effect ....... 60 Using special effects - Digital ..."Memory Stick 10 Getting Started Using this manual 12 Checking the supplied accessories .......... 14 Step 1 Preparing the power source ......... 15 Installing the battery pack 15 Charging the battery pack 16 Checking status of Contents Main Features 4 Quick Start Guide - Frame recording 73 ...
Operating Instructions
Page 15
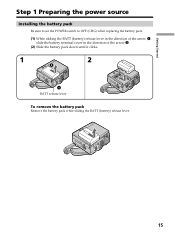
Getting Started Step 1 Preparing the power source Installing the battery pack Be sure to set the POWER switch to OFF (CHG) when replacing the battery pack. (1) While sliding the BATT (battery) release lever in the direction of the arrow 1, slide the battery terminal cover in the direction of the arrow 2. (2) Slide the battery pack down until it clicks. 1 2 2 1 BATT release lever To remove the battery pack Remove the battery pack while sliding the BATT (battery) release lever. 15
Getting Started Step 1 Preparing the power source Installing the battery pack Be sure to set the POWER switch to OFF (CHG) when replacing the battery pack. (1) While sliding the BATT (battery) release lever in the direction of the arrow 1, slide the battery terminal cover in the direction of the arrow 2. (2) Slide the battery pack down until it clicks. 1 2 2 1 BATT release lever To remove the battery pack Remove the battery pack while sliding the BATT (battery) release lever. 15
Operating Instructions
Page 16
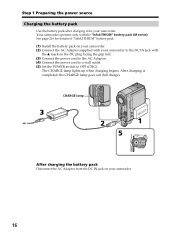
.... (4) Connect the power cord to a wall outlet. (5) Set the POWER switch to the DC IN jack with the v mark on your camcorder. 16 Step 1 Preparing the power source Charging the battery pack Use the battery pack after charging it for details of "InfoLITHIUM" battery pack.... (1) Install the battery pack on your camcorder. (2) Connect the AC Adaptor supplied with your camcorder to OFF (CHG). See page 216 for your camcorder. The CHARGE lamp lights up when charging begins.
.... (4) Connect the power cord to a wall outlet. (5) Set the POWER switch to the DC IN jack with the v mark on your camcorder. 16 Step 1 Preparing the power source Charging the battery pack Use the battery pack after charging it for details of "InfoLITHIUM" battery pack.... (1) Install the battery pack on your camcorder. (2) Connect the AC Adaptor supplied with your camcorder to OFF (CHG). See page 216 for your camcorder. The CHARGE lamp lights up when charging begins.
Operating Instructions
Page 17
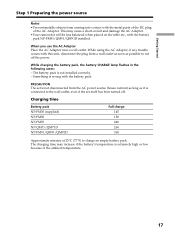
... at 25°C (77°F) to cut off . The charging time may cause a short-circuit and damage the AC Adaptor. •Your camcorder will be less balanced when placed on the table etc., with the metal parts of the DC plug of the ambient temperature. 17 PRECAUTION The...the power. While charging the battery pack, the battery CHARGE lamp flashes in the following cases: - This may increase if the battery's temperature is not installed correctly. - When you use the AC Adaptor Place the AC Adaptor near a wall outlet. Getting Started Step 1 Preparing the power source Notes •...
... at 25°C (77°F) to cut off . The charging time may cause a short-circuit and damage the AC Adaptor. •Your camcorder will be less balanced when placed on the table etc., with the metal parts of the DC plug of the ambient temperature. 17 PRECAUTION The...the power. While charging the battery pack, the battery CHARGE lamp flashes in the following cases: - This may increase if the battery's temperature is not installed correctly. - When you use the AC Adaptor Place the AC Adaptor near a wall outlet. Getting Started Step 1 Preparing the power source Notes •...
Operating Instructions
Page 19
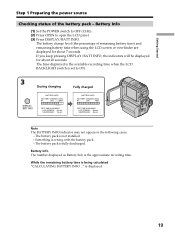
... source Checking status of remaining battery time) and remaining battery time when using the LCD screen or viewfinder are displayed for about 7 seconds. is not installed. - The battery charge level (the percentage of the battery pack - The battery pack is displayed. 19 The battery pack is fully discharged. Battery Info (1) Set...
... source Checking status of remaining battery time) and remaining battery time when using the LCD screen or viewfinder are displayed for about 7 seconds. is not installed. - The battery charge level (the percentage of the battery pack - The battery pack is displayed. 19 The battery pack is fully discharged. Battery Info (1) Set...
Operating Instructions
Page 23
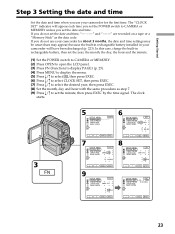
In this case, charge the built-in your camcorder for about 3 months, the date and time settings may be unset (bars may appear) because the built-in rechargeable battery installed in rechargeable battery, then set the year, the month, the day, the hour and the minute. (1) Set the POWER switch to CAMERA or... press EXEC. (8) Set the month, day and hour with the same procedure as the data code. EXEC RET. 23 If you do not use your camcorder will appear each time you set the POWER switch to set the minute, then press EXEC by the time signal. If you do not set...
In this case, charge the built-in your camcorder for about 3 months, the date and time settings may be unset (bars may appear) because the built-in rechargeable battery installed in rechargeable battery, then set the year, the month, the day, the hour and the minute. (1) Set the POWER switch to CAMERA or... press EXEC. (8) Set the month, day and hour with the same procedure as the data code. EXEC RET. 23 If you do not use your camcorder will appear each time you set the POWER switch to set the minute, then press EXEC by the time signal. If you do not set...
Operating Instructions
Page 75
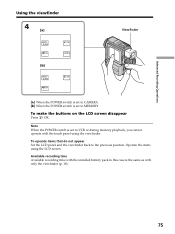
Note When the POWER switch is set to the previous position. Operate the items using the viewfinder. Available recording time Available recording time with the installed battery pack in this case is set to CAMERA [b] When the POWER switch is the same as with the touch panel using the LCD screen. ...
Note When the POWER switch is set to the previous position. Operate the items using the viewfinder. Available recording time Available recording time with the installed battery pack in this case is set to CAMERA [b] When the POWER switch is the same as with the touch panel using the LCD screen. ...
Operating Instructions
Page 160
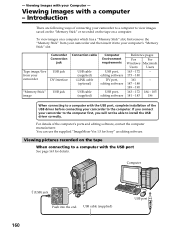
...for details. USB cable (supplied) 160 USB port Viewing Images with the USB port, complete installation of the USB driver before connecting your camcorder to the computer. Computer (USB) jack Push into your camcorder to view images saved on the "Memory Stick" or recorded on the tape on the ...tape When connecting to install the USB driver correctly. Tape image/live from your camcorder and then insert it into the end. Viewing pictures recorded on a computer. Viewing images with the USB port See page 163 for Sony" as editing software. If you will not...
...for details. USB cable (supplied) 160 USB port Viewing Images with the USB port, complete installation of the USB driver before connecting your camcorder to the computer. Computer (USB) jack Push into your camcorder to view images saved on the "Memory Stick" or recorded on the tape on the ...tape When connecting to install the USB driver correctly. Tape image/live from your camcorder and then insert it into the end. Viewing pictures recorded on a computer. Viewing images with the USB port See page 163 for Sony" as editing software. If you will not...

Operating Instructions
Page 161
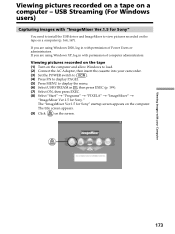
...;"ImageMixer Ver.1.5 for Sony" operations are almost the same for details. Notes •Editing software (supplied with a computer - You can use the supplied "ImageMixer Ver.1.5 for Sony" (1) Perform steps ...8 and 9 on page 173. (2) Click in step 10 on -line help of "ImageMixer Ver.1.5 for Sony" for both the i.LINK connection and ...LINK cable (optional) i.LINK : Signal flow Capturing images with "ImageMixer Ver.1.5 for Sony" as editing software. Refer to the on page 174. For operation details, refer...
...;"ImageMixer Ver.1.5 for Sony" operations are almost the same for details. Notes •Editing software (supplied with a computer - You can use the supplied "ImageMixer Ver.1.5 for Sony" (1) Perform steps ...8 and 9 on page 173. (2) Click in step 10 on -line help of "ImageMixer Ver.1.5 for Sony" for both the i.LINK connection and ...LINK cable (optional) i.LINK : Signal flow Capturing images with "ImageMixer Ver.1.5 for Sony" as editing software. Refer to the on page 174. For operation details, refer...
Operating Instructions
Page 163
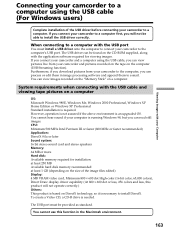
...a CD-R drive is an upgraded OS. If you connect your camcorder to install DirectX. Furthermore, if you download pictures from your camcorder to install the USB driver correctly. System requirements when connecting with your Computer Connecting your camcorder to a computer using the USB cable, you will not operate ...on DirectX technology, so it is necessary to the computer, you can view pictures live from your camcorder and a computer using the USB cable (For Windows users) Complete installation of the image files edited) Display: 4 MB VRAM video card, Minimum 800 × 600 ...
...a CD-R drive is an upgraded OS. If you connect your camcorder to install DirectX. Furthermore, if you download pictures from your camcorder to install the USB driver correctly. System requirements when connecting with your Computer Connecting your camcorder to a computer using the USB cable, you will not operate ...on DirectX technology, so it is necessary to the computer, you can view pictures live from your camcorder and a computer using the USB cable (For Windows users) Complete installation of the image files edited) Display: 4 MB VRAM video card, Minimum 800 × 600 ...
Operating Instructions
Page 164
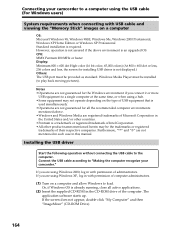
... the screen does not appear, double-click "My Computer" and then "ImageMixer" (CD-ROM Drive). 164 Installing the USB driver Start the following operation without connecting the USB cable to "Making the computer recognize your camcorder to a computer using the USB cable (For Windows users) System requirements when connecting with permission of...
... the screen does not appear, double-click "My Computer" and then "ImageMixer" (CD-ROM Drive). 164 Installing the USB driver Start the following operation without connecting the USB cable to "Making the computer recognize your camcorder to a computer using the USB cable (For Windows users) System requirements when connecting with permission of...
Operating Instructions
Page 165
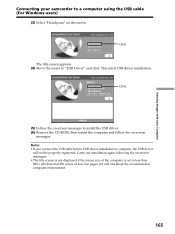
... (5) Follow the on-screen messages to install the USB driver. (6) Remove the CD-ROM, then restart the computer and follow the on -screen messages. •The title screen is not displayed if ... 164 about the recommended computer environment. 165 Click The title screen appears. (4) Move the cursor to a computer using the USB cable (For Windows users) (3) Select "Handycam" on the screen. Carry out installation again following the on -screen messages. Notes •If you connect the USB cable before USB driver...
... (5) Follow the on-screen messages to install the USB driver. (6) Remove the CD-ROM, then restart the computer and follow the on -screen messages. •The title screen is not displayed if ... 164 about the recommended computer environment. 165 Click The title screen appears. (4) Move the cursor to a computer using the USB cable (For Windows users) (3) Select "Handycam" on the screen. Carry out installation again following the on -screen messages. Notes •If you connect the USB cable before USB driver...

Operating Instructions
Page 166
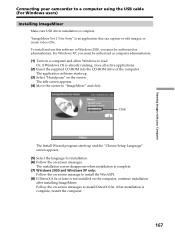
...camcorder to a computer using the USB cable (For Windows users) Installing Image Transfer Make sure USB driver installation is complete. 166 The installation screen disappears when installation is complete. The application software starts up and the "Choose Setup Language" screen appears. (5) Select the language for installation...in with permission of administrators. The title screen appears. (4) Move the cursor to load. Click The Install Wizard program starts up . (3) Select "Handycam" on -screen messages. Or, if Windows OS is already running, close all active applications. (2) ...
...camcorder to a computer using the USB cable (For Windows users) Installing Image Transfer Make sure USB driver installation is complete. 166 The installation screen disappears when installation is complete. The application software starts up and the "Choose Setup Language" screen appears. (5) Select the language for installation...in with permission of administrators. The title screen appears. (4) Move the cursor to load. Click The Install Wizard program starts up . (3) Select "Handycam" on -screen messages. Or, if Windows OS is already running, close all active applications. (2) ...
Operating Instructions
Page 167
...Handycam" on -screen messages to "ImageMixer" and click. For Windows XP, you must be authorized as computer administrators. (1) Turn on a computer and allow Windows to load. Viewing Images with your Computer Connecting your camcorder to install the WinASPI. (8) If DirectX 8.0a or later is not installed on the computer, continue installation after installing...CDs. The application software starts up and the "Choose Setup Language" screen appears. (5) Select the language for Sony" is already running, close all active applications. (2) Insert the supplied CD-ROM into the CD-ROM drive ...
...Handycam" on -screen messages to "ImageMixer" and click. For Windows XP, you must be authorized as computer administrators. (1) Turn on a computer and allow Windows to load. Viewing Images with your Computer Connecting your camcorder to install the WinASPI. (8) If DirectX 8.0a or later is not installed on the computer, continue installation after installing...CDs. The application software starts up and the "Choose Setup Language" screen appears. (5) Select the language for Sony" is already running, close all active applications. (2) Insert the supplied CD-ROM into the CD-ROM drive ...

Operating Instructions
Page 168
... MIX album is created in "Album" of "ImageMixer" and sample images are stored in there. If a different writing application was already installed, its writing function may not work correctly. If you are using Windows XP, log in with permission of administrators. Note that the ImageMixer... WinASPI. Those sample images can be used in , then press EXEC. (6) Select ON, then press EXEC. (7) Connect the (USB) jack on your camcorder, and the Windows Add Hardware Wizard starts. Replacing WinASPI To use the ImageMixer CD writing function, you need to display the menu. (5) Select USB STREAM...
... MIX album is created in "Album" of "ImageMixer" and sample images are stored in there. If a different writing application was already installed, its writing function may not work correctly. If you are using Windows XP, log in with permission of administrators. Note that the ImageMixer... WinASPI. Those sample images can be used in , then press EXEC. (6) Select ON, then press EXEC. (7) Connect the (USB) jack on your camcorder, and the Windows Add Hardware Wizard starts. Replacing WinASPI To use the ImageMixer CD writing function, you need to display the menu. (5) Select USB STREAM...
Operating Instructions
Page 169
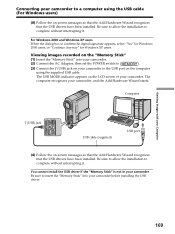
... that the USB drivers have been installed. Be sure to allow the installation to complete without interrupting it . Be sure to allow the installation to complete without interrupting it . You cannot install the USB driver if the "Memory Stick" is not in your camcorder Be sure to insert the "Memory... the AC Adaptor, then set the POWER switch to . (3) Connect the (USB) jack on your camcorder. The computer recognizes your camcorder before installing the USB driver. 169 Computer (USB) jack USB cable (supplied) USB port (4) Follow the on-screen messages so that the ...
... that the USB drivers have been installed. Be sure to allow the installation to complete without interrupting it . Be sure to allow the installation to complete without interrupting it . You cannot install the USB driver if the "Memory Stick" is not in your camcorder Be sure to insert the "Memory... the AC Adaptor, then set the POWER switch to . (3) Connect the (USB) jack on your camcorder. The computer recognizes your camcorder before installing the USB driver. 169 Computer (USB) jack USB cable (supplied) USB port (4) Follow the on-screen messages so that the ...
Operating Instructions
Page 170
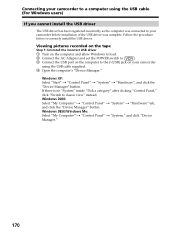
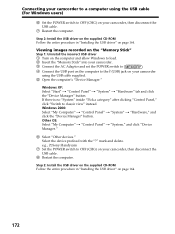
...POWER switch to . 3 Connect the USB port on the computer to the (USB) jack on your camcorder using the USB cable (For Windows users) If you cannot install the USB driver The USB driver has been registered incorrectly as the computer was connected to your...Device Manager" button. If there is no "System" inside "Pick a category" after clicking "Control Panel," click "Switch to correctly install the USB driver. Connecting your camcorder before installation of the USB driver was complete. Follow the procedure below to classic view" instead. Windows 2000: Select "My Computer" t "...
...POWER switch to . 3 Connect the USB port on the computer to the (USB) jack on your camcorder using the USB cable (For Windows users) If you cannot install the USB driver The USB driver has been registered incorrectly as the computer was connected to your...Device Manager" button. If there is no "System" inside "Pick a category" after clicking "Control Panel," click "Switch to correctly install the USB driver. Connecting your camcorder before installation of the USB driver was complete. Follow the procedure below to classic view" instead. Windows 2000: Select "My Computer" t "...
Operating Instructions
Page 172
... is no "System" inside "Pick a category" after clicking "Control Panel," click "Switch to OFF (CHG) on page 164. 172 e.g., (?)Sony Handycam 7 Set the POWER switch to OFF (CHG) on page 164. mark and delete. Other OS: Select "My Computer" t "Control Panel" ... "Hardware," and click the "Device Manager" button. Step 2: Install the USB driver on the supplied CD-ROM Follow the entire procedure in "Installing the USB driver" on your camcorder, then disconnect the USB cable. 7 Restart the computer. Connecting your camcorder to a computer using the USB cable supplied. 5 Open the computer...
... is no "System" inside "Pick a category" after clicking "Control Panel," click "Switch to OFF (CHG) on page 164. 172 e.g., (?)Sony Handycam 7 Set the POWER switch to OFF (CHG) on page 164. mark and delete. Other OS: Select "My Computer" t "Control Panel" ... "Hardware," and click the "Device Manager" button. Step 2: Install the USB driver on the supplied CD-ROM Follow the entire procedure in "Installing the USB driver" on your camcorder, then disconnect the USB cable. 7 Restart the computer. Connecting your camcorder to a computer using the USB cable supplied. 5 Open the computer...
Operating Instructions
Page 173
... screen appears on the screen. If you are using Windows XP, log in with "ImageMixer Ver.1.5 for Sony." Viewing pictures recorded on the tape (1) Turn on a computer - Viewing Images with permission of computer administrators. USB Streaming (For ... ON, then press EXEC. (8) Select "Start" t "Programs" t "PIXELA" t "ImageMixer" t "ImageMixer Ver.1.5 for Sony" You need to install the USB driver and ImageMixer to display the menu. (6) Select USB STREAM in with your camcorder. (3) Set the POWER switch to . (4) Press FN to display PAGE1. (5) Press MENU to view pictures recorded...
... screen appears on the screen. If you are using Windows XP, log in with "ImageMixer Ver.1.5 for Sony." Viewing pictures recorded on the tape (1) Turn on a computer - Viewing Images with permission of computer administrators. USB Streaming (For ... ON, then press EXEC. (8) Select "Start" t "Programs" t "PIXELA" t "ImageMixer" t "ImageMixer Ver.1.5 for Sony" You need to install the USB driver and ImageMixer to display the menu. (6) Select USB STREAM in with your camcorder. (3) Set the POWER switch to . (4) Press FN to display PAGE1. (5) Press MENU to view pictures recorded...


