Operating Instructions
Page 2
... presence of this device must accept any interference received, including interference that may not cause harmful interference, and (2) this Sony Handycam. This symbol is subject to the following two conditions: (1) This device may be producing home video that you . ... on your Handycam, you can enjoy for years to constitute a risk of important operating and maintenance (servicing) instructions in the U.S.A. Your Handycam is loaded with superior picture and sound quality. RECYCLING LITHIUM-ION BATTERIES Lithium-Ion batteries are recyclable. "Memory Stick" This device...
... presence of this device must accept any interference received, including interference that may not cause harmful interference, and (2) this Sony Handycam. This symbol is subject to the following two conditions: (1) This device may be producing home video that you . ... on your Handycam, you can enjoy for years to constitute a risk of important operating and maintenance (servicing) instructions in the U.S.A. Your Handycam is loaded with superior picture and sound quality. RECYCLING LITHIUM-ION BATTERIES Lithium-Ion batteries are recyclable. "Memory Stick" This device...
Operating Instructions
Page 4
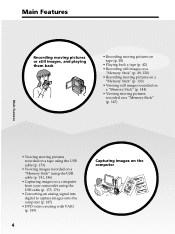
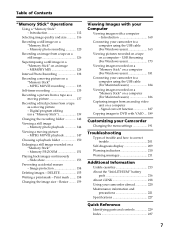
...back a tape (p. 42) • Recording still images on a "Memory Stick" (p. 49, 120) • Recording moving pictures on a "Memory Stick" (p. 133) • Viewing still images recorded on a "Memory Stick" (p. 144) • Viewing moving pictures recorded on a "Memory Stick" (p. 147) Main Features • Viewing moving pictures recorded on a... tape using the USB cable (p. 173) • Viewing images recorded on a "Memory Stick" using the USB cable (p. 181, 186) • Capturing images on a computer from your camcorder using the USB cable (p. 175, 176) • Converting an analog signal into ...
...back a tape (p. 42) • Recording still images on a "Memory Stick" (p. 49, 120) • Recording moving pictures on a "Memory Stick" (p. 133) • Viewing still images recorded on a "Memory Stick" (p. 144) • Viewing moving pictures recorded on a "Memory Stick" (p. 147) Main Features • Viewing moving pictures recorded on a... tape using the USB cable (p. 173) • Viewing images recorded on a "Memory Stick" using the USB cable (p. 181, 186) • Capturing images on a computer from your camcorder using the USB cable (p. 175, 176) • Converting an analog signal into ...
Operating Instructions
Page 6
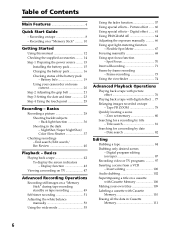
...exposure manually 66 Using spot light-metering function - Insert editing 100 Audio dubbing 102 Superimposing a title on a cassette with Cassette Memory 106 Making your camcorder on tape 87 Recording video or TV programs 97 Inserting a scene from a VCR - Basics Recording a picture 28 Shooting ... the white balance manually 53 Using the wide mode 55 Using the fader function 57 Using special effects - Recording on a "Memory Stick 10 Getting Started Using this manual 12 Checking the supplied accessories .......... 14 Step 1 Preparing the power source ......... 15 Installing the...
...exposure manually 66 Using spot light-metering function - Insert editing 100 Audio dubbing 102 Superimposing a title on a cassette with Cassette Memory 106 Making your camcorder on tape 87 Recording video or TV programs 97 Inserting a scene from a VCR - Basics Recording a picture 28 Shooting ... the white balance manually 53 Using the wide mode 55 Using the fader function 57 Using special effects - Recording on a "Memory Stick 10 Getting Started Using this manual 12 Checking the supplied accessories .......... 14 Step 1 Preparing the power source ......... 15 Installing the...
Operating Instructions
Page 7
... with your Computer Viewing images with VAIO .... 189 Customizing your Camcorder Changing the menu settings 191 Troubleshooting Types of Contents "Memory Stick" Operations Using a "Memory Stick" - Memory photo playback 144 Viewing a moving picture on a "Memory Stick 139 Changing the recording folder 142 Viewing a still image - Introduction 160 Connecting your camcorder to a computer using the USB cable (For Windows users...
... with your Computer Viewing images with VAIO .... 189 Customizing your Camcorder Changing the menu settings 191 Troubleshooting Types of Contents "Memory Stick" Operations Using a "Memory Stick" - Memory photo playback 144 Viewing a moving picture on a "Memory Stick 139 Changing the recording folder 142 Viewing a still image - Introduction 160 Connecting your camcorder to a computer using the USB cable (For Windows users...
Operating Instructions
Page 10
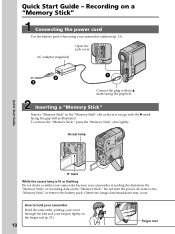
...B mark facing the grip belt as illustrated. How to hold your camcorder Hold the camcorder, putting your wrist through the belt and your camcorder is reading the data from the "Memory Stick" or recording data on the "Memory Stick." Access lamp Quick Start Guide B mark While the access lamp is... lit or flashing Do not shake or strike your camcorder because your fingers lightly on a "Memory Stick" Connecting the power...
...B mark facing the grip belt as illustrated. How to hold your camcorder Hold the camcorder, putting your wrist through the belt and your camcorder is reading the data from the "Memory Stick" or recording data on the "Memory Stick." Access lamp Quick Start Guide B mark While the access lamp is... lit or flashing Do not shake or strike your camcorder because your fingers lightly on a "Memory Stick" Connecting the power...
Operating Instructions
Page 11
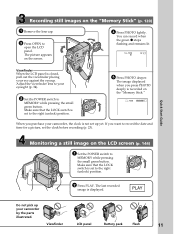
...CHG)OFF POWER LOCK 5 Press PHOTO deeper. PLAY Do not pick up yet. Recording still images on the "Memory Stick" (p. 120) 1 Remove the lens cap. 3 Press OPEN to MEMORY while pressing the small green button. You can record when the green z stops flashing and remains lit. 640 ... 23). If you press PHOTO deeply is closed, pull out the viewfinder placing your camcorder by the parts illustrated. The image displayed when you want to your camcorder, the clock is displayed. MEMORY CAMERA VCR (CHG)OFF POWER LOCK 2 Press PLAY. Viewfinder LCD panel Battery pack Flash...
...CHG)OFF POWER LOCK 5 Press PHOTO deeper. PLAY Do not pick up yet. Recording still images on the "Memory Stick" (p. 120) 1 Remove the lens cap. 3 Press OPEN to MEMORY while pressing the small green button. You can record when the green z stops flashing and remains lit. 640 ... 23). If you press PHOTO deeply is closed, pull out the viewfinder placing your camcorder by the parts illustrated. The image displayed when you want to your camcorder, the clock is displayed. MEMORY CAMERA VCR (CHG)OFF POWER LOCK 2 Press PLAY. Viewfinder LCD panel Battery pack Flash...
Operating Instructions
Page 14
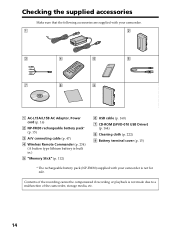
... accessories Make sure that the following accessories are supplied with your camcorder. 1 2 3 4 5 6 7 8 9 1 AC-L15A/L15B AC Adaptor, Power cord (p. 16) 2 NP-FM30 rechargeable battery pack* (p. 15) 3 A/V connecting cable (p. 47) 4 Wireless Remote Commander (p. 234) (A button type lithium battery is built in.) 5 "Memory Stick" (p. 112) 6 USB cable (p. 160) 7 CD-ROM (SPVD-010 USB Driver) (p. 164...
... accessories Make sure that the following accessories are supplied with your camcorder. 1 2 3 4 5 6 7 8 9 1 AC-L15A/L15B AC Adaptor, Power cord (p. 16) 2 NP-FM30 rechargeable battery pack* (p. 15) 3 A/V connecting cable (p. 47) 4 Wireless Remote Commander (p. 234) (A button type lithium battery is built in.) 5 "Memory Stick" (p. 112) 6 USB cable (p. 160) 7 CD-ROM (SPVD-010 USB Driver) (p. 164...
Operating Instructions
Page 23
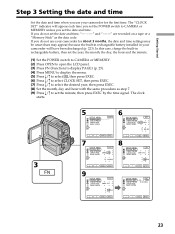
...then set the minute, then press EXEC by the time signal. In this case, charge the built-in your camcorder will appear each time you set the POWER switch to set the year, the month, the day, the ...the data code. Getting Started Step 3 Setting the date and time Set the date and time when you use your camcorder for the first time. The "CLOCK SET" indicator will have been discharged (p. 223). The clock starts. 3 FN...you do not set the date and time and "--:--:--" are recorded on a tape or a "Memory Stick" as step 7. (9) Press r/R to CAMERA or MEMORY unless you set the date and time.
...then set the minute, then press EXEC by the time signal. In this case, charge the built-in your camcorder will appear each time you set the POWER switch to set the year, the month, the day, the ...the data code. Getting Started Step 3 Setting the date and time Set the date and time when you use your camcorder for the first time. The "CLOCK SET" indicator will have been discharged (p. 223). The clock starts. 3 FN...you do not set the date and time and "--:--:--" are recorded on a tape or a "Memory Stick" as step 7. (9) Press r/R to CAMERA or MEMORY unless you set the date and time.

Operating Instructions
Page 25
... operation item. The display returns to display PAGE2/PAGE3. You can control the display with your camcorder. (4) Press PAGE2/PAGE3 to PAGE1/PAGE2/PAGE3. 25 See relevant pages of this manual for playback, or MEMORY to use a "Memory Stick." (2) Press OPEN to open the LCD panel. (3) Press FN. Touch the LCD screen directly with...
... operation item. The display returns to display PAGE2/PAGE3. You can control the display with your camcorder. (4) Press PAGE2/PAGE3 to PAGE1/PAGE2/PAGE3. 25 See relevant pages of this manual for playback, or MEMORY to use a "Memory Stick." (2) Press OPEN to open the LCD panel. (3) Press FN. Touch the LCD screen directly with...

Operating Instructions
Page 49
... set to . (1) Keep pressing PHOTO lightly until a still image appears. During tape recording standby The POWER switch should be recorded in the folder on the "Memory Stick" (p. 142). 1 50min 640 FINE 12 CAPTURE 2 101 FN 50min 640 FINE [a] Current recording folder 101 [a] FN 49 The image displayed on...
... set to . (1) Keep pressing PHOTO lightly until a still image appears. During tape recording standby The POWER switch should be recorded in the folder on the "Memory Stick" (p. 142). 1 50min 640 FINE 12 CAPTURE 2 101 FN 50min 640 FINE [a] Current recording folder 101 [a] FN 49 The image displayed on...
Operating Instructions
Page 50
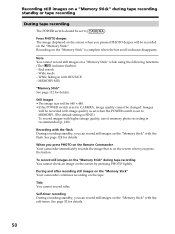
... 52 for details. 50 Recording on the screen when you press PHOTO on the Remote Commander Your camcorder immediately records the image that is on the "Memory Stick" is recommended (p. 120). Self-timer recording During recording standby, you pressed PHOTO deeper will be recorded...image displayed on the screen when you can record still images on a "Memory Stick" while using the following functions (The indicator flashes): - During and after recording still images on the "Memory Stick" Your camcorder continues recording on the screen by pressing PHOTO lightly. End search - To ...
... 52 for details. 50 Recording on the screen when you press PHOTO on the Remote Commander Your camcorder immediately records the image that is on the "Memory Stick" is recommended (p. 120). Self-timer recording During recording standby, you pressed PHOTO deeper will be recorded...image displayed on the screen when you can record still images on a "Memory Stick" while using the following functions (The indicator flashes): - During and after recording still images on the "Memory Stick" Your camcorder continues recording on the screen by pressing PHOTO lightly. End search - To ...
Operating Instructions
Page 52
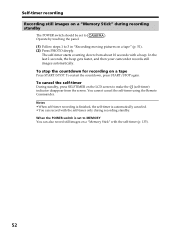
... the screen. In the last 2 seconds, the beep gets faster, and then your camcorder records still images automatically. Notes •When self-timer recording is finished, the self-timer is set to MEMORY You can record with the self-timer only during recording standby The POWER switch should be... set to . You cannot cancel the self-timer using the Remote Commander. Self-timer recording Recording still images on a "Memory Stick" during recording standby. When the POWER switch is automatically canceled. •You can also record still images on...
... the screen. In the last 2 seconds, the beep gets faster, and then your camcorder records still images automatically. Notes •When self-timer recording is finished, the self-timer is set to MEMORY You can record with the self-timer only during recording standby The POWER switch should be... set to . You cannot cancel the self-timer using the Remote Commander. Self-timer recording Recording still images on a "Memory Stick" during recording standby. When the POWER switch is automatically canceled. •You can also record still images on...
Operating Instructions
Page 56
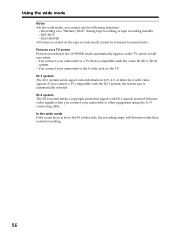
...:9, 4:3, or letter box) with the ID-1 system, the screen size is compatible with ID-1 signals inserted between video signals when you connect your camcorder to normal ratio. ID-2 system The ID-2 system sends a copyright protection signal with the video ID (ID-1/ID-2) system. - OLD MOVIE &#...recorded on the TV. If you cannot use the following functions: - BOUNCE - You connect your camcorder to the S video jack on the tape in the 16:9WIDE mode automatically appear on a "Memory Stick" during tape recording or tape recording standby - Using the wide mode Notes •In the wide...
...:9, 4:3, or letter box) with the ID-1 system, the screen size is compatible with ID-1 signals inserted between video signals when you connect your camcorder to normal ratio. ID-2 system The ID-2 system sends a copyright protection signal with the video ID (ID-1/ID-2) system. - OLD MOVIE &#...recorded on the TV. If you cannot use the following functions: - BOUNCE - You connect your camcorder to the S video jack on the tape in the 16:9WIDE mode automatically appear on a "Memory Stick" during tape recording or tape recording standby - Using the wide mode Notes •In the wide...
Operating Instructions
Page 59
Digital effect - Zoom - Recording on a "Memory Stick" Note on , you select OVERLAP, WIPE or DOT during recording Your camcorder stores the image recorded when your camcorder was set to standby, and sets itself ready for fade in the following: - PROGRAM AE 59 Color Slow Shutter - Recording with the flash When you ...
Digital effect - Zoom - Recording on a "Memory Stick" Note on , you select OVERLAP, WIPE or DOT during recording Your camcorder stores the image recorded when your camcorder was set to standby, and sets itself ready for fade in the following: - PROGRAM AE 59 Color Slow Shutter - Recording with the flash When you ...

Operating Instructions
Page 65
.... - Spot Focus •PROGRAM AE does not work . (The indicator flashes.) 65 NIGHTSHOT is set the POWER switch to FN Press EXIT. To return to MEMORY, the SPORTS mode does not work in PROGRAM AE: - SLOW SHTR - OLD MOVIE - BOUNCE - MANUAL SET PROGRAM AE P EFFECT RED EYE R FLASH LVL WHT BAL... AUTO SHTR EXIT AUTO SPOTLIGHT PORTRAIT SPORTS BEACH&SKI SUNSETMOON LANDSCAPE EXEC RET. (4) Select the desired mode, then press EXEC. To record images on a "Memory Stick" using the MEMORY MIX. •When you set to AUTO in the menu settings.
.... - Spot Focus •PROGRAM AE does not work . (The indicator flashes.) 65 NIGHTSHOT is set the POWER switch to FN Press EXIT. To return to MEMORY, the SPORTS mode does not work in PROGRAM AE: - SLOW SHTR - OLD MOVIE - BOUNCE - MANUAL SET PROGRAM AE P EFFECT RED EYE R FLASH LVL WHT BAL... AUTO SHTR EXIT AUTO SPOTLIGHT PORTRAIT SPORTS BEACH&SKI SUNSETMOON LANDSCAPE EXEC RET. (4) Select the desired mode, then press EXEC. To record images on a "Memory Stick" using the MEMORY MIX. •When you set to AUTO in the menu settings.
Operating Instructions
Page 76
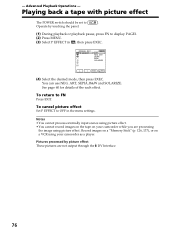
... touching the panel. (1) During playback or playback pause, press FN to . To return to OFF in , then press EXEC. Record images on a "Memory Stick" (p. 126, 137), or on your camcorder as a player. See page 60 for details of the each effect. - To cancel picture effect Set P EFFECT to FN Press EXIT. Advanced Playback...
... touching the panel. (1) During playback or playback pause, press FN to . To return to OFF in , then press EXEC. Record images on a "Memory Stick" (p. 126, 137), or on your camcorder as a player. See page 60 for details of the each effect. - To cancel picture effect Set P EFFECT to FN Press EXIT. Advanced Playback...
Operating Instructions
Page 77
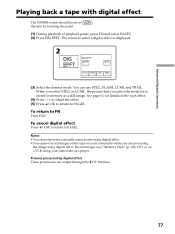
...not output through the DV Interface. 77 To cancel digital effect Press OFF to return to PAGE2. Record images on a "Memory Stick" (p. 126, 137), or on your camcorder as a still image. Operate by digital effect These pictures are processing the image using digital effect. To return to select... a digital effect is stored in memory as a player. The screen to FN Press EXIT. You can use STILL, FLASH, LUMI. Pictures ...
...not output through the DV Interface. 77 To cancel digital effect Press OFF to return to PAGE2. Record images on a "Memory Stick" (p. 126, 137), or on your camcorder as a still image. Operate by digital effect These pictures are processing the image using digital effect. To return to select... a digital effect is stored in memory as a player. The screen to FN Press EXIT. You can use STILL, FLASH, LUMI. Pictures ...
Operating Instructions
Page 78
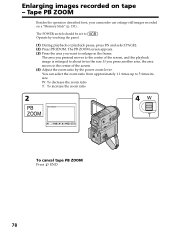
Enlarging images recorded on a "Memory Stick" (p. 151). Tape PB ZOOM Besides the operation described here, your camcorder can select the zoom ratio from approximately 1.1 times up to 5 times its size. Operate by the power zoom lever. You can enlarge still images recorded ...
Enlarging images recorded on a "Memory Stick" (p. 151). Tape PB ZOOM Besides the operation described here, your camcorder can select the zoom ratio from approximately 1.1 times up to 5 times its size. Operate by the power zoom lever. You can enlarge still images recorded ...
Operating Instructions
Page 79
...input scenes using tape PB ZOOM with your camcorder. •You cannot record images on your camcorder while you have processed the picture using your camcorder as a player. •You cannot record moving pictures on the "Memory Stick" on the tape in your camcorder when you are not output through the DV... Interface. During tape PB ZOOM If you pressed to the center of the image can record images on a "Memory Stick" (p. 126) or on a VCR using tape PB...
...input scenes using tape PB ZOOM with your camcorder. •You cannot record images on your camcorder while you have processed the picture using your camcorder as a player. •You cannot record moving pictures on the "Memory Stick" on the tape in your camcorder when you are not output through the DV... Interface. During tape PB ZOOM If you pressed to the center of the image can record images on a "Memory Stick" (p. 126) or on a VCR using tape PB...
Operating Instructions
Page 86
...VCR has an input selector, set TITLE DSPL to the operating instructions of the VCR. (3) Play back the recorded tape on your camcorder. (4) Start recording on your camcorder. Refer to input mode. The POWER switch should be set to . (1) Insert a blank tape (or the tape you want ...to LCD in the menu settings. (The default setting is LCD.) •When the search indicator is ON.) With the i.LINK cable Titles, screen indicators, Cassette Memory contents, and "Memory Stick...
...VCR has an input selector, set TITLE DSPL to the operating instructions of the VCR. (3) Play back the recorded tape on your camcorder. (4) Start recording on your camcorder. Refer to input mode. The POWER switch should be set to . (1) Insert a blank tape (or the tape you want ...to LCD in the menu settings. (The default setting is LCD.) •When the search indicator is ON.) With the i.LINK cable Titles, screen indicators, Cassette Memory contents, and "Memory Stick...


