Operating Instructions
Page 7
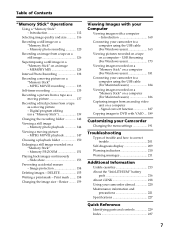
...Playing back images continuously - MEMORY MIX 128 Interval Photo Recording 132 Recording a moving picture - Introduction 160 Connecting your camcorder to correct trouble 201 Self-diagnosis display 209 Warning indicators 210 Warning messages 211 Additional Information Usable cassettes 213 About the... your camcorder to a computer using the USB cable (For Windows users 163 Viewing pictures recorded on a tape on a computer - USB Streaming (For Windows users 173 Viewing images recorded on a "Memory Stick" on a computer (For Windows users 181 Connecting your Camcorder Changing ...
...Playing back images continuously - MEMORY MIX 128 Interval Photo Recording 132 Recording a moving picture - Introduction 160 Connecting your camcorder to correct trouble 201 Self-diagnosis display 209 Warning indicators 210 Warning messages 211 Additional Information Usable cassettes 213 About the... your camcorder to a computer using the USB cable (For Windows users 163 Viewing pictures recorded on a tape on a computer - USB Streaming (For Windows users 173 Viewing images recorded on a "Memory Stick" on a computer (For Windows users 181 Connecting your Camcorder Changing ...
Operating Instructions
Page 8
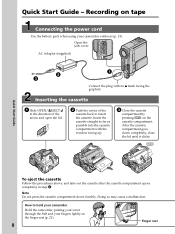
...of the arrow and open the lid. 2 Push the center of the cassette back to hold your camcorder Hold the camcorder, putting your wrist through the belt and your camcorder outdoors (p. 15). After the cassette compartment goes down forcibly. Note Do not press the cassette compartment... down completely, close the lid until it clicks. AC Adaptor (supplied) 2 3 1 Connect the plug with the window facing up. 3 Close the ...
...of the arrow and open the lid. 2 Push the center of the cassette back to hold your camcorder Hold the camcorder, putting your wrist through the belt and your camcorder outdoors (p. 15). After the cassette compartment goes down forcibly. Note Do not press the cassette compartment... down completely, close the lid until it clicks. AC Adaptor (supplied) 2 3 1 Connect the plug with the window facing up. 3 Close the ...
Operating Instructions
Page 13
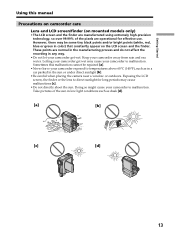
... the recording in the sun or under direct sunlight [b]. •Be careful when placing the camera near a window or outdoors. Sometimes this manual Precautions on camcorder care Lens and LCD screen/finder (on the LCD screen and the finder. Exposing the LCD screen, the ... These points are operational for long periods may cause malfunctions [c]. •Do not directly shoot the sun. Letting your camcorder get wet. Doing so might cause your camcorder exposed to direct sunlight for effective use. Getting Started Using this malfunction cannot be some tiny black points and/or bright...
... the recording in the sun or under direct sunlight [b]. •Be careful when placing the camera near a window or outdoors. Sometimes this manual Precautions on camcorder care Lens and LCD screen/finder (on the LCD screen and the finder. Exposing the LCD screen, the ... These points are operational for long periods may cause malfunctions [c]. •Do not directly shoot the sun. Letting your camcorder get wet. Doing so might cause your camcorder exposed to direct sunlight for effective use. Getting Started Using this malfunction cannot be some tiny black points and/or bright...
Operating Instructions
Page 64
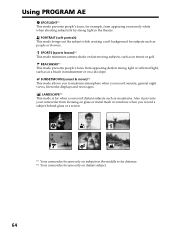
BEACH&SKI*1) This mode prevents people's faces from focusing on glass or metal mesh in windows when you to far distance. *2) Your camcorder focuses only on distant subject. 64 SPORTS (sports lesson)*1) This mode minimizes camera-shake on a ski slope. SUNSETMOON (sunset & moon)*2) This mode allows ...you record a subject behind glass or a screen. *1) Your camcorder focuses only on subjects in midsummer or on fast-moving subjects, such as in the theater. Also it prevents your...
BEACH&SKI*1) This mode prevents people's faces from focusing on glass or metal mesh in windows when you to far distance. *2) Your camcorder focuses only on distant subject. 64 SPORTS (sports lesson)*1) This mode minimizes camera-shake on a ski slope. SUNSETMOON (sunset & moon)*2) This mode allows ...you record a subject behind glass or a screen. *1) Your camcorder focuses only on subjects in midsummer or on fast-moving subjects, such as in the theater. Also it prevents your...
Operating Instructions
Page 114
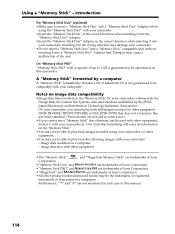
...your camcorder, on a computer - A "Memory Stick" formatted by a computer A "Memory Stick" formatted by Windows OS or Macintosh OS is guaranteed to be able to be compatible with your camcorder. ... other equipment (DCR-TRV890E/TRV900/TRV900E or DSC-D700/D770) that does not conform to insert a "Memory Stick Duo" into your camcorder conform with your camcorder. Notes on ... are trademarks of Sony Corporation. •"Memory Stick Duo" and are trademarks of Sony Corporation. •"Memory Stick PRO" and are trademarks of the unit. image data shot with your camcorder: - Using a ...
...your camcorder, on a computer - A "Memory Stick" formatted by a computer A "Memory Stick" formatted by Windows OS or Macintosh OS is guaranteed to be able to be compatible with your camcorder. ... other equipment (DCR-TRV890E/TRV900/TRV900E or DSC-D700/D770) that does not conform to insert a "Memory Stick Duo" into your camcorder conform with your camcorder. Notes on ... are trademarks of Sony Corporation. •"Memory Stick Duo" and are trademarks of Sony Corporation. •"Memory Stick PRO" and are trademarks of the unit. image data shot with your camcorder: - Using a ...
Operating Instructions
Page 160
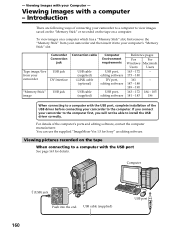
...Stick" image Camcorder Connection jack USB jack DV Interface USB jack Connection cable Computer Environment requirements USB cable (supplied) i.LINK cable (optional) USB cable (supplied) USB port, editing software DV port, editing software USB port, editing software Reference pages For For Windows Macintosh Users Users...a computer with the USB port See page 163 for Sony" as editing software. Viewing images with your camcorder to the computer. Viewing pictures recorded on a computer. Computer (USB) jack Push into your camcorder to a computer to view images saved on the "Memory...
...Stick" image Camcorder Connection jack USB jack DV Interface USB jack Connection cable Computer Environment requirements USB cable (supplied) i.LINK cable (optional) USB cable (supplied) USB port, editing software DV port, editing software USB port, editing software Reference pages For For Windows Macintosh Users Users...a computer with the USB port See page 163 for Sony" as editing software. Viewing images with your camcorder to the computer. Viewing pictures recorded on a computer. Computer (USB) jack Push into your camcorder to a computer to view images saved on the "Memory...
Operating Instructions
Page 162
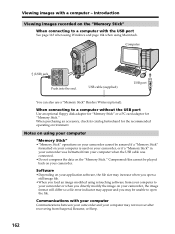
...USB port You can also use a "Memory Stick" Reader/Writer (optional). Viewing images with the USB port See page 163 when using Windows and page 184 when using Macintosh. Compressed files cannot be played back on your computer when the USB cable was formatted from Suspend, ...when you open a still image file. •When you may not recover after recovering from your camcorder. Introduction Viewing images recorded on your camcorder, or if a "Memory Stick" in your camcorder was connected. •Do not compress the data on the "Memory Stick." Communications with your computer...
...USB port You can also use a "Memory Stick" Reader/Writer (optional). Viewing images with the USB port See page 163 when using Windows and page 184 when using Macintosh. Compressed files cannot be played back on your computer when the USB cable was formatted from Suspend, ...when you open a still image file. •When you may not recover after recovering from your camcorder. Introduction Viewing images recorded on your camcorder, or if a "Memory Stick" in your camcorder was connected. •Do not compress the data on the "Memory Stick." Communications with your computer...
Operating Instructions
Page 163
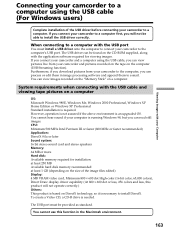
If you connect your camcorder and a computer using the USB cable (For Windows users) Complete installation of the image files edited) Display: 4 MB VRAM video card, Minimum 800 × 600 dot High-color (16 bit color, 65,000 ... it is based on the size of the USB driver before connecting your camcorder and pictures recorded on the tape on a computer OS: Microsoft Windows 98SE, Windows Me, Windows 2000 Professional, Windows XP Home Edition or Windows XP Professional Standard installation is running Windows 98, but you can process or edit them to a computer. Furthermore, if you...
If you connect your camcorder and a computer using the USB cable (For Windows users) Complete installation of the image files edited) Display: 4 MB VRAM video card, Minimum 800 × 600 dot High-color (16 bit color, 65,000 ... it is based on the size of the USB driver before connecting your camcorder and pictures recorded on the tape on a computer OS: Microsoft Windows 98SE, Windows Me, Windows 2000 Professional, Windows XP Home Edition or Windows XP Professional Standard installation is running Windows 98, but you can process or edit them to a computer. Furthermore, if you...
Operating Instructions
Page 164
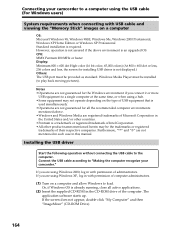
...starts up. Installing the USB driver Start the following operation without connecting the USB cable to "Making the computer recognize your camcorder to a computer using Windows 2000, log in the United States and/or other countries. •Pentium is a trademark or registered trademark of Intel Corporation..."ImageMixer" (CD-ROM Drive). 164 Furthermore, "™" and "®" are not guaranteed for installing USB driver is an upgraded OS. Connecting your camcorder." CPU: MMX Pentium 200 MHz or faster Display: Minimum 800 × 600 dot High-color (16 bit color, 65,000 colors) (At...
...starts up. Installing the USB driver Start the following operation without connecting the USB cable to "Making the computer recognize your camcorder to a computer using Windows 2000, log in the United States and/or other countries. •Pentium is a trademark or registered trademark of Intel Corporation..."ImageMixer" (CD-ROM Drive). 164 Furthermore, "™" and "®" are not guaranteed for installing USB driver is an upgraded OS. Connecting your camcorder." CPU: MMX Pentium 200 MHz or faster Display: Minimum 800 × 600 dot High-color (16 bit color, 65,000 colors) (At...
Operating Instructions
Page 165
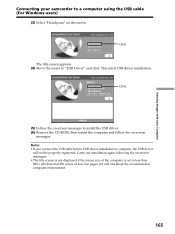
Click The title screen appears. (4) Move the cursor to a computer using the USB cable (For Windows users) (3) Select "Handycam" on -screen messages. Notes •If you connect the USB cable before USB driver installation is set to install the USB driver. (6) Remove the... CD-ROM, then restart the computer and follow the on the screen. Viewing Images with your Computer Connecting your camcorder to "USB Driver" and ...
Click The title screen appears. (4) Move the cursor to a computer using the USB cable (For Windows users) (3) Select "Handycam" on -screen messages. Notes •If you connect the USB cable before USB driver installation is set to install the USB driver. (6) Remove the... CD-ROM, then restart the computer and follow the on the screen. Viewing Images with your Computer Connecting your camcorder to "USB Driver" and ...

Operating Instructions
Page 166
... applications. (2) Insert the supplied CD-ROM in the CD-ROM drive of administrators. Click The Install Wizard program starts up . (3) Select "Handycam" on the screen. Connecting your camcorder to a computer using Windows 2000, log in with permission of computer administrators. (1) Turn on your computer. This function enables image data recorded on the "Memory...
... applications. (2) Insert the supplied CD-ROM in the CD-ROM drive of administrators. Click The Install Wizard program starts up . (3) Select "Handycam" on the screen. Connecting your camcorder to a computer using Windows 2000, log in with permission of computer administrators. (1) Turn on your computer. This function enables image data recorded on the "Memory...
Operating Instructions
Page 167
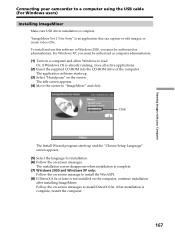
...camcorder to a computer using the USB cable (For Windows users) Installing ImageMixer Make sure USB driver installation is not installed on the computer, continue installation after installing ImageMixer. The installation screen disappears when installation is complete. (7) Windows 2000 and Windows... and use this software in Windows 2000, you must be authorized as...Windows OS is already running, close all active applications. (2) Insert the supplied CD-ROM into the CD-ROM drive of the computer. For Windows...up . (3) Select "Handycam" on a computer and allow Windows to install the WinASPI. ...
...camcorder to a computer using the USB cable (For Windows users) Installing ImageMixer Make sure USB driver installation is not installed on the computer, continue installation after installing ImageMixer. The installation screen disappears when installation is complete. (7) Windows 2000 and Windows... and use this software in Windows 2000, you must be authorized as...Windows OS is already running, close all active applications. (2) Insert the supplied CD-ROM into the CD-ROM drive of the computer. For Windows...up . (3) Select "Handycam" on a computer and allow Windows to install the WinASPI. ...

Operating Instructions
Page 168
.... If that the ImageMixer CD writing function may not work properly. Viewing pictures recorded on the tape (1) Connect the AC Adaptor to your camcorder. (2) Set the POWER switch to . (3) Press FN to display PAGE1. (4) Press MENU to display the menu. (5) Select USB STREAM...not work correctly. Making the computer recognize your camcorder If you are using Windows XP, log in there. The computer recognizes your camcorder, and the Windows Add Hardware Wizard starts. Connecting your camcorder to a computer using the USB cable (For Windows users) MEMORY MIX Album Once "ImageMixer" ...
.... If that the ImageMixer CD writing function may not work properly. Viewing pictures recorded on the tape (1) Connect the AC Adaptor to your camcorder. (2) Set the POWER switch to . (3) Press FN to display PAGE1. (4) Press MENU to display the menu. (5) Select USB STREAM...not work correctly. Making the computer recognize your camcorder If you are using Windows XP, log in there. The computer recognizes your camcorder, and the Windows Add Hardware Wizard starts. Connecting your camcorder to a computer using the USB cable (For Windows users) MEMORY MIX Album Once "ImageMixer" ...
Operating Instructions
Page 169
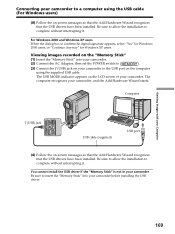
... the POWER switch to . (3) Connect the (USB) jack on your camcorder to confirm the digital signature appears, select "Yes" for Windows 2000 users, or "Continue Anyway" for Windows XP users. Viewing images recorded on the "Memory Stick" (1) Insert the "Memory Stick" into your camcorder before installing the USB driver. 169 Computer (USB) jack USB...
... the POWER switch to . (3) Connect the (USB) jack on your camcorder to confirm the digital signature appears, select "Yes" for Windows 2000 users, or "Continue Anyway" for Windows XP users. Viewing images recorded on the "Memory Stick" (1) Insert the "Memory Stick" into your camcorder before installing the USB driver. 169 Computer (USB) jack USB...
Operating Instructions
Page 170
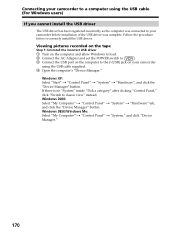
..."Pick a category" after clicking "Control Panel," click "Switch to correctly install the USB driver. Connecting your camcorder to a computer using the USB cable (For Windows users) If you cannot install the USB driver The USB driver has been registered incorrectly as the computer was ...connected to your camcorder using the USB cable supplied. 4 Open the computer's "Device Manager." Windows 2000: Select "My Computer" t "Control Panel" t "System" t "Hardware" tab, and click the...
..."Pick a category" after clicking "Control Panel," click "Switch to correctly install the USB driver. Connecting your camcorder to a computer using the USB cable (For Windows users) If you cannot install the USB driver The USB driver has been registered incorrectly as the computer was ...connected to your camcorder using the USB cable supplied. 4 Open the computer's "Device Manager." Windows 2000: Select "My Computer" t "Control Panel" t "System" t "Hardware" tab, and click the...
Operating Instructions
Page 171
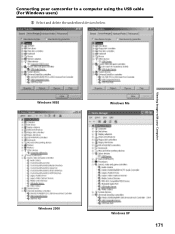
Connecting your Computer Windows 2000 Windows XP 171 Windows 98SE Windows Me Viewing Images with your camcorder to a computer using the USB cable (For Windows users) 5 Select and delete the underlined devices below.
Connecting your Computer Windows 2000 Windows XP 171 Windows 98SE Windows Me Viewing Images with your camcorder to a computer using the USB cable (For Windows users) 5 Select and delete the underlined devices below.
Operating Instructions
Page 172
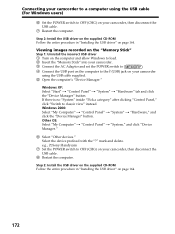
...camcorder using the USB cable supplied. 5 Open the computer's "Device Manager." If there is no "System" inside "Pick a category" after clicking "Control Panel," click "Switch to OFF (CHG) on page 164. Windows 2000: Select "My Computer" t "Control Panel" t "System" t "Hardware," and click the "Device Manager" button. e.g., (?)Sony Handycam... 7 Set the POWER switch to classic view" instead. Windows XP: Select "Start" t...
...camcorder using the USB cable supplied. 5 Open the computer's "Device Manager." If there is no "System" inside "Pick a category" after clicking "Control Panel," click "Switch to OFF (CHG) on page 164. Windows 2000: Select "My Computer" t "Control Panel" t "System" t "Hardware," and click the "Device Manager" button. e.g., (?)Sony Handycam... 7 Set the POWER switch to classic view" instead. Windows XP: Select "Start" t...
Operating Instructions
Page 173
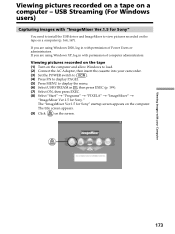
... appears. (9) Click on the computer. The "ImageMixer Ver.1.5 for Sony" You need to install the USB driver and ImageMixer to display the menu. (6) Select USB STREAM in with permission of Power Users or administrators. USB Streaming (For Windows users) Capturing images with your camcorder. (3) Set the POWER switch to . (4) Press FN to display...
... appears. (9) Click on the computer. The "ImageMixer Ver.1.5 for Sony" You need to install the USB driver and ImageMixer to display the menu. (6) Select USB STREAM in with permission of Power Users or administrators. USB Streaming (For Windows users) Capturing images with your camcorder. (3) Set the POWER switch to . (4) Press FN to display...
Operating Instructions
Page 174
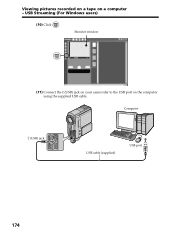
USB Streaming (For Windows users) (10) Click . Monitor window (11) Connect the (USB) jack on your camcorder to the USB port on a computer - Viewing pictures recorded on a tape on the computer using the supplied USB cable. Computer (USB) jack USB cable (supplied) USB port 174
USB Streaming (For Windows users) (10) Click . Monitor window (11) Connect the (USB) jack on your camcorder to the USB port on a computer - Viewing pictures recorded on a tape on the computer using the supplied USB cable. Computer (USB) jack USB cable (supplied) USB port 174
Operating Instructions
Page 175
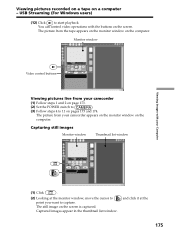
...your Computer (1) Click . (2) Looking at the 175 The picture from the tape appears on the monitor window on the screen is captured. Monitor window Video control buttons Viewing pictures live from your camcorder (1) Follow steps 1 and 2 on page 173. (2) Set the POWER switch to . (3) Follow... a tape on the computer. USB Streaming (For Windows users) (12) Click to 11 on the screen. The picture from your camcorder appears on the monitor window on a computer - Capturing still images Monitor window Thumbnail list window Viewing Images with the buttons on pages 173 and ...
...your Computer (1) Click . (2) Looking at the 175 The picture from the tape appears on the monitor window on the screen is captured. Monitor window Video control buttons Viewing pictures live from your camcorder (1) Follow steps 1 and 2 on page 173. (2) Set the POWER switch to . (3) Follow... a tape on the computer. USB Streaming (For Windows users) (12) Click to 11 on the screen. The picture from your camcorder appears on the monitor window on a computer - Capturing still images Monitor window Thumbnail list window Viewing Images with the buttons on pages 173 and ...


