

Operating Instructions
Page 5
Getting started Main Features Main Features Other uses Functions to adjust exposure in recording •BACK LIGHT (p. 32) •NightShot/Super NightShot/Color Slow Shutter (p. 32) •PROGRAM AE (p. 60) •White balance (p. 49) •Adjusting the exposure manually (p. 63) •Flexible ...
Getting started Main Features Main Features Other uses Functions to adjust exposure in recording •BACK LIGHT (p. 32) •NightShot/Super NightShot/Color Slow Shutter (p. 32) •PROGRAM AE (p. 60) •White balance (p. 49) •Adjusting the exposure manually (p. 63) •Flexible ...
Operating Instructions
Page 6
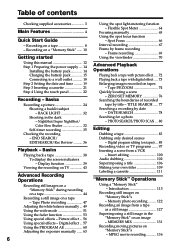
..."s - Table of recorded Recording a picture 24 tape by title - Recording on a tape 8 - NightShot/Super NightShot/ - Recording on a "Memory Stick" ...... 10 Getting started Using the spot light-metering function - BACK LIGHT 32 - Digital effect ... 57 Using the PROGRAM AE 60 Adjusting the exposure manually ...... 63 Using a "Memory Stick" -
..."s - Table of recorded Recording a picture 24 tape by title - Recording on a tape 8 - NightShot/Super NightShot/ - Recording on a "Memory Stick" ...... 10 Getting started Using the spot light-metering function - BACK LIGHT 32 - Digital effect ... 57 Using the PROGRAM AE 60 Adjusting the exposure manually ...... 63 Using a "Memory Stick" -
Operating Instructions
Page 9
... screen from the rear of the touch panel to open the LCD panel. Adjust the viewfinder lens to your camcorder, the clock setting is closed, pull out the viewfinder until it . POWER LOCK VCR MEMORY OFF CAMERA (... clock setting before recording (p. 19). Monitoring the playback picture on the screen. Do not press the LCD screen with your camcorder by the viewfinder, the LCD panel, the battery pack or the jack cover. Recording a picture (p. 24) 1 Remove ... START/ STOP again. NOTE When using the touch panel, press operation buttons lightly with sharp-pointed objects such as a pen. 9
... screen from the rear of the touch panel to open the LCD panel. Adjust the viewfinder lens to your camcorder, the clock setting is closed, pull out the viewfinder until it . POWER LOCK VCR MEMORY OFF CAMERA (... clock setting before recording (p. 19). Monitoring the playback picture on the screen. Do not press the LCD screen with your camcorder by the viewfinder, the LCD panel, the battery pack or the jack cover. Recording a picture (p. 24) 1 Remove ... START/ STOP again. NOTE When using the touch panel, press operation buttons lightly with sharp-pointed objects such as a pen. 9

Operating Instructions
Page 11
If you purchase your camcorder, the clock setting is set the clock setting before recording (p. 19). Quick Start Guide NOTE Do not pick up your eyesight ...green button. Make sure that the LOCK switch is set to off. PLAY INDEX FN 11 Adjust the viewfinder lens to your camcorder by the viewfinder, the LCD panel, the battery pack or the jack cover. The last recorded image is closed, pull ...the LCD panel is displayed. Recording a still image on a "Memory Stick" (p. 122) 1 Remove the lens cap. 4 Press PHOTO lightly. 3 Press OPEN to the right (unlock) position.
If you purchase your camcorder, the clock setting is set the clock setting before recording (p. 19). Quick Start Guide NOTE Do not pick up your eyesight ...green button. Make sure that the LOCK switch is set to off. PLAY INDEX FN 11 Adjust the viewfinder lens to your camcorder by the viewfinder, the LCD panel, the battery pack or the jack cover. The last recorded image is closed, pull ...the LCD panel is displayed. Recording a still image on a "Memory Stick" (p. 122) 1 Remove the lens cap. 4 Press PHOTO lightly. 3 Press OPEN to the right (unlock) position.
Operating Instructions
Page 13
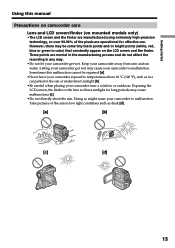
...Take pictures of the pixels are normal in the manufacturing process and do not affect the recording in any way. •Do not let your camcorder to malfunction. Getting started Using this malfunction cannot be some tiny black points and/or bright points (white, red, blue or green in ...using extremely high-precision technology, so over 99.99% of the sun in low light conditions such as in a car parked in the sun or under direct sunlight [b]. •Be careful when placing your camcorder exposed to direct sunlight for effective use. These points are operational for long periods ...
...Take pictures of the pixels are normal in the manufacturing process and do not affect the recording in any way. •Do not let your camcorder to malfunction. Getting started Using this malfunction cannot be some tiny black points and/or bright points (white, red, blue or green in ...using extremely high-precision technology, so over 99.99% of the sun in low light conditions such as in a car parked in the sun or under direct sunlight [b]. •Be careful when placing your camcorder exposed to direct sunlight for effective use. These points are operational for long periods ...
Operating Instructions
Page 15
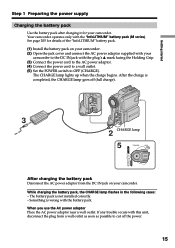
... Charging the battery pack Use the battery pack after charging it for details of the "InfoLITHIUM" battery pack. (1) Install the battery pack on your camcorder. The battery pack is completed, the CHARGE lamp goes off the power. 15 When you use the AC power adaptor Place the AC power adaptor... near a wall outlet. The CHARGE lamp lights up when the charge begins. Something is wrong with this unit, disconnect the plug from the DC IN jack on your camcorder. (2) Open the jack cover and connect the AC power adaptor supplied with your...
... Charging the battery pack Use the battery pack after charging it for details of the "InfoLITHIUM" battery pack. (1) Install the battery pack on your camcorder. The battery pack is completed, the CHARGE lamp goes off the power. 15 When you use the AC power adaptor Place the AC power adaptor... near a wall outlet. The CHARGE lamp lights up when the charge begins. Something is wrong with this unit, disconnect the plug from the DC IN jack on your camcorder. (2) Open the jack cover and connect the AC power adaptor supplied with your...
Operating Instructions
Page 23
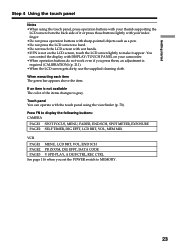
If an item is not available The color of it or press those buttons lightly with your camcorder. •When operation buttons do not work even if you set the POWER switch to gray. Touch panel You can control the display with DISPLAY/...TOUCH PANEL on the LCD screen, touch the LCD screen lightly to make it appear. Press FN to display the following buttons: CAMERA PAGE1 SPOT...
If an item is not available The color of it or press those buttons lightly with your camcorder. •When operation buttons do not work even if you set the POWER switch to gray. Touch panel You can control the display with DISPLAY/...TOUCH PANEL on the LCD screen, touch the LCD screen lightly to make it appear. Press FN to display the following buttons: CAMERA PAGE1 SPOT...

Operating Instructions
Page 24
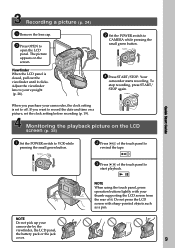
... set the Holding Grip back to fix it. (2) Install the power source and insert a cassette. Recording - Basics - The picture appears on the front of your camcorder firmly as illustrated. (4) Set the POWER switch to 21). (3) Pull down the Holding Grip. The REC indicator appears. See "Step 1" to "Step 3" for you. (1) Remove... the previous position. (3) Eject the cassette. (4) Remove the battery pack. 24 The camera recording lamp located on the LCD panel. (6) Press START/STOP. - Hold your camcorder lights up. Your camcorder is in standby. (5) Press OPEN to open the LCD panel.
... set the Holding Grip back to fix it. (2) Install the power source and insert a cassette. Recording - Basics - The picture appears on the front of your camcorder firmly as illustrated. (4) Set the POWER switch to 21). (3) Pull down the Holding Grip. The REC indicator appears. See "Step 1" to "Step 3" for you. (1) Remove... the previous position. (3) Eject the cassette. (4) Remove the battery pack. 24 The camera recording lamp located on the LCD panel. (6) Press START/STOP. - Hold your camcorder lights up. Your camcorder is in standby. (5) Press OPEN to open the LCD panel.

Operating Instructions
Page 32
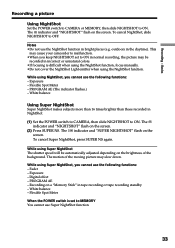
... The backlight function will be canceled when you use the backlight function. BACK LIGHT Set the POWER switch to shoot a subject in a dark place. indicator appears on the screen. Shooting in EXPOSURE or SPOT METER (p. 64). For example, ... animals for observation when you press MANUAL (p. 63) in the dark - BACK LIGHT When you to CAMERA or MEMORY, then press BACK LIGHT. To cancel, press BACK LIGHT again. The . NIGHTSHOT OFF COLOR SLOW S ON SUPER NS NightShot Light emitter 32 NightShot/Super NightShot/Color Slow Shutter NightShot enables you shoot a subject with...
... The backlight function will be canceled when you use the backlight function. BACK LIGHT Set the POWER switch to shoot a subject in a dark place. indicator appears on the screen. Shooting in EXPOSURE or SPOT METER (p. 64). For example, ... animals for observation when you press MANUAL (p. 63) in the dark - BACK LIGHT When you to CAMERA or MEMORY, then press BACK LIGHT. To cancel, press BACK LIGHT again. The . NIGHTSHOT OFF COLOR SLOW S ON SUPER NS NightShot Light emitter 32 NightShot/Super NightShot/Color Slow Shutter NightShot enables you shoot a subject with...
Operating Instructions
Page 33
... a "Memory Stick" in normal recording, the picture may be automatically adjusted depending on the brightness of the moving picture may cause your camcorder to ON. PROGRAM AE - Recording on the screen. Basics Recording a picture Using NightShot Set the POWER switch to CAMERA or MEMORY, then... Flexible Spot Meter When the POWER switch is difficult when using the NightShot function, focus manually. •Do not cover the NightShot Light emitter when using Super NightShot, you keep NIGHTSHOT set to MEMORY You cannot use the following functions: - To cancel Super NightShot, press...
... a "Memory Stick" in normal recording, the picture may be automatically adjusted depending on the brightness of the moving picture may cause your camcorder to ON. PROGRAM AE - Recording on the screen. Basics Recording a picture Using NightShot Set the POWER switch to CAMERA or MEMORY, then... Flexible Spot Meter When the POWER switch is difficult when using the NightShot function, focus manually. •Do not cover the NightShot Light emitter when using Super NightShot, you keep NIGHTSHOT set to MEMORY You cannot use the following functions: - To cancel Super NightShot, press...

Operating Instructions
Page 34
To cancel the Color Slow Shutter function, press COLOR SLOW S again. When the POWER switch is set N.S.LIGHT to OFF. (2) Press COLOR SLOW S. Flexible Spot Meter In total darkness Color Slow Shutter may slow down. The maximum shooting distance using ...to CAMERA, slide NIGHTSHOT to ON in tape recording or tape recording standby - While using the NightShot Light is ON.) NightShot Light NightShot Light rays are infrared and so are invisible. Exposure - To activate NightShot Light, set to MEMORY You cannot use the following functions: - PROGRAM AE - Using Color Slow Shutter Color...
To cancel the Color Slow Shutter function, press COLOR SLOW S again. When the POWER switch is set N.S.LIGHT to OFF. (2) Press COLOR SLOW S. Flexible Spot Meter In total darkness Color Slow Shutter may slow down. The maximum shooting distance using ...to CAMERA, slide NIGHTSHOT to ON in tape recording or tape recording standby - While using the NightShot Light is ON.) NightShot Light NightShot Light rays are infrared and so are invisible. Exposure - To activate NightShot Light, set to MEMORY You cannot use the following functions: - PROGRAM AE - Using Color Slow Shutter Color...

Operating Instructions
Page 44
... on the "Memory Stick." 1 2 640 SFN 1 / 12 CAPTURE FN 640 SFN FN Notes • Do not shake or strike your camcorder. • Set PHOTO REC to MEMORY in tape recording or tape recording standby. Wide mode - Digital effect - EDITSEARCH - The CAPTURE indicator appears.... Recording is MEMORY.) (1) In standby, keep pressing PHOTO lightly until a still image appears. Fader - The image displayed on a tape (p. 47). Picture effect - Recording does not start yet. To change the...
... on the "Memory Stick." 1 2 640 SFN 1 / 12 CAPTURE FN 640 SFN FN Notes • Do not shake or strike your camcorder. • Set PHOTO REC to MEMORY in tape recording or tape recording standby. Wide mode - Digital effect - EDITSEARCH - The CAPTURE indicator appears.... Recording is MEMORY.) (1) In standby, keep pressing PHOTO lightly until a still image appears. Fader - The image displayed on a tape (p. 47). Picture effect - Recording does not start yet. To change the...

Operating Instructions
Page 45
When you press the button. When you press PHOTO on the Remote Commander Your camcorder immediately records the image that is SUPER FINE.) During and after recording still images on a "Memory Stick" Your camcorder continues recording on the "Memory Stick." To record still images on a "Memory Stick"... during recording on the screen by pressing PHOTO lightly. The image when you selected when the POWER switch was set to ...
When you press the button. When you press PHOTO on the Remote Commander Your camcorder immediately records the image that is SUPER FINE.) During and after recording still images on a "Memory Stick" Your camcorder continues recording on the "Memory Stick." To record still images on a "Memory Stick"... during recording on the screen by pressing PHOTO lightly. The image when you selected when the POWER switch was set to ...
Operating Instructions
Page 47
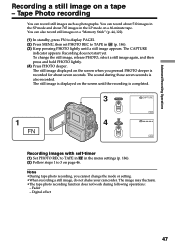
... image is displayed on the screen when you cannot change the still image, release PHOTO, select a still image again, and then press and hold PHOTO lightly. (4) Press PHOTO deeper. Notes •During tape photo recording, you pressed PHOTO deeper is completed. 3 CAPTURE 1 FN FN 4 FN Recording images with...during those seven seconds is also recorded. To change the mode or setting. •When recording a still image, do not shake your camcorder. Tape Photo recording You can record about 510 images in the SP mode and about 765 images in (p. 186). (3) Keep pressing PHOTO...
... image is displayed on the screen when you cannot change the still image, release PHOTO, select a still image again, and then press and hold PHOTO lightly. (4) Press PHOTO deeper. Notes •During tape photo recording, you pressed PHOTO deeper is completed. 3 CAPTURE 1 FN FN 4 FN Recording images with...during those seven seconds is also recorded. To change the mode or setting. •When recording a still image, do not shake your camcorder. Tape Photo recording You can record about 510 images in the SP mode and about 765 images in (p. 186). (3) Keep pressing PHOTO...

Operating Instructions
Page 48
..., the image may fluctuate. To record clear and less fluctuated still images We recommend that is recorded for about seven seconds and your camcorder returns to tape recording standby. Tape Photo recording If you record a moving subject with the tape photo recording function When you play back... the still image on the screen by pressing PHOTO lightly. Press PHOTO deeper. Recording a still image on "Memory Stick"s. 48 When you press PHOTO on the Remote Commander Your camcorder immediately records the image that you press the button. The still image is on...
..., the image may fluctuate. To record clear and less fluctuated still images We recommend that is recorded for about seven seconds and your camcorder returns to tape recording standby. Tape Photo recording If you record a moving subject with the tape photo recording function When you play back... the still image on the screen by pressing PHOTO lightly. Press PHOTO deeper. Recording a still image on "Memory Stick"s. 48 When you press PHOTO on the Remote Commander Your camcorder immediately records the image that you press the button. The still image is on...

Operating Instructions
Page 49
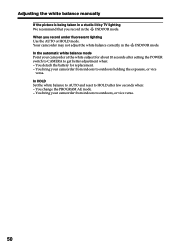
LIGHT AUTO SHTR EXIT AUTO HOLD OUTDOOR INDOOR EXEC RET. To return to the automatic white balance mode Set WHT BAL to AUTO in (p. 185). Normally ... background (OUTDOOR): •Recording a sunset/sunrise, just after sunset, just before sunrise, neon signs, or fireworks •Under a color matching fluorescent lamp n (INDOOR): •When lighting conditions change quickly •In too bright places such as photography studios •Under sodium lamps or mercury lamps 1 FN 2 MANUAL SET PROGRAM AE P EFFECT...
LIGHT AUTO SHTR EXIT AUTO HOLD OUTDOOR INDOOR EXEC RET. To return to the automatic white balance mode Set WHT BAL to AUTO in (p. 185). Normally ... background (OUTDOOR): •Recording a sunset/sunrise, just after sunset, just before sunrise, neon signs, or fireworks •Under a color matching fluorescent lamp n (INDOOR): •When lighting conditions change quickly •In too bright places such as photography studios •Under sodium lamps or mercury lamps 1 FN 2 MANUAL SET PROGRAM AE P EFFECT...
Operating Instructions
Page 50
... detach the battery for about 10 seconds after few seconds when: - You change the PROGRAM AE mode. - In the automatic white balance mode Point your camcorder from indoors to HOLD after setting the POWER switch to CAMERA to outdoors holding the exposure, or vice versa. In HOLD Set the white balance... to AUTO and reset to outdoors, or vice versa. 50 You bring your camcorder at the white subject for replacement. - Adjusting the white balance manually If the picture is being taken in a studio lit by TV...
... detach the battery for about 10 seconds after few seconds when: - You change the PROGRAM AE mode. - In the automatic white balance mode Point your camcorder from indoors to HOLD after setting the POWER switch to CAMERA to outdoors holding the exposure, or vice versa. In HOLD Set the white balance... to AUTO and reset to outdoors, or vice versa. 50 You bring your camcorder at the white subject for replacement. - Adjusting the white balance manually If the picture is being taken in a studio lit by TV...

Operating Instructions
Page 56
ART [a] : The color and brightness of the picture is monochrome (black-and-white). SOLARIZE [b] : The light intensity is automatically canceled. 56 S. OLD MOVIE - Recording on the TV. Picture effect You can digitally process images to other than CAMERA The ...FN to display PAGE1. (2) Press MENU, then set P EFFECT to FN Press EXIT. PASTEL [c] : The contrast of the picture are reversed. Using special effects - LIGHT AUTO SHTR EXIT OFF NEG. NEG. B&W : The picture is emphasized, and the picture looks like an animated cartoon. To cancel the picture effect function Select...
ART [a] : The color and brightness of the picture is monochrome (black-and-white). SOLARIZE [b] : The light intensity is automatically canceled. 56 S. OLD MOVIE - Recording on the TV. Picture effect You can digitally process images to other than CAMERA The ...FN to display PAGE1. (2) Press MENU, then set P EFFECT to FN Press EXIT. PASTEL [c] : The contrast of the picture are reversed. Using special effects - LIGHT AUTO SHTR EXIT OFF NEG. NEG. B&W : The picture is emphasized, and the picture looks like an animated cartoon. To cancel the picture effect function Select...
Operating Instructions
Page 60
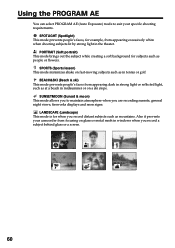
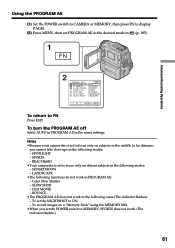
BEACH&SKI (Beach & ski) This mode prevents people's faces from appearing dark in strong light or reflected light, such as in midsummer or on a ski slope. Using the PROGRAM AE You can select PROGRAM AE (Auto Exposure) mode to maintain atmosphere when you ... minimizes shake on glass or metal mesh in the theater. SUNSETMOON (Sunset & moon) This mode allows you to suit your camcorder from appearing excessively white when shooting subjects lit by strong light in windows when you record a subject behind glass or a screen. 60 PORTRAIT (Soft portrait) This mode brings out the subject...
BEACH&SKI (Beach & ski) This mode prevents people's faces from appearing dark in strong light or reflected light, such as in midsummer or on a ski slope. Using the PROGRAM AE You can select PROGRAM AE (Auto Exposure) mode to maintain atmosphere when you ... minimizes shake on glass or metal mesh in the theater. SUNSETMOON (Sunset & moon) This mode allows you to suit your camcorder from appearing excessively white when shooting subjects lit by strong light in windows when you record a subject behind glass or a screen. 60 PORTRAIT (Soft portrait) This mode brings out the subject...
Operating Instructions
Page 61
LIGHT AUTO SHTR EXIT AUTO SPOTLIGHT PORTRAIT SPORTS BEACH&SKI SUNSETMOON LANDSCAPE EXEC RET. Notes •Because your camcorder is set to focus only on subjects in the middle to far distance, you set to focus only on distant subjects in PROGRAM AE: - BEACH&SKI •Your camcorder is set the POWER switch to...
LIGHT AUTO SHTR EXIT AUTO SPOTLIGHT PORTRAIT SPORTS BEACH&SKI SUNSETMOON LANDSCAPE EXEC RET. Notes •Because your camcorder is set to focus only on subjects in the middle to far distance, you set to focus only on distant subjects in PROGRAM AE: - BEACH&SKI •Your camcorder is set the POWER switch to...


