Operating Instructions
Page 6
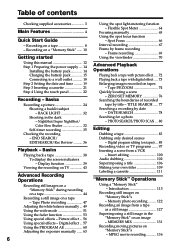
... power supply .... 14 Installing the battery pack 14 Advanced Playback Operations Charging the battery pack 15 Playing back a tape with picture effect ..... 72 Connecting to a wall outlet 18 Playing back a tape with digital effect .... 73 Step 2 Setting the date and time ......... 19 Enlarging images recorded on "Memory Stick"s - ZERO SET MEMORY 76 Searching the boundaries of contents Checking supplied accessories 3 Main Features 4 Quick Start Guide - END SEARCH/ Dubbing only desired scenes EDITSEARCH/Rec Review .......... 36 - Digital program editing (on a "Memory Stick...
... power supply .... 14 Installing the battery pack 14 Advanced Playback Operations Charging the battery pack 15 Playing back a tape with picture effect ..... 72 Connecting to a wall outlet 18 Playing back a tape with digital effect .... 73 Step 2 Setting the date and time ......... 19 Enlarging images recorded on "Memory Stick"s - ZERO SET MEMORY 76 Searching the boundaries of contents Checking supplied accessories 3 Main Features 4 Quick Start Guide - END SEARCH/ Dubbing only desired scenes EDITSEARCH/Rec Review .......... 36 - Digital program editing (on a "Memory Stick...
Operating Instructions
Page 43
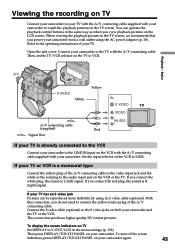
... screen. When viewing the playback picture on the LCD screen. If your TV or VCR is already connected to the VCR Connect your camcorder to the LINE IN input on the VCR with the A/V connecting cable supplied with your camcorder. If your camcorder to LINE. This connection produces higher quality DV format pictures. Connect your TV has an S video jack Pictures can operate the playback control buttons in the menu settings (p. 192). Set the input selector on TV Set DISPLAY to connect the yellow (video) plug...
... screen. When viewing the playback picture on the LCD screen. If your TV or VCR is already connected to the VCR Connect your camcorder to the LINE IN input on the VCR with the A/V connecting cable supplied with your camcorder. If your camcorder to LINE. This connection produces higher quality DV format pictures. Connect your TV has an S video jack Pictures can operate the playback control buttons in the menu settings (p. 192). Set the input selector on TV Set DISPLAY to connect the yellow (video) plug...
Operating Instructions
Page 47
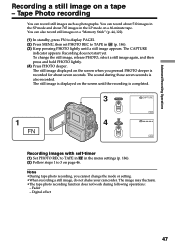
... still image displayed on a 60-minute tape. Recording does not start yet. Digital effect 47 The CAPTURE indicator appears. To change the mode or setting. •When recording a still image, do not shake your camcorder. The sound during following operations: - The still image is displayed on the screen until the recording is completed. 3 CAPTURE 1 FN FN 4 FN Recording images with self-timer (1) Set PHOTO REC to TAPE in in the menu settings (p. 186). (2) Follow steps 1 to TAPE in...
... still image displayed on a 60-minute tape. Recording does not start yet. Digital effect 47 The CAPTURE indicator appears. To change the mode or setting. •When recording a still image, do not shake your camcorder. The sound during following operations: - The still image is displayed on the screen until the recording is completed. 3 CAPTURE 1 FN FN 4 FN Recording images with self-timer (1) Set PHOTO REC to TAPE in in the menu settings (p. 186). (2) Follow steps 1 to TAPE in...
Operating Instructions
Page 72
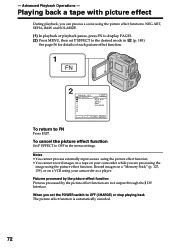
... process externally input scenes using the picture effect function. • You cannot record images on a tape on a VCR using your camcorder while you are not output through the DV Interface. Pictures processed by the picture effect function Pictures processed by the picture effect function are processing the image using the picture effect functions: NEG.ART, SEPIA, B&W and SOLARIZE. (1) In playback or playback pause, press FN to display PAGE1. (2) Press MENU, then set the POWER switch to the desired mode in the menu settings...
... process externally input scenes using the picture effect function. • You cannot record images on a tape on a VCR using your camcorder while you are not output through the DV Interface. Pictures processed by the picture effect function Pictures processed by the picture effect function are processing the image using the picture effect functions: NEG.ART, SEPIA, B&W and SOLARIZE. (1) In playback or playback pause, press FN to display PAGE1. (2) Press MENU, then set the POWER switch to the desired mode in the menu settings...
Operating Instructions
Page 94
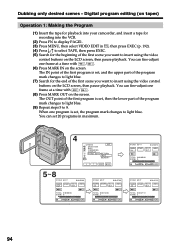
... tapes) Operation 1: Making the Program (1) Insert the tape for playback into your camcorder, and insert a tape for recording into the VCR. (2) Press FN to light blue. You can fine-adjust one frame at a time with / . (6) Press MARK IN on the LCD screen, then pause playback. When one frame at a time with / . (8) Press MARK OUT on the LCD screen, then pause playback. You can fine-adjust one program is set , and the upper part...
... tapes) Operation 1: Making the Program (1) Insert the tape for playback into your camcorder, and insert a tape for recording into the VCR. (2) Press FN to light blue. You can fine-adjust one frame at a time with / . (6) Press MARK IN on the LCD screen, then pause playback. When one frame at a time with / . (8) Press MARK OUT on the LCD screen, then pause playback. You can fine-adjust one program is set , and the upper part...
Operating Instructions
Page 137
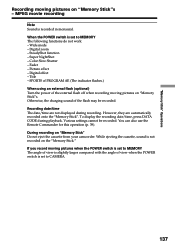
..."Memory Stick"s - When the POWER switch is set to CAMERA. 137 Digital zoom - Fader - SPORTS of PROGRAM AE (The indicator flashes.) When using an external flash (optional) Turn the power of view when the POWER switch is set to MEMORY The following functions do not work: - You can also use the Remote Commander for this operation (p. 39). While ejecting the cassette, sound is recorded in monaural. "Memory Stick" Operations Recording moving pictures on "Memory Stick"s. Color Slow Shutter - However, they are not displayed during playback. During recording on the "Memory Stick...
..."Memory Stick"s - When the POWER switch is set to CAMERA. 137 Digital zoom - Fader - SPORTS of PROGRAM AE (The indicator flashes.) When using an external flash (optional) Turn the power of view when the POWER switch is set to MEMORY The following functions do not work: - You can also use the Remote Commander for this operation (p. 39). While ejecting the cassette, sound is recorded in monaural. "Memory Stick" Operations Recording moving pictures on "Memory Stick"s. Color Slow Shutter - However, they are not displayed during playback. During recording on the "Memory Stick...
Operating Instructions
Page 143
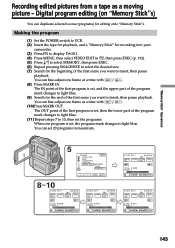
... IMAGE UNDO SIZE TOTAL 0:00:00 SCENE 0 END V I DEO ED I T MARK START I N 0:10:01:23 320 15sec IMAGE UNDO SIZE TOTAL 0:30:11 SCENE 3 END 143 Making the program (1) Set the POWER switch to VCR. (2) Insert the tape for playback, and a "Memory Stick" for editing onto "Memory Stick"s. The IN point of the first program is set, the program mark changes to insert, then pause playback. "Memory Stick" Operations Recording edited pictures from a tape...
... IMAGE UNDO SIZE TOTAL 0:00:00 SCENE 0 END V I DEO ED I T MARK START I N 0:10:01:23 320 15sec IMAGE UNDO SIZE TOTAL 0:30:11 SCENE 3 END 143 Making the program (1) Set the POWER switch to VCR. (2) Insert the tape for playback, and a "Memory Stick" for editing onto "Memory Stick"s. The IN point of the first program is set, the program mark changes to insert, then pause playback. "Memory Stick" Operations Recording edited pictures from a tape...
Operating Instructions
Page 168
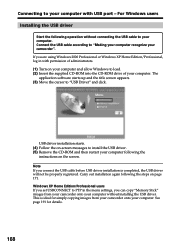
... CD-ROM into the CD-ROM drive of your computer following the instructions on -screen messages to install the USB driver. (5) Remove the CD-ROM and then restart your computer. See page 191 for simply copying images from your camcorder onto your computer. Note If you set USBCONNECT to "USB Driver" and click. Windows XP Home Edition/Professional users If you connect the USB cable before USB driver installation is ideal for details. 168 USB driver installation starts...
... CD-ROM into the CD-ROM drive of your computer following the instructions on -screen messages to install the USB driver. (5) Remove the CD-ROM and then restart your computer. See page 191 for simply copying images from your camcorder onto your computer. Note If you set USBCONNECT to "USB Driver" and click. Windows XP Home Edition/Professional users If you connect the USB cable before USB driver installation is ideal for details. 168 USB driver installation starts...
Operating Instructions
Page 170
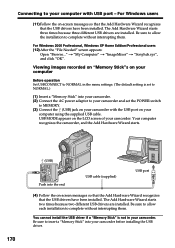
... using the supplied USB cable. Viewing images recorded on "Memory Stick"s on the LCD screen of your camcorder. Your computer recognizes the camcorder, and the Add Hardware Wizard starts. 170 (USB) Push into your camcorder and set the POWER switch to complete without interrupting them . USB MODE appears on your computer Before operation Set USBCONNECT to NORMAL in your camcorder. Be sure to insert a "Memory Stick" into the end USB cable (supplied) USB port (4) Follow the on -screen messages...
... using the supplied USB cable. Viewing images recorded on "Memory Stick"s on the LCD screen of your camcorder. Your computer recognizes the camcorder, and the Add Hardware Wizard starts. 170 (USB) Push into your camcorder and set the POWER switch to complete without interrupting them . USB MODE appears on your computer Before operation Set USBCONNECT to NORMAL in your camcorder. Be sure to insert a "Memory Stick" into the end USB cable (supplied) USB port (4) Follow the on -screen messages...
Operating Instructions
Page 171
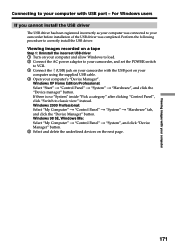
... USB driver 1 Turn on your computer and allow Windows to load. 2 Connect the AC power adaptor to your camcorder, and set the POWER switch to VCR. 3 Connect the (USB) jack on your camcorder with USB port - Windows 2000 Professional: Select "My Computer" t "Control Panel" t "System" t "Hardware" tab, and click the "Device Manager" button. Viewing images with your computer Connecting to your computer with the USB port on your computer using the supplied USB cable. 4 Open your camcorder before installation...
... USB driver 1 Turn on your computer and allow Windows to load. 2 Connect the AC power adaptor to your camcorder, and set the POWER switch to VCR. 3 Connect the (USB) jack on your camcorder with USB port - Windows 2000 Professional: Select "My Computer" t "Control Panel" t "System" t "Hardware" tab, and click the "Device Manager" button. Viewing images with your computer Connecting to your computer with the USB port on your computer using the supplied USB cable. 4 Open your camcorder before installation...
Operating Instructions
Page 173
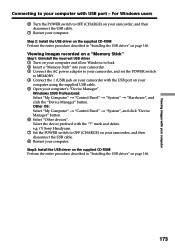
..." t "Control Panel" t "System" t "Hardware", and click the "Device Manager" button. Viewing images with your computer Connecting to MEMORY. 4 Connect the (USB) jack on your camcorder with the USB port on your computer using the supplied USB cable. 5 Open your computer's "Device Manager". mark and delete. Select the device prefixed with the "?" e.g. (?) Sony Handycam 7 Set the POWER switch to OFF (CHARGE) on your camcorder, and then disconnect the USB cable. 7 Restart your computer. For Windows users 6 Turn the POWER switch to OFF (CHARGE) on...
..." t "Control Panel" t "System" t "Hardware", and click the "Device Manager" button. Viewing images with your computer Connecting to MEMORY. 4 Connect the (USB) jack on your camcorder with the USB port on your computer using the supplied USB cable. 5 Open your computer's "Device Manager". mark and delete. Select the device prefixed with the "?" e.g. (?) Sony Handycam 7 Set the POWER switch to OFF (CHARGE) on your camcorder, and then disconnect the USB cable. 7 Restart your computer. For Windows users 6 Turn the POWER switch to OFF (CHARGE) on...
Operating Instructions
Page 174
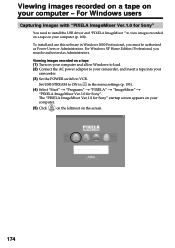
... be authorized as Administrators. Viewing images recorded on a tape (1) Turn on your computer and allow Windows to load. (2) Connect the AC power adaptor to your camcorder, and insert a tape into your camcorder. (3) Set the POWER switch to view images recorded on a tape on your computer (p. 168). For Windows users Capturing images with "PIXELA ImageMixer Ver.1.0 for Sony" You need to install the USB driver and "PIXELA ImageMixer " to VCR. Set USB STREAM to ON in in Windows 2000 Professional, you must...
... be authorized as Administrators. Viewing images recorded on a tape (1) Turn on your computer and allow Windows to load. (2) Connect the AC power adaptor to your camcorder, and insert a tape into your camcorder. (3) Set the POWER switch to view images recorded on a tape on your computer (p. 168). For Windows users Capturing images with "PIXELA ImageMixer Ver.1.0 for Sony" You need to install the USB driver and "PIXELA ImageMixer " to VCR. Set USB STREAM to ON in in Windows 2000 Professional, you must...
Operating Instructions
Page 178
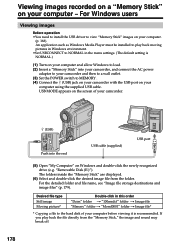
... operation •You need to install the USB driver to view "Memory Stick" images on your camcorder. 178 (USB) Push into your camcorder, and connect the AC power adaptor to your camcorder and then to a wall outlet. (3) Set the POWER switch to play back the file directly from the folder. The folders inside the "Memory Stick" are displayed. (6) Select and double-click the desired image file from the "Memory Stick," the image and sound may break off. USB MODE appears on the screen...
... operation •You need to install the USB driver to view "Memory Stick" images on your camcorder. 178 (USB) Push into your camcorder, and connect the AC power adaptor to your camcorder and then to a wall outlet. (3) Set the POWER switch to play back the file directly from the folder. The folders inside the "Memory Stick" are displayed. (6) Select and double-click the desired image file from the "Memory Stick," the image and sound may break off. USB MODE appears on the screen...
Operating Instructions
Page 180
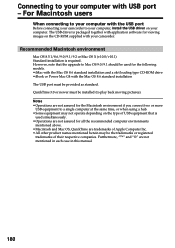
... models. •iMac with the Mac OS 8.6 standard installation and a slot loading type CD-ROM drive •iBook or Power Mac G4 with the USB port Before connecting your computer. Furthermore, "™" and "®" are not assured for the Macintosh environment if you connect two or more USB equipment to play back moving pictures). For Macintosh users When connecting to your computer with the Mac OS 8.6 standard installation...
... models. •iMac with the Mac OS 8.6 standard installation and a slot loading type CD-ROM drive •iBook or Power Mac G4 with the USB port Before connecting your computer. Furthermore, "™" and "®" are not assured for the Macintosh environment if you connect two or more USB equipment to play back moving pictures). For Macintosh users When connecting to your computer with the Mac OS 8.6 standard installation...
Operating Instructions
Page 182
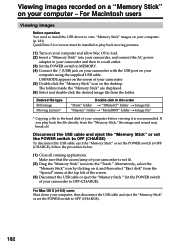
... t "100msdcf" folder t Image file "Mssony" folder t "Moml0001" folder t Image file* * Copying a file to the hard disk of your computer before viewing it , and then select "Eject disk" from the "Special" menu at the top left of your computer - If you play back moving pictures. (1) Turn on your computer using the supplied USB cable. Set the POWER switch of the screen. (3) Disconnect the USB cable or eject the "Memory Stick." Viewing images recorded on a "Memory Stick" on your camcorder to OFF (CHARGE). USB MODE appears on your...
... t "100msdcf" folder t Image file "Mssony" folder t "Moml0001" folder t Image file* * Copying a file to the hard disk of your computer before viewing it , and then select "Eject disk" from the "Special" menu at the top left of your computer - If you play back moving pictures. (1) Turn on your computer using the supplied USB cable. Set the POWER switch of the screen. (3) Disconnect the USB cable or eject the "Memory Stick." Viewing images recorded on a "Memory Stick" on your camcorder to OFF (CHARGE). USB MODE appears on your...
Operating Instructions
Page 185
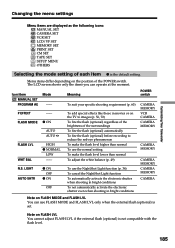
... menu settings Menu items are displayed as the following icons: MANUAL SET CAMERA SET VCR SET LCD/VF SET MEMORY SET PRINT SET CM SET TAPE SET SETUP MENU OTHERS Selecting the mode setting of the POWER switch. P EFFECT -- N.S. Menu items differ depending on the position of each item z is the default setting. LIGHT AUTO SHTR z ON OFF z ON OFF Meaning POWER switch To suit your specific shooting requirement (p. 60) To add special effects like those in movies or on the TV to images...
... menu settings Menu items are displayed as the following icons: MANUAL SET CAMERA SET VCR SET LCD/VF SET MEMORY SET PRINT SET CM SET TAPE SET SETUP MENU OTHERS Selecting the mode setting of the POWER switch. P EFFECT -- N.S. Menu items differ depending on the position of each item z is the default setting. LIGHT AUTO SHTR z ON OFF z ON OFF Meaning POWER switch To suit your specific shooting requirement (p. 60) To add special effects like those in movies or on the TV to images...
Operating Instructions
Page 199
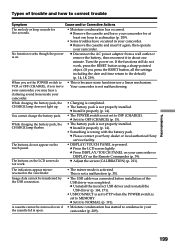
..., then operate your camcorder, you press the RESET button, all the settings including the date and time return to VCR or OFF (CHARGE), if you move your camcorder. If the functions still do not work . Types of the USB driver was connected before installation of trouble and how to OFF (CHARGE) (p. 15). When you set the POWER switch to the default) (p. 14, 18, 219). Your camcorder is not properly installed. camcorder. You cannot charge the battery pack...
..., then operate your camcorder, you press the RESET button, all the settings including the date and time return to VCR or OFF (CHARGE), if you move your camcorder. If the functions still do not work . Types of the USB driver was connected before installation of trouble and how to OFF (CHARGE) (p. 15). When you set the POWER switch to the default) (p. 14, 18, 219). Your camcorder is not properly installed. camcorder. You cannot charge the battery pack...
Operating Instructions
Page 202
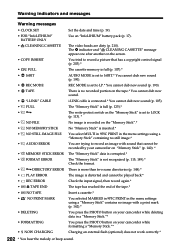
...; PLAY ERROR The image is not recognized (p. 115, 189).* Check the format. • - The write-protect switch on the "Memory Stick" is set to record an image with sound that has a copyright control signal (p. 203).* • FULL The cassette memory is full (p. 107).* • 16BIT AUDIO MODE is set to 16BIT.* You cannot dub new sound (p. 190). • REC MODE REC MODE is set to LOCK (p. 113). * • NO FILE No image is recorded on the "Memory Stick".* •...
...; PLAY ERROR The image is not recognized (p. 115, 189).* Check the format. • - The write-protect switch on the "Memory Stick" is set to record an image with sound that has a copyright control signal (p. 203).* • FULL The cassette memory is full (p. 107).* • 16BIT AUDIO MODE is set to 16BIT.* You cannot dub new sound (p. 190). • REC MODE REC MODE is set to LOCK (p. 113). * • NO FILE No image is recorded on the "Memory Stick".* •...
Operating Instructions
Page 214
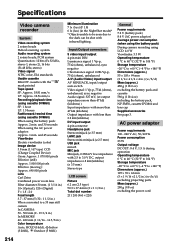
... printed Tape speed SP: Approx. 18.81 mm/s LP: Approx. 12.56 mm/s Recording/playback time (using cassette DVM60) SP: 1 hour LP: 1.5 hours Fastforward/rewind time (using cassette DVM60) When using the battery pack: Approx. 2 min. Specifications Video camera recorder System Video recording system 2 rotary heads Helical scanning system Audio recording system 2 rotary heads, PCM system Quantization: 12 bits (Fs 32 kHz, stereo 1, stereo 2), 16 bits (Fs 48 kHz, stereo) Video signal NTSC color, EIA...
... printed Tape speed SP: Approx. 18.81 mm/s LP: Approx. 12.56 mm/s Recording/playback time (using cassette DVM60) SP: 1 hour LP: 1.5 hours Fastforward/rewind time (using cassette DVM60) When using the battery pack: Approx. 2 min. Specifications Video camera recorder System Video recording system 2 rotary heads Helical scanning system Audio recording system 2 rotary heads, PCM system Quantization: 12 bits (Fs 32 kHz, stereo 1, stereo 2), 16 bits (Fs 48 kHz, stereo) Video signal NTSC color, EIA...
Operating Instructions
Page 223
... 211 Camera Chromakey 131 Cassette memory 12, 203 Charging battery 15 Charging manganese-lithium battery 211 CLEANING CASSETTE ...... 210 Clock set memory 76 Zoom 29 223 Quick Reference FADER 53 NTSC system 208 O, P, Q OLD MOVIE 57 OVERLAP 53 Photo save 146 Photo scan 81 Photo search 80 PICTURE EFFECT 56, 72 Picture search 41 Playback time 16 Print mark 160 PROGRAM AE 60 PTP 191 R Recording time 16 Rec Review 37 Remaining battery time indicator 31 Remaining tape indicator ...... 31 Remote...
... 211 Camera Chromakey 131 Cassette memory 12, 203 Charging battery 15 Charging manganese-lithium battery 211 CLEANING CASSETTE ...... 210 Clock set memory 76 Zoom 29 223 Quick Reference FADER 53 NTSC system 208 O, P, Q OLD MOVIE 57 OVERLAP 53 Photo save 146 Photo scan 81 Photo search 80 PICTURE EFFECT 56, 72 Picture search 41 Playback time 16 Print mark 160 PROGRAM AE 60 PTP 191 R Recording time 16 Rec Review 37 Remaining battery time indicator 31 Remaining tape indicator ...... 31 Remote...


