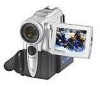
Operating Instructions
Page 3
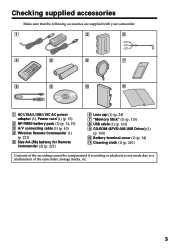
... Remote Commander (1) (p. 221) 5 Size AA (R6) battery for Remote Commander (2) (p. 221) 6 Lens cap (1) (p. 24) 7 "Memory Stick" (1) (p. 113) 8 USB cable (1) (p. 163) 9 CD-ROM (SPVD-008 USB Driver) (1) (p. 168) q; Battery terminal cover (1) (p. 14) qa Cleaning cloth (1) (p. 210) Contents of the recording cannot be compensated if recording or playback is not made due to...
... Remote Commander (1) (p. 221) 5 Size AA (R6) battery for Remote Commander (2) (p. 221) 6 Lens cap (1) (p. 24) 7 "Memory Stick" (1) (p. 113) 8 USB cable (1) (p. 163) 9 CD-ROM (SPVD-008 USB Driver) (1) (p. 168) q; Battery terminal cover (1) (p. 14) qa Cleaning cloth (1) (p. 210) Contents of the recording cannot be compensated if recording or playback is not made due to...
Operating Instructions
Page 163
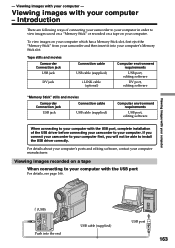
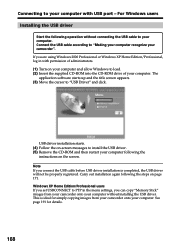
...images recorded on a tape When connecting to your computer with the USB port, complete installation of connecting your camcorder to your computer in order to install the USB driver correctly. If you will not be able to view images saved on a "Memory Stick" or recorded ...software, contact your computer first, you connect your camcorder to your camcorder and then insert it into the end USB cable (supplied) USB port 163 - Introduction There are following ways of the USB driver before connecting your camcorder to your computer manufacturer. Viewing images with your ...
...images recorded on a tape When connecting to your computer with the USB port, complete installation of connecting your camcorder to your computer in order to install the USB driver correctly. If you will not be able to view images saved on a "Memory Stick" or recorded ...software, contact your computer first, you connect your camcorder to your camcorder and then insert it into the end USB cable (supplied) USB port 163 - Introduction There are following ways of the USB driver before connecting your camcorder to your computer manufacturer. Viewing images with your ...
Operating Instructions
Page 166
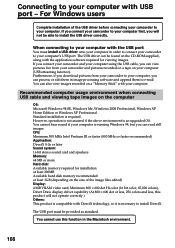
... the USB cable, you can view pictures live from your camcorder to your computer, you download pictures from your camcorder and pictures recorded on a tape on the size of the USB driver before connecting your camcorder to your computer with the application software required for installation: ...use this product will not be provided as standard. Connecting to your computer. The USB port must install a USB driver onto your computer in order to connect your camcorder to your computer. For Windows users Complete installation of the image files edited) Display: 4 MB VRAM video card...
... the USB cable, you can view pictures live from your camcorder to your computer, you download pictures from your camcorder and pictures recorded on a tape on the size of the USB driver before connecting your camcorder to your computer with the application software required for installation: ...use this product will not be provided as standard. Connecting to your computer. The USB port must install a USB driver onto your computer in order to connect your camcorder to your computer. For Windows users Complete installation of the image files edited) Display: 4 MB VRAM video card...
Operating Instructions
Page 168
...(3) Move the cursor to PTP in with USB port - This is completed, the USB driver will not be properly registered. See page 191 for simply copying images from your camcorder onto your computer without connecting the USB cable to your computer. For Windows users Installing the ...USB driver Start the following the instructions on the screen. Note If you can copy "Memory Stick" images from your camcorder onto your camcorder". Windows XP Home...
...(3) Move the cursor to PTP in with USB port - This is completed, the USB driver will not be properly registered. See page 191 for simply copying images from your camcorder onto your computer without connecting the USB cable to your computer. For Windows users Installing the ...USB driver Start the following the instructions on the screen. Note If you can copy "Memory Stick" images from your camcorder onto your camcorder". Windows XP Home...
Operating Instructions
Page 170
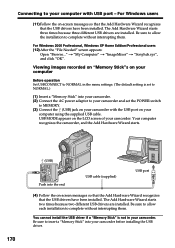
... operation Set USBCONNECT to NORMAL in the menu settings. (The default setting is not in your camcorder. The Add Hardware Wizard starts two times because two different USB drivers are installed. Be sure to allow the installation to complete without interrupting them . Be sure to... insert a "Memory Stick" into your camcorder. (2) Connect the AC power adaptor to your camcorder and set to NORMAL.) (1) Insert a "Memory Stick" into your camcorder before installing the USB driver. For Windows 2000 Professional, Windows XP Home Edition/Professional users (12) ...
... operation Set USBCONNECT to NORMAL in the menu settings. (The default setting is not in your camcorder. The Add Hardware Wizard starts two times because two different USB drivers are installed. Be sure to allow the installation to complete without interrupting them . Be sure to... insert a "Memory Stick" into your camcorder. (2) Connect the AC power adaptor to your camcorder and set to NORMAL.) (1) Insert a "Memory Stick" into your camcorder before installing the USB driver. For Windows 2000 Professional, Windows XP Home Edition/Professional users (12) ...
Operating Instructions
Page 171
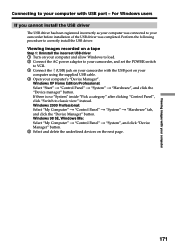
...'s "Device Manager". Viewing images recorded on a tape Step 1: Uninstall the incorrect USB driver 1 Turn on your computer and allow Windows to load. 2 Connect the AC power adaptor to your camcorder, and set the POWER switch to VCR. 3 Connect the (USB) jack on the... Computer" t "Control Panel" t "System", and click "Device Manager" button. 5 Select and delete the underlined devices on your camcorder before installation of the USB driver was connected to your camcorder with USB port - Windows XP Home Edition/Professional: Select "Start" t "Control Panel" t "System" t "Hardware", and click...
...'s "Device Manager". Viewing images recorded on a tape Step 1: Uninstall the incorrect USB driver 1 Turn on your computer and allow Windows to load. 2 Connect the AC power adaptor to your camcorder, and set the POWER switch to VCR. 3 Connect the (USB) jack on the... Computer" t "Control Panel" t "System", and click "Device Manager" button. 5 Select and delete the underlined devices on your camcorder before installation of the USB driver was connected to your camcorder with USB port - Windows XP Home Edition/Professional: Select "Start" t "Control Panel" t "System" t "Hardware", and click...
Operating Instructions
Page 173
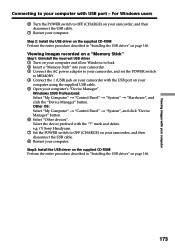
... cable. 7 Restart your computer's "Device Manager". e.g. (?) Sony Handycam 7 Set the POWER switch to your computer with USB port - For Windows users 6 Turn the POWER switch to MEMORY. 4 Connect the (USB) jack on your camcorder with the "?" Viewing images recorded on a "Memory Stick" Step1: Uninstall the incorrect USB driver 1 Turn on your computer and allow...
... cable. 7 Restart your computer's "Device Manager". e.g. (?) Sony Handycam 7 Set the POWER switch to your computer with USB port - For Windows users 6 Turn the POWER switch to MEMORY. 4 Connect the (USB) jack on your camcorder with the "?" Viewing images recorded on a "Memory Stick" Step1: Uninstall the incorrect USB driver 1 Turn on your computer and allow...
Operating Instructions
Page 174
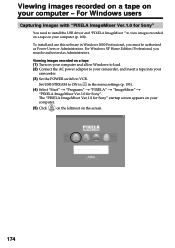
... allow Windows to load. (2) Connect the AC power adaptor to your camcorder, and insert a tape into your computer (p. 168). For Windows users Capturing images with "PIXELA ImageMixer Ver.1.0 for Sony" You need to install the USB driver and "PIXELA ImageMixer " to view images recorded on a tape on... your camcorder. (3) Set the POWER switch to ON in in Windows 2000 Professional, you must be...
... allow Windows to load. (2) Connect the AC power adaptor to your camcorder, and insert a tape into your computer (p. 168). For Windows users Capturing images with "PIXELA ImageMixer Ver.1.0 for Sony" You need to install the USB driver and "PIXELA ImageMixer " to view images recorded on a tape on... your camcorder. (3) Set the POWER switch to ON in in Windows 2000 Professional, you must be...
Operating Instructions
Page 177
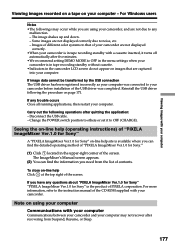
... Sony" on page 171. Reinstall the USB driver following operations after recovering from the list of the screen. Change the POWER switch position to others or set it turns off automatically after five minutes. •We recommend setting DEMO MODE to OFF in the menu settings when your camcorder ...- Carry out the following the procedure on -line help Click at the top right of the USB driver was connected to the instruction manual of the CD-ROM supplied with your camcorder before installation of the screen. If image data cannot be transferred by the USB connection The USB...
... Sony" on page 171. Reinstall the USB driver following operations after recovering from the list of the screen. Change the POWER switch position to others or set it turns off automatically after five minutes. •We recommend setting DEMO MODE to OFF in the menu settings when your camcorder ...- Carry out the following the procedure on -line help Click at the top right of the USB driver was connected to the instruction manual of the CD-ROM supplied with your camcorder before installation of the screen. If image data cannot be transferred by the USB connection The USB...
Operating Instructions
Page 178
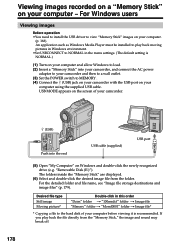
... your computer - For Windows users Viewing images Before operation •You need to install the USB driver to the hard disk of your camcorder. 178 (USB) Push into your camcorder, and connect the AC power adaptor to your camcorder and then to a wall outlet. (3) Set the POWER switch to MEMORY . (4) Connect the (USB) jack... on your camcorder with the USB port on your computer before viewing it is NORMAL.) (1) Turn on your computer and allow Windows to play back the file directly ...
... your computer - For Windows users Viewing images Before operation •You need to install the USB driver to the hard disk of your camcorder. 178 (USB) Push into your camcorder, and connect the AC power adaptor to your camcorder and then to a wall outlet. (3) Set the POWER switch to MEMORY . (4) Connect the (USB) jack... on your camcorder with the USB port on your computer before viewing it is NORMAL.) (1) Turn on your computer and allow Windows to play back the file directly ...
Operating Instructions
Page 180
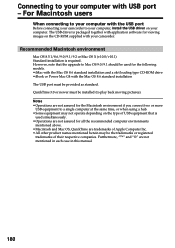
... OS 9.0/9.1 should be used simultaneously. •Operations are not assured for viewing images on your computer. Connecting to your computer with your camcorder. Recommended Macintosh environment Mac OS 8.5.1/8.6/9.0/9.1/9.2 or Mac OS X (v10.0/v10.1) Standard installation is used for the following models. •iMac ...the type of their respective companies. Notes •Operations are not mentioned in each case in this manual. 180 The USB driver is packaged together with the Mac OS 8.6 standard installation The USB port must be provided as standard. For Macintosh users ...
... OS 9.0/9.1 should be used simultaneously. •Operations are not assured for viewing images on your computer. Connecting to your computer with your camcorder. Recommended Macintosh environment Mac OS 8.5.1/8.6/9.0/9.1/9.2 or Mac OS X (v10.0/v10.1) Standard installation is used for the following models. •iMac ...the type of their respective companies. Notes •Operations are not mentioned in each case in this manual. 180 The USB driver is packaged together with the Mac OS 8.6 standard installation The USB port must be provided as standard. For Macintosh users ...
Operating Instructions
Page 181
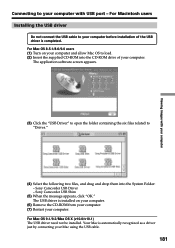
... USB cable. 181 The USB driver is installed on your computer and allow Mac OS to your computer before installation of your computer. Sony Camcorder USB Driver - Your Mac is completed. For Mac OS 9.1/9.2/Mac OS X (v10.0/v10.1) The USB driver need not be installed. Viewing... images with USB port - For Macintosh users Installing the USB driver Do not connect the USB cable to...
... USB cable. 181 The USB driver is installed on your computer and allow Mac OS to your computer before installation of your computer. Sony Camcorder USB Driver - Your Mac is completed. For Mac OS 9.1/9.2/Mac OS X (v10.0/v10.1) The USB driver need not be installed. Viewing... images with USB port - For Macintosh users Installing the USB driver Do not connect the USB cable to...
Operating Instructions
Page 182
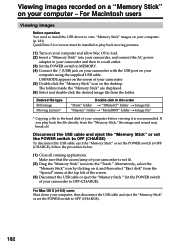
... users Viewing images Before operation You need to install the USB driver to view "Memory Stick" images on your computer. (p. 181) QuickTime 3.0 or newer must be installed to MEMORY. (4) Connect the (USB) jack on your camcorder with the USB port on your computer - Desired file type ..." or set the POWER switch to load. (2) Insert a "Memory Stick" into the "Trash." For Mac OS X (v10.0) users Shut down your camcorder to OFF (CHARGE), follow the procedure below. (1) Close all running applications. Viewing images recorded on a "Memory Stick" on your computer using the supplied ...
... users Viewing images Before operation You need to install the USB driver to view "Memory Stick" images on your computer. (p. 181) QuickTime 3.0 or newer must be installed to MEMORY. (4) Connect the (USB) jack on your camcorder with the USB port on your computer - Desired file type ..." or set the POWER switch to load. (2) Insert a "Memory Stick" into the "Trash." For Mac OS X (v10.0) users Shut down your camcorder to OFF (CHARGE), follow the procedure below. (1) Close all running applications. Viewing images recorded on a "Memory Stick" on your computer using the supplied ...
Operating Instructions
Page 199
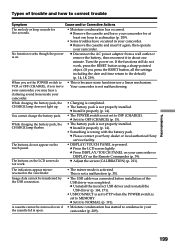
...(p. 209). • Some troubles have occurred in about one minute. c Set it properly (p. 14). c Uninstall the incorrect USB driver and re-install the USB driver (p. 168, 171). • USBCONNECT is set to PTP when the POWER switch is not set the POWER switch to VCR or ...(p. 14). • Something is pressed. c Install it in your camcorder (p. 209). The buttons do not appear on the LCD screen do not work . c Please contact your camcorder or DISPLAY on your Sony dealer or local authorized Sony service facility. Image data cannot be removed even if the cassette lid...
...(p. 209). • Some troubles have occurred in about one minute. c Set it properly (p. 14). c Uninstall the incorrect USB driver and re-install the USB driver (p. 168, 171). • USBCONNECT is set to PTP when the POWER switch is not set the POWER switch to VCR or ...(p. 14). • Something is pressed. c Install it in your camcorder (p. 209). The buttons do not appear on the LCD screen do not work . c Please contact your camcorder or DISPLAY on your Sony dealer or local authorized Sony service facility. Image data cannot be removed even if the cassette lid...


