Operating Instructions
Page 166
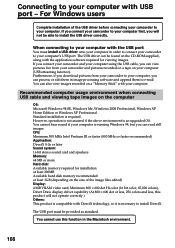
... view images recorded on the size of the USB driver before connecting your camcorder to your computer, you connect your camcorder and your computer. You cannot use this product will not be able to install the USB driver correctly. When connecting to your computer is running Windows 98, but you will not operate correctly.) Others...
... view images recorded on the size of the USB driver before connecting your camcorder to your computer, you connect your camcorder and your computer. You cannot use this product will not be able to install the USB driver correctly. When connecting to your computer is running Windows 98, but you will not operate correctly.) Others...
Operating Instructions
Page 168
... the title screen appears. (3) Move the cursor to "Making your computer recognize your camcorder". Connect the USB cable according to "USB Driver" and click. Connecting to your computer with permission of administrators. (1) Turn on your computer and allow Windows to load. (2) Insert the supplied CD-ROM into the CD-ROM drive of your...
... the title screen appears. (3) Move the cursor to "Making your computer recognize your camcorder". Connect the USB cable according to "USB Driver" and click. Connecting to your computer with permission of administrators. (1) Turn on your computer and allow Windows to load. (2) Insert the supplied CD-ROM into the CD-ROM drive of your...
Operating Instructions
Page 170
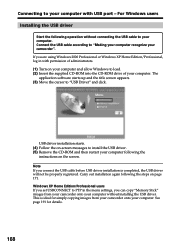
...) Follow the on -screen messages so that the Add Hardware Wizard recognizes that the USB drivers have been installed. Your computer recognizes the camcorder, and the Add Hardware Wizard starts. 170 (USB) Push into your camcorder. For Windows 2000 Professional, Windows XP Home Edition/Professional users (12) After the "File Needed" screen appears: Open "Browse...
...) Follow the on -screen messages so that the Add Hardware Wizard recognizes that the USB drivers have been installed. Your computer recognizes the camcorder, and the Add Hardware Wizard starts. 170 (USB) Push into your camcorder. For Windows 2000 Professional, Windows XP Home Edition/Professional users (12) After the "File Needed" screen appears: Open "Browse...
Operating Instructions
Page 171
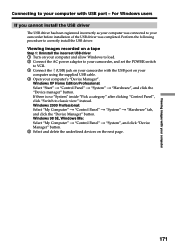
... 3 Connect the (USB) jack on your camcorder with the USB port on your computer using the supplied USB cable. 4 Open your computer's "Device Manager". Viewing images recorded on a tape Step 1: Uninstall the incorrect USB driver 1 Turn on the next page. 171 Windows 2000 Professional: Select "My Computer" t ... on your computer and allow Windows to load. 2 Connect the AC power adaptor to your camcorder, and set the POWER switch to classic view" instead. Viewing images with your computer Connecting to your camcorder before installation of the USB driver was completed. Perform the following...
... 3 Connect the (USB) jack on your camcorder with the USB port on your computer using the supplied USB cable. 4 Open your computer's "Device Manager". Viewing images recorded on a tape Step 1: Uninstall the incorrect USB driver 1 Turn on the next page. 171 Windows 2000 Professional: Select "My Computer" t ... on your computer and allow Windows to load. 2 Connect the AC power adaptor to your camcorder, and set the POWER switch to classic view" instead. Viewing images with your computer Connecting to your camcorder before installation of the USB driver was completed. Perform the following...
Operating Instructions
Page 173
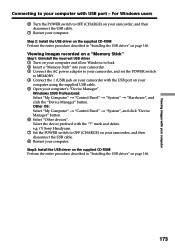
Windows 2000 Professional: Select "My Computer" t "Control Panel" t "System" t "Hardware", and click the "Device Manager" button. e.g. (?) Sony Handycam 7 Set the POWER switch to OFF (CHARGE) on your camcorder, and then ...disconnect the USB cable. 7 Restart your computer's "Device Manager". Viewing images with your computer Connecting to your computer. mark and delete. Viewing images recorded on a "Memory Stick" Step1: Uninstall the incorrect USB driver 1 Turn on your computer and allow Windows...
Windows 2000 Professional: Select "My Computer" t "Control Panel" t "System" t "Hardware", and click the "Device Manager" button. e.g. (?) Sony Handycam 7 Set the POWER switch to OFF (CHARGE) on your camcorder, and then ...disconnect the USB cable. 7 Restart your computer's "Device Manager". Viewing images with your computer Connecting to your computer. mark and delete. Viewing images recorded on a "Memory Stick" Step1: Uninstall the incorrect USB driver 1 Turn on your computer and allow Windows...
Operating Instructions
Page 174
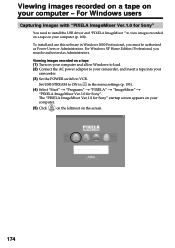
... Professional, you must be authorized as Power Users or Administrators. For Windows users Capturing images with "PIXELA ImageMixer Ver.1.0 for Sony" You need to install the USB driver and "PIXELA ImageMixer " to your camcorder, and insert a tape into your computer. (5) Click on the leftmost on the screen. 174 Viewing images recorded on a tape on...
... Professional, you must be authorized as Power Users or Administrators. For Windows users Capturing images with "PIXELA ImageMixer Ver.1.0 for Sony" You need to install the USB driver and "PIXELA ImageMixer " to your camcorder, and insert a tape into your computer. (5) Click on the leftmost on the screen. 174 Viewing images recorded on a tape on...
Operating Instructions
Page 177
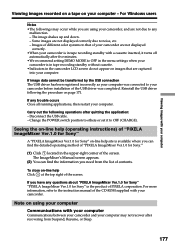
...PIXELA ImageMixer Ver.1.0 for Sony" "PIXELA ImageMixer Ver.1.0 for Sony" is the product of PIXELA corporation. Reinstall the USB driver following operations after recovering from the list of contents. Note on -line help Click at the top right of the screen. For Windows users Notes •The ... the detailed operating method of "PIXELA ImageMixer Ver.1.0 for Sony." (1) Click located in the camcorder LCD screen do not appear on page 171. If image data cannot be transferred by the USB connection The USB driver has been registered incorrectly as your computer was completed. For...
...PIXELA ImageMixer Ver.1.0 for Sony" "PIXELA ImageMixer Ver.1.0 for Sony" is the product of PIXELA corporation. Reinstall the USB driver following operations after recovering from the list of contents. Note on -line help Click at the top right of the screen. For Windows users Notes •The ... the detailed operating method of "PIXELA ImageMixer Ver.1.0 for Sony." (1) Click located in the camcorder LCD screen do not appear on page 171. If image data cannot be transferred by the USB connection The USB driver has been registered incorrectly as your computer was completed. For...
Operating Instructions
Page 178
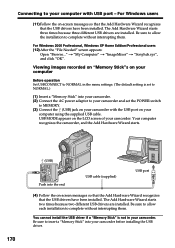
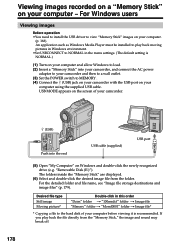
Viewing images recorded on a "Memory Stick" on your computer. (p. 168). USB MODE appears on the screen of your camcorder with the USB port on Windows and double-click the newly recognized drive (e.g. For the detailed folder and file name, see "Image file storage destinations and image files" (p. ... computer using the supplied USB cable. An application such as Windows Media Player must be installed to play back the file directly from the folder. For Windows users Viewing images Before operation •You need to install the USB driver to load. (2) Insert a "Memory Stick" into the end...
Viewing images recorded on a "Memory Stick" on your computer. (p. 168). USB MODE appears on the screen of your camcorder with the USB port on Windows and double-click the newly recognized drive (e.g. For the detailed folder and file name, see "Image file storage destinations and image files" (p. ... computer using the supplied USB cable. An application such as Windows Media Player must be installed to play back the file directly from the folder. For Windows users Viewing images Before operation •You need to install the USB driver to load. (2) Insert a "Memory Stick" into the end...


