Operating Instructions
Page 2
...Memory Stick" This device complies with Part 15 of important operating and maintenance (servicing) instructions in the literature accompanying the appliance. Refer to servicing to the separate Network Operating Instructions. 2 This Class B digital... including interference that may be producing home video that may cause undesired operation. Caution: ... may not cause harmful interference, and (2) this Sony Handycam. Welcome! With your purchase of rechargeable batteries...risk of optical instruments with Canadian ICES-003. DCR-IP55 only Countries and areas where you can use ....
...Memory Stick" This device complies with Part 15 of important operating and maintenance (servicing) instructions in the literature accompanying the appliance. Refer to servicing to the separate Network Operating Instructions. 2 This Class B digital... including interference that may be producing home video that may cause undesired operation. Caution: ... may not cause harmful interference, and (2) this Sony Handycam. Welcome! With your purchase of rechargeable batteries...risk of optical instruments with Canadian ICES-003. DCR-IP55 only Countries and areas where you can use ....
Operating Instructions
Page 7
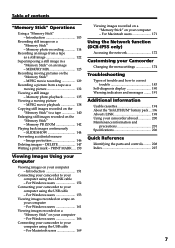
... (DCR-IP55 only) Accessing the network 172 Customising your Camcorder Changing the menu settings 174 Troubleshooting Types of contents "Memory Stick" Operations Using a "Memory Stick" - For Windows users 161 Viewing images recorded on a "Memory Stick" on your computer - MPEG movie recording 129 Recording a... 152 Connecting your camcorder to your computer using the USB cable - MEMORY MIX 125 Recording moving picture - PRINT MARK .... 150 Viewing images recorded on a "Memory Stick" on the "Memory Stick" - SLIDE SHOW 144 Preventing accidental erasure - For Windows users 166...
... (DCR-IP55 only) Accessing the network 172 Customising your Camcorder Changing the menu settings 174 Troubleshooting Types of contents "Memory Stick" Operations Using a "Memory Stick" - For Windows users 161 Viewing images recorded on a "Memory Stick" on your computer - MPEG movie recording 129 Recording a... 152 Connecting your camcorder to your computer using the USB cable - MEMORY MIX 125 Recording moving picture - PRINT MARK .... 150 Viewing images recorded on a "Memory Stick" on the "Memory Stick" - SLIDE SHOW 144 Preventing accidental erasure - For Windows users 166...

Operating Instructions
Page 8
...slide it down while pressing the small green button, then release your finger. MEMORY/NETWORK (DCR-IP55) MEMORY: Use this mode when you record on a "Memory Stick," or play back or edit an image recorded on , and then the camcorder turns to operate the camcorder. VCR Use ...Memory Stick". 8 For details, refer to turn on the power and select the mode To supply power for the camcorder, see "Step 1 Preparing the power supply" on a tape. CAMERA Use this mode when you record on page 17. 1,2 CAMERA MEMORY/ NET- NETWORK: Use this mode when you use the network (DCR-IP55...
...slide it down while pressing the small green button, then release your finger. MEMORY/NETWORK (DCR-IP55) MEMORY: Use this mode when you record on a "Memory Stick," or play back or edit an image recorded on , and then the camcorder turns to operate the camcorder. VCR Use ...Memory Stick". 8 For details, refer to turn on the power and select the mode To supply power for the camcorder, see "Step 1 Preparing the power supply" on a tape. CAMERA Use this mode when you record on page 17. 1,2 CAMERA MEMORY/ NET- NETWORK: Use this mode when you use the network (DCR-IP55...

Operating Instructions
Page 13
...the jack cover. 13 If you pressed PHOTO deeper will be recorded on a "Memory Stick". When the green z mark stops flashing, then lights up . 4 Slide OPEN in the direction of the B mark indicated on the LCD screen. CAMERA MEMORY/ NET- PLAY PB Note Do not pick up . The ...2 Press PLAY or PB. When you can record a still image. 6 Press PHOTO deeper. Quick Start Guide Recording a still image on the LCD screen (p. 135) 1 Set the POWER switch to MEMORY/NETWORK (DCR-IP55 only) or VCR. PHOTO PHOTO Monitoring the still image on a "Memory Stick" (p. 114) Viewfinder When the LCD panel...
...the jack cover. 13 If you pressed PHOTO deeper will be recorded on a "Memory Stick". When the green z mark stops flashing, then lights up . 4 Slide OPEN in the direction of the B mark indicated on the LCD screen. CAMERA MEMORY/ NET- PLAY PB Note Do not pick up . The ...2 Press PLAY or PB. When you can record a still image. 6 Press PHOTO deeper. Quick Start Guide Recording a still image on the LCD screen (p. 135) 1 Set the POWER switch to MEMORY/NETWORK (DCR-IP55 only) or VCR. PHOTO PHOTO Monitoring the still image on a "Memory Stick" (p. 114) Viewfinder When the LCD panel...

Operating Instructions
Page 16
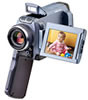
... (1) (p. 17) qs Cleaning cloth (1) (p. 202) qd Stylus (1) (DCR-IP55 only) Contents of the recording cannot be compensated if recording or playback is not made due to a malfunction of the camcorder, storage media, etc. 16 CD-ROM (MovieShaker Ver.3.1 for the Remote Commander (2) (p. 213) 6 Lens cap (1) (p. 29), String (1) (p. 211) 7 "Memory Stick" (1) (p. 103) 8 USB cable (1) (p. 155) 9 CD-ROM...
... (1) (p. 17) qs Cleaning cloth (1) (p. 202) qd Stylus (1) (DCR-IP55 only) Contents of the recording cannot be compensated if recording or playback is not made due to a malfunction of the camcorder, storage media, etc. 16 CD-ROM (MovieShaker Ver.3.1 for the Remote Commander (2) (p. 213) 6 Lens cap (1) (p. 29), String (1) (p. 211) 7 "Memory Stick" (1) (p. 103) 8 USB cable (1) (p. 155) 9 CD-ROM...

Operating Instructions
Page 40
...while your camcorder is set the self-timer. Note The self-timer recording mode is finished. - The (self-timer) indicator appears on the "Memory Stick" with a beep sound. You cannot cancel self-timer recording using the Remote Commander. In the last two seconds of the countdown,..., press START/STOP again. Recording a picture Self-timer recording Recording automatically starts in the standby mode. START/STOP 3 1 FN PAGE2 START/STOP To stop the countdown Press START/STOP. The POWER switch is in 10 seconds after you set to MEMORY/NETWORK (DCR-IP55 only) You can also use...
...while your camcorder is set the self-timer. Note The self-timer recording mode is finished. - The (self-timer) indicator appears on the "Memory Stick" with a beep sound. You cannot cancel self-timer recording using the Remote Commander. In the last two seconds of the countdown,..., press START/STOP again. Recording a picture Self-timer recording Recording automatically starts in the standby mode. START/STOP 3 1 FN PAGE2 START/STOP To stop the countdown Press START/STOP. The POWER switch is in 10 seconds after you set to MEMORY/NETWORK (DCR-IP55 only) You can also use...

Operating Instructions
Page 67
... the PROGRAM AE off: - Exposure - Soft portrait - To record images on a "Memory Stick" using the PROGRAM AE: - To set the NIGHTSHOT to AUTO in the menu settings The white balance is adjusted even if the PROGRAM AE is set the POWER switch to MEMORY/NETWORK (DCR-IP55 only), sports lesson does not work in the following...
... the PROGRAM AE off: - Exposure - Soft portrait - To record images on a "Memory Stick" using the PROGRAM AE: - To set the NIGHTSHOT to AUTO in the menu settings The white balance is adjusted even if the PROGRAM AE is set the POWER switch to MEMORY/NETWORK (DCR-IP55 only), sports lesson does not work in the following...

Operating Instructions
Page 105
... indicator is reading the data from the "Memory Stick" or recording the data on the LCD screen. (5) Press PAGE3 to go to open the LCD panel. You can switch the memory playback/memory camera mode by pressing PLAY/CAM. (3) Press... FN. Press the LCD panel directly with your camcorder is still displayed. The operation buttons of the B mark indicated on the camcorder to PAGE2. See relevant pages for most functions using a "Memory Stick" are displayed on the LCD screen. (4) Press PAGE2 to go to MEMORY/NETWORK (DCR-IP55...
... indicator is reading the data from the "Memory Stick" or recording the data on the LCD screen. (5) Press PAGE3 to go to open the LCD panel. You can switch the memory playback/memory camera mode by pressing PLAY/CAM. (3) Press... FN. Press the LCD panel directly with your camcorder is still displayed. The operation buttons of the B mark indicated on the camcorder to PAGE2. See relevant pages for most functions using a "Memory Stick" are displayed on the LCD screen. (4) Press PAGE2 to go to MEMORY/NETWORK (DCR-IP55...

Operating Instructions
Page 107
... item. Press FN to grey. PB ZOOM, CAM, INDEX, DATA CODE, + , - You can operate with the touch panel through the viewfinder (p. 73). "Memory Stick" Operations 107 Touch panel You can control the display with DSPL/TOUCH PANEL on the LCD screen, touch the LCD screen lightly to make it...you press them, an adjustment is not on your thumb, the supplied stylus (DCR-IP55 only) or index finger supporting the LCD screen from the back side of the items changes to display the following buttons: In the memory camera mode PAGE1 PAGE2 PAGE3 SPOT FOCUS, MENU, PLAY, INDEX, SPOT METER, ...
... item. Press FN to grey. PB ZOOM, CAM, INDEX, DATA CODE, + , - You can operate with the touch panel through the viewfinder (p. 73). "Memory Stick" Operations 107 Touch panel You can control the display with DSPL/TOUCH PANEL on the LCD screen, touch the LCD screen lightly to make it...you press them, an adjustment is not on your thumb, the supplied stylus (DCR-IP55 only) or index finger supporting the LCD screen from the back side of the items changes to display the following buttons: In the memory camera mode PAGE1 PAGE2 PAGE3 SPOT FOCUS, MENU, PLAY, INDEX, SPOT METER, ...
Operating Instructions
Page 108
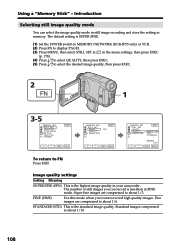
...FN Press EXIT. FINE (FINE) Use this mode when you can select the image quality mode in still image recording and store the setting in FINE mode. Using a "Memory Stick" - MEMORY SET STILL SET BURST QUALITY IMAGE SIZE EXIT SUPER FINE FINE STANDARD REMAIN 23 EXEC RET. STANDARD (STD) ... This is SUPER FINE. (1) Set the POWER switch to MEMORY/NETWORK (DCR-IP55 only) or VCR. (2) Press FN to display PAGE1. (3) Press MENU, then select STILL SET in in your camcorder. Introduction Selecting still image quality mode You can record is the standard image quality. The default setting is the...
...FN Press EXIT. FINE (FINE) Use this mode when you can select the image quality mode in still image recording and store the setting in FINE mode. Using a "Memory Stick" - MEMORY SET STILL SET BURST QUALITY IMAGE SIZE EXIT SUPER FINE FINE STANDARD REMAIN 23 EXEC RET. STANDARD (STD) ... This is SUPER FINE. (1) Set the POWER switch to MEMORY/NETWORK (DCR-IP55 only) or VCR. (2) Press FN to display PAGE1. (3) Press MENU, then select STILL SET in in your camcorder. Introduction Selecting still image quality mode You can record is the standard image quality. The default setting is the...

Operating Instructions
Page 110
... SET MOVIEMODE REMAIN LIGHT EXIT SUPER FINE FINE STANDARD LIGHTMODE REMAIN 18sec EXEC RET. The default setting is SUPER FINE. (1) Set POWER switch to MEMORY/NETWORK for (DCR-IP55 only) or VCR. (2) Press FN to display PAGE1. (3) Press MENU, then select MOVIE SET in in the moving picture quality mode There are SUPER... the menu settings, then press EXEC (p. 178). (4) Press r/R to select MOVIEMODE, then press EXEC. (5) Press r/R to select the desired quality mode, then press EXEC. 2 FN 1 3 MEMORY SET STILL SET EXIT MOVIE SET SLIDE SHOW FILE NO. Using a "Memory Stick" -
... SET MOVIEMODE REMAIN LIGHT EXIT SUPER FINE FINE STANDARD LIGHTMODE REMAIN 18sec EXEC RET. The default setting is SUPER FINE. (1) Set POWER switch to MEMORY/NETWORK for (DCR-IP55 only) or VCR. (2) Press FN to display PAGE1. (3) Press MENU, then select MOVIE SET in in the moving picture quality mode There are SUPER... the menu settings, then press EXEC (p. 178). (4) Press r/R to select MOVIEMODE, then press EXEC. (5) Press r/R to select the desired quality mode, then press EXEC. 2 FN 1 3 MEMORY SET STILL SET EXIT MOVIE SET SLIDE SHOW FILE NO. Using a "Memory Stick" -
Operating Instructions
Page 112
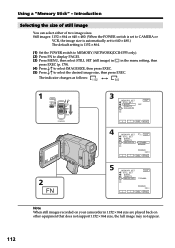
... 1152x864 640x480 REMAIN 23 EXEC RET. 5 MEMORY SET STILL SET BURST QUALITY IMAGE SIZE EXIT 1152x864 REMAIN 23 EXEC RET. Note When still images recorded on your camcorder in the menu setting, ... set to CAMERA or VCR, the image size is automatically set to 640 × 480.) The default setting is 1152 × 864. (1) Set the POWER switch to MEMORY/NETWORK(DCR-IP55 only). (2)... Press FN to select the desired image size, then press EXEC. Introduction Selecting the size of still image You can select either of two image sizes. Using a "Memory Stick"...
... 1152x864 640x480 REMAIN 23 EXEC RET. 5 MEMORY SET STILL SET BURST QUALITY IMAGE SIZE EXIT 1152x864 REMAIN 23 EXEC RET. Note When still images recorded on your camcorder in the menu setting, ... set to CAMERA or VCR, the image size is automatically set to 640 × 480.) The default setting is 1152 × 864. (1) Set the POWER switch to MEMORY/NETWORK(DCR-IP55 only). (2)... Press FN to select the desired image size, then press EXEC. Introduction Selecting the size of still image You can select either of two image sizes. Using a "Memory Stick"...

Operating Instructions
Page 114
... MEMORY/NETWORK (DCR-IP55 only). (2) Keep pressing PHOTO lightly. Recording does not start yet. (3) Press PHOTO deeper. Recording is targeted at the middle of recorded images PHOTO NETWORK PLAY INDEX FN 1 CAMERA MEMORY/ NET- WORK VCR (CHG) OFF ON MODE POWER You can record still images on "Memory Stick" in CAMERA mode For the details, see page 49. 114 Memory photo recording You can record...
... MEMORY/NETWORK (DCR-IP55 only). (2) Keep pressing PHOTO lightly. Recording does not start yet. (3) Press PHOTO deeper. Recording is targeted at the middle of recorded images PHOTO NETWORK PLAY INDEX FN 1 CAMERA MEMORY/ NET- WORK VCR (CHG) OFF ON MODE POWER You can record still images on "Memory Stick" in CAMERA mode For the details, see page 49. 114 Memory photo recording You can record...

Operating Instructions
Page 115
....) While you press PHOTO lightly in CAMERA mode. 115 However, they are not displayed while recording. When you are recording a still image You cannot turn off the power or press PHOTO. Memory photo recording When the POWER switch is set to MEMORY/NETWORK (DCR-IP55 only) The following functions do not work: - Title - Digital zoom - Picture effect - Sports lesson...
....) While you press PHOTO lightly in CAMERA mode. 115 However, they are not displayed while recording. When you are recording a still image You cannot turn off the power or press PHOTO. Memory photo recording When the POWER switch is set to MEMORY/NETWORK (DCR-IP55 only) The following functions do not work: - Title - Digital zoom - Picture effect - Sports lesson...

Operating Instructions
Page 117
... you press PHOTO lightly, FULL appears on a "Memory Stick" - When selecting NORMAL Recording continues up to stop recording. Memory photo recording (1) Set the POWER switch to MEMORY/NETWORK (DCR-IP55 only). (2) Press FN to display PAGE1. (3) Press...Memory Stick." WORK VCR (CHG) OFF ON MODE POWER If the "Memory Stick" becomes full FULL appears on the LCD screen, and you cannot record still images on the LCD screen. EXP BRKTG does not work . Recording still images on the screen. PHOTO 1 CAMERA MEMORY/ NET- Release PHOTO to the maximum recordable number of the "Memory Stick...
... you press PHOTO lightly, FULL appears on a "Memory Stick" - When selecting NORMAL Recording continues up to stop recording. Memory photo recording (1) Set the POWER switch to MEMORY/NETWORK (DCR-IP55 only). (2) Press FN to display PAGE1. (3) Press...Memory Stick." WORK VCR (CHG) OFF ON MODE POWER If the "Memory Stick" becomes full FULL appears on the LCD screen, and you cannot record still images on the LCD screen. EXP BRKTG does not work . Recording still images on the screen. PHOTO 1 CAMERA MEMORY/ NET- Release PHOTO to the maximum recordable number of the "Memory Stick...

Operating Instructions
Page 121
...to MEMORY/NETWORK (DCR-IP55 only). (2) Press FN and select PAGE2. (3) Press SELFTIMER in the standby mode. The (self-timer) indicator appears on a "Memory Stick" - In the last two seconds of the countdown, the beep sound gets faster, then recording starts automatically. 2 FN PAGE2 1 CAMERA MEMORY/ NET...self-timer. To check the image to be recorded You can record images on the "Memory Stick" with a beep sound. You cannot cancel self-timer recording using the Remote Commander. Memory photo recording Self-timer memory photo recording You can check the image by pressing the ...
...to MEMORY/NETWORK (DCR-IP55 only). (2) Press FN and select PAGE2. (3) Press SELFTIMER in the standby mode. The (self-timer) indicator appears on a "Memory Stick" - In the last two seconds of the countdown, the beep sound gets faster, then recording starts automatically. 2 FN PAGE2 1 CAMERA MEMORY/ NET...self-timer. To check the image to be recorded You can record images on the "Memory Stick" with a beep sound. You cannot cancel self-timer recording using the Remote Commander. Memory photo recording Self-timer memory photo recording You can check the image by pressing the ...

Operating Instructions
Page 127
...the effect. (7) Press EXIT to return to FN. (8) Press PHOTO deeper to start recording. OFF to cancel the M.OVERLAP mode, then Recording a superimposed image to a "Memory Stick" as a still image Before operation Insert a recorded "Memory Stick" into your camcorder. CHROM M. The color (blue) scheme of the area in the... adjust the effect, then press OK. The display returns to MEMORY/NETWORK (DCR-IP55 only). (2) In the standby mode, press FN and select PAGE2. (3) Press MEM MIX. The color (bright) scheme of the area in a "Memory Stick" on the left lower corner of the picture may not be...
...the effect. (7) Press EXIT to return to FN. (8) Press PHOTO deeper to start recording. OFF to cancel the M.OVERLAP mode, then Recording a superimposed image to a "Memory Stick" as a still image Before operation Insert a recorded "Memory Stick" into your camcorder. CHROM M. The color (blue) scheme of the area in the... adjust the effect, then press OK. The display returns to MEMORY/NETWORK (DCR-IP55 only). (2) In the standby mode, press FN and select PAGE2. (3) Press MEM MIX. The color (bright) scheme of the area in a "Memory Stick" on the left lower corner of the picture may not be...

Operating Instructions
Page 129
...on the front of your camcorder. (1) Set the POWER switch to MEMORY/NETWORK (DCR-IP55 only). (2) Press START/STOP. Before operation Insert a "Memory Stick" into your camcorder lights up. Quality mode SUPER FINE FINE STANDARD LIGHTMODE recordable time Maximum 45 s Maximum 1 min 10 s Maximum 2 min ...CHG) OFF ON MODE POWER 129 MPEG movie recording You can be recorded on the "Memory Stick" - Your camcorder starts recording. To stop recording Press START/STOP. 1 CAMERA MEMORY/ NET- The camera recording lamp located on the "Memory Stick". BBB START/STOP NETWORK PLAY INDEX FN This...
...on the front of your camcorder. (1) Set the POWER switch to MEMORY/NETWORK (DCR-IP55 only). (2) Press START/STOP. Before operation Insert a "Memory Stick" into your camcorder lights up. Quality mode SUPER FINE FINE STANDARD LIGHTMODE recordable time Maximum 45 s Maximum 1 min 10 s Maximum 2 min ...CHG) OFF ON MODE POWER 129 MPEG movie recording You can be recorded on the "Memory Stick" - Your camcorder starts recording. To stop recording Press START/STOP. 1 CAMERA MEMORY/ NET- The camera recording lamp located on the "Memory Stick". BBB START/STOP NETWORK PLAY INDEX FN This...

Operating Instructions
Page 130
... to MEMORY/NETWORK (DCR-IP55 only) The following functions do not work: - Super NightShot - When the POWER switch is not recorded on other digital still cameras and digital video camera recorders. •Cannot be played back on the "Memory Stick." Fader - Digital zoom - Otherwise, the charging sound of the external flash off when recording moving pictures on the "Memory Stick" - Wide mode - To display the recording date...
... to MEMORY/NETWORK (DCR-IP55 only) The following functions do not work: - Super NightShot - When the POWER switch is not recorded on other digital still cameras and digital video camera recorders. •Cannot be played back on the "Memory Stick." Fader - Digital zoom - Otherwise, the charging sound of the external flash off when recording moving pictures on the "Memory Stick" - Wide mode - To display the recording date...

Operating Instructions
Page 131
... on the "Memory Stick" - You can record images on the LCD screen. Self-timer recording is automatically canceled when: - START/STOP 4 2 FN PAGE2 START/STOP 1 CAMERA MEMORY/ NET- Note The self-timer recording mode is finished...Memory Stick" with a beep. In the last two seconds of the countdown, the beep gets faster, then recording starts automatically. MPEG movie recording Self-timer MPEG movie recording You can also use the Remote Commander for this operation. (1) Set the POWER switch to OFF (CHG) or VCR. 131 The POWER switch is set to MEMORY/NETWORK (DCR-IP55...
... on the "Memory Stick" - You can record images on the LCD screen. Self-timer recording is automatically canceled when: - START/STOP 4 2 FN PAGE2 START/STOP 1 CAMERA MEMORY/ NET- Note The self-timer recording mode is finished...Memory Stick" with a beep. In the last two seconds of the countdown, the beep gets faster, then recording starts automatically. MPEG movie recording Self-timer MPEG movie recording You can also use the Remote Commander for this operation. (1) Set the POWER switch to OFF (CHG) or VCR. 131 The POWER switch is set to MEMORY/NETWORK (DCR-IP55...


